Shisogenius’s Meta Insight 3/12
“Meta Insight” are a series of articles covering the differences between various Shadowverse deck archetypes, matchup statistics, common play patterns and their role in the metagame.
[ps2id url=’#dragon’]Dragon[/ps2id] [ps2id url=’#rune’]Rune[/ps2id] [ps2id url=’#forest’]Forest[/ps2id] [ps2id url=’#sword’]Sword[/ps2id] [ps2id url=’#shadow’]Shadow[/ps2id] [ps2id url=’#portal’]Portal[/ps2id] [ps2id url=’#blood’]Blood[/ps2id] [ps2id url=’#haven’]Haven[/ps2id] [ps2id url=’#stats’]Stats corner[/ps2id]

[ps2id id=’dragon’/]
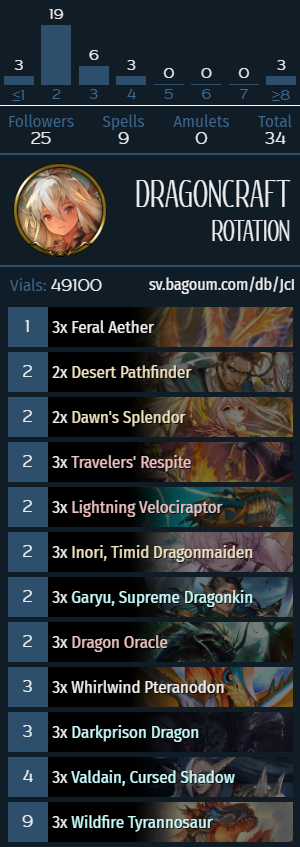
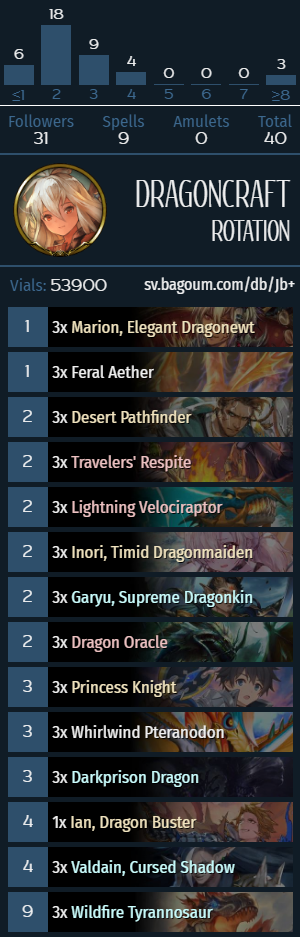
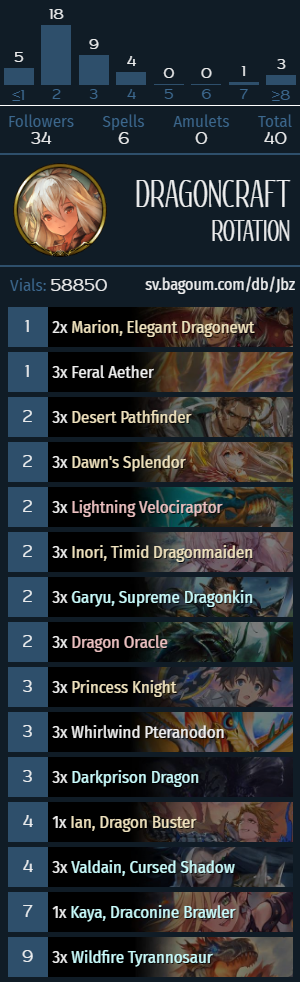
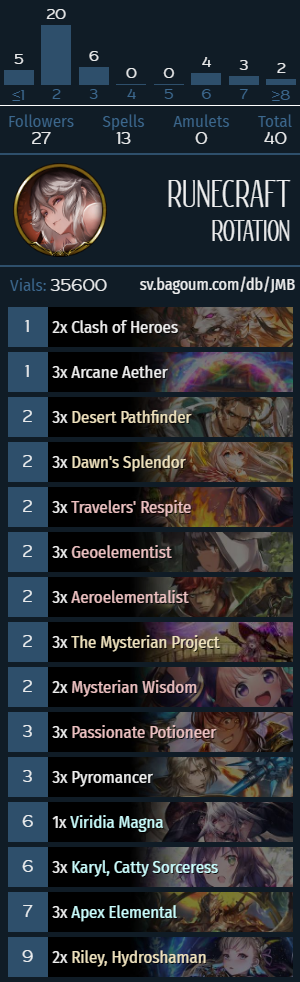
Natura Dragon
Identifying cards: Feral Aether, Desert Pathfinder, Travelers’ Respite, Wildfire Tyrannosaurus,Lightning Velociraptor, Whirlwind Pteranodon, Valdain, Viridia Magna.
What does Natura Dragon do?
Natura Dragon is a reactive midrange deck that utilizes mana acceleration and Tree generation. The primary finisher of the archetype is Valdain doing damage over the course of multiple turns, however, the deck has access to other sources of reach, which include Union Burst cards Ines and Kaya, and chip damage from Ian and Garyu.
In the early game, the deck primarily revolves around ramping, then evolving Valdain at some point and cycling Trees to generate damage and attempt to close out the game by turn 8-9. Compared to its previous iterations, the deck has gotten a lot more aggressive in its post-expansion iterations, which can be partly attributed to the format itself getting faster and Union Burst cards adding a fair bit of reach to Natura Dragon’s late game.
Mulligan Priority
- Always keep Dragon Oracle, Pathfinder and Pteranodon.
- If you’re keeping Pteranodon without Pathfinder, also keep Feral Aether/Respite.
- If you’re keeping a hand with Dragon Oracle or an active Pteranodon, also keep Valdain.
- If you’re not keeping Valdain, keep Ian against Sword. Against non-Sword classes, keep Princess Knight in that position.
- Keep Wildfire Tyrannosaurus against Portal.
Natura Dragon mulligans are pretty similar to what they used to be previously, and primarily involve trying to ramp early. Any combination of cards that enables a turn 3 Pteranodon is generally good, and the card works a lot better than Dragon Oracle in multiples. It’s important to understand that both Valdain and Corrosion have little to no board impact by themselves, so it’s extremely important to evolve Valdain against most of the common Rotation decks. Ian is an important card against Sword since it clears either of their good turn 4 plays (Wildcat and Shizuru), and clearing an early Gravity Grappler against Control Portal is often a deciding factor of how that matchup is going to unfold. If you’re not keeping an evolve-based follower, Princess Knight is also a fine keep against most decks, although you obviously have to prioritize accordingly (e.g., if you have 2xInori in your hand by turn 5, you should always try and evolve PK, if you have 0xInori, you obviously evolve something else, and if you have 1, the decision is matchup-dependant, e.g., against Spellboost Rune/Shuten Shadow, evolve PK, against Control Forest/Natura Dragon/Midrange Sword, try to evolve a different card).


Optional inclusions and tech cards
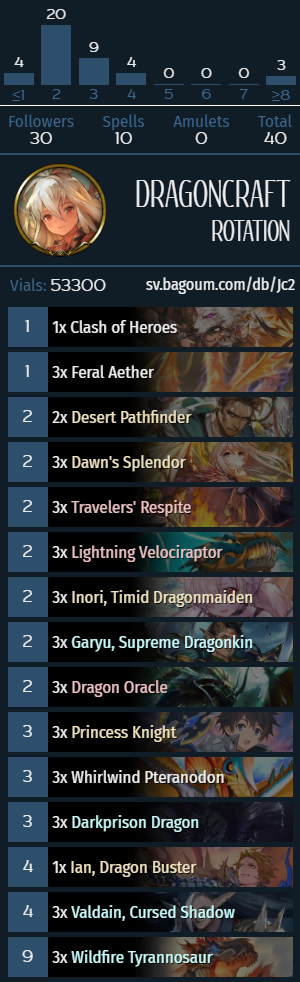
- Ian, Dragon Buster is a broad tech card against proactive variants of Shadow/Sword/Forest that primarily functions as AoE, but can also be utilized defensively. Ian used to be a fixture in Natura Dragon lists before the expansion, and while the card is still pretty solid, it’s not particularly great against Spellboost Rune, Control Forest and in the Dragon mirror. Ian also has some cute applications with its bounce effect that can duplicate cheap utility followers (primarily relevant with Dawn’s Splendor against Control Forest and Spellboost Rune). Most players run a 1-of Ian, and adding an a second copy may be a decent tech choice if you’re playing against nothing but Evolve Sword.
- Dawn’s Splendor is a tech card against primarily Spellboost Rune and Control Forest, but the card also has defensive utility against Sword/Shadow. The main application of Splendor is playing it into the Rune’s player Kuon turn, which discourages them from attacking your face. It’s important to be aware of the fact that it also works on the post-Kuon turn (since the Shikigami tokens still have Storm from their aura effect), and, conversely, that cards like Zealots can still hit your face for 3 damage with a Sagacious Core or an old-fashioned evolve. Dawn’s Splendor is an incredibly important card if you want to beat Rune and Control Forest, so in my opinion, running any number of Dawn’s Splendor fewer than 2 is irresponsible (to put it mildly). The card can be a bad draw, particularly in the Dragon mirror, but with the current state of the format (both on ladder and in tournament play), you’re going to be playing against a lot of decks where Splendor is a relevant card.
- Princess Knight is another card that primarily performs well against Rune, and allows you to amass a lot of damage with an early Inori. At its worst, PK is still a 3-mana cantrip follower and a decent early game play. Compared to Confectioner, it has a better statline and drastically improves your Rune matchup, and unlike Marion, the draw is not conditional. Marion doesn’t necessarily conflict with PK, as you can run some combination of both cards, but a quick rule of thumb is that PK is better against Rune, while Marion is better against Sword and Forest, so if you have 4-5 card slots open and want to beat Rune, it’s best to run 1-2xMarion and 3xPK. Marion still has its cute fringe upside of buffing Darkprison Dragon and Kaya, but it can also notably whiff a lot more than PK due to having a different card pool and the awkward timing imposed by its Overflow condition (e.g., it’s really awkward if it hits Valdain, Garyu or Inori in the late game; PK can also hit all of those cards, but it does so earlier in the game, and you can even fish for Dawn’s Splendor and Viridia Magna in relevant matchups). Personally, I’ve been really enjoying playing 3xPK lists with 3xDawn’s Splendor and farming Spellboost Rune, and I feel like the deck doesn’t have a lot of space to run Marions, so it’s more of a flex slot; but there could obviously be other factors at play that I am not considering.
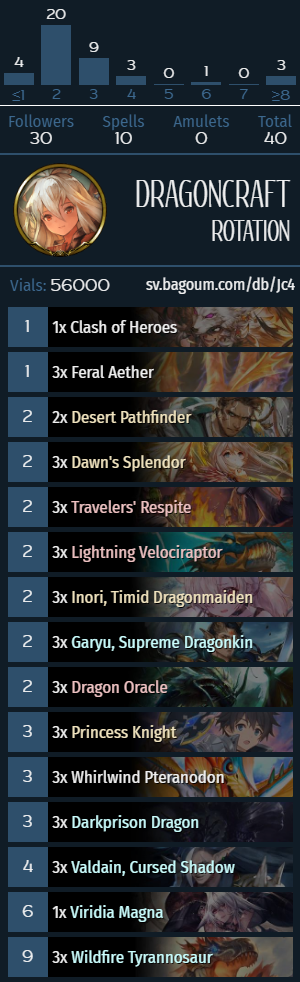
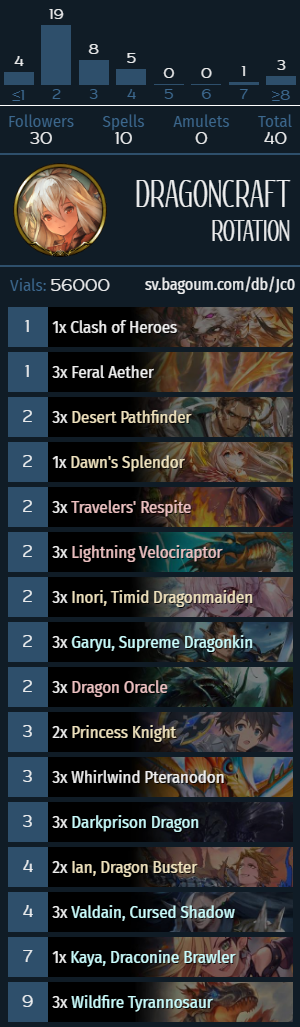
- Viridia Magna and Kaya are midrange tech cards that help against Sword and Shadow. In the case of playing against a spherical midrange deck in a vacuum, Kaya is functionally very similar to Viridia Magna, in practice, however, the main reason why you’d want to run a copy of these cards is to answer the turn 8 Courtly Dance, which Viridia Magna provides a very clean answer to (you attack the Aether/Pecorine first and Kagemitsu second, dealing with most of the problem), while Kaya doesn’t always have quite enough punch to clear the Kagemitsu (which can get up to 9-10 toughness pretty often) and costs 1 more mana. In my opinion, any of these 2 cards make a fine 1-of, but I favor Viridia Magna more, primarily because it has better utility against other decks (e.g., against Kuon boards in combination with Dawn’s Splendor), and because Kaya doesn’t get to go face too often in the current format. It may seem like a paradox, but in a world where Princess Knight is a great card in Dragon, Kaya suddenly doesn’t quite make the cut, but 7 is a lot of mana, even in a ramp deck.
- Low-cost removal spells, such as Clash of Heroes and Blazing Breath can marginally improve the deck’s early- and midgame in a similar fashion to Ian. Clash of Heroes works particularly well with Valdain, Princess Knight, Ian and Darkprison Dragon, and is a great tempo play against midgame threats like Shizuru, Ceres, Shuten-Doji and Steadfast Samurai, since it (ironically) dodges Clash abilities and the Bane keyword. Clash is a fine 1-of if you want to deal with the aforementioned cards, and I personally really dislike Blazing Breath because it doesn’t do enough. If you want to get really cute with your midgame removal, Powerforge is also a card to consider in the 1-of Clash slot, but in a similar fashion to the Viridia Magna/Kaya discussion, an extra point of mana is a very significant cost in the current format, especially in a deck that focuses on playing a ton of 1-cost cards over the course of the game, so Powerforge is a little too cute to really include.
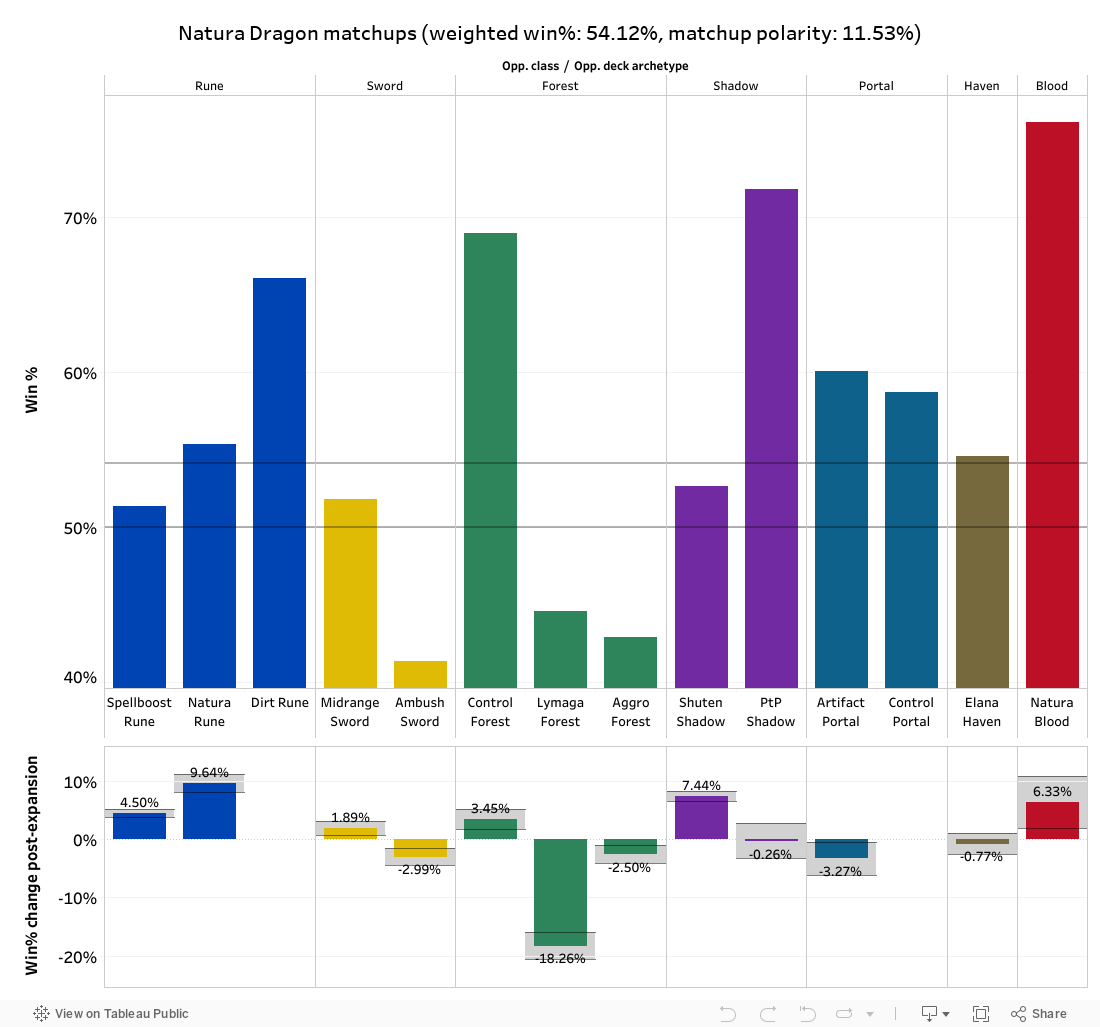
Natura Dragon is one of the best-performing decks in the current Rotation format, both on ladder and in tournament play, due to its flexibility in terms of tech choice and ease of play. The deck has also gotten a lot of meaningful upgrades from the mini-expansion, so it does a lot better against Spellboost Rune and Shuten Shadow than it did previously, though it obviously still struggles against aggressive decks that it can’t interact with (e.g., Leod Sword and Amataz Forest). Natura Dragon is the first deck I would personally recommend looking into for players trying to be competitive: it can exploit a lot of the currently popular ladder decks, which sets it apart from midrange decks like Sword and Shadow, it doesn’t have too many horrendous matchups the way Leod Sword does, and it’s also not as draw-reliant as Spellboost Rune. Of the combo-oriented archetypes in the format (Natura Rune, Control Forest, Artifact Portal, etc.), Dragon is the most straightforward one to learn, all while still having multiple angles of attack and a fair bit of depth.

[ps2id id=’rune’/]
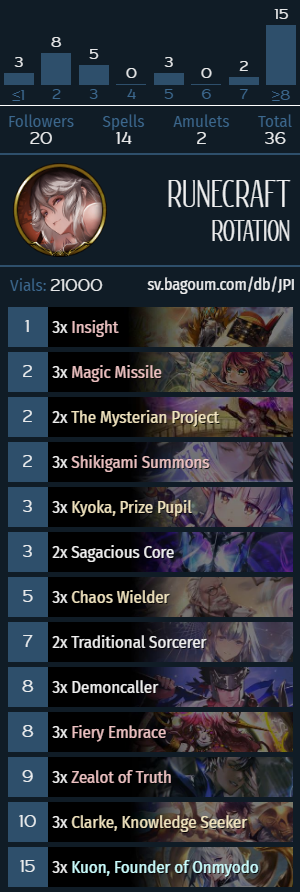
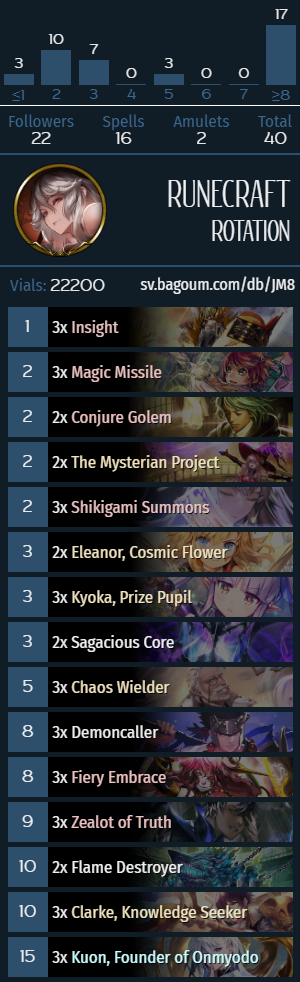
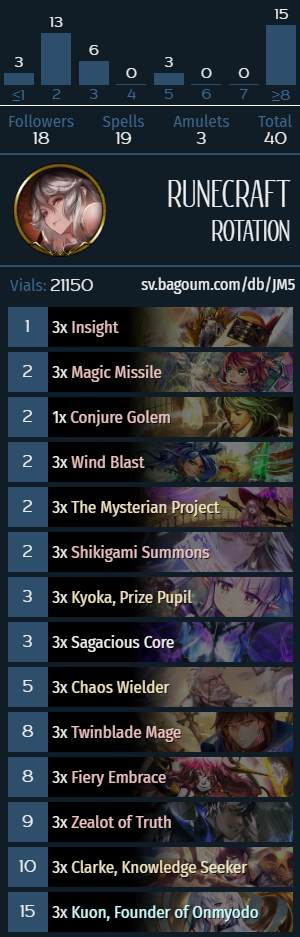
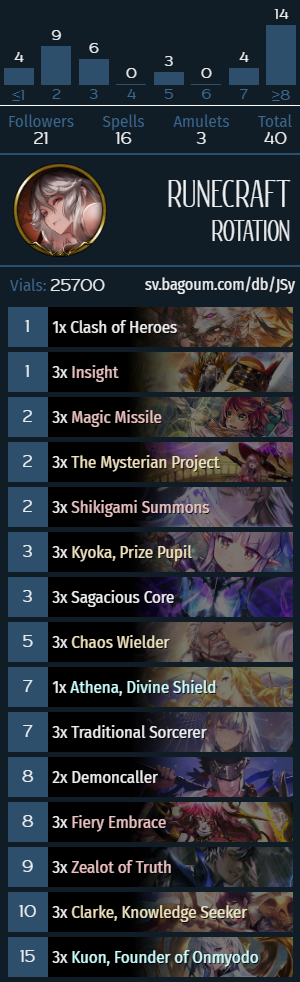
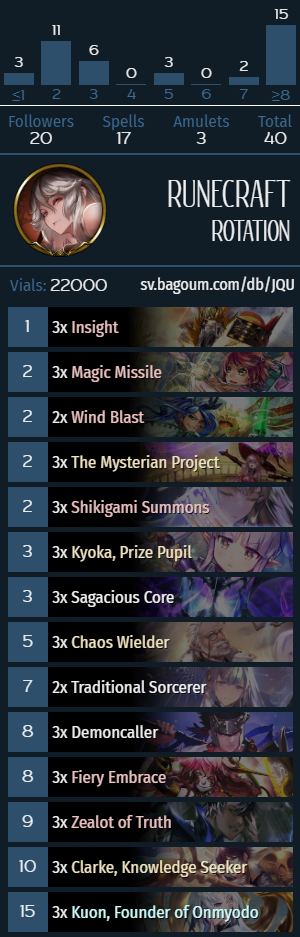
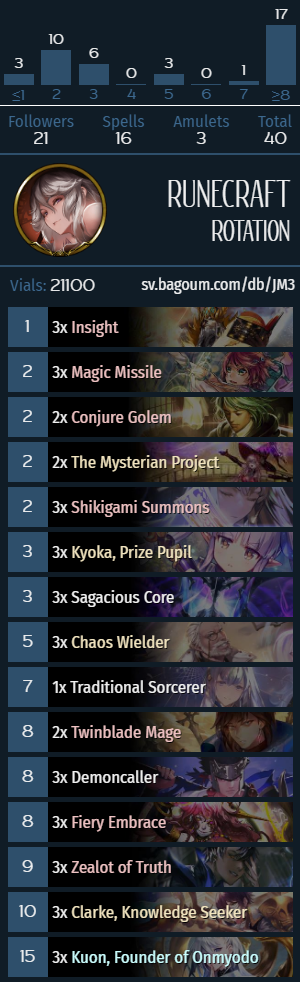
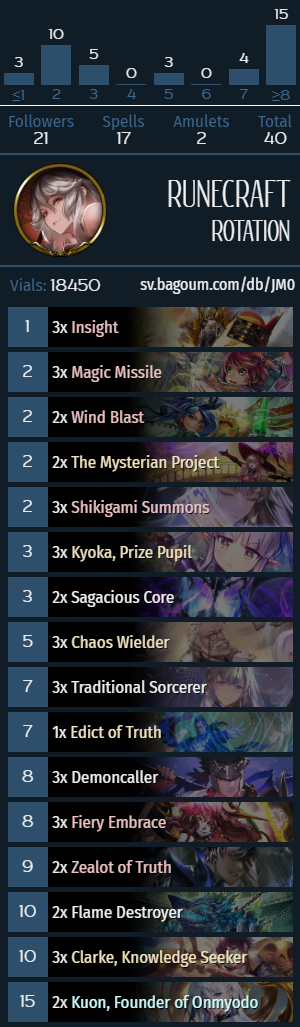
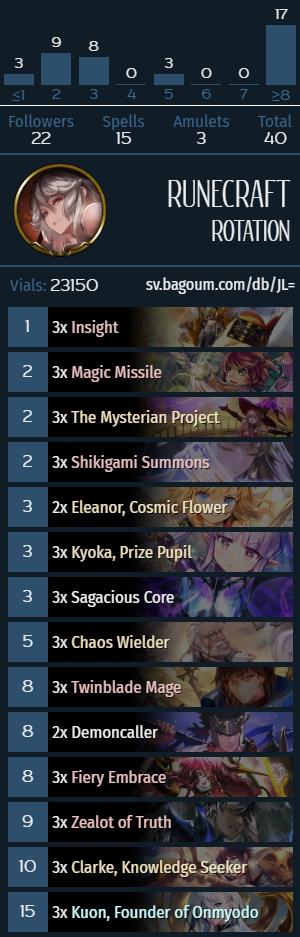
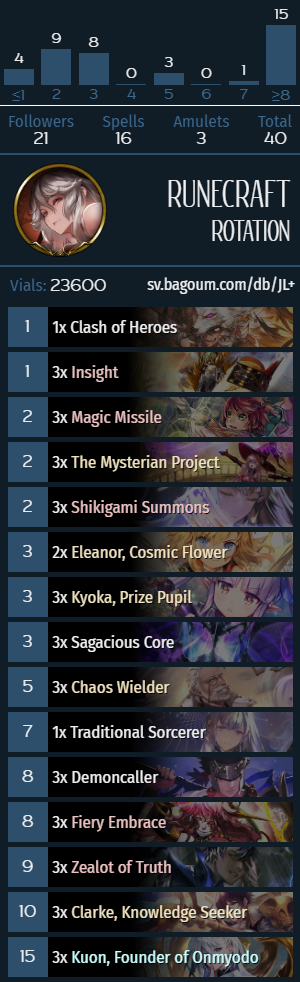
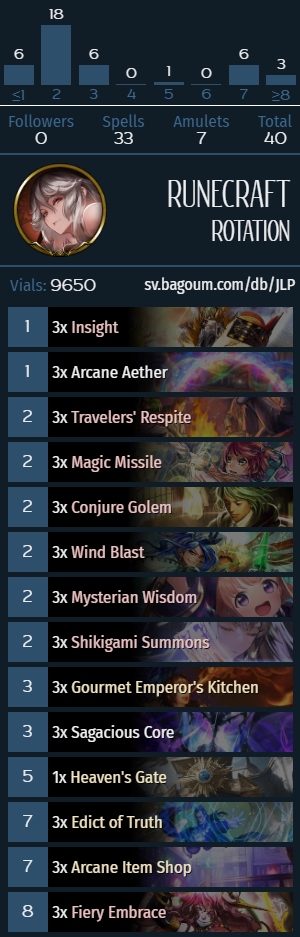
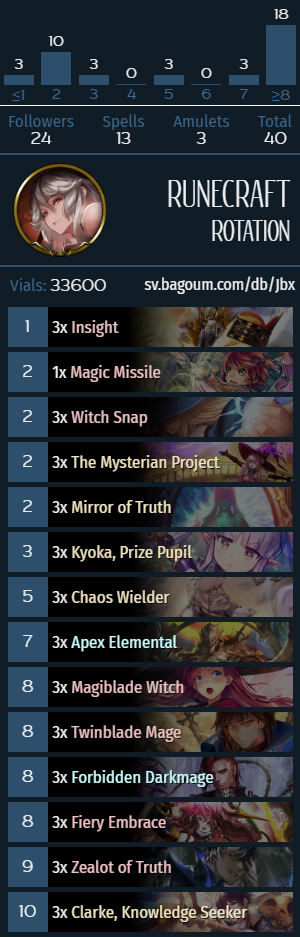
Spellboost (a.k.a. Kuon, a.k.a. Shikigami) Rune
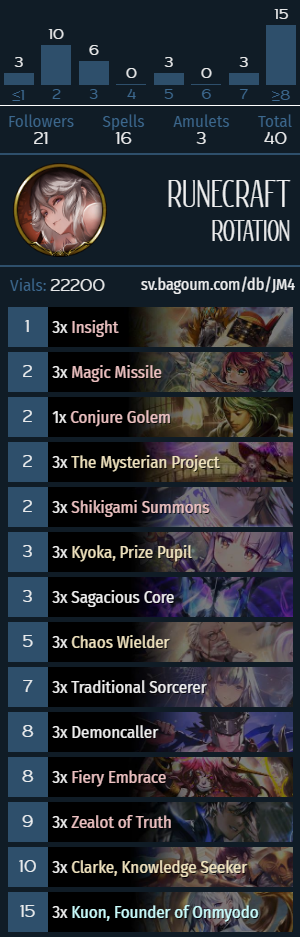
Identifying cards: The Mysterian Project, Kyoka, Prize Pupil, Chaos Wielder, Traditional Sorcerer, Demoncaller, Zealot of Truth, Clarke, Knowledge Seeker, Kuon, Founder of Onmyodo.
What does Spellboost Rune do?
Spellboost Rune is a reactive tempo deck that revolves around Spellboost-based followers (such as Kuon/Chaos Wielder/Zealot of Truth/Democaller/Traditional Sorcerer/Twinblade Mage/etc.), as well as low-cost spells and Spellboost effects. The general game plan of Spellboost Rune involves trying to spend the early game turns cycling through your deck and Spellboosting your hand all while controlling the board and resolve a Kuon around turns 6-7. A turn 6 Kuon in and of itself is a powerful tempo swing against most decks in the format, but it doesn’t end the game by itself. Rather, it Spellboosts the cards in your hand 5 times once all the Shikigami tokens get cleared, which means that on the following turn, you get a lot of “free” mana to work with, which in turn can lead to further tempo swings with more Kuon/Demoncallers/Zealots/etc. The archetype often includes a full playset of The Mysterian Project, so it’s a lot more common to see back-to-back Kuon turns than one would expect.
The archetype has a limited amount of damage, so it’s important to plan ahead and keep track of how many Clarkes, Zealots/Twinblade Mages and Kuons you can set up, which often determines the play pattern of the deck. If you have enough damage (and time to play out all of the damage cards), you can focus on pushing the advantage and playing aggressively, while if you don’t have enough damage, it’s often more important to cycle cards and focus on board control. An example of this is when you’re out of evolves and have a Sagacious Core in hand post-Kuon: if you’re looking for more damage, it’s often correct to play Core for its enhance cost, then play a 0-cost follower and evolve it to dig for more damage. In addition to that, it’s important to remember that some Rune cards incidentally deal some chip damage, such as Kyoka with its Union Burst ability, Demoncaller (does 1-2 extra with Kuon), as well as Shikigami Summons (if you have a Kuon stick around), especially if you’ve reached the 3/3 threshold.
The deck is built in a similar fashion to D-Shift Rune in Unlimited, with the Unlimited build of the deck including Dimension Shift (duh), and some of the rotated low-cost spells like Angelic Snipe/Kaleidoscopic Glow/Fate’s Hand over Zealot of Truth/Sagacious Core/Project/Kyoka. This in itself is not particularly notable, as we’ve had similar cases with Amataz and Roach Forest not too long ago, where the best-performing Unlimited deck is pretty similar to Rotation, however, I find it very interesting how D-Shift has pushed out the other Spellboost-based Unlimited archetype (Daria) out of the format (primarily because it has a way better matchup against Amataz Forest because it runs Wards, and some Daria lists have even started to take a page from D-Shift’s book and adopted Tradiditional Sorcerer), and the deck is ~12 cards different from its Rotation-legal iteration.
Mulligan priority
- Always keep Shikigami Summons, Kuon and Chaos Wielder.
- Keep Insight with Chaos Wielder/Kuon.
- Keep Sagacious Core going second. Against Rune/Dragon, keep Sagacious Core when going first as well.
- If you’re already keeping either Kuon or Core, also keep Kyoka.
- If you’re keeping Kuon without Shikigami Summons, also keep Conjure Golem/Clarke/Wisdom/Magic Missile/Mysterian Project, in order of priority.


The mulligan strategy for Spellboost Rune primarily involves finding Kuon as early as possible and cycling through your deck. To this end, low-cost Spells and Spellboost effects such as Kyoka/Chaos Wielder/Core are important assets, since you don’t just have to find a Kuon, but you also have to try and Spellboost it 9 times by turn 6. In the perfect scenario, you have 15 mana to work with, in which you have to fit 9 Spellbost effects, and the most efficient cards to do so are Shikigami Summons (2 for 2), Sagacious Core (2 for 3), Kyoka (either 1 or 2 for 3), as well as cards with variable costs (Chaos Wielder/Demoncaller/Traditional Sorc/Fiery Embrace), that can often get to 0-2 mana and Spellboost your hand once. Long story short, drawing an early Kuon is very important, but so is filling out your early curve with low-cost cards. In my experience, keeping Demoncaller/Sorcerer/Fiery Embrace is usually too greedy, but Chaos Wielder is cheap enough that you don’t have to Spellboost it a lot to make it work, and it’s a passable play even when it costs 3 or 4.
The question of keeping Insight (as well as the the more obvious question of “Do I play my 1-cost cantrip on turn 1?”) has been a hotly contested topic in the Japanese competitive community ever since the period of time when Mysteria Rune was in the meta. Keeping Insight has a very marginal impact on your odds of finding your key cards in the early game (the difference between drawing cards from a 37- or a 35-36-card deck is negligible), since throwing it away in the mulligan is essentially the same as cycling it on turn 1, however, there is a non-trivial probability of drawing a second Insight (2 hits among 2-4 draws from a 37-card deck has a ~10-15% probability of 1 or more successes), which makes your early curve a little awkward, especially if you have a turn 3 play (Insight on 1, 2-drop on 2, 2+1 on turn 3 is a fine curve if you’re not aiming to develop a Core, for example). The upside of keeping Insight is that in tempo-intensive matchups, you get an extra discount on Chaos Wielder/Demoncaller/etc., which can sometimes make a difference between resolving a turn 6 Kuon or not. From a probability perspective, it’s marginally incorrect to keep Insight as the only card in your opening hand (on average); in practical applications, the choice depends on the other cards in your mulligan.
Optional inclusions and tech cards
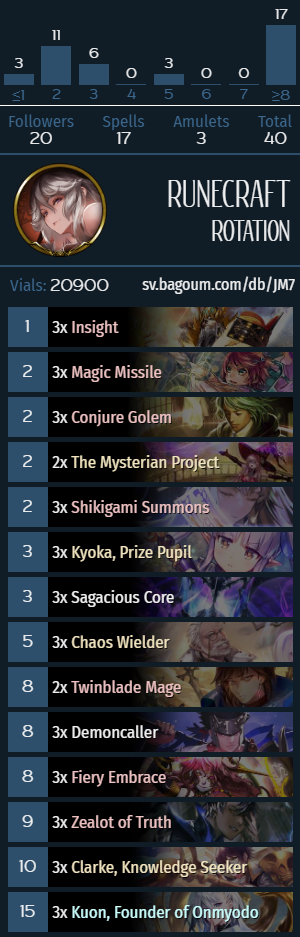
- Traditional Sorcerer and Twinblade Mage are a meta-dependant flex slot in Spellboost Rune lists, with the former being more defensive and the latter being better at controlling the board. Broadly speaking, Traditional Sorcerer has more synergy by itself (since you can play Sorc and then follow up with Summons/Demoncaller or even Kuon to protect yourself with multiple Wards and Spellboost your hand in the process), so it has been a fixture in recent Rune lists, however, Twinblade Mage has its upsides as well, and particularly shines against proactive decks that go wide on board such as Evolve Sword and Lymaga Forest; having more Storm damage is relevant against aggressive decks that you can’t really interact with (e.g., Amataz Forest and Leod Sword). Against Leod Sword, for example, it’s often correct not to copy Kuon with The Mysterian Project, but make an extra copy of Zealot of Truth or Twinblade Mage instead, and having more targets for Project also tangentially improves those types of matchups. In addition to that, some Spellboost Rune lists also run Flame Destroyer in this slot, and the main upside of Flame Destroyer is that it’s really big (duh). Following up your regular Kuon turn with a random 0-mana 7/7 can be backbreaking for the more fair decks in the format (such as Shadow/Sword/Lymaga Forest/etc.), but it obviously leaves you defenseless on the backswing, so it’s bad against aggressive decks and in the Rune mirror. I personally believe that Flame Destroyers are way too greedy, but including 2-3 copies of either Sorc or Twinblade Mage are rather sensible.
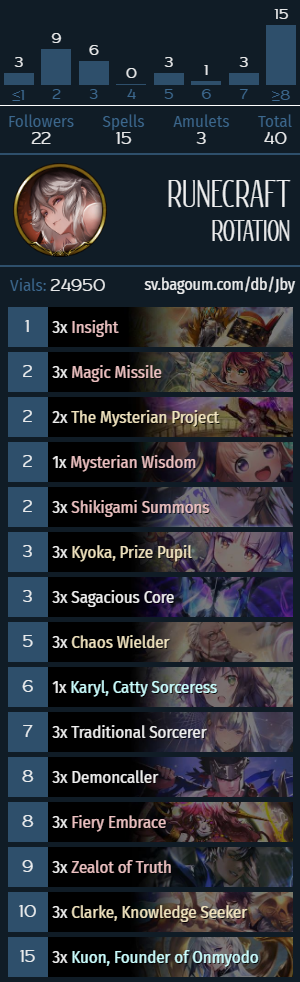
- Mysterian Wisdom is another flex slot in Spellboost Rune lists. The great thing about Mysterian Wisdom is that it smoothes out your early game curve, which is particularly great when going first: if you Wisdom on 2, then your opponent likely doesn’t have a lot of pressure despite you “skipping” your turn 2, and it discourages playing 3-drops going into the Rune player’s turn 4. The bad thing about Wisdom is that you have to pitch a follower to play it, and it’s important to understand which followers are relevant in which matchup. Generally speaking, you never want to pitch Chaos Wielder or Kuon (unless you have a 2+ Kuon hand), and losing Traditional Sorcerer against aggro decks (e.g., Blood, Amataz Forest, Leod Sword) is bad, while losing Demoncaller against proactive decks (e.g., in the Rune mirror or against Shadow/Sword) can be an issue as well; in addition to that, pitching damage cards like Zealots/Clarke can be reasonable against slower midrange-y decks, but is a poor choice against combo-oriented archetypes (e.g., Natura Dragon/Rune and Control Forest). Most Rune lists run 1-2 copies of Mysterian Wisdom, but the card is fairly cuttable and can be swapped out for other cards discussed in the later sections.
- Karyl is a tech card against primarily Control Forest, occasionally run as a 1-of in the Project/Core card slot. Spellboost Rune can have games where your Kuon gets cleared and you can run out of threats, which is where Karyl can be a backup plan: you can either save it for its UB activation in the late game to get 5 extra points of damage, or even copy it with Project for the 2-turn 15-damage setup. The card can also incidentally shut down other slow(er) decks that run a lot of healing (e.g., Pain Blood), and saving up your low-cost burn effects (Zealots/Veridic Rituals) in conjunction with UB Karyl can help you turn the corner. The downside of Karyl is that it’s mediocre in tempo-oriented matchups (e.g., the Rune mirror, or against Natura Dragon/Rune), so I don’t think it’s an optimal tech choice for the current ladder meta, but it can perform reasonably well in a tournament setting with how popular Control Forest is there.
- Conjure Golem and other low-cost followers, such as Eleanor and Golem Squad, improve the consistency of Sagacious Core and the deck’s early game curve in general. Spellboost Rune can have bit of a follower problem, where if you’re going second and play Sagacious Core on turn 3, the only playable followers on turn 4 are Kyoka, Chaos Wielder and Shikigami Summons (if you drew multiple copies). For this reason, if you’re running a deck with 3xCores, a non-trivial amount of matches can turn into non-games if you can’t evolve a follower on curve. The most efficient and versatile option of the three is Conjure Golem, since it’s a playable 2-drop by itself. Elenor is the best card to actually evolve, since it can either clear two followers or even save the token for later. The issue with Eleanor is twofold: on the one hand, its Fanfare ability is at its best when your deck isn’t functioning well, which is not a huge downside, but often means that the Fanfare only Spellboosts 1 card once; and on the other hand, there’s the “Tetra problem”: if you play Clarke/Missile/Project on 2 and Core on 3, then evolve Eleanor on 4, you go up to 9 cards in hand, which is not as bad as that same line of play with Tetra, where you burn one of the Insights from Core, but still blocks Chaos Wielder and generally makes your turn awkward (basically means you have to use the Eleanor spell token right then and there). Golem Squad is somewhat redundant with Traditional Sorcerer and I wouldn’t run it instead of Conjure Golem in a 2-3xSorc list, but it’s decent in a deck that runs Twinblade Mages or FD in that slot, and it can serve as a Spellboost payoff effect by itself as well.
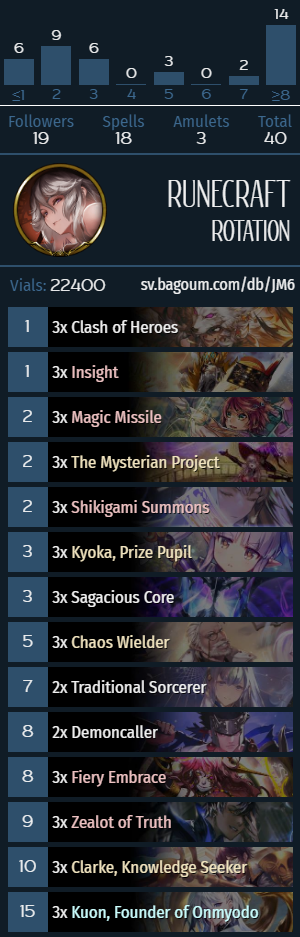
- Clash of Heroes and Wind Blast are optional reactive inclusions that help against Sword/Shadow. Clash saw fringe play at the start of the expansion since it can allow evolved Kyoka to clear 3 followers at the same time, and it’s particularly relevant against Shuten-Doji and Ceres (since Clash ignores Bane and Clash abilities), and the card also has some fringe synergy in that it kill off your Shikigami tokens, effectively Spellboosting your hand twice for 1 mana. Clash also works decently well with Storm cards (e.g., Zealot/Kuon) since you can attack the opponent first and then get a “trade” with Clash. The issue with Clash (and symmetrical fight effects in general) is that you always 2-for-1 yourself, and while there could be cases where the tempo is valuable enough to justify running the card, the format’s aggro decks are either not super aggressive in the early game (the only exceptions being Aggro Blood) or have a plan that Clash doesn’t interact with (e.g., Amataz Forest and Leod Sword), but if there’s a meta where Goblin decks are prevalent, Clash of Heroes could find a home in Spellboost Rune lists. Wind Blast is a more versatile and slower alternative to Clash: 2 mana is quite expensive for a removal spell in a Fiery Embrace/Demoncaller deck, but at least you’re not 2-for-1-ing yourself.
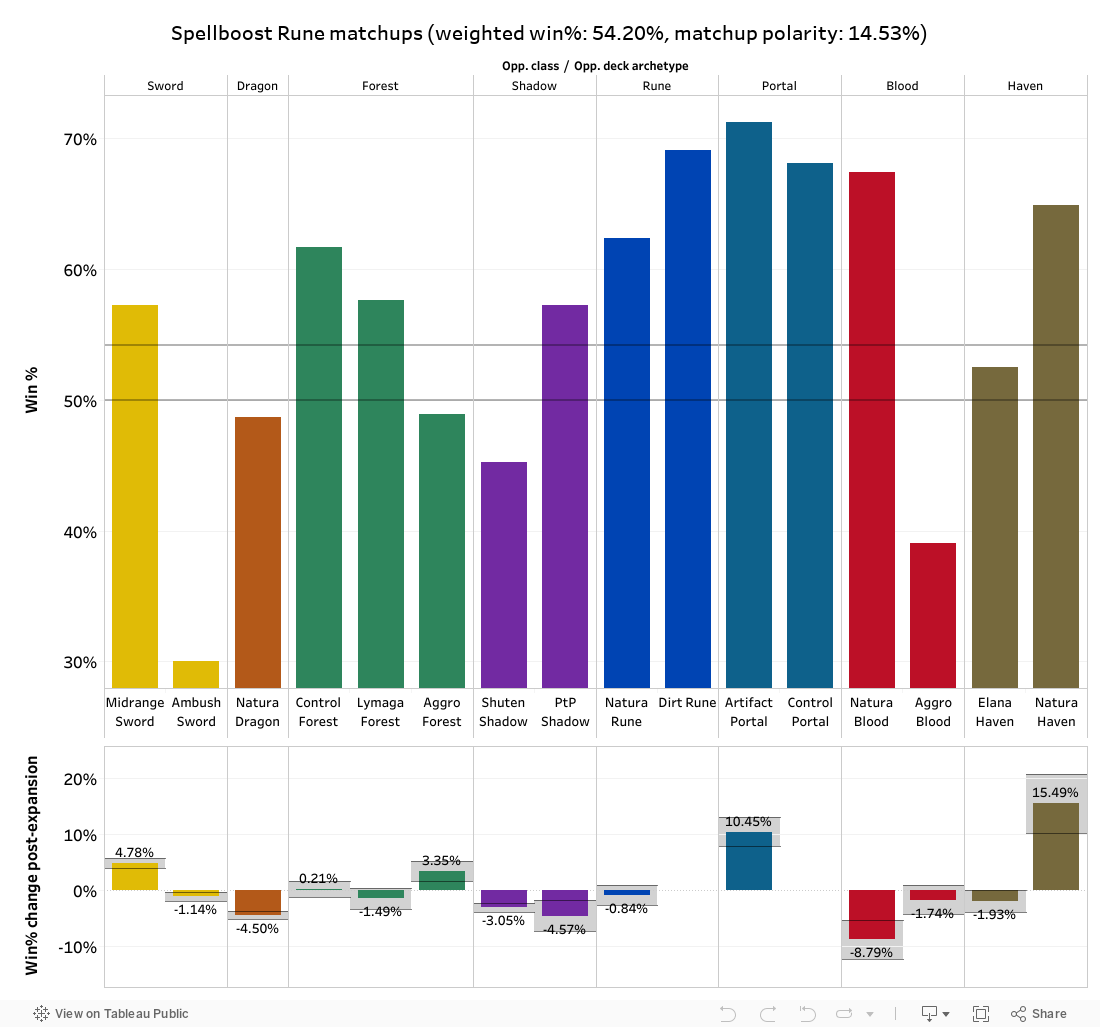
Spellboost Rune is the second most popular ladder deck in the Rotation format, and it’s one of the three best-performing archetypes in tournament play. That is not without reason, of course, as even if the deck has some weaker matchups against aggressive strategies that dodge your early interaction (e.g., Leod Sword, Amataz Forest), the blowout potential of a turn 6 Kuon still keeps Spellboost Rune in a good spot. The archetype is extremely well-optimized and a lot of players are very comfortable with piloting the deck after its long period of prevalence in the meta, so it makes for a very “safe” deck to pick up for the more enfranchised players. After the mini-expansion, the only matchup that has flipped on its head is the Natura Dragon one: with most presently popular Dragon lists, you’re looking at a deck with 2-3xDawn’s Splendors and often a playset of Princess Knights, which can all be problematic for Spellboost Rune to maneuver around: Spellboost Rune is one of the only decks in the format with no actual healing, so every point of damage sticks and it’s not uncommon to get burned out by Inori/DPD coupled with Valdain ticks and some early chip damage, all while Dawn’s Splendor is slowing you down. Spellboost Rune can also have some draw consistency issues: a non-trivial amount of the time (~11-15%) you don’t draw Kuon in your first 18-20 cards, which is not a total nightmare scenario (as you don’t technically need Kuon to win games), but can still make the archetype feel bricky and frustrating to play. Even with all that said, if you can stomach the occasional clunky draw, Spellboost Rune is one of the powerful decks in the Rotation format and is an archetype to look into if you’re trying to be competitive, especially if you’re playing on a budget.


Natura Rune
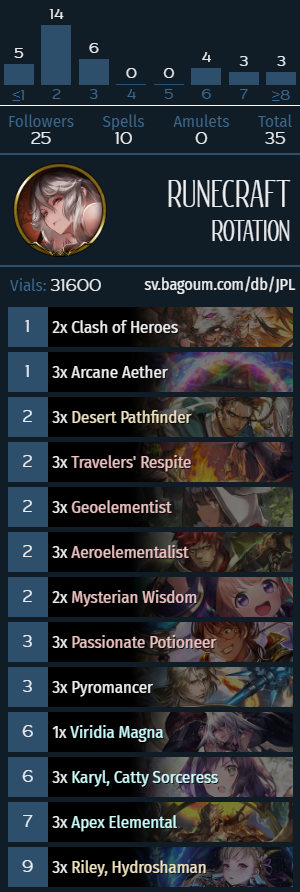
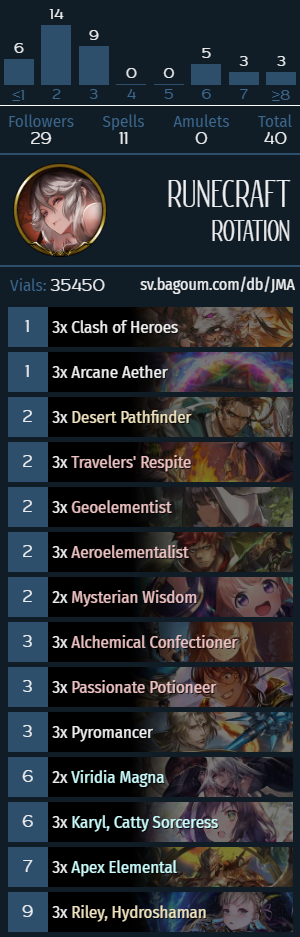
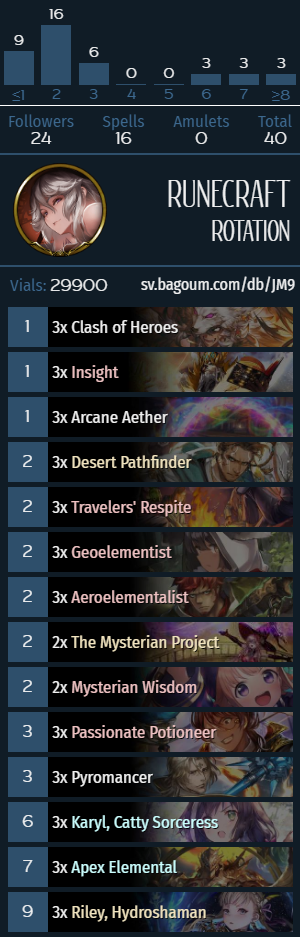
Identifying cards: Desert Pathfinder, Geoelementist, Apex Elemental, Pyromancer,Passionate Potioneer, Aeroelementalist, Viridia Magna, Karyl, Catty Sorceress, Riley, Hydroshaman.
What does Natura Rune do?
Natura Rune is a combo deck that utilizes Tree synergy and uses Karyl and Riley as its primary finishers. The archetype runs every card that can either generate or bounce Trees, and by the time it gets to 7 or more played Trees, a Union Burst Karyl in combination with the invoked Riley is often enough to close out the game against most decks. Generally speaking, the numbers don’t quite line up (since Karyl reduces the opponent’s max health by 5 and then does 5 damage), so it’s not a complete OTK in the strictest sense, but if you deal some early chip damage (more specifically, put the opponent below 13 health), save an evolve point or play 2 additional Trees the Natura Rune setup does result in 20 damage, and even if all else fails, you can always just wait for a turn instead.
Natura Rune is the quintessential “glass cannon” combo deck: it has a lot of card draw and can set up 20-damage combos often as early as turn 7-8, however, it has no good way to Ward up against Storm cards, and since the whole Tree setup often takes a significant amount of mana, the deck can struggle if it falls behind on tempo. The archetype has access to some powerful board control tools in Aeroelementalist, Pyromancer, Karyl and Viridia Magna, however, the more pressure is put on the Natura Rune player, the slower their OTK setup becomes, and since the deck has very limited defensive capabilities against Storm followers and cards like Leod, most Natura Rune games turn into a race.
Mulligan priority
- Always keep Desert Pathfinder and Apex Elemental.
- If you’re not keeping Pathfinder, keep Geolementist.
- Against Sword/Shadow/Forest, keep Pyromancer with a Tree-generating card, these include Pathfinder/Aether/Respite, but not Geolementist.
- Keep Potioneeer with Pathfinder.
- If you’re keeping Potioneer or have 2 other Tree-generating cards (e.g., Pathfinder+Geoelementist), keep Aeroelementalist.
- Don’t keep Riley/Mysterian Wisdom/Karyl.
The mulligan strategy for Natura Rune involves trying to cycle Trees and utilize powerful board-centric payoff effects (Apex Ele/Pyromancer). Aeroelementalist is an insane Shadowverse card if you manage to activate it by turn 4, but it’s somewhat conditional and can get stuck in your hand if your draw is awkward. Apart from that, Desert Pathfinder is the best 2-drop in the deck, and Apex Elementalist is an incredibly efficient way to rack up your Tree count, so it’s always good to have in the early game, and a double Pathfinder draws allow Apex Ele to effectively draw a card “for free”, which is amazing rate. Riley and Mysterian Wisdom are the deck’s invoke-based finisher and the card that shuffles said finisher back into your deck in the event that you manage to draw multiple copies, respectively, and as cards that you never want to draw, they’re not good in your opening hand. Karyl is a bit more controversial: certainly, in slower matchups, the card is a godsend, and there are specific matchups (e.g., Control Forest and Blood decks that somehow come to the bright idea of evolving Azazel against Natura Rune) where Karyl is the bee’s knees, but the Azabazel matchup is incredibly rare and Control Forest is more or less unlosable for Rune anyway, so I think it’s more important to cycle Trees and set up your early game plays, since it could always be Lymaga Forest, and the percentages you gain by mulliganing for Control Forest are (on average) not worth losing a card in your opening against Lymaga Forest. With that said, if you’re playing in an open decklist setting and know that your opponent is playing Control Forest, you can obviously keep a 3xKaryl opening hand: what is Control Forest going to do about it? Play 1-attack followers at you, menacingly?
Optional inclusions and tech cards
- Clash of Heroes is a card that I would personally consider a core inclusion in the archetype, since it helps the deck’s worst matchups and works particularly well with Aeroelementalist, Karyl and during your Riley invoke turns it effectively becomes a 1-mana removal spell that can get through Wards. The card that Clash often gets cut for is Insight, and while Insight in and of itself is not terrible, it’s a card draw spell with no board impact in a deck chock-full of cards that cycle themselves, which is the exact opposite of Clash. I personally believe that 3xClash is a responsible build of the deck, but running 2 copies can also be justifiable.
- Viridia Magna is an optional tech card against Sword and Shadow. In my testing, I’ve found the card incredibly important, as the deck can consistently have Viridia Magna active on turn 6 and it can even bring down Karyl‘s Union Burst count, which is valuable in and of itself, particularly when going first. I personally believe that running at least 2 copies is necessary if you want to have a decent shot at beating Sword and Shadow, but the card is somewhat mediocre against Spellboost Rune, so I don’t think it’s good enough to run a full playset.
- Princess Knight is a functionally similar card to Viridia Magna, in that it helps bridge the gap between your early game and the UB Karyl setup necessary for the Riley turn. Being an early cantrip that doesn’t draw Riley (the way Confectioner does) is also an upside, however, the card is not as good as Pyromancer for early tempo, and doesn’t activate Aeroelementalist the way a turn 3 Geolementist or Potioneer can, so it’s a bit of an awkward card in the deck and not something I would keep in the mulligan. I personally don’t think that PK is really necessary in the deck, as it doesn’t really cover any of the matchups in which Natura Rune struggles.
- Alchemical Confectioner is an optional inclusion that helps in slower matchups like Rune/Dragon. Broadly speaking, Confectioner is a fine card for any sort of Natura deck, however, Natura Rune is a little awkward in that one of its finishers is a Natura card that you never want to draw from your deck. For that reason, I don’t think that Confectioner is a good fit for the deck as anything more than a 1-of: it’s a passable, if low-tempo, 3-drop, but drawing Riley as one of its cards is just too sad, especially if you draw it with a Pathfinder or some such. For most intents and purposes, Confectioner is worse than Geolementist and Potioneer on curve, and I personally don’t believe that Natura Rune needs more value.
- Mysterian Wisdom is a necessary evil in a Rune deck that tries to rely on invoking unplayable cards out of the deck as a win condition. The probability of drawing 3xRiley in the first ~20 cards of your deck is roughly 11.5%, so in 1 out of 9 Natura Rune matches, Mysterian Wisdom saves you from having non-games. Regarding the argument of playing fewer copies of Riley, with 2xRiley, that same probability increases to ~24.3%, so it’s actually very much necessary to run 3 copies of Riley.
- Dawn’s Splendor is a broad tech choice against Rune/Sword/Shadow that can protect your precious life total against Storm cards.
- Bazooka Goblins are a tech card against Sword (particularly, Leod Sword). Natura Rune is one of the only decks in the format that can actually utilize Bazooka Goblins, because the deck has a lot of card draw and can dig up 2 copies pretty consistently if you’re running a full playset, and you can set up Goblins on 5 into Karyl on 6, which can sometimes clear the Leod(s). Even with that in mind, it’s important to not show Bazooka Goblins in the early game against Leod Sword, because if you blow up the Leod on curve, the Sword player is going to realize that the jig is up (where there is one Bazooka Goblin, there is usually a full playset), and stop playing into it with cards like Clash of Heroes and value trades, which does not bode well for the Natura Rune player. Generally, I don’t believe that Leod Sword is popular enough currently to justify running Bazooka Goblins, but it could be a relevant tech choice in the future.
Natura Rune is yet another Rune deck that did not receive particularly impactful upgrades in the mini-expansion, which does show in terms of its matchup data: it has lost a lot of percentages against Natura Dragon, as well as a few other decks like Lymaga and Amataz Forest. The archetype’s saving grace is the abundance of Midrange Sword and Control Forest in the format, which does inflate its winrate somewhat, even if the deck still has a lot of the same weak matchups against faster decks like Spellboost Rune, Leod Sword and Amataz Forest, which Natura Rune can’t interact with to a sufficient extent. The archetype has seen some fringe tournament success and can have potential usage cases in specific pockets of the meta, but the archetype is fairly polarized and not particularly consistent. In my opinion, both Natura Dragon and Control Forest fulfill a similar niche in the format, however, those decks are a lot less vulnerable to proactive decks like Spellboost Rune, so I find it difficult to recommend playing Natura Rune over a less reliable combo-oriented deck.
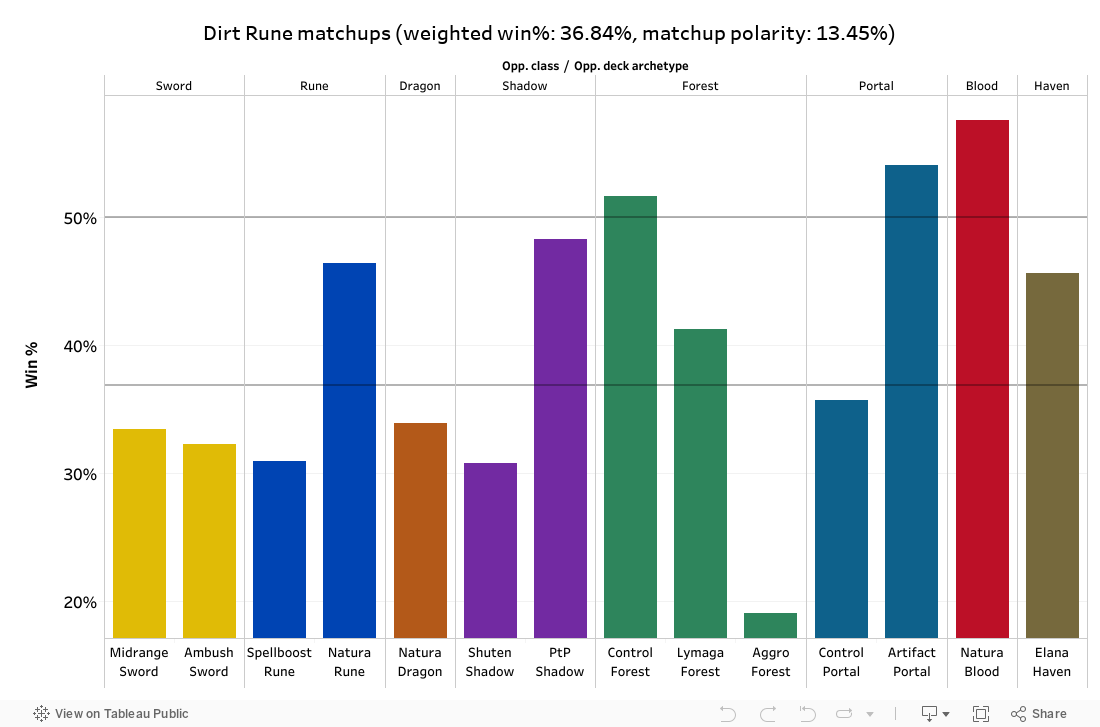
Regarding Dirt Rune
Dirt Rune is an archetype that I’ve personally been a little excited about going into the mini-expansion, however, the deck did not prove itself to be particularly functional with the current Rotation card pool, and the above matchup section should be an obvious enough explanation for the deck’s shortcomings: any archetype that is either aggressive or can develop a board of 2-3 midsized threats in the midgame demolishes the current iterations of Dirt Rune. The archetype’s inherent strengths lie in its ability to generate incremental burn damage, which is relevant against combo-oriented decks, such as Natura Rune and Control Forest, but its lack of comeback mechanics against Union Burst effects and high draw reliance mean that the archetype is unlikely to be competitive without additional support and a deck I’d recommend avoiding if you’re trying to be competitive.
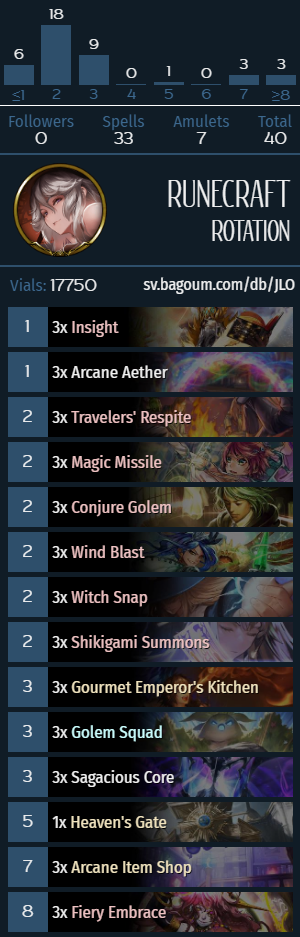
Regarding Item Shop Rune
Rune decks built around Arcane Item Shop are another example of poorly refined glass cannon combo decks. The game plan of Item Shop Rune involves getting a 0-cost card (either the token from Travelers’ Respite or a Spellboosted Fiery Embrace), then, once you get to turn 7, play Arcane Item Shop, then the 0-cost card, followed by either 1-cost spells (Insight and Trees) that effectively don’t cost mana, cards that refund play points (Arcane Aether gives +1 by itself, and secondary Fiery Embraces can also give +1 if you have a target for it), and 2-mana spells (that effectively cost 1). Getting a big enough chain can result in a 20-damage setup on turn 7 (with multiple Aethers/Respite/Insights/etc.), since each of the Tree-generating Spells does 4 damage (if the board is clear).
The deck often runs a full playset of Edict of Truth, which can be utilized by playing it on turn 7 before running out the Item Shop to fill up your hand (if it’s Spellboosted enough, of course). It should also be mentioned that while 1- and 2-cost spells are generally way better than 3-cost Spells, follower-summoning spells like Golem Squad are at a premium in a deck that can’t run followers: on the one hand, because they allow you to have proactive turns in the early game, and on the other hand, because you need to evolve for board control at every opportunity you can get: evolves are essentially free tempo, and as trivial as it may sound for real Shadowverse decks, you have to have at least 3 followers by turn 7 every game, so even mediocre follower cards like Conjure Golem/Mysterian Wisdom are at a premium in Item Shops decks.
Lastly, a card that should be mentioned in the context of Item Shop Rune is Heaven’s Gate, which is another way to get a 0-cost card in your hand to start the chain. The issue with Heaven’s Gate is plain to see: 5 mana is a lot and in most matchups you can’t afford to spend your turn 5 invoking (or playing) that thing, with the only exceptions being slower decks like Natura Dragon. Heaven’s Gate can very rarely “highroll” and discount the Item Shop, but the deck generally keeps a pretty high hand size at all times, so it’s not very likely, and in addition to that, it can also “lowroll” if it hits cards that already cost 0 or things like Edict of Truth. Long story short, invoking Heaven’s Gate is good only if you have multiple Item Shops in hand, have no other way to get a 0-cost card (no Respites/Embraces), or if you’re playing a matchup that is extremely slow (e.g., Control Forest), and in all other cases, it’s usually correct to avoid it like the plague, because giving discounts to your opponent is generally bad, especially if their card quality is better on average.

[ps2id id=’forest’/]
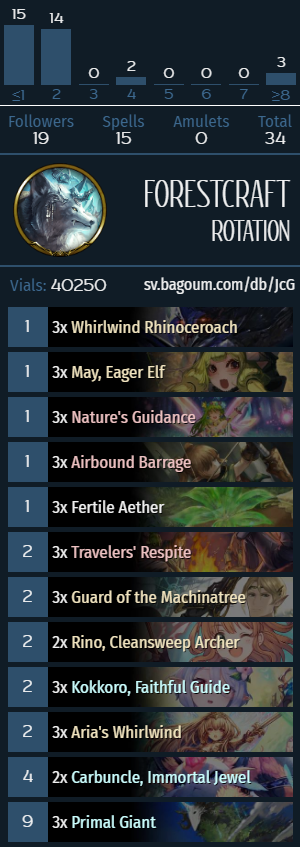
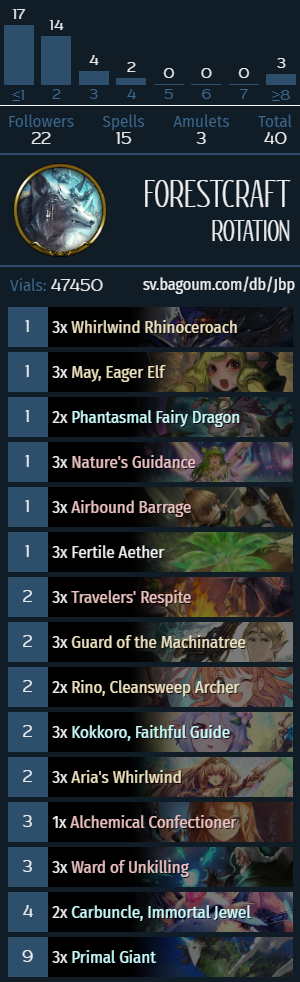
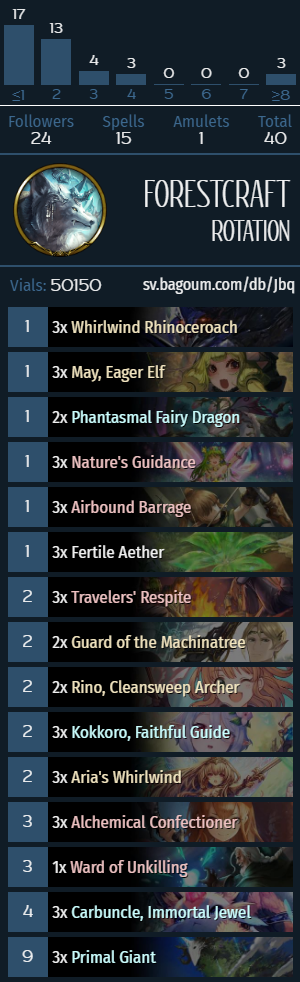
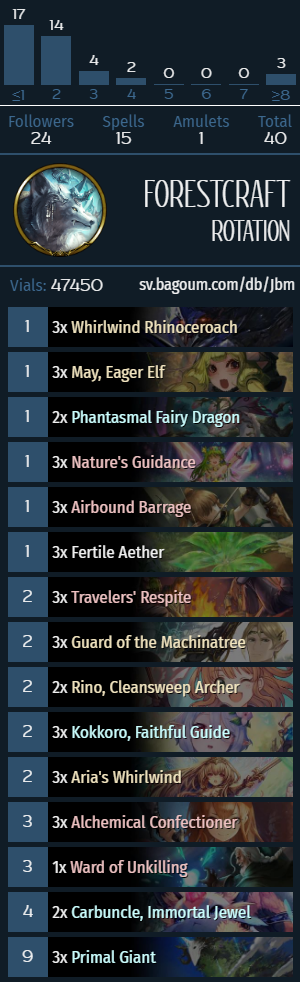
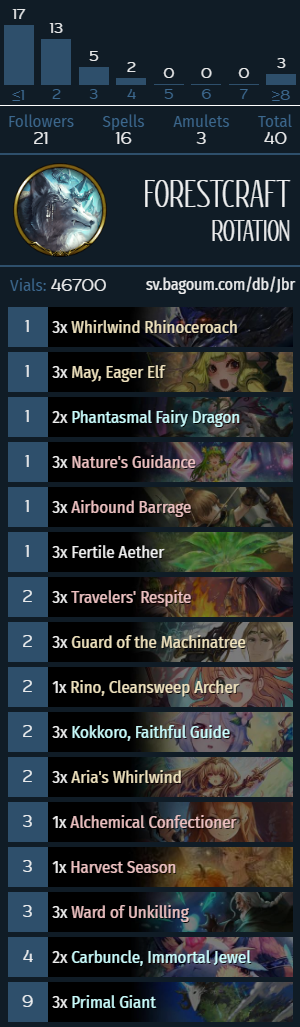
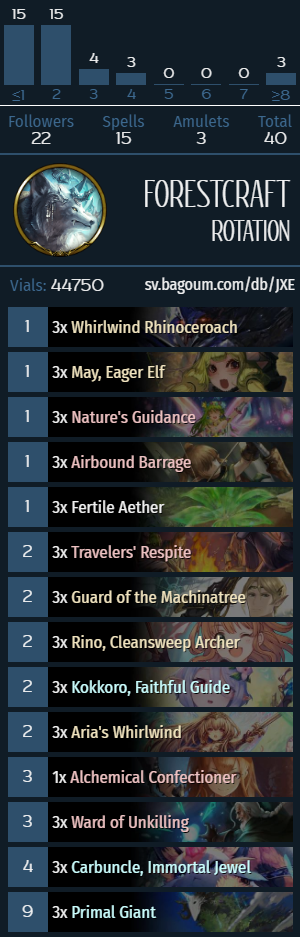
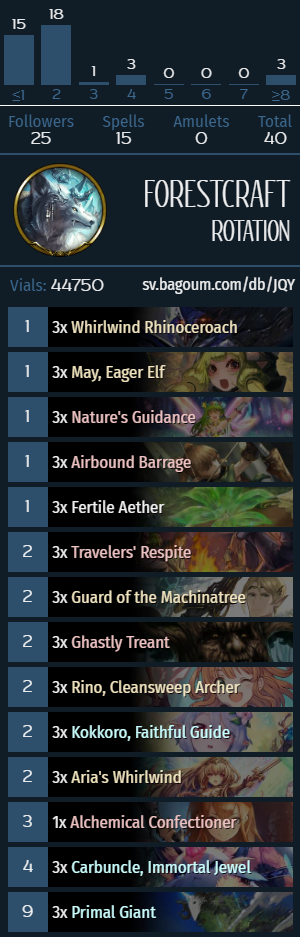
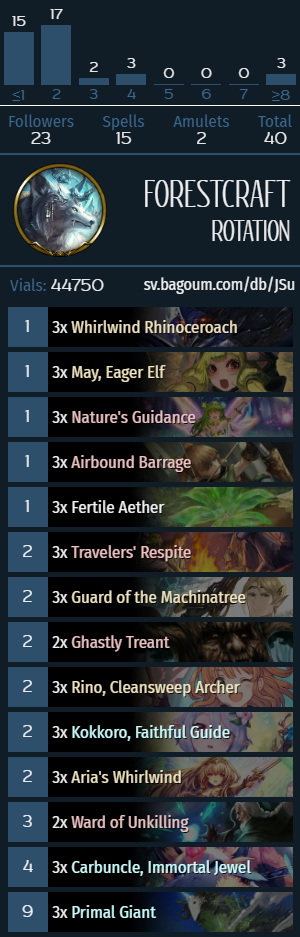
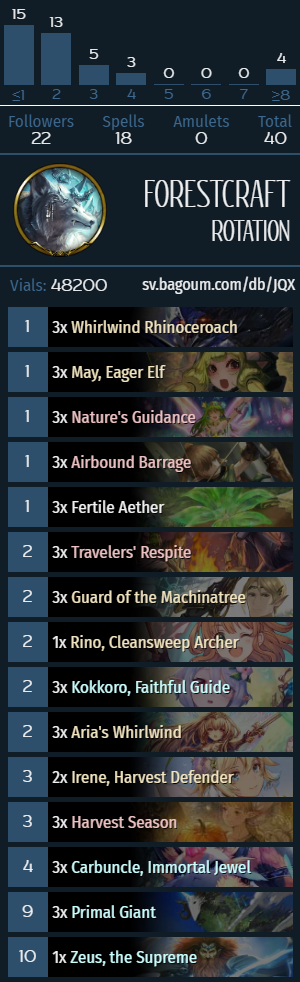
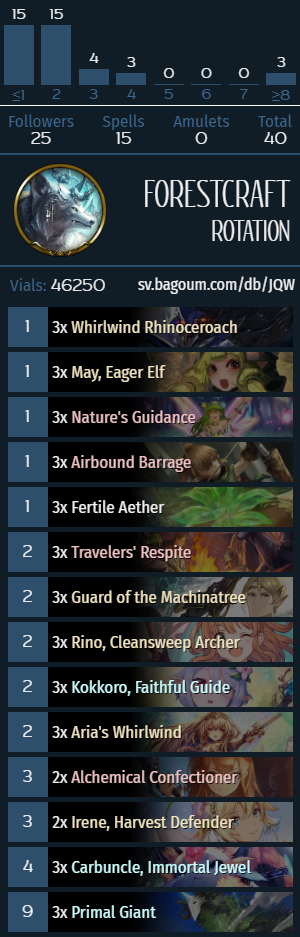
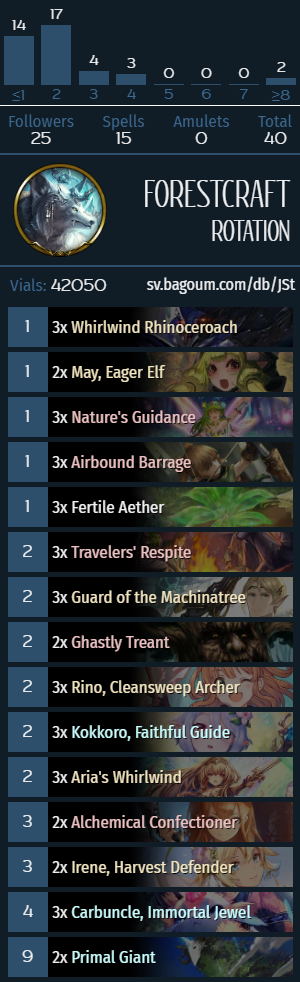
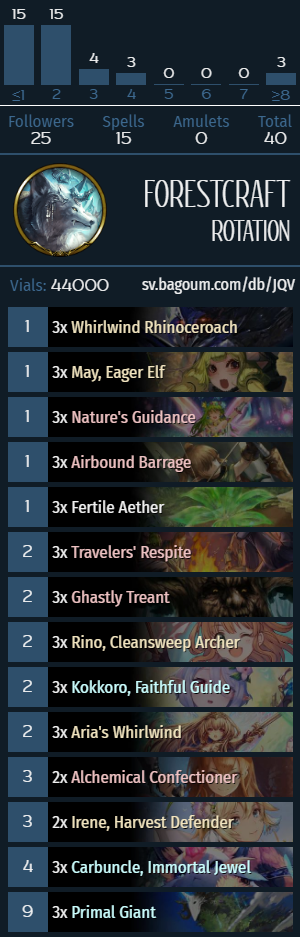
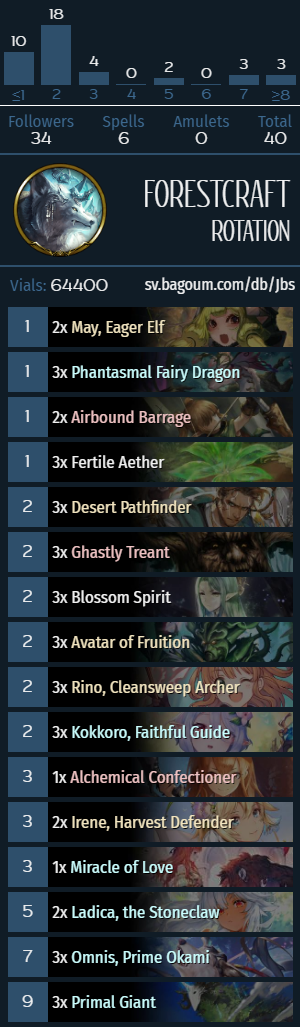
Control Forest
Identifying cards: Whirlwind Rhinoceroach, Guard of the Machinatree, Carbuncle, Immortal Jewel, Aria’s Whirlwind.
What does Control Forest do?
Control Forest is a reactive Forestcraft deck with a combo finisher. The archetype has 2 primary game plans: on the one hand, there are matchups where the deck plays in a similar fashion to pre-Divine Smithing Roach decks: trying to evolve Roaches at every opportunity, and trying to race to the magical number of 8 played Roaches. Since there is no way to reliably tutor for Roaches in the current Rotation format, it’s sometimes unrealistic to follow this game plan (outside of getting very specific “nut draws”) against decks like Spellboost Rune, Shuten-Doji Shadow, all builds of Sword and other midrange board-control-oriented decks; however, against decks with fast inevitability engines (such as Natura Dragon/Rune, Control Forest mirrors, Artifact Portal, etc.), the Roach plan is your only out (you can’t outvalue a 20-damage OTK), so you have to dig through your deck rapidly, evolve Roaches and occasionally even ignore the board state if it gets you to complete the combo setup faster.
Against midrange decks (Spellboost Rune, Shadow, Sword, etc.), Control Forest employs a wide array of healing (between Primal Giant and Respite) and removal (May/Irene), with a key card being Aria’s Whirlwind, which can clear most boards in the current Rotation format, when paired up with some combination of Fertile Aether/Travelers’ Respite, 1-cost bounce effects and May. Against decks with a finite number of threats, Control Forest can often get to turn 10, at which point a lot of doors open to the Forest player: all 6 of the Union Burst cards become constantly active by definition and can be bounced for extra AoE/healing/card draw, Fertile Aether turns into Pot of Greed, and with the constant stream of card advantage and healing, there is more than enough time to run the opponent out of threats and complete the Roach setup eventually, even if you don’t draw your Roaches in the early game. While the combo-centric games usually end around turns 7-9, midrange matchups can last up to turn 12-13 if the opponent is putting on a lot of pressure.
An important card to mention in regards to slower matchups is Carbuncle, which is the pseudo-inevitability engine in grindy games: while it’s not “true” inevitability, as you can’t really control when you draw the Sparks and you technically get a finite number of them, but the fact of the matter is that after a certain point of the game, you can start evolving Rhinoceroaches on every turn, and since it’s often possible to cycle through 30-ish cards over the course of the game, it’s more than enough to close out games in practice.
Mulligan priority
- Always keep Kokkoro, Carbuncle, and either a Confectioner/Harvest Season/Ward of Unkilling, in order of priority.
- Keep Aria’s Whirlwind against Rune/Shadow/Sword.
- If you’re keeping a card draw effect without Carbuncle against Sword/Shadow/Rune, also keep Rino going second.
- Keep Rhinoceroach and/or Hoverboard Mercenary against Dragon/Portal/Forest.
- If you’re keeping Roach, also keep Nature’s Guidance, Airbound Barrage and Guard of the Machinatree. Going first, the priority is Guard/Guidance/Barrage; going second, it’s Guidance/Barrage/Guard.
- Always mulligan away May and Primal Giant.
Control Forest skeleton


The mulligan strategy for Control Forest is somewhat unorthodox, as the majority of the deck consists of cards that are unplayable before turn 4, and with cards like Respite/Aether, Rino and bounce effects, it’s aggressively terrible to play them, even if you have nothing else to play, as they are either important setup pieces for May and/or Aria’s Whirlwind or part of the Roach combo setup. With these factors in mind, it’s still important to utilize your early game turns, as doing something is always better than doing nothing, and the best “development” plays in the deck are either early card draw or effects that take a while to get going, such as Carbuncle (since getting the dork down earlier means that you potentially start drawing Spark(s) faster). It’s generally correct to play Kokkoro on turn 2. The priority on the 3-drop draw effects is that Confectioner is generally the best thing to do on turn 3, as it sets up May on turn 5, and Ward has more value in the late game than Harvest Season on turn 3 because of the damage prevention effect, where that’s relevant, so it’s better to play the worse card (Harvest) early on when possible.
In combo-centric matchups (Natura Dragon/Artifact Portal and the Control Forest mirror), keeping combo pieces is important, as the earlier you find a Rhinoceroach to evolve, the better. Broadly speaking, Forest and Rune are uncertain matchup on ladder in terms of mulligans, but I generally assume that Rune is usually Spellboost Rune (though if you know that your opponent is playing Natura Rune through external means, it’s obviously better to mulligan against it the same way you would against Dragon). Forest is a split between 3 decks, the most common of which being the mirror and Amataz Forest. The reason to assume that you’re playing the mirror is that Amataz Forest is not really a winnable matchup for Control Forest (and the way you beat Amataz Forest is that you have to hope that the Amataz player gets a bad draw while you draw well). Sometimes, you miss and get paired up against Lymaga Forest or a non-Maisha Portal deck, which are midrange-y decks, but since those decks are generally not very fast, these uncommon matchups should generally be Control Forest-favored, even with a suboptimal draw.
Optional inclusions and tech cards
- Alchemical Confectioner is a broad general inclusion that helps against midrange decks. Since Confectioner always draws Respite+Aether in the standard build of the deck, it sets up May and Aria’s Whirlwind by itself. The weak point of Confectioner is that the first drawn copy is always very good, but since the card is restricted to drawing 2 different Natura cards, the second and third copies often only get to draw 1 card (e.g., if you have played 3xAether and 1xRespite, Confectioner is only going to draw 1 Respite), so the card has some redundancy issues.
- Ward of Unkilling and Harvest Season are an alternative to Confectioner that are better than Confectioner in multiples. Personally, I would never swap out the first Confectioner for Ward/Harvest, but in lists that don’t run Treants, having a 1-of Confectioner and 1-2 copies of either Ward/Harvest are reasonable. Ward of Unkilling also has fringe utility against specifically Natura Rune since it stops the 20-damage Riley+Karyl setup, but the damage prevention is pretty irrelevant against most other decks in the format. Even against Dragon and in the Control Forest mirror, the 5 damage threshold doesn’t save you against a 4xRoach setup and incremental Valdain/Inori/etc. damage, and while it can prevent some setups (primarily relevant in the Forest mirror), it only really stops Dragon if they don’t have any other sources of damage (primarily DPD and Kaya, as you don’t usually have a lot of followers in play for Inori to be relevant). In addition to that, you can bounce Ward to dig really deep if your hand is close to empty, but realistically speaking, there is very little difference between Ward and Harvest: the former can sometimes incidentally hose Natura Rune and possibly help you in the Forest mirror, while the other can sometimes draw an extra card. I personally prefer Ward over Harvest Season, but it’s a very marginal difference on ladder.
- Hoverboard Mercenary is a tech card against Dragon and the Control Forest mirror. The card helps speed up the Roach setup in combo-oriented matchups, but since it only has 3 targets in the deck and doesn’t draw cards that help against Rune/Shadow/Sword, it’s difficult to justify running it over any of the 3-mana “draw 2” cards and as anything more than a 1-of. A simple way to think about Hoverboard Merc is that it’s an inverse Confectioner: makes combo matchups better, but is a bit mediocre against midrange decks.
- Phantasmal Fairy Dragon is a tech card against proactive decks such as Spellboost Rune and Midrange Evole Sword. Fairy Dragon gets “activated” with Aether/Respite, as well as May (technically, Roaches as well, which can sometimes represent an extra dead 1-drop, but if your Roaches are dying, you must be doing something wrong), so it has some natural synergy with Confectioner and generally only “activates” around turns 6-7. For most intents and purposes, Fairy Dragon is a more flexible Irene (the two cards are functionally different, but serve as a similar role of “honorary UB cards” in midrange matchups). Unlike Irene, Fairy Dragon costs 1, so it’s a lot more flexible, which matters in the Control Forest mirror, and not having the condition of playing 4 cards in a turn leaves you a lot more breathing room to develop Roaches, play healing/removal cards and can even open up some play patterns that are impossible with Irene, particularly with Union Burst cards (when the condition is fulfilled), either with Fairy Dragon into Rino (for AoE) or Kokkoro (to get a bit of healing and also buff it to 4 attack, which is occasionally relevant). The UB setups are particularly relevant when going first, as you usually only get the UB count to 8 at the lowest (barring amazing Carbuncle luck), and for that reason, the turn 7 “activation” lines up just right to get the Union Burst effect on time. I personally don’t like running 3xFairy Dragon, as the card is pretty mediocre against Dragon and only does so much against Sword/Rune, but running at least 2 copies seems sensible in the current Rotation environment, usually over a third Rino (seeing as how Rino can be bad when going first), Carbuncle (similar reasoning, although Carbuncle can also be played as a cantrip so it’s not as bad), or one of the 3-drops that say “draw 2 cards” on them (Ward/Harvest, as they are flex slots in the first place).
- Cutting the third copy of Rino and Carbuncle is a way to improve the combo-oriented matchups at the expense of Shadow/Rune/Sword matchups. I personally really dislike cutting Carbuncle even if can be a clunky draw in the combo-oriented matchups, since it’s still a good early play as a cantrip (you often don’t really want to play it as a 4-drop against Forest/Dragon, and the cantrip effect can be tricky to utilize since you often have to do it as the last action of the turn; and “drawing last” is generally not a good thing to do in card games, this effect is further exacerbated in a deck like Control Forest, that runs Roaches, a bunch of combo pieces and 5-6 Union Burst cards). Rino is a lot less important than it used to be before the mini-expansion, as Shadow is on a decline and there is a relatively lower amount of Rune on ladder (so activating Aria’s Whirlwind without Tree cards is less relevant). The 6/4 statline also lines up poorly against Shizuru against Sword when going first. I would still consider double Rino and Carbuncle core inclusions in the archetype, but the third copies of each of those cards should be scrutinized a bit more carefully based on what decks you are trying to beat.
- Despite running 6 Union Burst cards, Princess Knight is a very awkward fit in Control Forest. The 3-drop slot is fairly competitive the archetype, with Confectioner and Ward bringing far better utility than PK, and the UB thresholds are a lot less relevant than in classes like Sword/Dragon, where you get huge power spikes from active UB cards that have synergy with the game plans of their decks. PK can hit combo pieces like Roaches/Guards with a decently high probability (roughly ~20-25%, depending on the exact list), however, it can also hit May (~10%), which is effectively equivalent to drawing 0 cards. In a combo-oriented deck, drawing 2 cards is more valuable than drawing one, even if those draws have worse odds on paper, so I believe that Princess Knight is an aggressively terrible inclusion in Control Forest and should be avoided like the plague in the current iterations of the archetype. This idiom is getting a little too topical, huh.
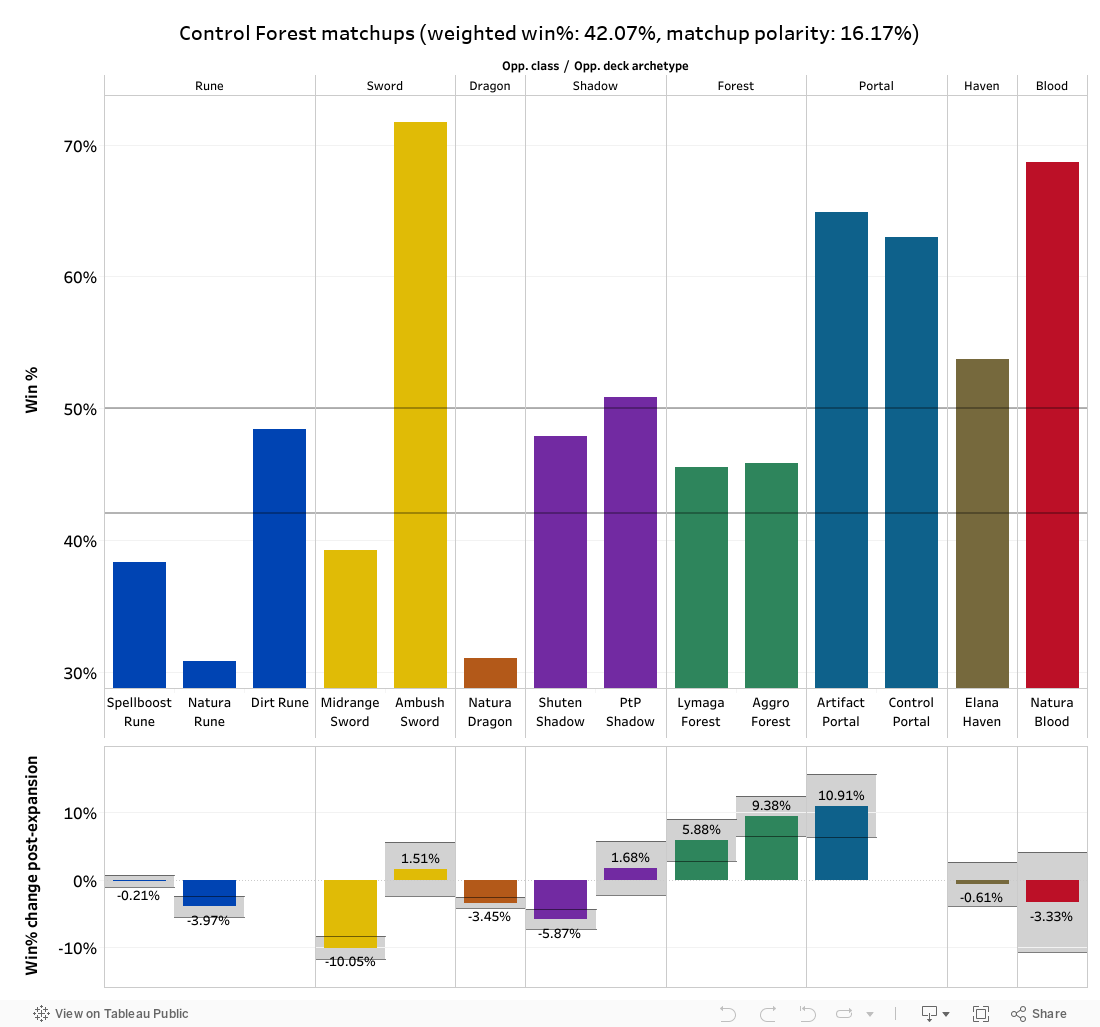
Control Forest is an archetype that generally always underperforms in ladder data compared to tournament results. The deck consistently hoses aggressive decks like Ambush Sword and does decently well against midrange-y archetypes like Evolve Sword and Shuten Shadow, but struggles against faster combo decks like Natura Dragon and Rune. The Spellboost Rune matchup is somewhat draw-dependant, as it heavily depends on what your early curve looks like and whether you manage to draw Aria’s Whirlwind (preferably, 2 copies) in your first 20-ish cards. I’ve done extensive testing of both of those decks, and combining my personal data from both sides of that matchup results in a 55/45 matchup for Forest. I could be biased, of course, but I do get the impression that Control Forest is a way better deck than its ladder winrates would suggest. Certainly, Natura Dragon feels like a pretty rough matchup if you don’t find a Roach quickly enough, and Midrange Sword can sometimes curve out really well and put up multiple Wards for your Roach turn, but I do believe that Control Forest is in a very good spot currently. The archetype is one of the best-performing decks in tournament play, and while you can sometimes hit a string of bad matchups, Control Forest is one of the most consistent decks in the format in terms of draw reliance (since you draw through 30 or so cards in most games), which makes it one of the best decks to pick up if you’re trying to be competitive.
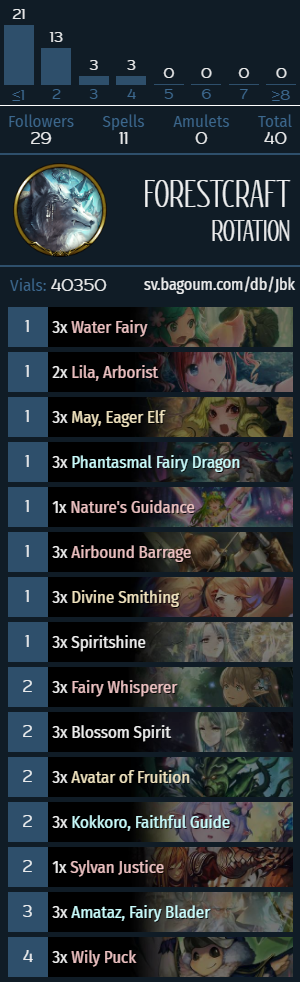
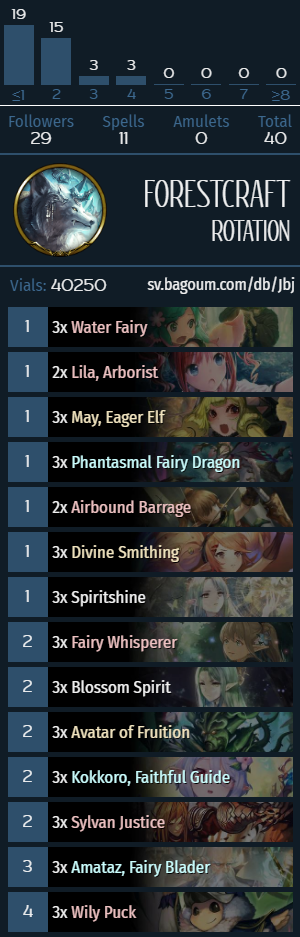
Amataz Forest skeleton
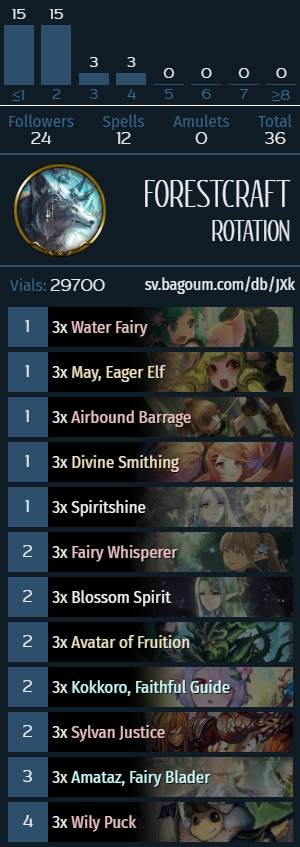


Amataz (a.k.a. Aggro) Forest
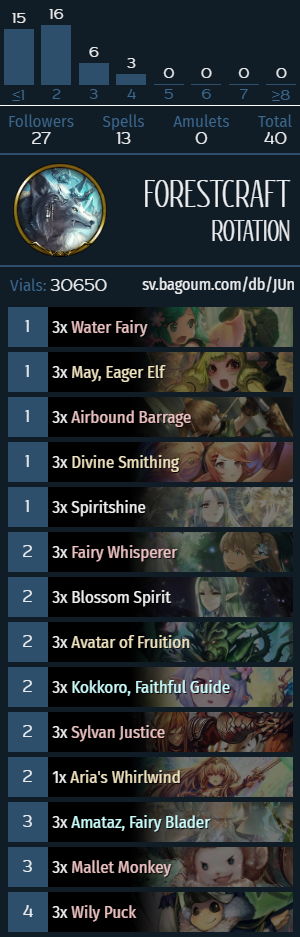
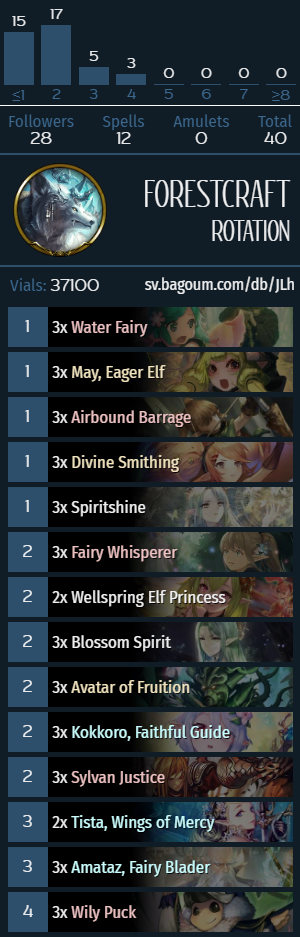
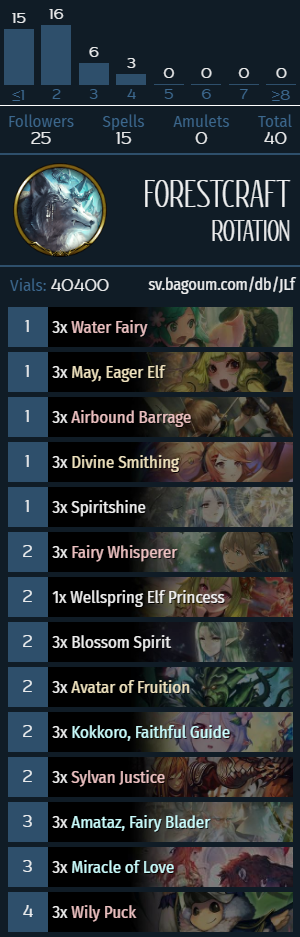
Identifying cards: Water Fairy, Divine Smithing, Spiritshine, Fairy Whisperer, Sylvan Justice, Amataz, Fairy Blader, Wily Puck.
What does Amataz Forest do?
Amataz Forest is an aggressive combo deck that uses Divine Smithing and Amataz to give Fairies (and other 1-cost followers, in the case of Smithing) Storm, which can then be utilized in conjunction with Blossom Spirit and Airbound Barrage (on Amataz) to set up 2-turn lethals around turn 6-7. The archetype is not particularly different from its pre-rotation iteration, however, losing access to Lily makes the deck less consistent across the board. Even with that in mind, the deck’s underlying strengths (speed of the combo setup and its ability to generate incremental Storm damage) can still prey on slower reactive decks in the format that don’t run Dawn’s Splendor, a lot of Wards and/or healing.
Mulligan priority
- Always keep Amataz or Divine Smithing, prioritizing Amataz.
- If you’re keeping either of the 2 enablers, also keep turn 1 plays like Wily Puck/Water Fairy/Spiritshine, in order of priority.
- Keep a proactive 2-drop when going first, these include Avatar of Fruition/Fairy Whisperer. Sylvan Justice can also function as a 2-drop against Sword/Shadow.
- Keep Kokkoro against Dragon/Rune.
- Do not keep May.
Drawing one of its 6 enablers by turn 4-5 makes or breaks Amataz Forest, and I generally consider trying to aggressively mulligan for Amataz/Smithing necessary. With that said, early tempo is still somewhat important, so keeping a playable 2-drop is often fine. There is an argument to be made for keeping Wily Puck because it takes the most setup compared to other Fairy-generating effects, but I personally like having an enabler way more than a turn 1 Puck. The archetype hasn’t changed much after the expansion, however, out of the new cards played in the deck, only Kokkoro is a passable early play. At its worst, it cycles itself, and in slower matchups, you can even wait until turn 4 and draw 2 with it, if you still don’t have an enabler by that point. Kokkoro is generally too slow to keep against Sword/Shadow, and keeping it against Forest is a bit of a toss-up: it’s really good against Control, but pretty mediocre against both Lymaga and Amataz Forest, and I generally don’t believe it’s correct to keep blindly against Forest, unless Control Forest is the only Forest deck in the format (which it is not, at the time of writing).
There is a discussion to be had about early game hand size issues in Amataz Forest: if your enablers are exactly double (or even triple) Amataz, you have to plan your early curve around having to play out of some of your Fairies and 1-drops somewhat inefficiently in order to get to 6 open card slots in your hand. This can mean saving Spiritshine or Fairy Whisperer for after you dump the “bad” cards from your hand. With most combinations of Smithing+Amataz, you also have to be aware that you often don’t get to have the Smithing buff on the maximum number of Fairies, so it’s important to count how much damage you need and how many buffs are actually necessary. With an exact Amataz+Smithing setup, you get 20 damage with one evolve if you get full Smithing value, however, a Blossom Spirit can represent an extra 3-4 damage, so if you have a Blossom+Smithing+Amataz hand, you are free to either evolve for board control or play Smithing when it only hits 3-4 Fairies. Conversely, if you haven’t drawn enough enablers to close out the game, it’s important not to overdraw cards, which is particularly relevant with Wily Puck and Water Fairy, each of which effectively represents an extra card in your hand.
Optional inclusions and tech cards
- Kokkoro is a near-ubiquitous inclusion that helps in slower matchup such as Rune/Dragon and can serve a low-cost cantrip in other matchups. If an Amataz Forest deck is functioning properly, you’re never really going to get to Union Burst turns, so Kokkoro is generally just played for the early card draw. Certainly, against decks like Natura Dragon and Control Forest, games can drag out to the point where you can get to turn 7 and buff your board by +1/+1 if you’re going second, but it is a fringe case, and drawing towards an extra Amataz, a Barrage to bounce Amataz, or a Blossom Spirit is going to make you win more games on average than holding onto Kokkoro for the Union Burst buff.
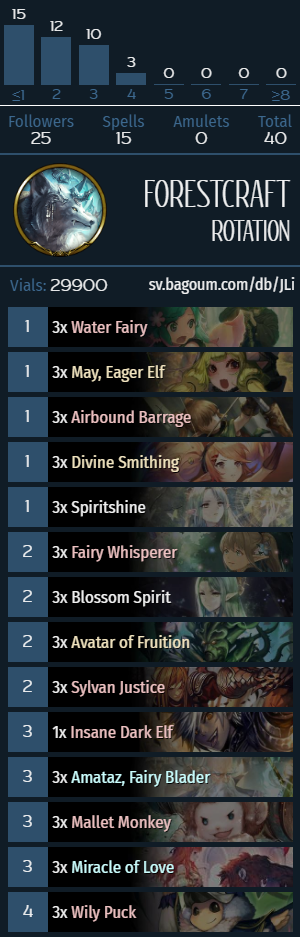
- Phantasmal Fairy Dragon is an optional inclusion that helps against midrange decks, namely, Sword and Shadow. In games where you get a slower start and/or don’t draw Amataz/Smithing early enough, Fairy Dragon can control the board after you extend with a Blossom Spirit turn, for example. In addition to that, you can play it alongside a board of Fairies to protect the rest of your board even if it’s only a 1/3 and potentially push some damage that way. I have some mixed feelings about Fairy Dragon in Amataz Forest, as it’s not a good early game card, and it functions the best when the rest of your deck doesn’t run properly. If you have an Amataz+Smithing draw, then you can just dump it from your hand (which is way less painful than dumping Mallet Monkey, for example, since it only costs 1), so it’s passable when you’re ahead, and good when you’re behind. The card has some cute synergies in the deck, namely, it gets buffed with Smithing and gets Rush even if it’s not active, and 2 damage is a way better breakpoint than 1; in addition to that, it can help activate the UB effect on Kokkoro when active, often getting another relevant attack buff, but then again, if you’re activating Kokkoro‘s UB in Amataz Forest, something must be going wrong with your game. Some of the common cards to cut for Fairy Dragon include Sylvan Justice and other “fallback cards”, covered in further sections. In the current format, Fairy Dragon seems like a necessary evil in Amataz lists, but it’s not necessarily going to maintain that position in the future.
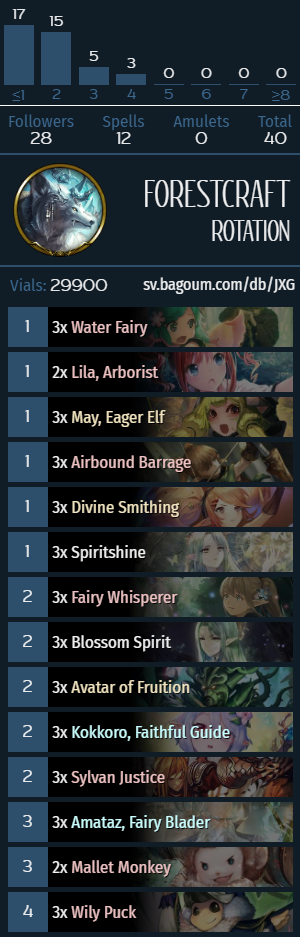
- Lila, Arborist is another flex slot in the archetype that works particularly well when your deck isn’t running properly. Unlike Fairy Dragon, Lila can actually push some face damage, and can even open up some unique lines of play against decks like Spellboost Rune: if you’re going first and played a Puck or Spiritshine on 1 and a 2-drop on turn 2 (e.g., Blossom Spirit/Fairy Whisperer/Avatar), and play out 3 Fairies (or other 1-drops, for Blossom Spirit) on turn 3, Lila can then push a lot of damage on turn 4, but this obviously only works against decks with no early interaction, so it’s somewhat matchup-dependant. Aside from that, Lila can still add an extra point of damage on a buffed Fairy (if you evolve it), and if you played Smithing, it can either do some trading itself with the attack buff or go face if it has Storm. Lila is the first card to cut if you’re looking to include more fallback effects, but it’s a solid baseline choice if you’re looking to make the deck more aggressive.
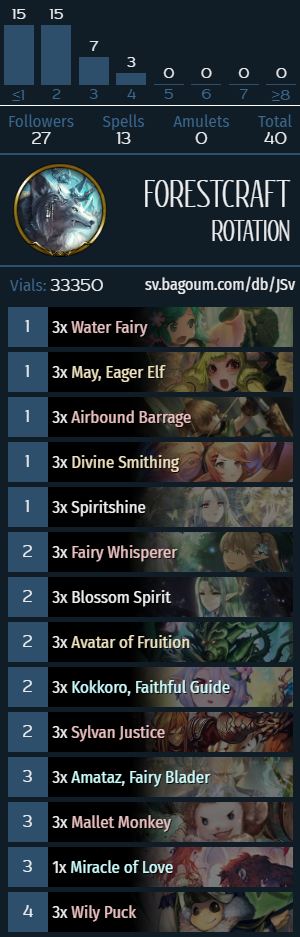
- Mallet Monkey is a card that skews the deck in the opposite direction from Fairy Dragon, and can generate a bit of extra chip damage in the later stages of the game. Amataz Forest doesn’t really have any out-of-hand damage when it doesn’t draw Smithing/Amataz, so having an out for the times when you draw poorly and need that last bit of damage can be valuable, although the card itself is a lot worse than Lila/Fairy Dragon when the deck is running well.
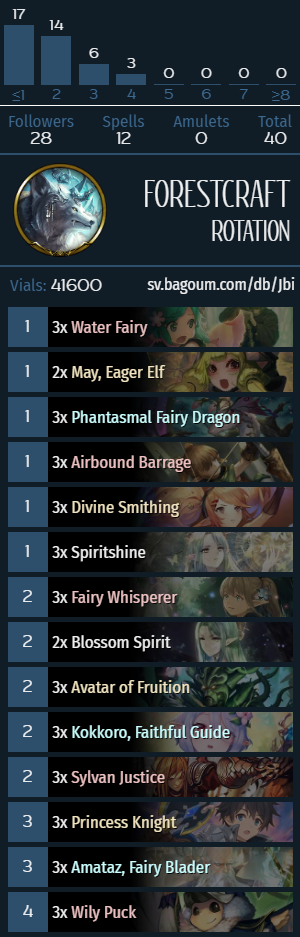
- Princess Knight is a card that has seen some experimentation in Amataz lists after the mini-expansion in the Lila/Mallet Monkey slot. The Union Burst synergy is not particularly relevant in a fast deck like Amataz Forest, but having a cantrip 3-drop that has a decently high (~1/7) change of fetching Amataz from your deck could potentially be viable, although the card is obviously a little too slow for the type of game plan Amataz Forest usually follows. It should also be mentioned that PK can draw cards that are mediocre in the midgame (e.g., Puck or May), so while it can fetch Amataz if you’re lucky, it can also whiff spectacularly if you’re not, and there are more bad hits than good ones, so I personally believe that Princess Knight is a bad inclusion in Amataz Forest lists.
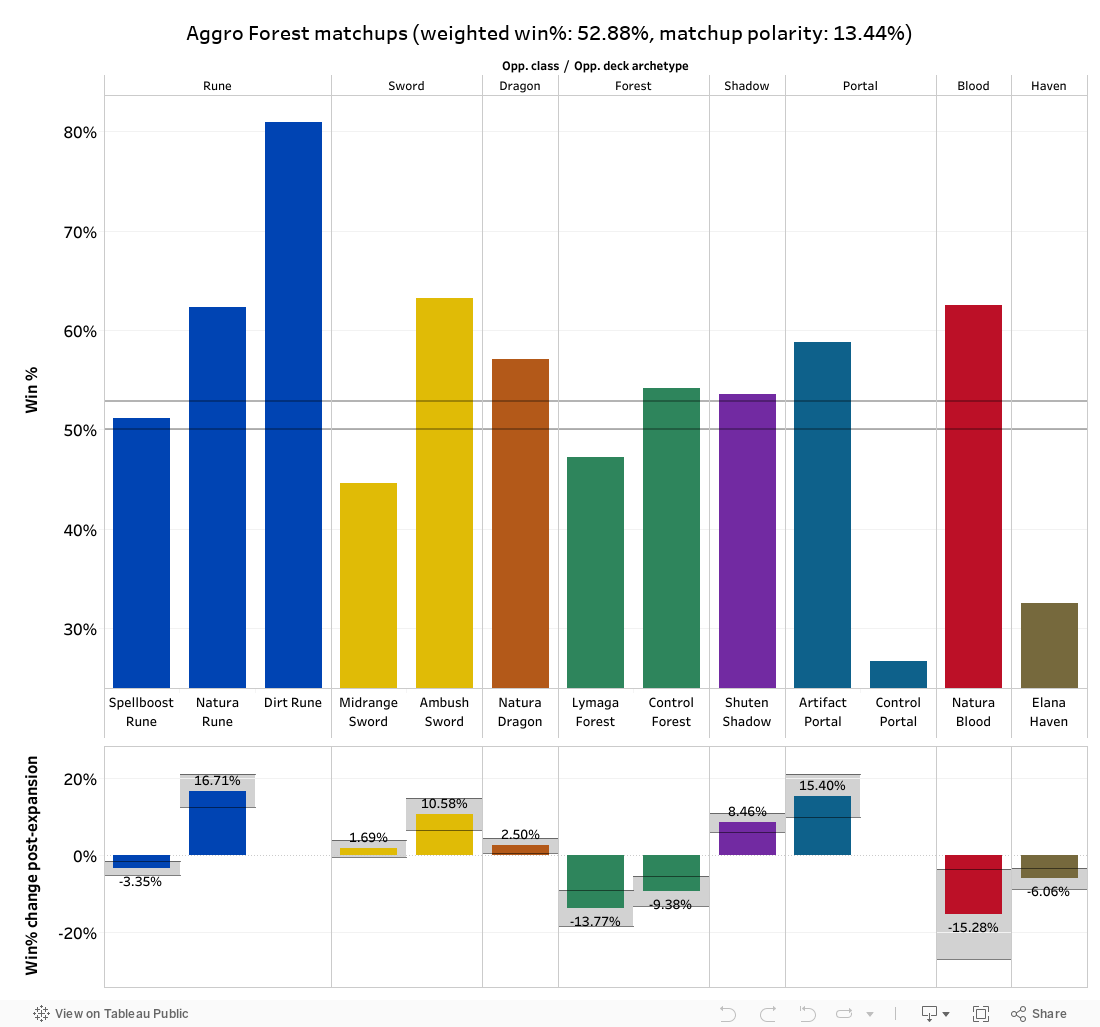
Amataz Forest is a fairly one-dimensional deck, it beats up slower reactive decks (Natura Dragon, Rune, etc.) and really dislikes playing against decks with a lot of Wards (e.g., Evolve Sword). Unlike a lot of the other aggressive decks in the format, Amataz Forest actually has a lot of low-cost interaction, between May, Barrage and even Fairy Dragon, and its primary “combo setup” involves putting down a 4/5 Ward, which makes it good at fighting other aggro decks (e.g., Leod Sword). The addition of Fairy Dragon makes the Shadow matchup significantly better for Forest, and skews the Control Forest matchup away from Amataz Forest (since Control Forest benefits from Wards a lot more than Amataz Forest does), although I do not think this matchup is as close to even as the limited ladder data would suggest, and it seems fairly draw-dependant, as Control Forest’s primary AoE effect (Whirlwind) doesn’t actually clear boards of Fairies. Amataz Forest is in a decent spot currently, but the high draw variance puts a damper on my enthusiasm in regard to the archetype: you’re playing a combo deck with 6 combo starters and more or less zero card draw, which can lead to some unsatisfying games. While it’s a great deck to recommend if you’re trying to beat up Rune and Dragon, I would still like to say that playing Amataz Forest in Rotation makes me a bit sad, in that I could be playing the Unlimited version of the archetype instead, which is a lot less reliant on drawing one of its enablers and can transition into its (turn 6) endgame in a much smoother fashion. Imagine knowing what a turn 7 looks like. This matchup section discussion is brought to you by the Unlimited gang.
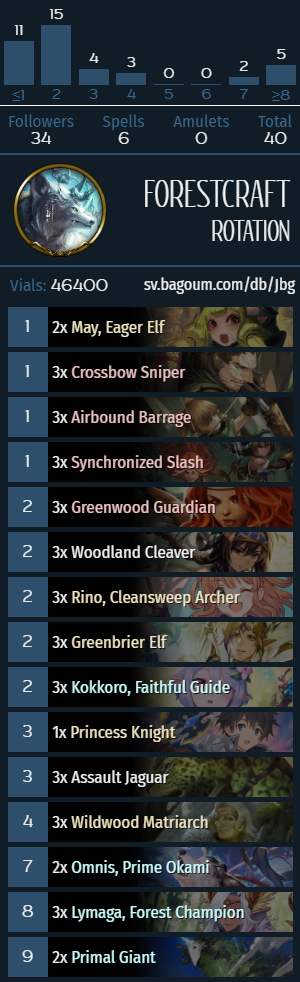
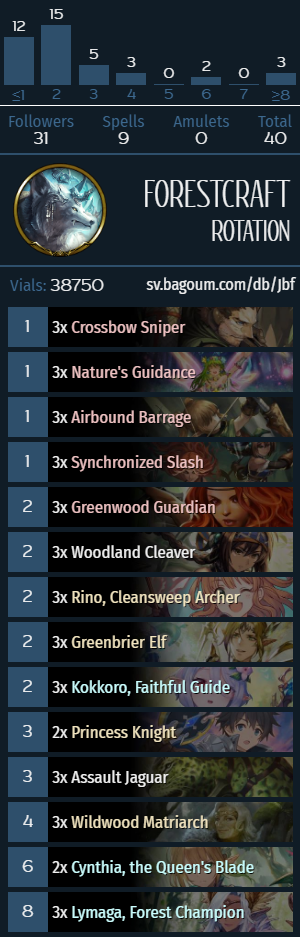
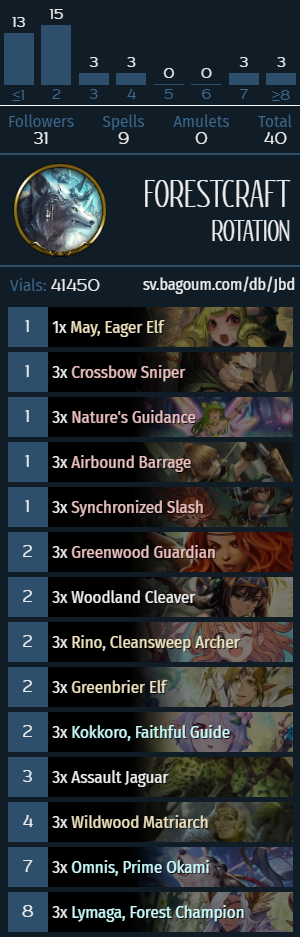
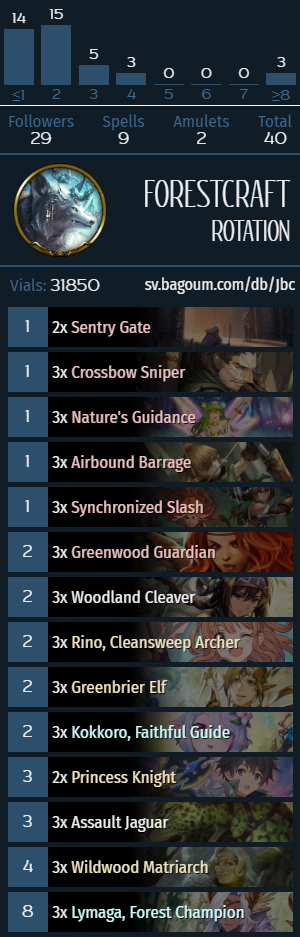
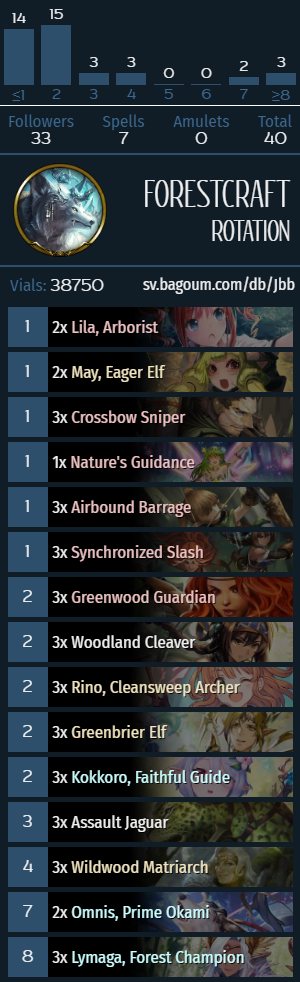
Lymaga (a.k.a. Greenwood, a.k.a. Jungle) Forest
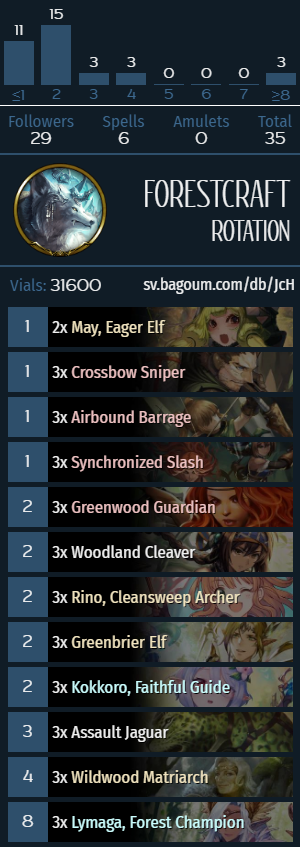
Identifying cards: Crossbow Sniper, Greenwood Guardian, Woodland Cleaver, Lymaga, Forest Champion, Greenbriar Elf, Assault Jaguar, Synchronized Slash, Wildwood Matriarch.
What does Lymaga Forest do?
Lymaga Forest is a midrange archetype that revolves around playing multiple Greenwood Guardians over the course of the game, which eventually invokes Lymaga, which in combination with Okami, Miracle of Love and Wildwood Matriarch can close out games. Six Union Burst cards, a Storm-based finisher and every generically good midrange card to fill out the gaps; those were the ingredients chosen to create the perfect midrange Forest deck, and Lymaga Forest is that deck. Having access to low-cost Union Burst cards in combination with bounce effects is a unique strength of Forest, and since Barrage/Nature’s Guidance already have synergy with the Greenwood Guardians themselves and cards like May (and even Okami) can bring a lot of value in slower matchups if you bounce a Lymaga or one of the Union Burst cards. The archetype, as should be evident from the joking tone in one of the previous sentences, is very similar to Shuten-Doji Shadow in terms of construction, but has a bit of a different flavor, with most of the Greenwood Guardian cards generating incremental tempo advantages, either by dealing damage, having Rush, or by being cheap enough to help invoke May.
The mini-expansion’s addition to Lymaga Forest is Greenbriar Elf, which is primarily just another Guardian-generating 2-drop in a deck that already effectively runs 12-15 2-drops of that nature, so the archetype is not particularly different from its pre-mini-expansion iterations, with the main difference being that the deck is a lot more consistent at invoking Lymaga on turn 7-8 and getting a good early- to mid-game curve.
Mulligan priority
- Always keep Crossbow Sniper, Woodland Guardian, Assault Jaguar and Matriarch.
- If you’re not keeping Sniper, keep Lymaga.
- If you’re not keeping a 2-drop (Woodland Guardian or Lymaga without a Sniper), keep Greenbriar Elf or Woodland Cleaver.
- Going first, keep Princess Knight if you’re not keeping Assault Jaguar. Going second, keeping both is fine.
Lymaga Forest mulligans are pretty punt-proof and mostly involve trying to curve out aggressively while generating Greenwood Guardian tokens. A lot of players seem to have a misconception of Lymaga Forest being a combo deck and playing it the way they would Roach Forest, trying to bounce Woodland Guardians in the early game with Barrage/Guidance to invoke Lymaga faster, but I’ve personally found this approach to be generally incorrect. While it can be fine to hit face for 2 with Guardian, bounce it with Airbound Barrage and replay it on turn 3 (to clear the opponent’s 2- or 3-drop), using Guidance on non-Union Burst cards is often poor value and doesn’t develop the board in a meaningful manner. When I was younger, a wise man once told me: “tempo = good”, and I have taken this piece of advice to heart and have been following it ever since. Having more stats in play than your opponent, pushing face damage and getting value trades are what Lymaga Forest is all about, and the deck has enough comeback mechanics to recover from the opponent’s tempo swing turns. Please, stop playing vanilla 2-drops on turn 3 and bouncing them to your hand with Nature’s Guidance, it’s painful to look at.

Optional inclusions and tech cards
- Nature’s Guidance is a tech card that helps in slower midrange matchups like Shadow/Sword/Haven, since it allows to bounce either Rino or Kokkoro and reuse their Union Burst effects (or even just plain card draw, in the case of Kokkoro). This is a bit of an unpopular opinion based on the common builds of the archetype, but I personally believe that Guidance is aggressively terrible and too slow for most Lymaga Forest lists. The card has other fringe synergy, like being able to bounce Woodland Cleaver and May for extra board control and value, but I personally believe that Barrage and Okami are more than enough value for those purposes. I have also already expressed my opinion on bouncing Greenwood Guardians to complete the “Lymaga quest” faster, so I’m not going to comment on it any further.
- Princess Knight is a flexible addition to the archetype that helps provide value in slower matchups like Sword/Shadow, and also opens up unique lines of play when going second. Lymaga Forest is about the only Forest deck that PK fits in particularly well, and this makes sense as the deck doesn’t have a lot of 3-drops, doesn’t run a lot of “bad” Fanfare cards (the only bad draw being May) and benefits from having the UB cards come online earlier. As with most reactive UB cards, if you’re going second and have a PK and a Rino in hand, it’s usually correct to save PK for the evolve turn so that you can Rino on turn 6, however, even if you only have a Kokkoro, having it with a lower UB count is also pretty valuable, since you can often playing a couple of Guardians, then buff them with UB Kokkoro, effectively generating a board of a few 4/4s, healing and refilling your hand, and also potentially setting up for an Okami follow-up. This works particularly well on turns that you invoke Lymaga, as the 4/4s get Ward, and your Lymaga gets to attack for 6, which provides a lot of pressure. In addition to that, since the deck incidentally runs a lot of 2-drops due to its underlying strategy, a evolving PK on turn 4 is also a reasonably smooth curve, since you can either play a Guardian, or even play a 1-drop with SynchroSlash as follow-up. I personally believe that Princess Knight is a very good addition to the archetype and adds a lot of consistency to the deck, so 2-3 copies of PK seem necessary if you want to have a good shot at beating other midrange decks.
- Omnis, Prime Okami is a potential inclusion in the archetype that puts a lot of pressure on other midrange decks when played. Usually, you don’t get to invoke Lymaga on turn 7 without a good draw, but when you do, Okami is a potent tempo play, since you get to later reshuffle Lymaga into your deck for another activation. More often than that, however, Lymaga gets invoked at the start of turn 8, so if you save a 1-drop (May/Sniper), you can get the “full value” Okami, which is usually not as strong of a tempo play as a turn 8 Courtly Dance into Kagemitsu, but still nets you 5-9 face damage, so you can’t really complain too much. Some players cut Okami altogether in favor of Cynthia and whatnot, however, in my testing, I’ve found Okami to be a critical card against Shadow and Sword, while Cynthia really underperformed, so I would personally recommend running at least 2 copies of Okami, maybe even 3 if the field you’re facing is primarily dominated by midrange decks.
- Primal Giant is a tech card against Rune/Dragon that also helps against Shadow. Broadly speaking, bouncing Kokkoro can provide a fair bit of healing in longer games, however, against Spellboost Rune specifically, being able to heal 4 for 1 mana during your May turn can negate some of the damage from Zealots/Clarke/etc., and allow you to stabilize and get to the later stages of the game. The first Lymaga usually gets invoked around turns 7-8, so the archetype can close out games around turn 9, and being able to get to that point against either a highroll-y Rune opening or an early Valdain can make the difference between winning and losing games where your opponent draws well. In my opinion, running 1-2xPrimal Giant is reasonable if you want a better shot at beating Rune/Dragon.
- Clash of Heroes is an optional inclusion that helps against decks that can Ward up against the Lymaga setup. I’ve personally found that Clash is a dead draw too often, so I don’t think it’s a necessary inclusion, but running it as a 1-of can get a good amount of value with Storm followers like Lymaga/Okami/Matriarch. Trading with Storm cards is a cardinal sin, of course, but if you can both attack your opponent’s face and still get a trade, that is some very good tempo.
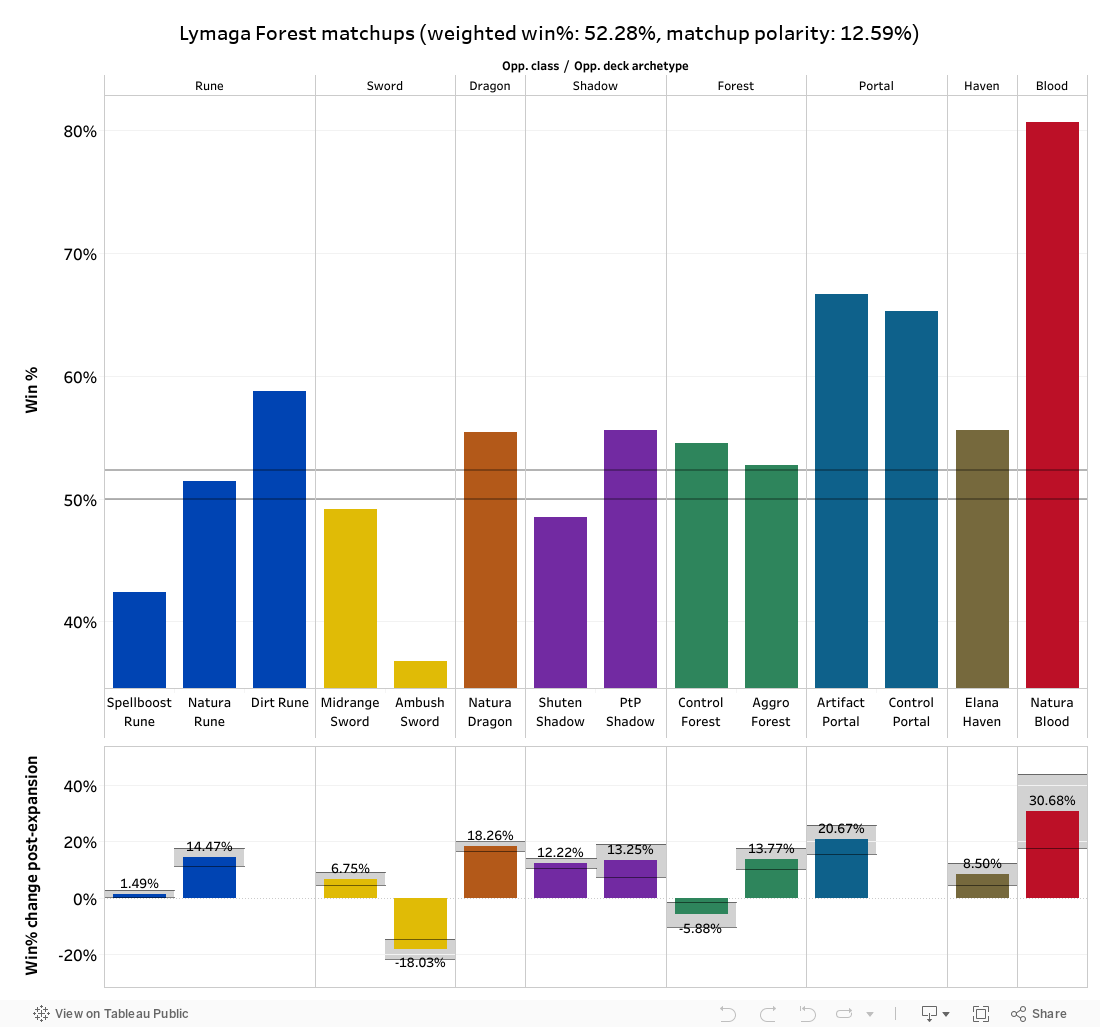
Lymaga Forest has a pretty consistent, if not particularly exciting matchup spread. The archetype is about even against Midrange Sword, mildly favored against Dragon and Control Forest, moderately unfavored against Spellboost Rune, Shuten Shadow and Amataz Forest. The deck seems to be struggling against Leod Sword, which it can’t interact with the way Control Forest can (activating double May is difficult with the deck’s high curve). Lymaga Forest is a real thinking man’s deck, as its strongest points are its consistent curve and pressure, which put it in a similar category of decks as Shuten Shadow and Evolve Sword: it’s not as flashy as Sword and it doesn’t have as much healing or card selection as Shadow, but you very rarely end your turn with more than 1 mana open, and you don’t rely on drawing a particular enabler (e.g., Shuten-Doji) to have a finisher or any card advantage. On paper, Control Forest is a better Forest deck if you’re trying to beat midrange decks, but Lymaga Forest has a faster learning curve than Control Forest and (despite my sarcasm) still has a lot of interesting decision making: you have to keep track of your Guardian count and the opponent’s threats and plan out your turns accordingly, so while the archetype may appear simple on the surface, it’s honestly a good entry point to midrange decks of the format and I would consider it to be about on par with Shuten Shadow in terms of its competitive potential. Sharing a class slot with 2 of the more prevalent tournament decks means that Lymaga Forest is not very likely to see a lot of tournament play, but if you’re looking to pick up a midrange deck that is stress-free and you do not have access to 18 Sword legendaries for some reason, Lymaga Forest is a deck I would personally recommend.

[ps2id id=’sword’/]
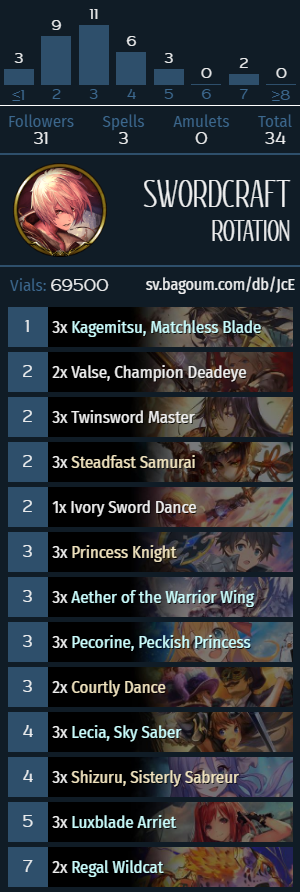
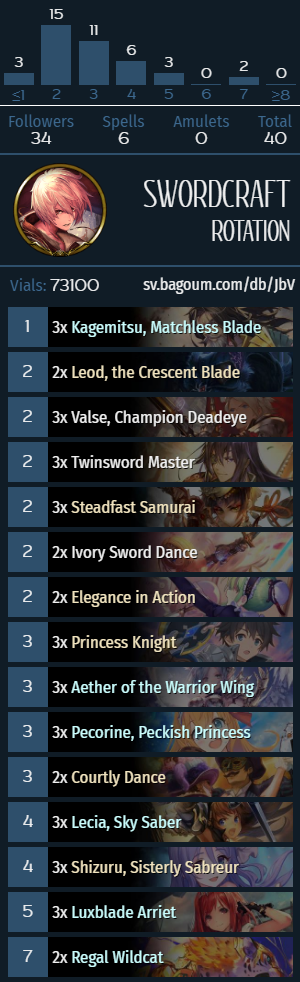
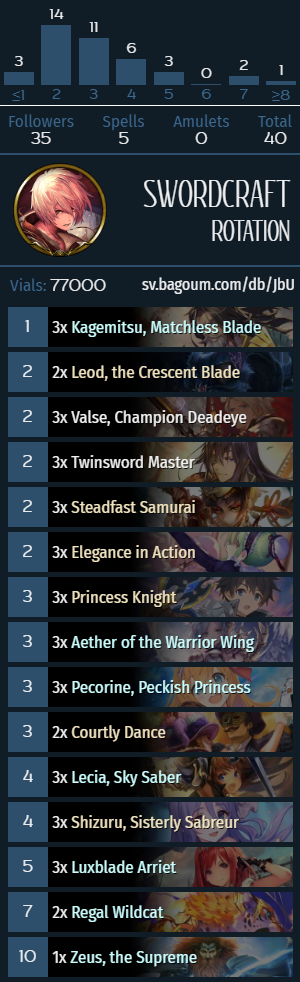
Evolve (Midrange) Sword
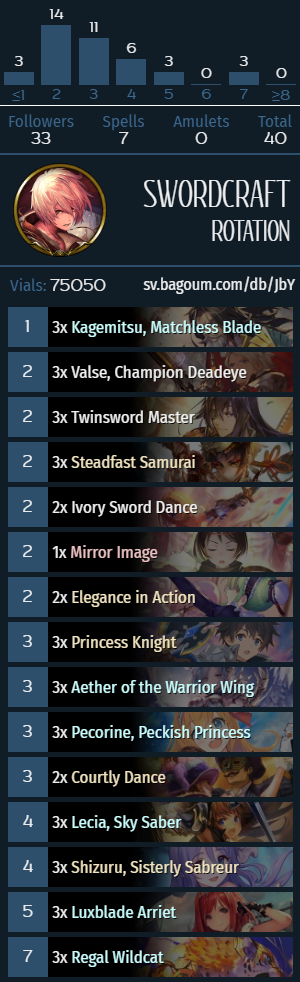
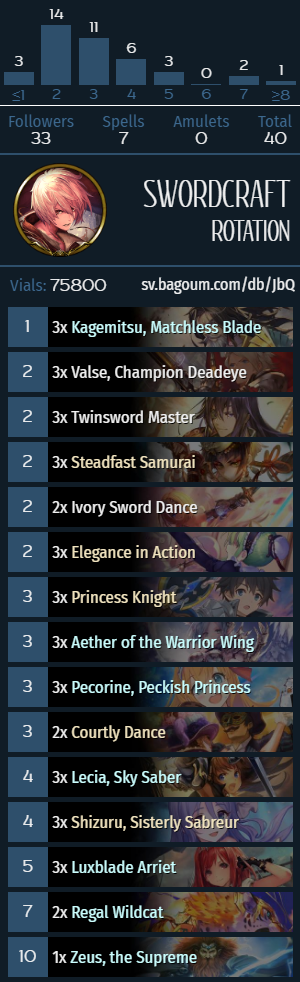
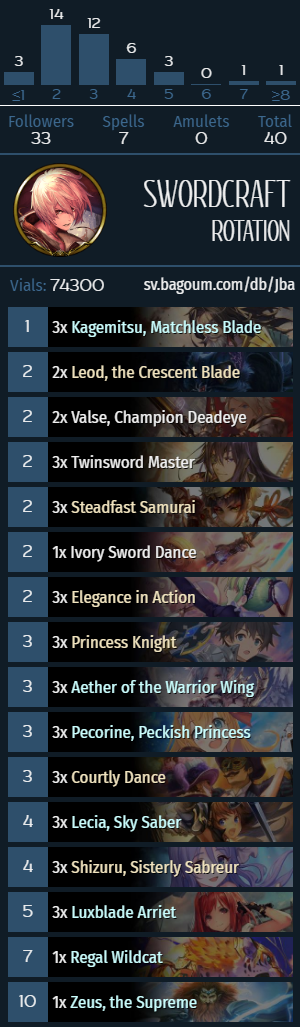
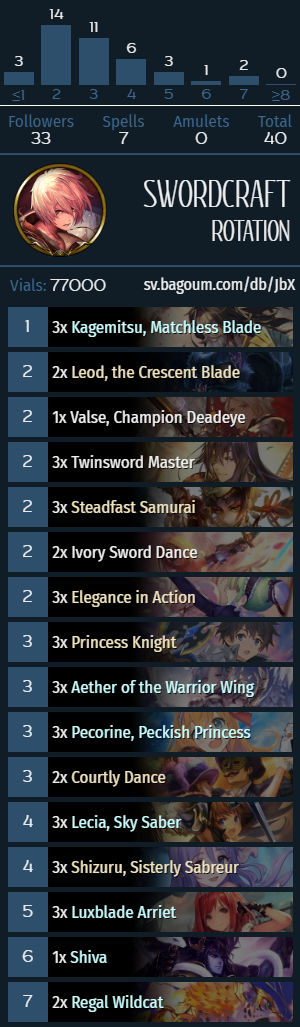
Identifying cards: Kagemitsu, Matchless Blade, Steadfast Samurai, Twinsword Master, Lecia, Sky Saber, Regal Wildcat.
What does Evolve Sword do?
Evolve Sword is a midrange deck that runs a variety of Sword-specific Evolve synergy with cards such as Kagemitsu/Twinsword Master/Steadfast Samurai/Lecia/Arriet, as well as 6 Union Burst cards (Pecorine and Shizuru). The primary win condition the archetype involves getting Regal Wildcat active, which can then be used with either Kagemitsu (where you play Kagemitsu on a preceding turn), which does a variable amount of damage (usually, around ~15-ish total damage, but can scale up to 20 in longer games), Twinsword Master (where you save an evolve point, and then Twinsword Master into Wildcat on turn 9 for 14 damage), as well as a variety of other miscellaneous setups (e.g., with QB, Leod, Arriet, and Union Burst Pecorine on turn 10). The secondary win condition of the archetype involves resolving a turn 8 Courtly Dance, which is usually sufficient to enable card draw from Arriet on the following turn, which can either curve into Arriet+Wildcat for 10 damage, or simply generate enough value to run the opponent out of threats or generate a big enough tempo swing. In addition to that, the deck has a fair bit of incidental chip damage between Leod, Quickblader, Steadfast Samurai and Union Burst Shizuru, which can get the opponent low enough for most of the used lethal setups. Evolve Sword is a fairly straightforward deck that is heavily telegraphed in terms of its win condition (since it requires at least 10 dead followers to activate Regal Wildcat, and in the sense that having an evolve up or setting up a Kagemitsu informs the more savvy opponents of what you’re trying do do), but even with that, you can often force the opponent’s hand and “make them have it”, which makes Evolve Sword a bit more interactive than one would be led to believe at first glance.
Evolve Sword is an archetype that has made it out of the mini-expansion like a bandit: Princess Knight enables a lot of the deck’s high-end cards a few turns earlier (some of said high-end has synergy with one another, e.g., if you can evolve Shizuru for free with its UB ability, you’re also getting your other Union Burst cards lower and getting closer to Arriet thresholds); Arriet, at its worst, is a 2-mana 4/5 Ward, can turn into a 2-mana Curate after a small investment, and sometimes even draws up to 7 cards; Courtly Dance is a pseudo-finisher in decks that cut Quickbladers: it doesn’t quite end the game on the spot, but it generates a ton of reactive tempo and sets up for so much value that other midrange decks can struggle to come back from it.
Mulligan priority
- Always keep Leod, Aether and Princess Knight.
- If you’re not keeping Leod, keep a proactive 2-drop, this can include Valse/Elegance in Action, in order of priority. Twinsword Master and Steadfast Samurai are not 2-drops that are good to keep.
- Going first, keep Regal Wildcat or Cybercannoneer as a 4-drop.
- Going second against non-Shadow decks, keep Shizuru.
- Going second against Sword/Shadow, keep Kagemitsu if you’re not keeping Aether or PK.


Evolve Sword mulligans involve trying to curve out in the early game and hitting your card draw. The best proactive 2-drop in Sword is generally Leod, but Leod, vanilla 2-drops and Elegance in Action are passable plays as well. Of the vanilla 2-drops, Twinsword Master has the most value in the midgame since it’s pretty trivial to enable, so it’s often preferable to save it for later and not play it out on turn 2. Steadfast Samurai is not a good 2-drop most of the time, in a similar fashion to Twinsword Master. Sword has no actual 4-drops that can be played on a neutral board state, so Regal Wildcat (or Cybercannoneer) are the best proactive options, which also happen to set up for Wildcat in the future. Shizuru is always active when evolved on turn 4 (since your opponent doesn’t have any evolve points at that point), so it’s a great tempo play, however, the 5/7 body lines up poorly against evolved Shuten-Doji, so it’s not that great against Shadow. Kagemitsu is a good reactive 3-drop, since it sets up for a turn 4 tempo swing and starts to discount your UB cards and enable evolve synergies, however, I don’t think it’s correct to keep it going first, as your opponent isn’t always going to have a 2-drop that you can interact with (e.g., with Leod), or if they miss their 2-drop or play a removal spell on 2, the Kagemitsu keep can look a little silly. It may seem odd to snap keep two different 3-drops, but since Aether actually sets up for a better Princess Knight (since it has a 50% change of pulling Shizuru), so Aether into PK is a fine 3-4 curve when going second, and when going first, you can always just save Princess Knight for turn 5 if you have a Pecorine in hand, but it’s also fine to just cycle it on 4, even if you’re playing a little off-curve. The Cybercannoneer mention is a bit outdated for the current iteration of the archetype, but if I’m still running the card for some reason, I would still snap keep the hell out of a Cybercannoneer going first. That card is gas, fight me. You won’t.
Optional inclusions and tech cards
- The main difference between a lot of Evolve Sword lists is the 2-drop slot. Evolve Sword has so many good top-end cards that the only way to get all of that sweet juicy value is to trim some of the 2-drops to make enough room. For that reason, using the amazing capabilities of HTML nested lists, let’s discuss the differences between the various 2-drop options in Evolve Sword. We sure have come a long way since 1991.
- Twinsword Master evolves for free and slaps up to 2 followers for 3 damage. The card also has a 14-damage Wildcat setup. Twinsword is the last 2-drop that I would consider cutting, as it’s the best Lecia enabler, can accelerate evolve synergies with Pecorine/Leod and can even work as part of your win condition.
- Valse is the second best Lecia enabler, and particularly shines against other midrange decks with its Enhance and Evolve abilities. For most midrange decks in the Rotation format, it’s difficult to generate a board state that doesn’t get cleared by a turn 6 Valse, so I would personally consider cutting Valse extremely greedy and not something I’d recommend. You can get away with playing 2 copies, if you play other removal effects, but Valse is still a very good Sword card.
- Steadfast Samurai is a good card in lists that don’t run Quickblader, as Sword doesn’t have a lot of good turn 5 plays when behind without Lecia into QB. Samurai is not that great as a 5-drop either and it’s mediocre against Shadow in particular due to how Bane and Clash priority work (if 2 followers with Clash effects bump into one another, the active player gets their Clash trigger first, so Ceres attacking into Steadfast Samurai clears it for free), however, it’s usually a passable play since your opponent has to deal with it on their turn, and you’re still getting a “free” evolve, as well as an occasional value trade or 3 face damage. In addition to that, it’s another officer to activate Lecia, which can even push some face damage. The damage prevention effect can also be moderately relevant against Dragon, since it can prevent Valdain damage (if it doesn’t get removed) and a lot of Inori setups (since Inori damage goes from the oldest summoned followers to newest, if it’s your right-most follower, all prior ticks will not deal damage to your face). Steadfast Samurai is pretty bad against Rune and Control Forest, but the ability to push face damage and enable a lot of incidental synergies makes it a frequent 2-3-of in most Evolve lists.
- Leod is arguably the best proactive 2-drop in Evolve Sword. In and of itself, it doesn’t do a whole lot, but when evolved, Leod can push a fair bit of face damage without any help, and better yet, you can save the Assassin for either a Lecia activation (which is a little awkward since it loses Ambush if you attack, or you lose the Bane token if you don’t, but it’s better than nothing) or to give UB Pecorine Ambush after it gets a value trade, both of which can potentially represent a lot of face damage on the following turn. Leod is bad against Forest/Portal and is pretty cuttable if you’re playing a slower list that doesn’t benefit much from getting in for early face damage, but is a fixture in more aggressive variants of the deck.
- Elegance in Action isn’t technically just a 2-drop, but it is a passable play on turn 2. The primary function of Elegance is reloading against other midrange decks with its Enhance effect, and the card particularly shines in decks with a low number of Spells, since if you’re running it in a list with 9 spells, you have a ~20% probability of getting the 3 damage out of it (which can be good, but also fizzles Lecia and is a bad play on turn 2 going first), and you have a ~50% probability of getting 2 followers and 1 damage effect out of its Enhance effect, which is preferrable against some board states (e.g., against Ceres), but can be bad proactively. The argument is somewhat unclear, as 3 random damage is technically a better deal than a 1/2, but the random aspect of the card is its main downside, so some faster Sword lists can cut Elegance altogether, but a lot of players still run 2-3 copies to have it as a reload option. I personally really dislike Elegance and I don’t think you need a full playset that most players default to.
- Ivory Sword Dance is a reactive flex slot that helps against Shadow and proactive Forest decks. The main application of ISD is clearing wide early- to midgame boards, and the card works particularly well with Princess Knight (evolving PK on turn 4 leaves you with just enough mana for ISD, so it’s a good play if you’re getting overwhelmed by early pressure), as well as UB Pecorine and secondary Kagemitsu in the late game. ISD can be awkward if your opponent develops primarily defensively-statted followers (e.g., Spellboost Rune), or doesn’t play followers proactively (e.g., Control Forest and Natura Dragon), but it’s still one of the few early comeback mechanics you can utilize. For that reason, I believe that at least 1-2 copies of ISD are necessary to include, but you can get away with fewer copies in a faster list.
- Courtly Dance is a near-ubiquitous inclusion in Evolve Sword and serves as a secondary win condition of the archetype. Resolving Dance on turn 8 adds 3 evolves to the “Arriet quest” and in a list with no Quickbladers, generates a lot of immediate tempo since it pulls a Kagemitsu from your deck, which usually has 8-9 power by that point in the game. Playing Courtly Dance on turn 3 is not ideal, as you’re always pulling a Kagemitsu (one of your evolve enablers) and some of your 2-drops are also evolve enablers (e.g., Twinsword Master or Samurai). Quickblader lists can be a lot more lenient with a turn 3 Dance, but then the card can also be a lot weaker on turn 8 as well. A lot of players default to running 3xCourtly Dance, which I personally believe to be incorrect for most matchups, as it’s not a card that you want in every single matchup and even when it’s good, you usually don’t get to resolve more than 1 copy in a game, so I believe that running 2 copies is more than sufficient.
- Regal Wildcat is the actual finisher of the archetype, which can be utilized with a variety of followers to close out games. Generally, Wildcat is a fine proactive play on 4 and feeds into itself, so running 3 copies is usually fine, however, there is an argument to be made about cutting the third Wildcat, which makes it so that your Aether in the late game has better odds of drawing Arriet, e.g., if you’re going first and have kept a Wildcat in your opening, if you draw double Aether (or an Aether and a Wildcat) after turn 6, then the only target for Aether is going to be Arriet, which is the most expensive Sword follower in your deck at that point. The split between Courtly Dance and Wildcat depends on how much late-game value you actually need, and I personally really dislike lists that run fewer copies of Dance than Wildcat: either 2/2 or 2/3 splits between Dance/Wildcat make sense, but 3/1 and 3/2 are simply too greedy with how popular Rune is currently. Getting all of that Arriet value is sweet, but it’s important to understand that not all Sword games last to turn 9, and Wildcat is a way lesser brick than Dance in the early game, since Sword has 9 proactive 3-drops, but only up to 3 good 4-drops (since Shizuru only works going second), so Wildcat is more versatile and covers up a weak spot in your curve.
- Quickblader is a card that improves the deck’s midgame by allowing you to activate Lecia on turn 5 without wasting a Kagemitsu. The card interacts unfavorably with Courtly Dance, so most lists have stopped running QB after the mini-expansion, but it’s a fine potential inclusion if you want your deck to be a little more proactive.
- Zeus is an optional inclusion that helps in the Sword mirror and against Shadow, but is a dead draw against Forest, Dragon and Rune. Zeus is effectively an extra copy of Wildcat for most intents and purposes, however, having 2xWildcats and 1xZeus doesn’t have the same downsides that running 3xWildcat does (as in, you still draw Arriet more often from Aether), so if you’re trying to grind out midrange mirrors, a 1-of Zeus is a fine replacement for the third Wildcat. Running more than 1 copy of Zeus is somewhat unwise, as most Sword games don’t last to turn 10, and due to the card’s random nature, it can cause some tilting scenarios when you don’t roll the right keywords or healing, so it can whiff after 10 turns of setup, which isn’t great. While the opportunity cost of having a 1-of Zeus is not that high, it doesn’t necessarily improve your percentages in a lot of matchups, so it’s not a card I would consider really necessary. For more information on Zeus RNG and the likelihood of its outcomes, I would recommend looking at the Addendum section.
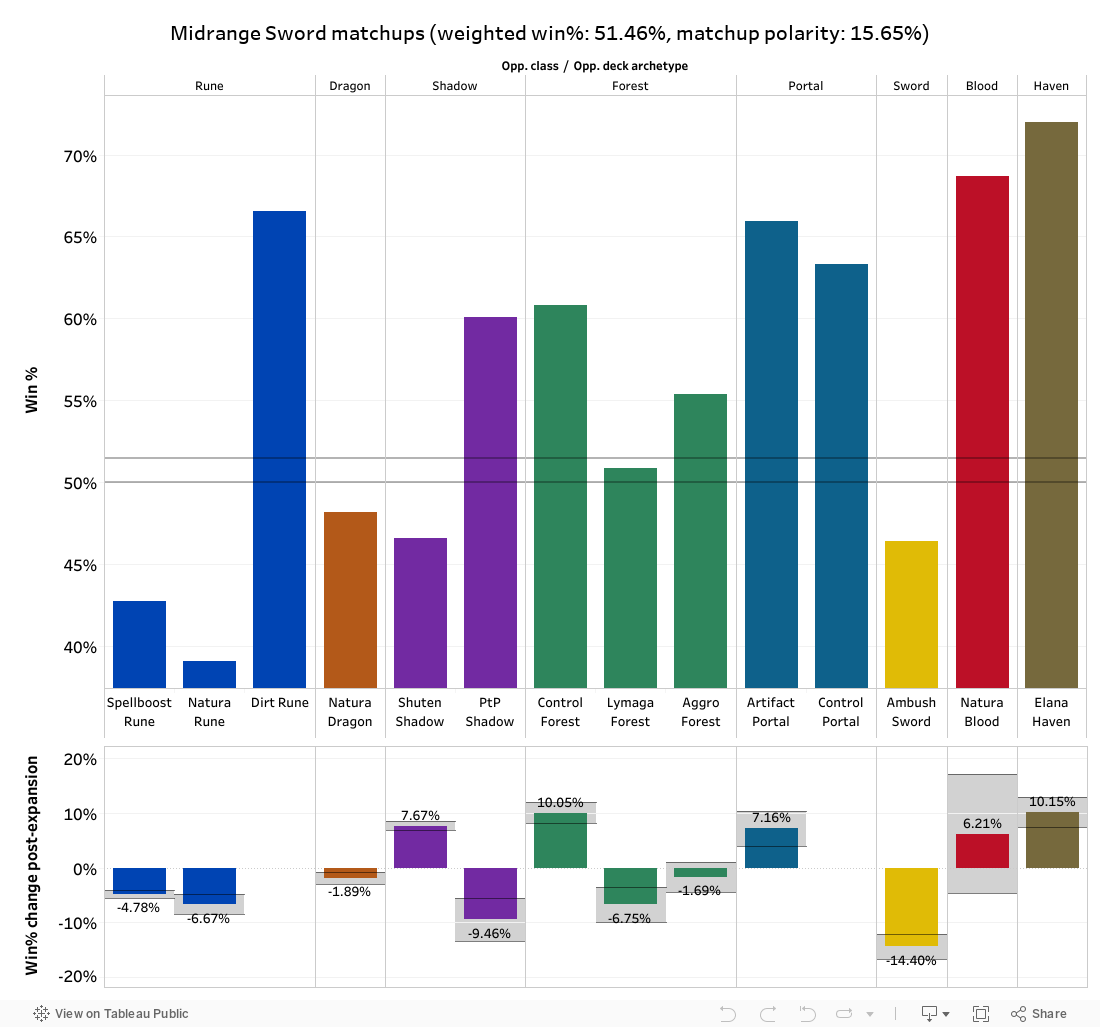
Midrange Sword is currently the most popular midrange deck in the Rotation format, some of which may be attributed to recency bias, of course (people want to play the new flashy thing), but the archetype is still fairly competitive: it’s mildly unfavored against Rune and Shuten Shadow and is even to moderately favored against most other decks in the format. The archetype has shown underwhelming results in tournament play, which is primarily dominated by Rune, Dragon and Control Forest, however, the amount of random janky decks that can get beat up by playing beefy Union Burst cards is a lot higher on ladder, so Evolve Sword gets treated a lot better in that environment. Evolve Sword is in a similar spot to Shuten Shadow: it’s proactive and decently consistent, but occasionally gets hosed by hitting its bad matchups, though it’s important to understand that these so called “bad matchups” of midrange decks are different from bad matchups of combo and tempo decks, so even at its worst, the archetype is still somewhere in the 40/60 range even against its supposed “counters”. Evolve Sword is a great deck to pick up if you’re looking to be competitive on ladder, although there might be better choices to consider for tournament play (such as Leod Sword).
Addendum: Zeus 2, Electric Boogaloo
A few months ago, when Evolve-based decks with Zeus, such as Evolve Blood, Forest, Haven, Shadow, Ginger Rune, and (probably) some other decks that my senile old man brain is struggling to remember at this point, I have created an interactive chart for Zeus probability distributions, that could go up to 10 possible evolve points, and was basically a sum of multinomial probability distributions for each of the rolls (where the damage is weighed as 0 for two of the multinomial probability distributions, and as 1, 2 and 3 for the remaining three, respectively). The extra damage is added to 5 (Zeus‘s base power) and multiplied by 0 if it doesn’t roll Storm as one of its keywords. This approach is exact, but not particularly efficient, so in order to expand it to a higher number of trials, I had to write a C++ script that would fill out the used spreadsheet for the 142506 total combinations, since I have decided to expand it to 25 trials. Certainly, 30 would be a prettier number, but going from 25 to 30 increases the total number of combinations to 324632, and a twofold increase in source data for the highly impractical case of evolving more than 25 times in a game isn’t very applicable in actual games of Shadowverse.
The updated interactive chart can be seen below, and the number of evolves can be adjusted using the slider in the top right corner, with the probability distributions (hopefully) being self-explanatory. The best way to use this chart is to set the number of evolves, then look at the cumulative probability chart that shows the probability of getting X or less damage and looking at the probability equal to your opponent’s health total and subtracting 1. For example, if you evolved 12 followers over the course of the game, your opponent is at 20 health and you have an evolve point (so they’re effectively at 18), the probability of whiffing with Zeus is 35.64%, which means that the probability of dealing enough damage is 1-P = 64.36%. The table below is a cheat sheet for the cases of at least 18 and 20 damage.
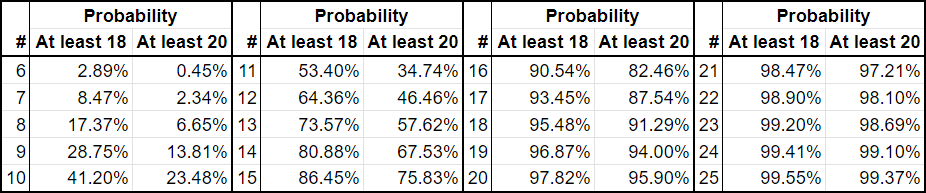
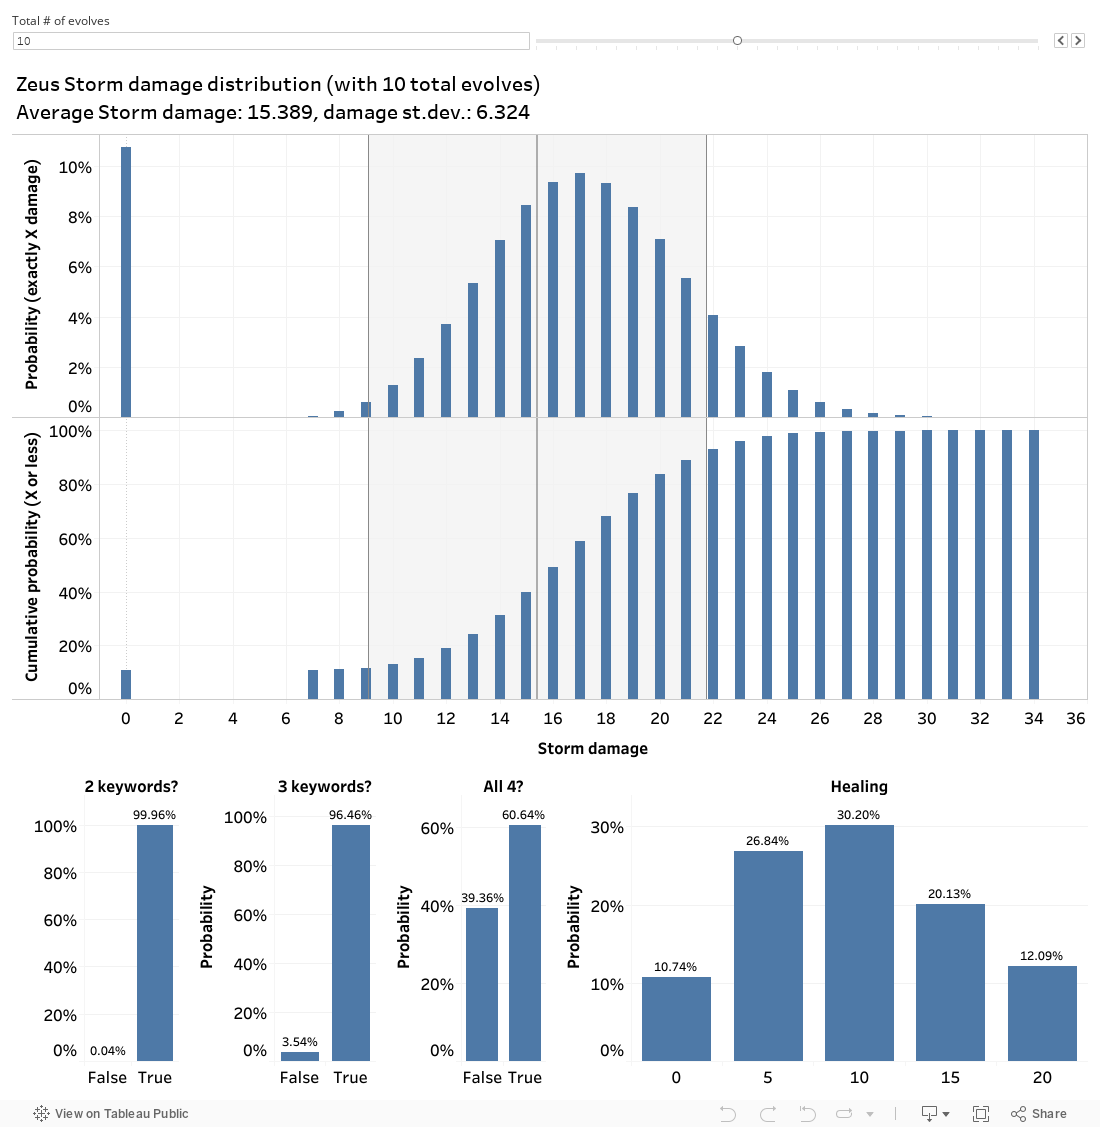
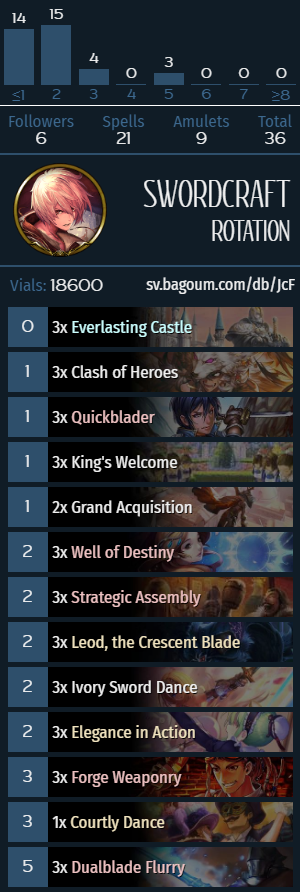
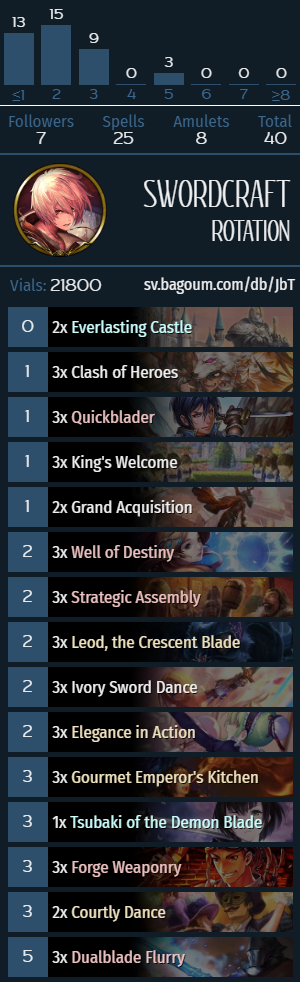

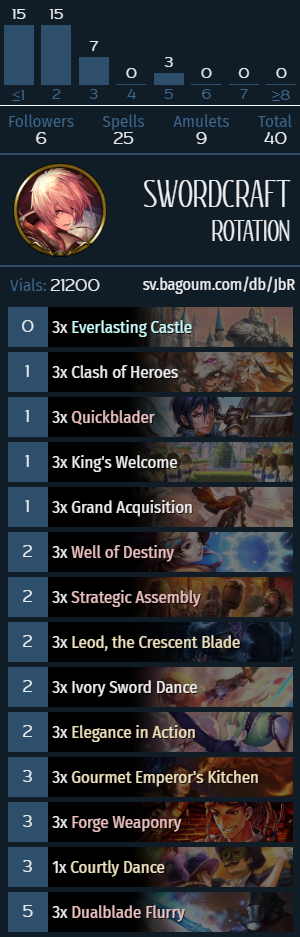
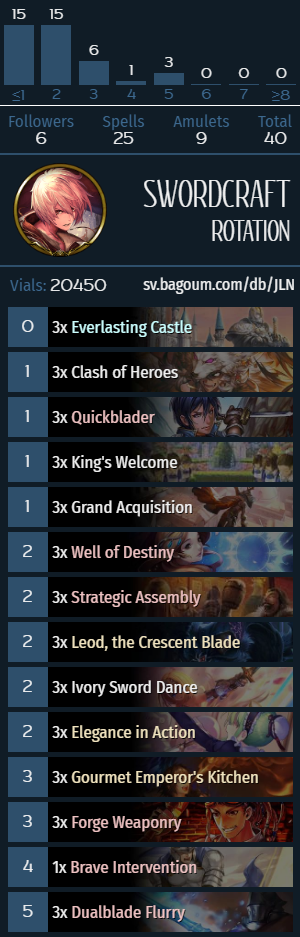


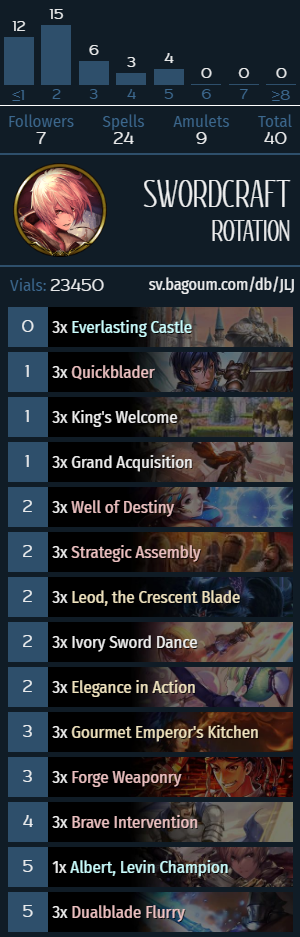
Ambush (a.k.a. Leod) Sword
Identifying cards: Everlasting Castle, Clash of Heroes, Grand Acquisition, Well of Destiny, Strategic Assembly, Forge Weaponry, Brave Intervention.
What does Leod Sword do?
Ambush (Leod) Sword is an aggressive combo deck that revolves around stacking buffs on its eponymous card, Leod, and closing out games in multiple attacks, either over the course of multiple turns, using Assassin token to prevent your opponent from interacting with Leod, or Dualblade Flurry to double up the Leod damage.
After the rotation, Leod Sword has lost some of its old toys, namely, some of the damage buffs (Craving’s Splendor and Sgathaich) have rotated out, so the deck has more demand for Amulet-based buffs (e.g., Well of Destiny/ Strategic Assembly), and some of the removal spells (primarily Usurping Spineblade, but Jiraiya is also a card) are gone, which makes cards like Clash of Heroes and Gourmet Emperor’s Kitchen a lot more prominent.
Mulligan priority
- Always keep King’s Welcome, Everlasting Castle and Leod. The priority is Castle/Leod/Welcome.
- If you’re not keeping Leod or Castle, keep Courtly Dance.
- If you don’t have a Leod or any of the tutor effects, mulligan away all 3 cards.
- Keep Well/Assembly with Courtly Dance.
- If you have a Leod/Castle/Welcome, keep early-game buff cards (Well of Destiny/Grand Acquisition/Strategic Assembly/Forge Weaponry, in order of priority).
- If you’re already keeping a Leod or a tutor effect, as well as one of the early-game buff effects, also keep Ivory Sword Dance.
- If you’re keeping Leod/Castle (and not King’s Welcome), keep Quickblader.
- Keep Elegance in Action against Sword/Shadow (if you’re already keeping a Leod).
Leod Sword mulligans are fairly consistent with previous iterations of the deck and generally involve trying to have Leod on curve using one of its 6 tutors effects. If you have a Leod, the rest of the early game plays is generally dedicated to establishing ongoing buffs (the earlier they come down, the better), followed in priority by 1-time buffs. Elegance in Action more or less always does 3 random damage and draws you a card, which is a solid rate even for an aggressive deck, and has the fringe synergy of being able to clear the opponent’s Leod in mirror matchess (not necessarily a Leod Sword mirror, since most Sword decks play a playset of Leods). Grand Acquisition is technically the least mana-efficient buff in the deck, however, since the cost can be split between multiple turns, it’s quite good at filling out your curve whenever you have 1 mana open, so it’s fairly efficient with a 2-cost card on turn 3. The first Courtly Dance of the game is usually great tempo, but if you’re already losing tempo on turn 2 by playing out a Leod, following it up with Dance on turn 3 can be awkward, as sandbagging two turns in a row is inadvisable in most matchups. Turn 2 Amulets, on the other hand, curve nicely into Dance, and are an efficient use of mana even if you do technically miss out on a proc of Assembly.
Optional inclusions and tech cards
- Courtly Dance is a recent addition to Leod Sword, that has largely eclipsed Brave Intervention, and consistently hits its only targets in the deck, Leod and a Quickblader. Unlike other Leod tutors, Dance also thins your deck by removing 1 bad card from it, which does not make a huge difference in an aggressive deck with effectively zero non-tutor card draw, but it does mean that you have a slightly higher chance of hitting key cards like Dualblade Flurry, for example, which isn’t nothing. From a mana efficiency standpoint, odd-costed cards are generally worse than even-costed cards, so some lists still run 1-2x Intervention with 2xDance, but running a full playset is a lot more common. Having a full playset of Dance also means that you can trim one of the Everlasting Castles (which becomes more awkward to utilize with multiple 3-drops added to the deck).
- Dionne and Gourmet Emperor’s Kitchen are optional inclusions that improve midrange matchups. Generally speaking, Kitchen has more value and can generate a bit of chip damage when going second, while Dionne is more flexible since it costs less, but the 2 cards are mostly up to player preference and are in contention for the remaining 2-3 card slots. Leod Sword is a deck that has an extremely one-dimensional game plan, so it’s difficult to trim cards from the archetype, and the restrictive deckbulding requirements mean that the only tech cards available to the archetype are Spells and Amulets, which are, frankly, quite lacking after rotation.
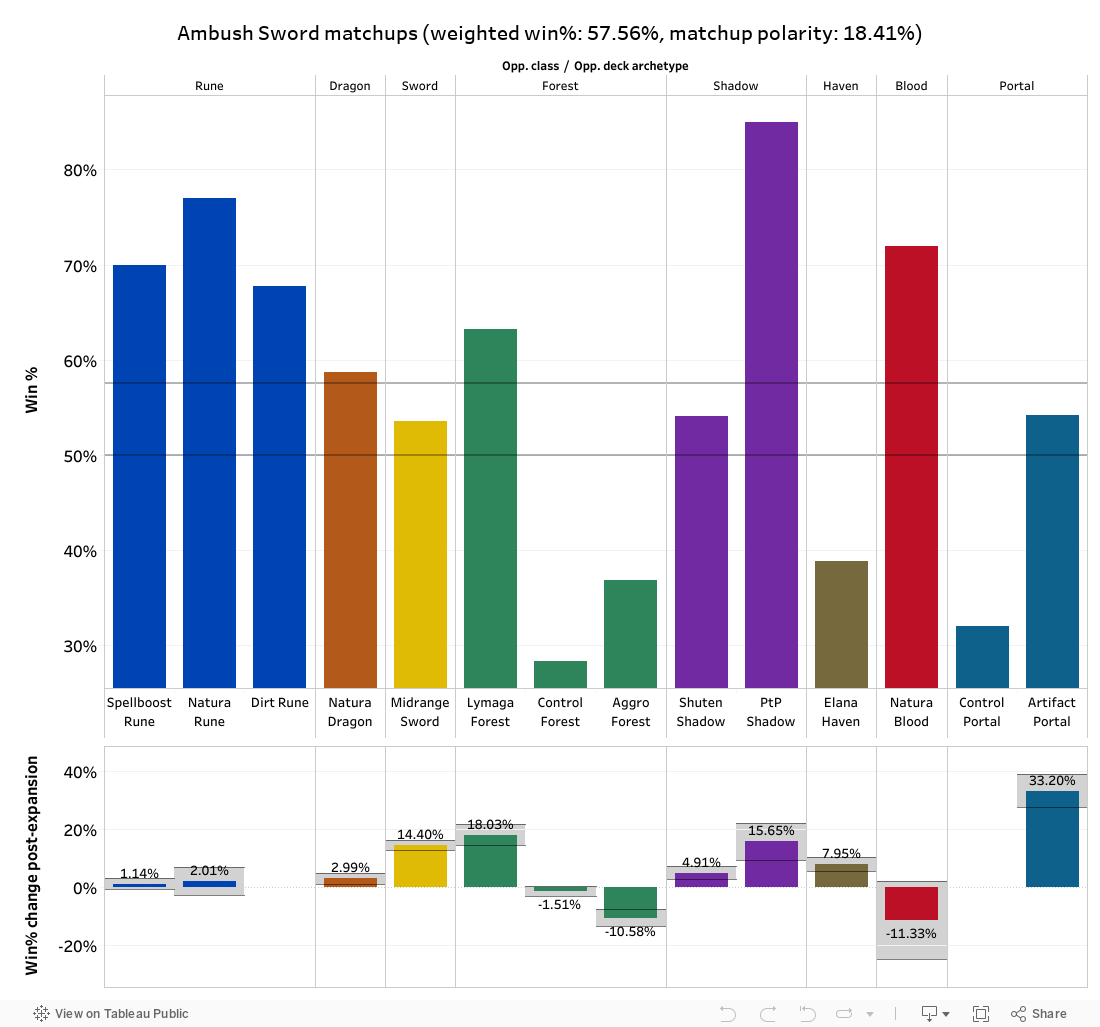
Leod Sword is one of the most polarized decks of the Rotation format, which, coupled with its ability to prey on slow reactive decks like Dragon/Rune, makes it one of the best-performing decks in terms of both ladder winrates and tournament results. The archetype struggles against Control Forest (since May and Whirlwind can easily clear all of your Leods, after which point most of your deck can’t really function), Amataz Forest (which is a similar, albeit faster aggro deck, that also incidentally runs May, so if the game lasts to turn 6, you can say goodbye to your Leod in most games), as well as Portal in general, which is the actual nightmare matchup for Leod Sword, between Mugnier and Karula making short work of your game plan. Even with all of those factors at play, Leod Sword is still a great “meta breaker” in the current format: its poor matchups are not very common, and with players teetering closer to greedier and greedier Evolve Sword lists, even midrange matchups are surprisingly manageable for Leod Sword. The biggest downside of the archetype is its high polarity: the deck is very bad in its poor matchups, but even if you queue for a bad matchup, the deck also loses really quickly, so I would personally highly recommend Leod Sword to soulless husks masquerading as Shadowverse players for 7-odd months and still playing Ambush Sword in the year of our Lord 2020. It’s a ton of fun, I sure do love Leod Sword. Very nice, great success, two thumbs up.

[ps2id id=’shadow’/]
Shuten-Doji (a.k.a. Yokai) Shadow
Note: personally, I find the name “Yokai Shadow” somewhat confusing since it doesn’t describe any of the in-game mechanics or relevant card names, and “yokai” is not a very common word in the English language, so in the interest of clarity for new and returning players, I personally prefer the nomenclature that is different from the direct translation of the Japanese name for the deck, and call it “Shuten-Doji Shadow”, or “Shuten Shadow” for short.
What does Shuten Shadow do?
Shuten Shadow is a midrange deck that is built around the synergy between its eponymous engine piece, Shuten-Doji, and heavy-hitting 1-power/toughness cards such as Legendary Skeleton, Ginsetsu, Miyako, etc. The archetype features a lot of card draw between Demonic Procession and Kasha, and due to incidental card advantage of Thoth, Union Burst cards, Enhance effects and Ginsetsu, it’s difficult to run Shuten Shadow out of threats. Unlike most other midrange decks with 6 Union Burst cards and some sort of Storm finisher (e.g., Evolve Sword, Lymaga Forest, etc.), Shadow gets to have a lot of healing with cards like Ceres and Ginsetsu, and since Shuten-Doji incidentally turns most of your cards into pseudo-removal (when necessary), Shadow is generally considered the premier midrange deck of the format.
The archetype has a bit of highroll potential as well, the Shadow “nut draw” involves going second, evolving Shuten-Doji on 4, followed by Ceres on 5, Vow on 6 (which allows you to run out Legendary Skeleton/Yuki-Onna/Manifest/ etc. to negate the tempo loss), followed up by a turn 7 Ginsetsu. A Ginsetsu this early can be often be backbreaking for other midrange decks, and even if the opponent does manage to clear the Ginsetsu, you can often play another one on turn 9, and the second wave can be even more difficult to answer if you’ve run the opponent out of their answers. After double Ginsetsu (whether you get the highroll or not), Thoth usually comes online, and while Thoth is not true inevitability (since you’re not playing Natura Shadow and can’t churn through Trees and Lubelle tokens), it adds a fair bit of extra damage to your Storm cards, so Shadow can grind out long games even when it would seemingly run out of threats at some point.
In addition to that, Shuten Shadow can play an aggressive game with sticky early drops like Miyako and Helio, and the flexibility of putting up multiple Wards with Ginsetsu‘s Accelerate ability can allow it to eke out early wins and race Storm-based combo setups, so while the archetype is generally fairly slow, against tempo decks like Spellboost Rune and Amataz Forest, playing efficient early threats on curve and stabilizing with Ceres can be a decent game plan. Long story short, against faster inevitability setups (e.g., Natura Rune/Dragon), Shadow plays the beatdown role, against tempo decks (e.g., Spellboost Rune), Shadow usually plays the role of the control deck, and midrange decks depend on the draw and usually end up at some middle ground in-between the two.
Mulligan priority
- Always keep a Shuten-Doji.
- If you’re keeping Shuten, also keep Bone Crane and Helio/Kasha.
- If you don’t have Shuten, keep Procession/Kasha, with Kasha taking priority over Helio.
- Keep Bone Crane with Procession.
- Going first and against Rune/Dragon in general, keep Miyako/Mino as a 1-drop.
- Going second against Sword/Forest/Shadow, keep Manifest Malice.
Shuten Shadow skeleton
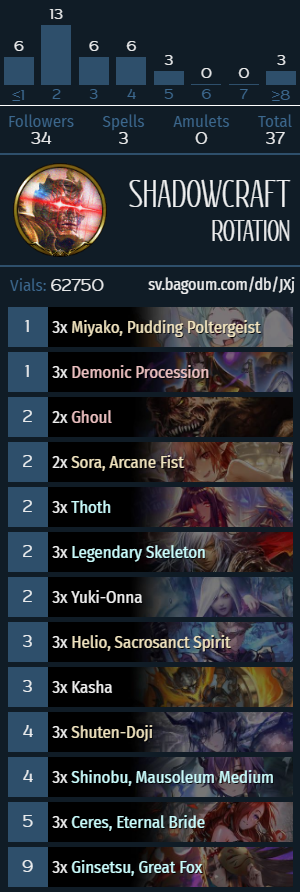
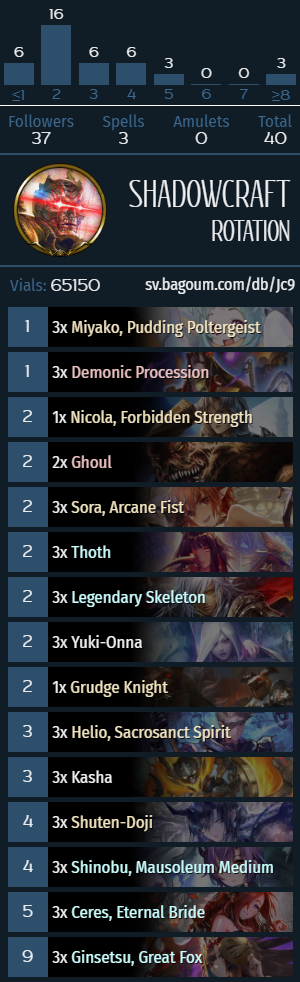
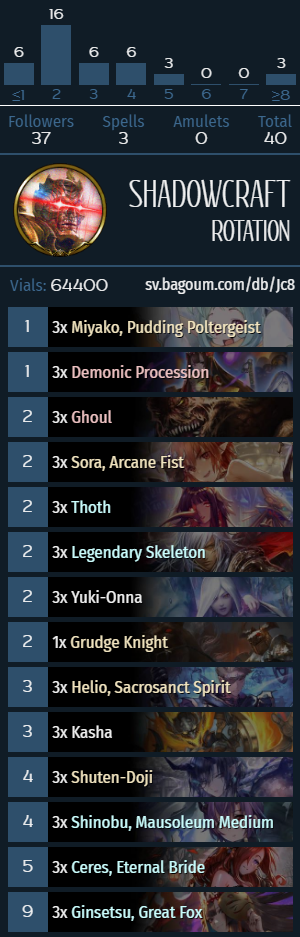
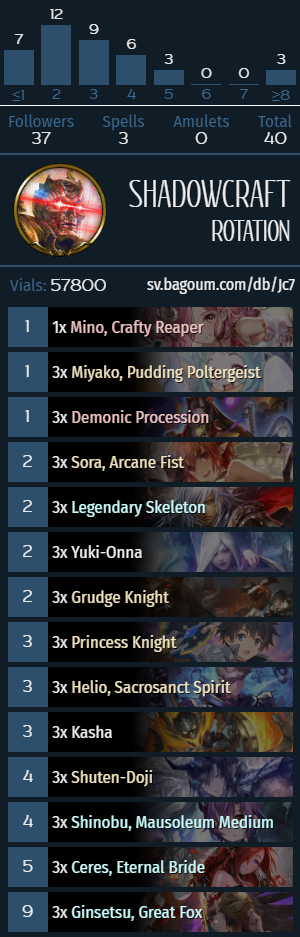

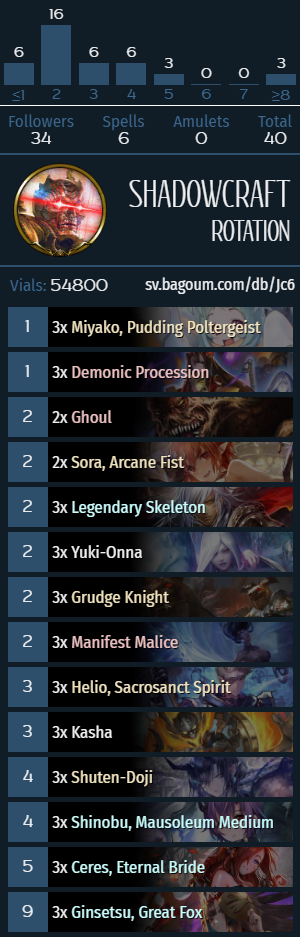
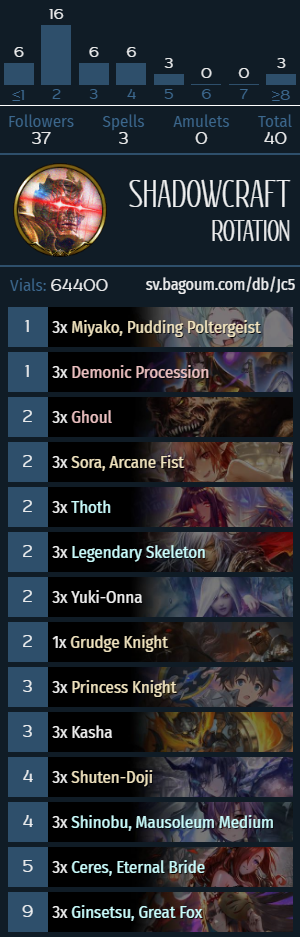
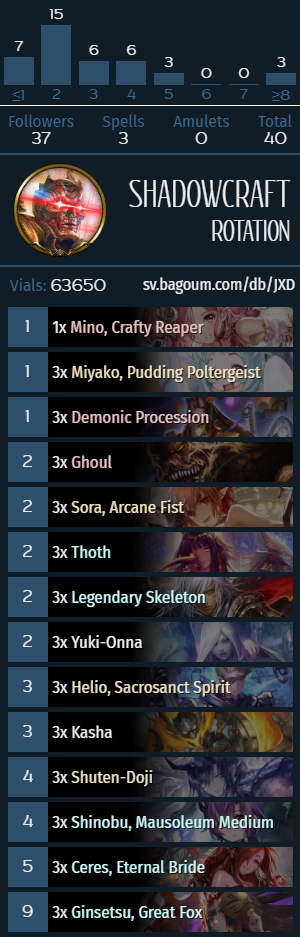
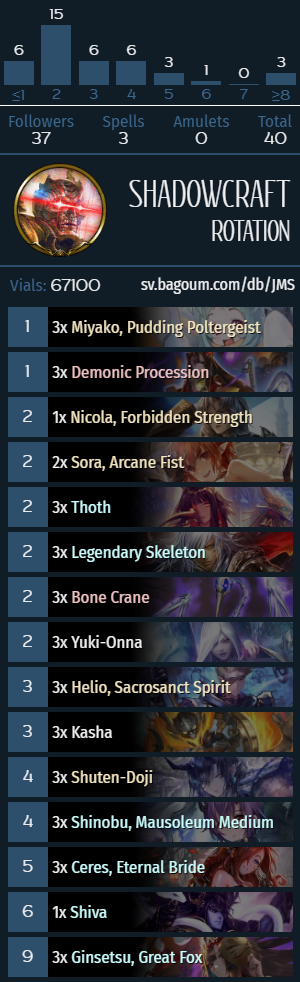
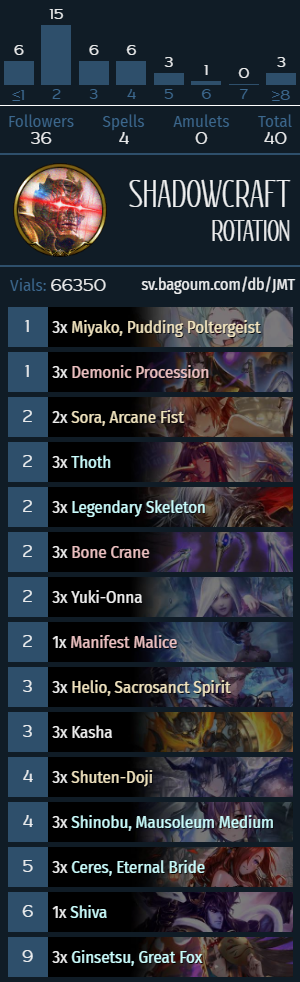
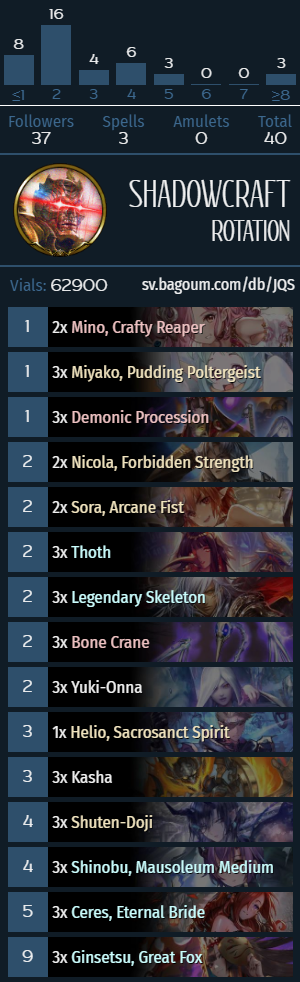

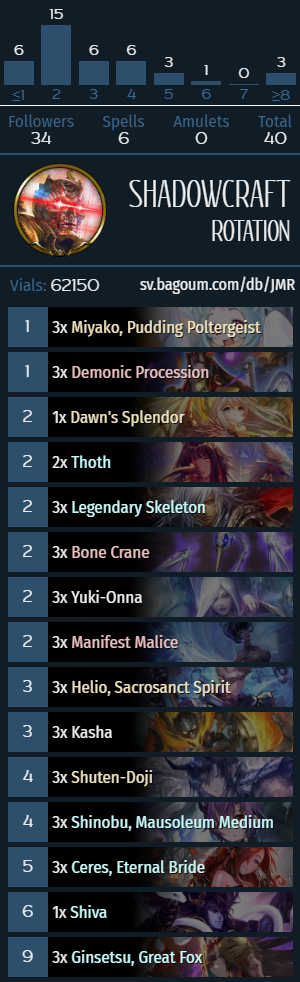
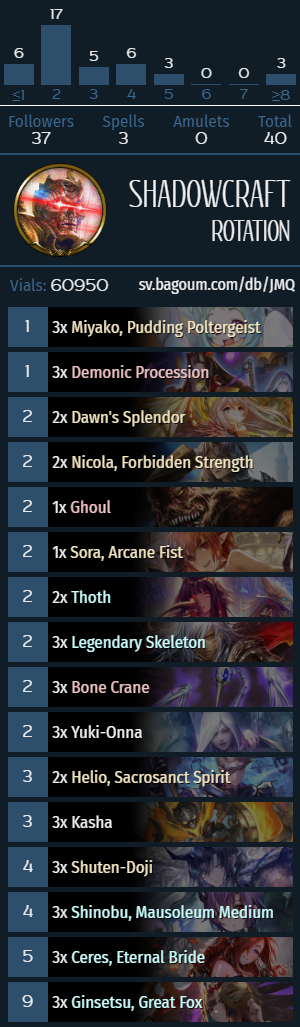
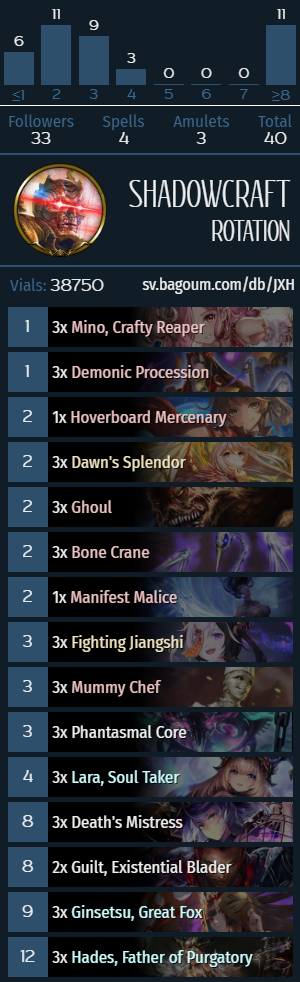
Shadow mulligans involve trying to curve out in the early game and set up for Shuten as early as possible. In the beatdown matchups (Rune/Dragon), having a 1-drop is a huge boon as it puts a fair bit of pressure on the opponent, and Miyako can even tank a Magic Missile or other removal spells, so it often gets to stick around and get in for 3-4 face damage. Apart from that, Bone Crane with Procession is a ton of gas (effectively draws 2 cards for 1 mana, which is not quite Ancestral Recall, but still an amazing rate for what you’re getting). It’s important to be aware of the fact that you don’t always want to play Shuten on curve, and when going first, it’s often fine to play Ceres on 5, then Shuten with a 2-drop (e.g., Yuki-Onna or Skeleton Man) on 6, and you can also evolve Shuten on 5 with a 1-drop (that still gets Storm), so Shuten is very flexible, often gets a 2-for-1 because of the Bane ability and enables the deck’s engine. This is a pretty verbose way of saying “tempo = good”, but it’s important to keep in mind that while tempo is good, giving Storm to most of your deck is even better.
Optional inclusions and tech cards
- Thoth, Bone Crane and Manifest Malice are cuttable 2-drops that can be slotted out for other cards with similar early game functionality, which includes more aggressive early game cards like Mino and reactive 2-drops like Sora. In my experience, Sora is specifically only good against Rune/Sword and eats Shadows that could be used for Skeleton Man activations instead, so it’s somewhat matchup-dependant, so it’s difficult to justify running a full playset, but if you want to have a better shot at beating midrange decks, running 2-3xSora over Manifest is a fine choice. Mino is aggressively terrible against Sword/Shadow, but helps against Rune and Dragon. I personally believe that Mino makes you effectively 2-for-1 yourself in too many matchups, but if you want the deck to be more aggressive, it’s a decent choice.
- Ghoul (and in a similar vein, Guilt) are optional inclusions that help in slower matchups. Broadly speaking, Shuten Shadow doesn’t have a lot of sacrifice fodder, and the only targets are the Skeleton token from Bone Crane, Manifest Malice and Nicola (which even buffs the Ghoul to a 2/2), so for most intents and purposes, these cards are mostly just slower Demonic Procession. There are some cute applications, for example, if you discount either of the pieces with Ceres (doesn’t apply to Guilt, obviously), you can eat one of the Ginsetsu tokens if your opponent doesn’t have a big enough board and deal an extra +2 damage with Ginsetsu, or how it’s possible to speed up the Nicola clock by playing it twice (or thrice) in a turn. I personally believe that Guilt is aggressively terrible, while Ghoul is a justifiable 2-of due to how common Shadow mirrors are on ladder. A lot of players bring lists with 3xGhouls in tournament play to have more gas in the Shadow mirror, cutting Bone Cranes, which is not necessarily wrong, but is a bit greedy. The saving grace of Ghoul is that you can always pitch it to Demonic Procession in tempo-oriented matchups, so it’s not a dead draw even if you can’t afford to sacrifice tempo.
- Nicola is a tech card for midrange mirrors that can generate a fair bit of extra damage in the late game. Having a recurring threat in grindy matchups is fairly relevant, and while you often don’t get to the 20 Shadow threshold, it’s still decent even it only does 4, since you can often pair it up with other damage cards (e.g. Union Burst Miyako and Skeleton Man). Nicola has some redundancy with itself, so it’s difficult to justify running multiple copies, but you can still pitch it to Demonic Procession, so drawing the card even in its “bad matchups” does not make it a completely dead draw. The two common splits between Nicola and Ghoul are 1/2 and 0/3, with the former giving you an extra threat against Sword, and the latter being better at digging for answers against the more standard decks of the format, such as Natura Dragon and Control Forest.
- Grudge Knight is a tech card against Evolve Sword and burn-oriented archetypes such as Aggro Blood and Natura Dragon. The main application of the card against Sword is that it can function as an extra threat with its Enhance ability, often getting a 3-for-1. The Enhance cost may seem somewhat clunky, but if you have a good Ceres curve (as in, Ceres on turn 5, Vow on turn 6), it can often be paired up with a high-tempo 2-drop (such as Yuki-Onna or Skeleton Man) to push face damage while clearing the opponent’s threats and protecting yourself at the same time. In addition to that, in matchups where your life total gets pressured by incremental damage, having access to some extra incidental healing (which you can activate proactively with Ghoul with Ceres discounts) can create enough of a health buffer to not get burned out by out-of-hand damage. A simple way to think about Grudge Knight is that it’s a 4th copy of Sora which can have a bit of extra utility in slower matchups, but in a similar fashion to Sora, can turn out to be nothing more than a Fighter against combo-oriented archetypes. A 1-of Grudge Knight is a sensible inclusion with the high popularity of Evolve Sword, but it can be swapped out for a Manifest/Bone Crane/etc., depending on the exact meta you’re preparing for.
- Princess Knight is a card that has seen some experimentation after the mini-expansion, often played in the Helio slot. Shuten Shadow lists almost universally include 6 Union Burst cards, so being able to get to the Shinobu AoE or saving up multiple Puddings for a big Miyako turn in the late game can open up some lines that are impossible without Princess Knight. I personally really dislike Princess Knight in Shuten Shadow, as it competes with Kasha in the early game, fights for evolve priority with Shuten-Doji, Sora and Ceres in the mid-game; in addition to that, Ceres is racist against Neutral cards and refuses to discount them, so it can make your post-Vow turns a lot clunkier. Princess Knight is a very good Shadowverse card in general, but as far as Shuten Shadow goes, I’ve personally found it pretty underwhelming in my testing and it has been consistently underperforming in tournament lists of the archetype, so I do not think it’s a particularly good tech choice.
- Shiva is an optional inclusion that helps against Shadow and Sword. The card has gotten a lot worse with how popular Rune is, and a lot of midrange decks can activate Union Burst on the turn where you want to run out the Shiva, so it lines up poorly against things like Pecorine and Miyako even in the matchups where it’s supposed to be good. With that said, it still brings a considerable amount of value in slower matches, and Shadow gets a bit of extra tempo when playing it on turn 8 since a lot of Shadow 2-drops are decent plays at that point (e.g., Yuki-Onna and Skeleton Man). The main issue with Shiva is that it’s a dead draw against Rune (you don’t get enough breathing room to play it in that matchup), so it’s difficult to justify running more than 1 copy, and I would personally consider 0xShiva to be optimal currently.
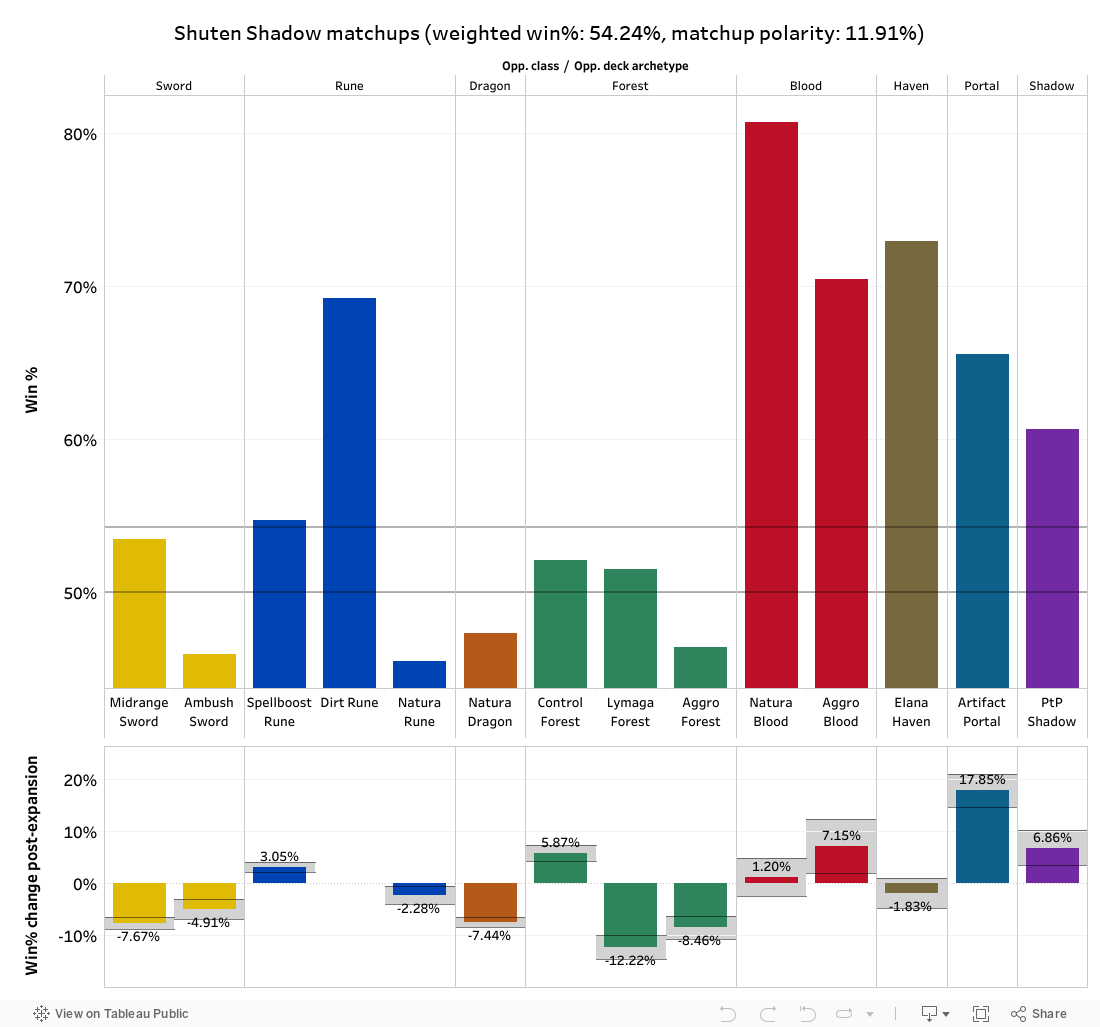
Shuten Shadow is an archetype that did not receive as much help from the mini-expansion as some of the other midrange decks in the format, and while that doesn’t mean that it’s a bad deck by any means, the archetype has been on a steady declining trend over the course of the mini-expansion and has not been performing well in tournament play. The deck still has a high overall winrate due to the fact that some of the newly introduced archetypes are not particularly functional (namely, Dirt Rune and Natura/Pain Blood) and run out of threats against Shadow, but a lot of the deck’s popular matchups (Midrange Sword, Natura Dragon, Lymaga and Amataz Forest) have lost percentages due to those decks getting direct upgrades. Nevertheless, Shuten Shadow still has a very even matchup spread and it’s only really unfavored against reactive decks with fast inevitability or pseudo-inevitability (e.g., Natura Rune, Amataz Forest), so it’s a decent choice for ladder play if you enjoy having better card selection and midgame than Evolve Sword, but even answering the turn 7-8 swings from Evolve Sword (either multiple UB cards or even a Courtly Dance pulling Kagemitsu) or playing around Natura Dragon burst damage is a lot more difficult than it was previously, so Shuten Shadow has fallen from its prior position as the (arguably) best deck of the format, which still leaves it in a pretty good spot, all things considered.

[ps2id id=’portal’/]
Artifact Portal
Identifying cards: Dazzling Archer, Magisteel Lion, Cat Gunner, Artifact Call, Mechagun Wielder, Displacer Bot, Augmentation Bestowal.
What does Artifact Portal do?
Artifact Portal is a combo deck that utilizes Artifact-based synergies in order to enable OTK setups with Maisha. Throughout the course of the early- and midgame, Artifact Portal spends turns cycling towards the combo pieces and controlling the board using efficient midrange Portal cards and low-cost Artifacts. The primary win condition of the archetype involves getting at least 2 cost-refunding cards going at the same time (which includes either Acceleratium from Displacer Bot or Augmentation Bestowal), and some number of 1-cost Artifacts to cheat mana costs (the total number of which depends on the turn when the combo is assembled and whether you need to spend mana setting up the Augmentation). The setup is as follows: if you have an Acceleratium in play and it’s at least turn 7, and your hand has a Maisha, Augmentation Bestowal and at least 2-3 1-cost Artifacts, you play Maisha and Augmentation, then start cycling Artifacts and if you get enough to get to 7 open mana and have X – 4 dead followers (where X is the opponent’s life total), then you evolve Maisha, use the spell token, and attack for lethal damage. Naturally, there are other ways to set up the Maisha OTK (e.g., if you play an Alpha Core on a prior turn, or, well, if you get to turn 10 somehow), which can be a contingency plan with a bad draw against slower decks, but Portal in general doesn’t have a lot of ways to heal or defend itself, so it’s unwise to follow a slow game plan against decks with linear win conditions (e.g., Shuten-Doji Shadow, Evolve Sword, Natura Dragon, Lymaga Forest and Rune in general), and the only way to outpace those decks is through an early Maisha setup.
Maisha being a win condition in Portal decks is not a novel concept, and the pattern of cheating mana costs with Artifact-based discounts has been a defining characteristic of Artifact Portal lists in multiple formats over the course of the last ~5 months (it was technically possible even before that with Deus in Unlimited and even before the Displacer Bot buff, but it only came to prominence in Rotation following the July balance changes). What’s different this time around, however, is that, on the one hand, Portal has no (playable) Rotation-legal way to generate Radiant Artifacts without Mechanization, meaning that the previous midrange iterations of the deck with more tempo-oriented cards like Ines/Shion can no longer close out games; and on the other hand, because of Kaiser and Focus, which are powerful draw spells that help find the necessary combo pieces. Focus is a card that needs no explanation: it draws cards in the early- to midgame, at 2 different mana breakpoints, and has a fair bit of incidental synergy with Portal cards in general. Kaiser, however, is somewhat different: while there are spots where you mulligan into unplayable cards, so you pitch your hand and redraw 3-4 cards, Kaiser is primarily useful during the Maisha turns. After doing the initial setup of Maisha into Augmentation and cycling (most of) the Artifacts that you have available, you can then play Kaiser (keeping one of your 1-cost Artifacts or the second Kaiser, of course), and try to find more fuel to keep the combo setup going. The reason to keep an Artifact is that if you draw an extra Augmentation with no other Artifacts, you can jump-start the draw chain again and get to something useful.
Artifact Portal skeleton
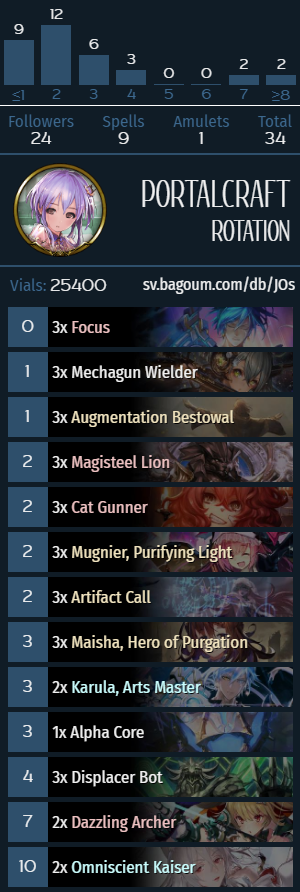
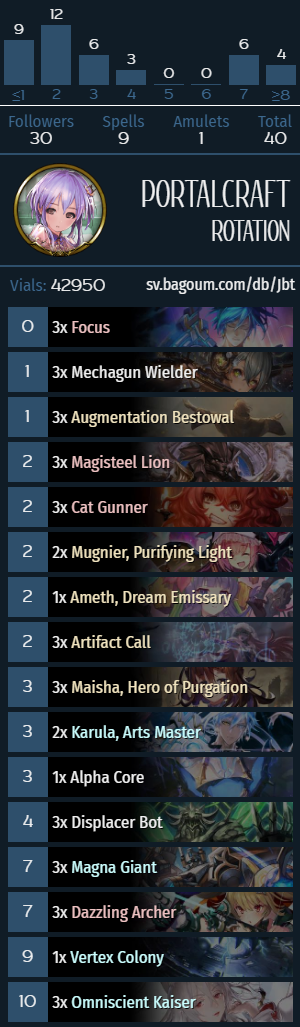

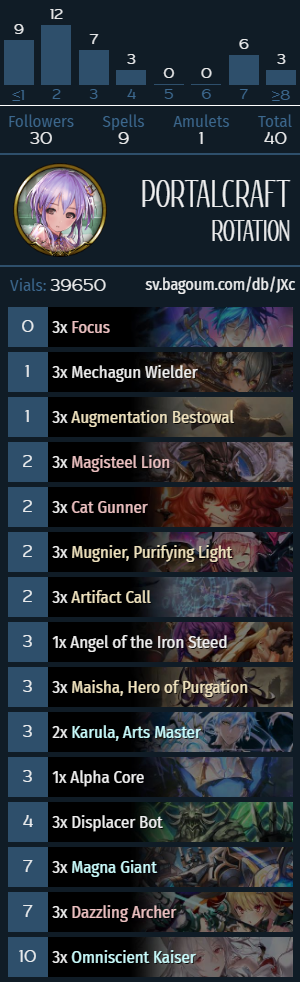


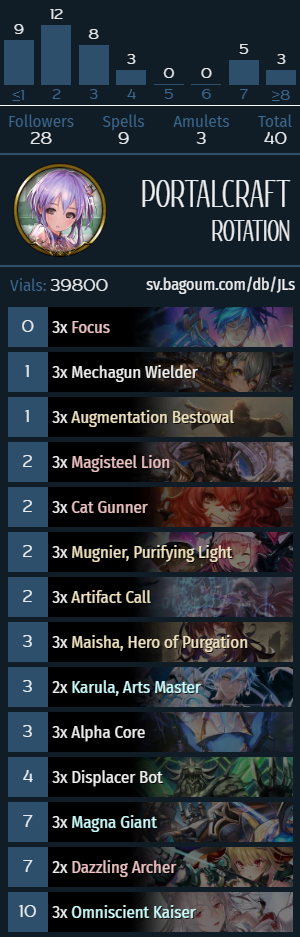

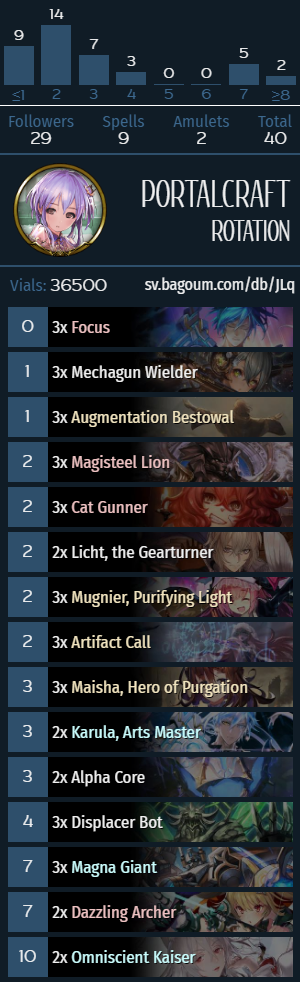
Control Portal skeleton


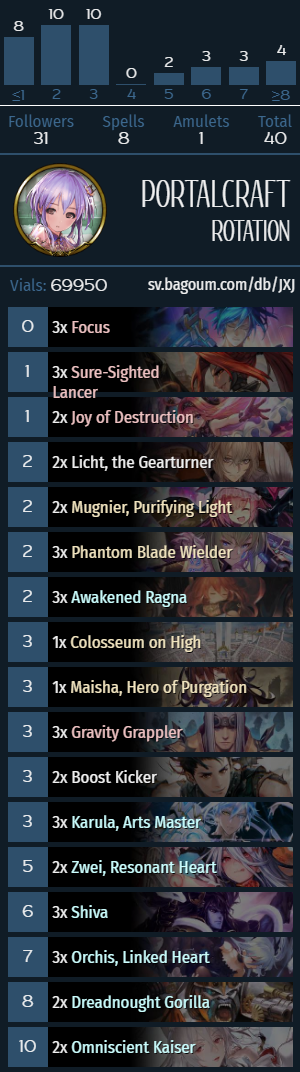

Naturally, this does come with some risks, as you have to keep track of how many Artifacts you have in your deck, how many Artifacts you need (considering that you spend an extra point of mana on Kaiser), how many allied followers died this game (as in, can you get to lethal damage?), board space (relevant with things like Mechagun Wielder, also in the sense that you sometimes have to intentionally trade the Artifacts awkwardly in order to get more trades and more board space), hand size (you need an empty card slot to evolve Maisha, which may sound like a trivial requirement, but can be tricky once you have multiple Augmentations going, so keep a Focus or a Kaiser to dump from your hand before evolving Maisha), cards in your deck (don’t deck yourself) and lastly, the turn timer. The last item on the list is probably the most important of all in the moment, as animations take up time (with some, such as Maisha’s evolve animation and Kaiser redraw taking significantly longer than one would expect), so it’s important to keep track of all the extraneous factors (the first 4 mentioned above) before you start taking your turn and plan the early part of the turn in advance. The critical decision here involves asking yourself the question, “is it necessary to start the combo this turn, or do I have more time?”, which is influenced by how much damage your opponent can do (how likely are you to die next turn?), how much setup you still need to go through (e.g., with cards like Mechagun Wielder/Displacer Bot or Artifact-shuffling effects) and what the remaining Countdown on your Acceleratium is (or whether you have another one ready).
Mulligan priority
- Always keep Dazzling Archer, Magisteel Lion, Cat Gunner and Displacer Bot.
- If you’re already keeping Archer/Lion/Cat, also keep Artifact Call and/or Mechagun Wielder.
- If you’re not keeping Displacer Bot, keep Magna Giant.
- Keep Mugnier against Sword and Shadow.
- Going second against Sword, keep Karula.
The mulligan plan for Artifact Portal involves trying to get Artifacts into your deck. Some of the Artifact-shuffling effects are fine cards in the midgame (as “vanilla” 2-drops), however, Dazzling Archer specifically requires 2 turns of “setup”, so the earlier you have an Archer, the better. Displacer Bot is a Shadowverse card that is legal in the Rotation format, so it’s a snap keep. Keeping Artifact Call can be a little risky if you don’t manage to get any Artifacts in your deck (which is reasonably common on turns 2-3, with most lists only having ~9 Artifact generators). Artifact Portal is a pretty linear deck that can play both proactively and reactively, but some matchup-specific factors involve keeping Mugnier against Sword (stops Leod shenanigans) and Shadow (answers Helio and can often hit multiple targets in that matchup). Karula is an efficient Leod answer that can often get at least a 3-for-1, and Evolve Sword lists have trouble clearing the 6/X body on the crackback (e.g., it can often kill the main body of Lecia).
Optional inclusions and tech cards
- Karula is an optional inclusion that helps in midrange matchups and is played in most lists at 2-3 copies. Both modes of the card (an evolve target on turns 4-5 and its enhance ability on turns 8+) can usually answer 2 followers, and present a threat that could generate value on future turns. In and of itself, Karula is a pretty fair midrange card, but it’s pushed over the edge by 2 factors: on the one hand, Artifact Portal decks always need to save an evolve point and often can’t go off with Maisha on turn 8, so the enhance ability can bridge the deck’s game plan between the midgame and the OTK setup; and on the other hand, it can pair up with Focus and mitigate the usual tempo loss associated with the draw effect. Focus in general is one of my personal favorite cards of the set, and making Focus better makes me happy, so spinny shirtless Tron man also makes me happy. I have never actually watched Tron, but I think that’s the aesthetic Cygames were going for. He could pass for a Furi boss, if drawn in a simpler, less busy art style.
- Mugnier is an optional inclusion that helps against specifically Sword and Shadow, but can hit a lot of targets in the current Rotation format (Shikigami tokens in Rune, Leod in decks that play Leod, Desert Pathfinder/Pteranodon in Dragon, turns off Wilbert‘s leader effect against Haven and other incidental Ward cards, banishes Elana’s Prayer and can even enable some nasty turn 4 Maisha beats when going first). It’s important to be aware of the sequencing (mostly relevant with Acceleratium, but also comes up with Karula and Analyzing Artifacts), since the effect is symmetrical, but Mugnier is very rarely bad, so it’s difficult to justify running fewer copies than a full playset.
- The role of Kaiser has already been discussed in previous sections, but since the card has some heavy redundancy issues, it can be correct to play 2xKaiser. In my testing, I’ve found that running 3xKaiser makes it so that there are often 2 copies of it stuck in the left of my hand, so I personally prefer running 2, but there is merit to running a full playset as well.
- Alpha Core is a necessary evil for the sorry state of Artifact Portal in Rotation: on the one hand, it enables the secondary Maisha setup (as in, play Core on turn 7-8, then evolve Maisha on the following turn) and it can be useful to have an evolve-refunding effect in a deck that hinges on Maisha as much as Artifact Portal, and on the other hand, it shuffles 6 Arifacts into your deck, 4 of which are good Artifacts, with the other 2 being passable at best. Unlike Sagacious Core, you often don’t want to play the Core on turn 3 (unless you haven’t drawn any of the other Artifact-shuffling effects), but Core on 3 into Karula with a 2-drop on 4 (e.g., with Cat Gunner or Artifact Call) can be a decent tempo play. The problem with Alpha Core is that it makes your Magna Giant draws a lot worse (since there are only 6 other good targets for it), so running 3xCore has proven mediocre in my personal testing, but running 1-2 is generally a responsible choice.
- Dawn’s Splendor, Phantom Blade Wielder and the 2 new additions to the class from the mini-expansion, Ameth and Vertex Colony, are optional cards that can be included in Artifact Portal lists if you’re trying to strengthen the deck’s early game. Artifact Portal doesn’t have a lot of 2-drops, and Fighters that come with a bit of an upside (Focus synergy, or ways to protect yourself against Rune/Shadow/Sword) are reasonable inclusions. I’m not entirely convinced that running Splendor actually helps the Rune matchup to a significant extent and Sword/Shadow don’t really play multiple Storm cards per turn, so the Dawn’s Splendor only heals for 2-4 at most. Ameth is a more flexible version of that type of defensive effect, as it can cycle itself on evolve turns and pairs particularly nicely with Karula, though the card obviously competes with Mugnier. I would personally consider Ameth a strict upgrade over Shin and a fine 3-of in 3xKarula list, but the card is not particularly outstanding in most matchups. Phantom Blade Wielder is generally good against most midrange-y decks since it gives you a +2 to the Maisha counter if it activates, and if you can line it up with a Focus on turn 3, it’s a decent tempo play, in a similar fashion to Licht. Vertex Colony is mostly just a bad Artifact Call in the early game; it’s definitely not a card that you want to include as anything more than a 1-of, but it’s a fine play in the early game.
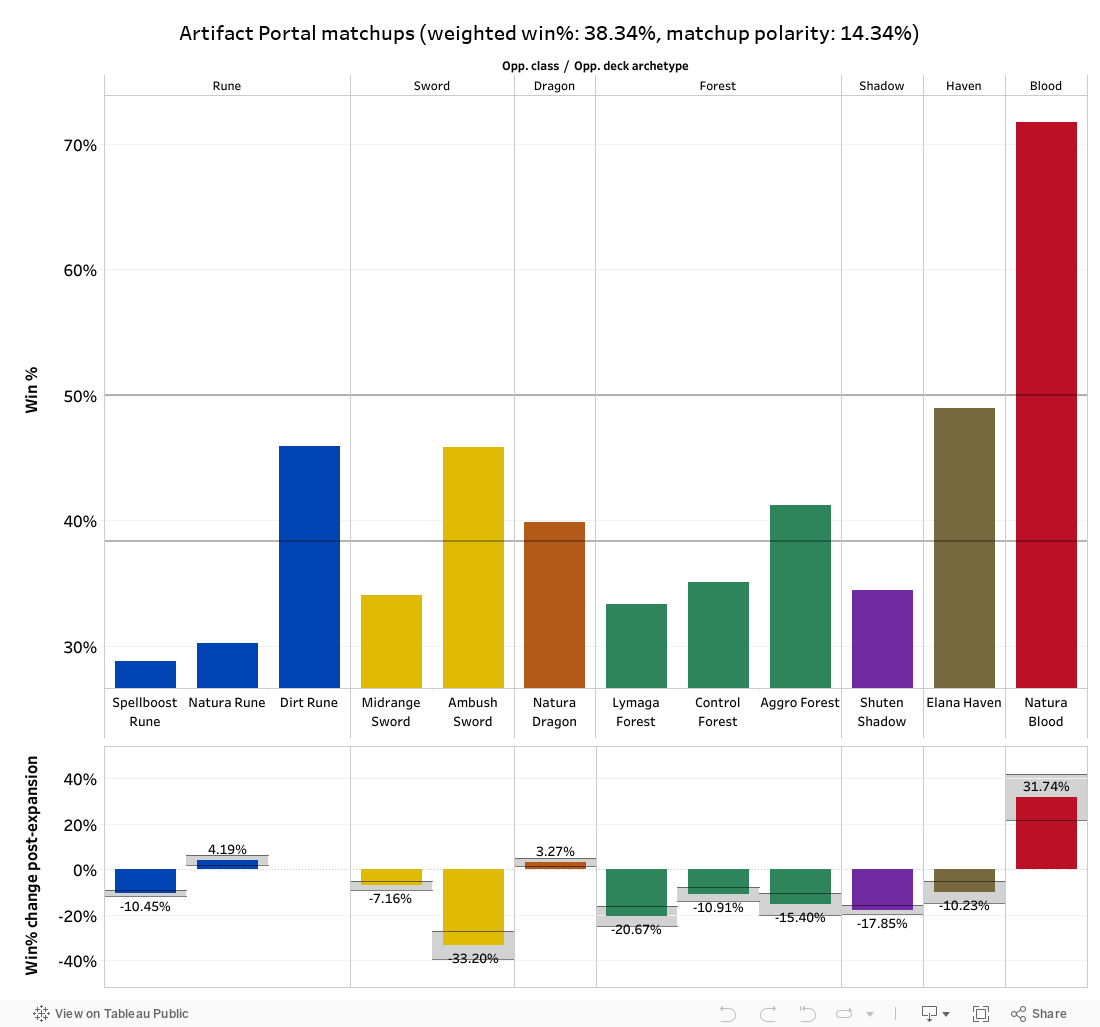
Artifact Portal is not a deck with a particularly high amount of ladder data behind it, and the small amount of data we do have does not inspire much confidence in the archetype. Generally speaking, it’s to be expected for a deck like Artifact Portal to have a poor ladder winrate, as the deck is not very straightforward to pilot. The deck generally struggles against faster tempo decks such as Spellboost Rune, does (comparatively) well against midrange decks like Evolve Sword and Shuten Shadow, and hoses Leod Sword. Having such an awkward matchup spread would make any other deck difficult to recommend to anyone, but Artifact Portal actually has a pretty unique playstyle and a fair bit of complexity, so it could be an interesting deck to explore, particularly if you’re trying to transition towards the Unlimited version of the deck, which is (arguably) even more complicated to pilot and actually has a passable position in the Unlimited metagame. It wouldn’t surprise me if the archetype eventually shows some semblance of tournament viability if a large enough cabal of Artifact Portal players gets established, as it’s definitely not a deck for everyone and going off its performance in Unlimited tournaments, as its level of popularity has definitely gone through some ups and downs, and it would not be strange to see a short-lived spike of Artifact Portal popularity in Rotation either.
Control Portal
Identifying cards: Sure-Sighted Lancer, Barrage Brawler, Gravity Grappler, Boost Kicker, Colosseum on High, Orchis, Linked Heart.
What does Control Portal do?
Control (a.k.a. Float) Portal is a collective name for a variety of reactive Portal archetypes revolving around the double-dipping synergy between various cards that require you to have unspent mana at the end of your turn, chief examples among which being Gravity Grappler, Focus and Karula. Despite the common name for the archetype being “Control”, the deck is a lot closer to being a reactive midrange deck, and as any other midrange deck in the format, it aims to establish an early tempo lead by playing out a 1-2-3 curve of followers (ideally, Barrage Brawler into Ameth or Phantom Blade Wielder, followed by Gravity Grappler), then, if any of the played cards (especially the Grappler) didn’t get cleared along the way, you can pass on turn 4 (ideally with a Focus or two) and cash in on that sweet value.
The archetype runs a fairly efficient suite of reactive midgame drops between Karula, Boost Kicker and Ines, some of which contribute to clearing the board and even deal some chip damage. The archetype uses a turn 10 Kaiser or Maisha as its primary win condition, and outvaluing midrange decks with your AoE, removal and recurring value from Grappler/Phantom Blade Wielder can generate enough of a lead to not need an actual win condition. Most Control lists run 1-2xShiva, which also has a turn 11 “OTK” setup with Awakened Ragna, where if you pick the token that sets the opponent’s max health to 2 and play it on turn 10, the Shiva shot on turn 11 is enough to kill the opponent, which may sound like absolute jank (which it is), but can close out some long games in which both players are playing extremely bad decks.
Another variant of the deck is “Colosseum Portal”, which is a deck that also includes a 1-of Colosseum on High with Orchis and some number of Puppet-generating cards. The setup is that you evolve Orchis, get the token that can attack twice, and double-dip on the Colosseum buff for a 10-14 damage turn 8 setup. The issue with Colosseum is that the effect is symmetrical and also affects Zealots of Truth, more or less every card in Shuten Shadow, Regal Wildcats and other Storm cards, from the opponent, and breaking the symmetry is one of the challenges for a Colosseum Portal build. Sure-Sighted Lancer is a neat way to capitalize on the opponent getting buffs, and the card incidentally also hits a lot of cards in currently popular decks, such as Pecorine, Kagemitsu, Fairy Dragon, buffed Demoncaller tokens, Ginsetsu, etc., so Lancer can pick up some good value even in matchups where you can’t afford to invoke Colosseum.
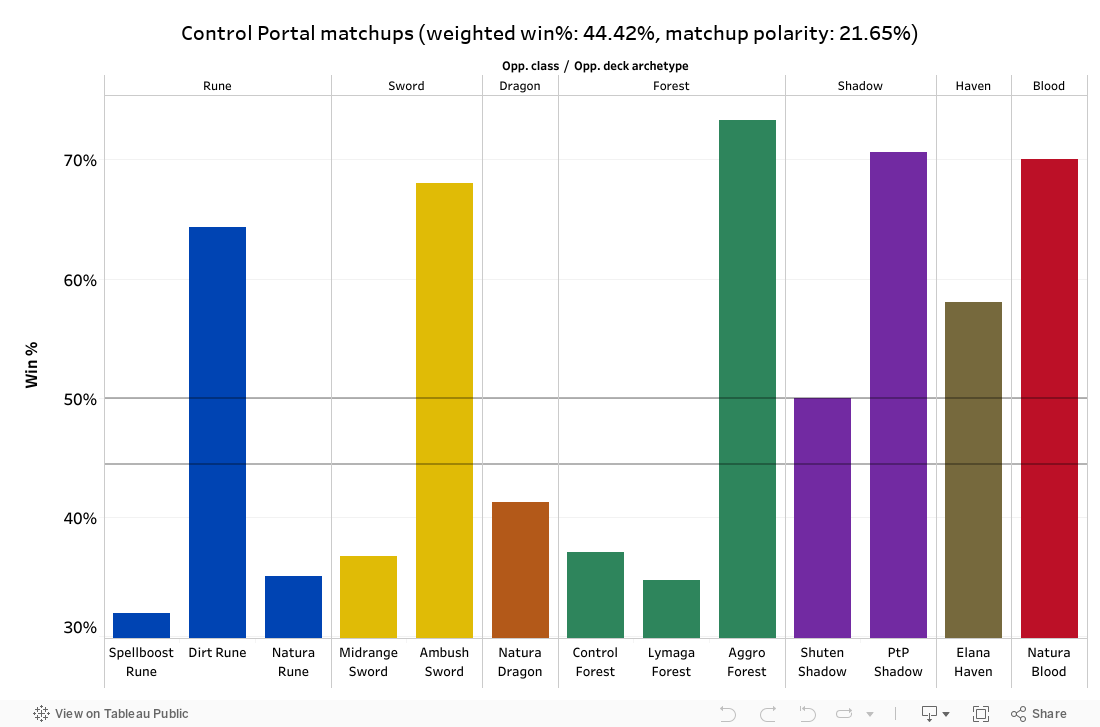
Control Portal doesn’t have a ton of data behind it, but it does appear to have some redeeming qualities, namely, it hoses Leod Sword (as all Portal decks with Mugnier and Karula do), and has a 60/40 matchup against Shuten Shadow. The deck is unfavored against most other decks in the format, though I am very surprised to see that it somehow has an even matchup against Natura Dragon, which inflates its aggregate winrate in a significant manner. I would personally recommend taking these Control Portal numbers with a grain of salt, and I might revisit this section once more data becomes available, but seeing as how the deck has seen effectively zero tournament success and very limited testing at high ladder ranks, I am very skeptical of the deck’s reported ladder performance. Based on my personal testing, I believe that Control Portal should realistically settle somewhere in the sub-40% range with an adequate data sample.

[ps2id id=’blood’/]
Aggro Blood
Identifying cards: Goblin, Vuella, One-Winged Demon, Swarming Wraith, Razory Claw, Laura, Enraged Commander, Yuna, Vampire Seeker.
What does Aggro Blood do?
Aggro Blood is a blanket term for aggressive Blood decks that aim to establish early-game board control with aggressive 1- and 2-drops. Doing so allows the deck to push some chip damage, and also enables Hellblaze Demon to buff either Laura, a Leoparion (the 2/1 Storm token from Doublame) or Kudlak. When combined with other handbuff effects (Vuella/Entrancing Blow), chip damage from Yurius and Razory Claw, the archetype can aim to close out games by turn 6. The deck is fairly aggressive and has a low curve, but has 2 reload effects (Unleash and Yuna), which allow the archetype to dig for extra damage to close out games.
There are 2 primary builds of the archetype: on the one hand, there is the “standard” build, which runs more handbuff synergy and relies on buffing a Storm card of your choosing (usually a Laura or an Imp Lancer) for lethal damage. On the other hand, there is also a Vengeance-based build of the deck, that runs Seductress Vampire and a more aggressive 2-drop base with Swarming Wraiths and Nightmare, Dreameater, also commonly including Dark General instead of cards like Razory Claw. While there are multiple flavors of the deck, which does cause a fair bit of build variety, you can’t really teach an old dog new tricks, and Aggro Blood is more or less the same deck as it was before the expansion. The archetype exists to punish greedy decks with its aggressive early game curve and an abundance of reach, but it can obviously struggle to close out games if it falls behind on tempo or if the opponent has too many Wards and/or healing.
The addition of Io in the mini-expansion made Kudlak pretty obsolete, and the card has been relegated to at most a 1-of in most lists I’ve seen. Io allows the deck to play a more midrange-y game and makes it so the deck has actual comeback mechanics. Aggro Blood is not a particularly popular or successful archetype in Rotation currently, however, it should still be mentioned that Io is an incredibly powerful Shadowverse card in a vacuum, which should be pretty evident from the performance of Aggro Blood in Unlimited, which is a pretty similar contstruction to its Rotation counterpart (with some Unlimited-only upgrades, of course, such as Blood Wolf, Savage Wolf, the 2-drop Yurius and the absurdly overpowered class-specific Goblin that is Cursebrand Vampire), being within a 10-odd card margin. What this means is that Aggro Blood could be a similar case to Amataz Forest: a deck that started as an Unlimited archetype initially, then got 1 support card and suddenly became a force to be reckoned with in both formats. Now, this doesn’t mean that printing a vanilla 1/2 for 1 in Blood is going to break the Rotation meta, but I do hope that Cygames are a little careful with giving the archetype pushed support pieces, because if a deck is highly competitive in Unlimited with minimal changes, it could be a sign of it doing something particularly unfair in the future, even with a smaller card pool.
Regarding Pain (a.k.a. Control, a.k.a. Midrange, a.k.a. Natura) Blood
Identifying cards: Creeping Madness, Corrupted Bat, Bear Pelt Warrior, Prison of Pain, Permafrost Behemoth, Aragavy, Cougar Pelt Warrior, Balto, Lunatic Aether.

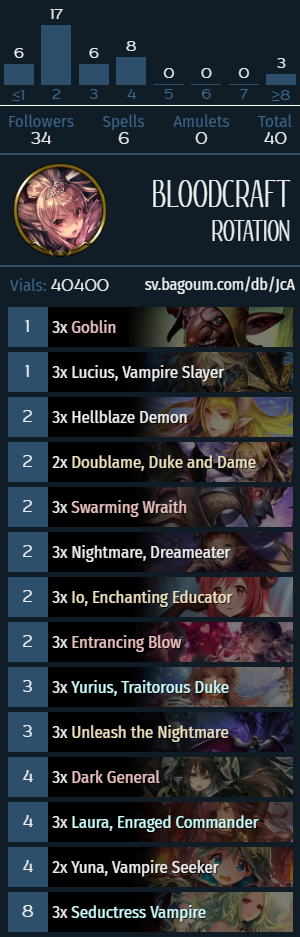
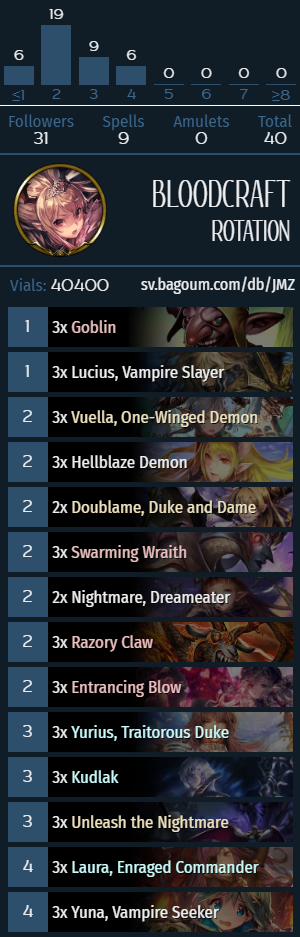
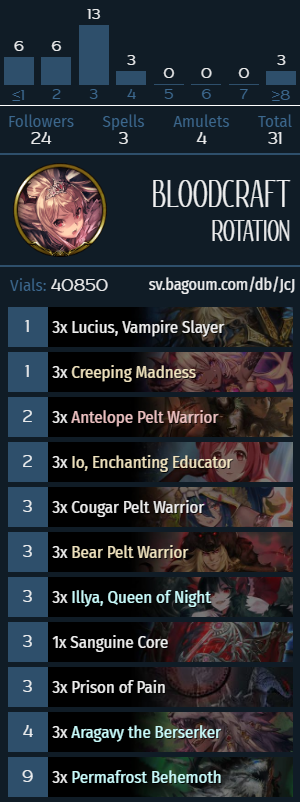
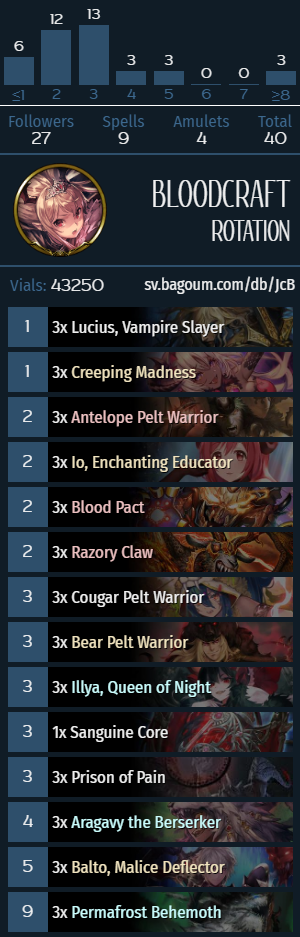
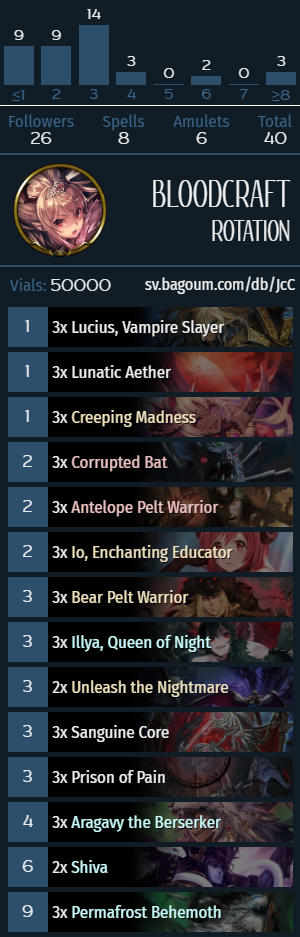
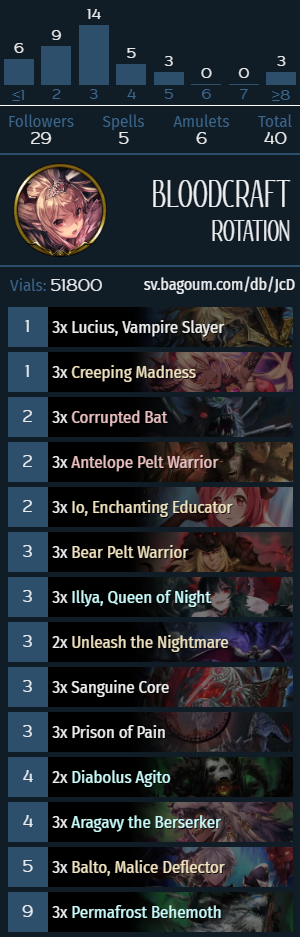
Pain Blood is a blanket term for Blood decks revolving around the synergy package of effects that deal damage to your leader and various pay-off effects. The most common build of the archetype includes Lunatic Aether as a source of reach in the late game, hence why certain builds of the archetype can be referred to as “Natura Blood”. The distinctive characteristic of Pain Blood is its ability to control the board with some very unfair (by Rotation standards) board control tools, namely, Io, Cougar Pelt Warrior and Aragavy, which, coupled with healing from Bear, Aragavy and Sanguine Core and efficient card advantage engines in Prison of Pain and Cradle of Dark Divinity, make Pain Blood the most efficient self-milling deck in the Rotation format. This is mostly a joke, of course, but the deck does have a lot of issues with closing out games, as you usually can’t play 2 Behemoths in a game, and while you can save up multiple UB Illyas and Lunatic Aethers for a 2-turn lethal setup, it is often difficult to find an opportunity to do so if your opponent is putting on a lot of pressure. Putting it simply, the deck needs 1-2 high-end threats to be functional, and those threats don’t seem to exist in the current Rotation format, with the best options being Neutral cards, which are not particularly impressive. Zeus doesn’t really have enough synergy (as it only activates 7-8 times at most, which does not make for a reliable win condition), and Shiva is close to what the deck is looking for, but requires a pretty slow setup because it’s a 6-drop and you need to play it before turn 9 to get the full value, which is doable (e.g., with a turn 8 Shiva into UB Io, for example), but not always possible.
In the early game, the main priority is usually to set up Cougar/Aragavy/Antelope for later, to this end, the cards that you’re usually looking for in the mulligan are Prison of Pain, Bear and Antelope Pelt Warrior. Playing an early Permafrost is also decently valuable, but it’s important to keep track of how much actual damage you have in your deck, so as you have enough to actually close out the game. Once Scion of Ruin and Aragavy come online, you get to have a lot of highly undercosted board control tools and healing, to a point where if you get an early 2-3 curve of Antelope into Prison, it’s often possible to answer Kuon boards and have enough healing to stay out of burn range at the same time. All of those factors, however, are also the deck’s chief weakness: you have a lot of removal and healing, but the win condition is so slow that you’re going to take 20 damage in a turn eventually, particularly against Dragon, Natura Rune and Control Forest. For this reason, Pain Blood feels like a proto-Control Forest of sorts, except your Roaches cost 9 mana and can’t do 20 damage in a turn. I believe the archetype has potential in the future, but the top-end in Blood is just too slow to compete with all the healing in Sword/Shadow or the 20-damage lethal setups from the various combo decks in the format.
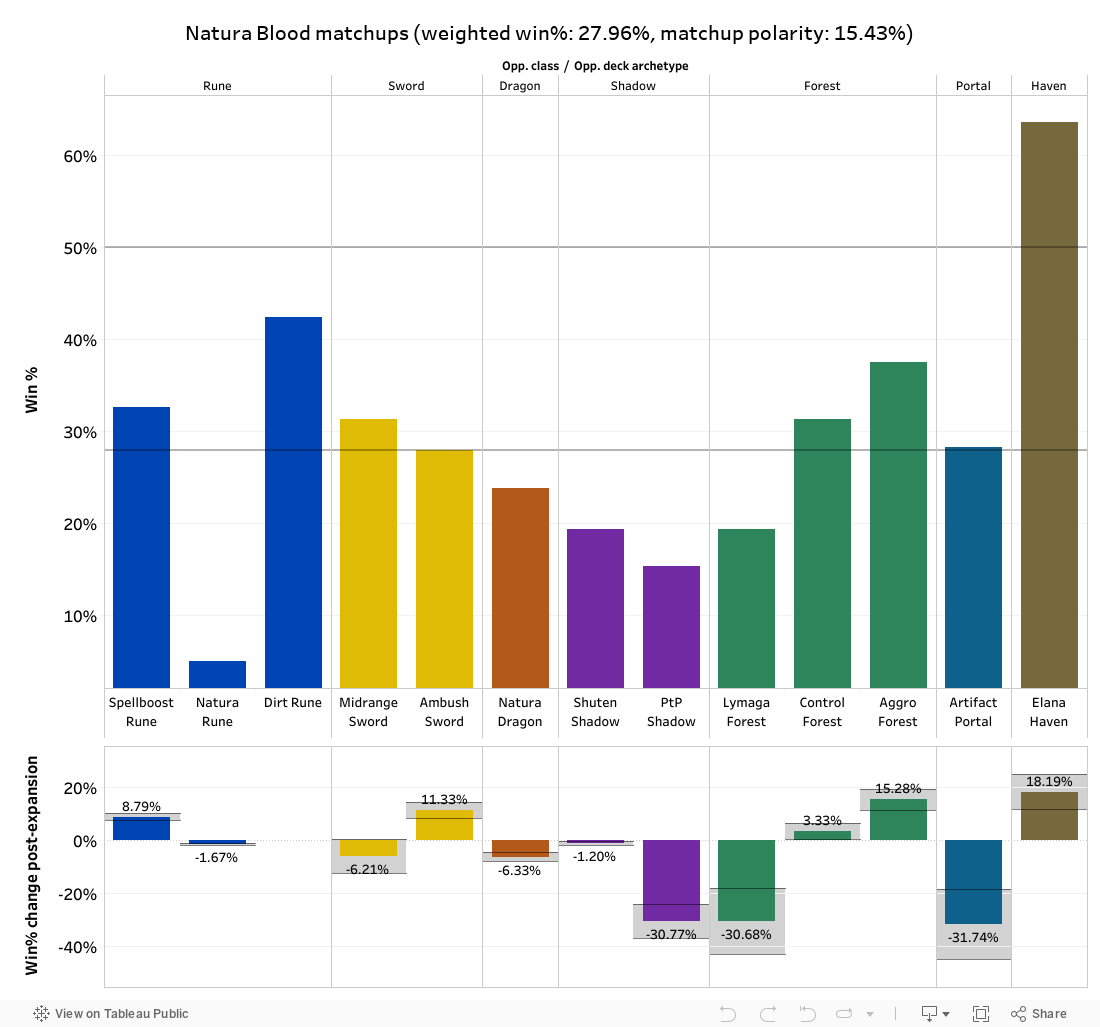
Natura Blood is, by a very significant margin, the worst-performing ladder deck of the Rotation format, which is a bit of a shame, as it’s a pretty unique archetype and feels like it could have some potential in the future, but it simply doesn’t currently. On paper, with a good early draw, the archetype feels pretty favored against Spellboost Rune, but any Karyl deck or any other combo that enables a 20-damage setup (e.g., Roaches, or Valdain with DPD), is going to give Pain/Natura Blood a hard time. In addition to that, the deck simply doesn’t have enough threats to chew through 3xArriets or Ginsetsu: if you play Behemoth for 10 damage, then your opponent can usually heal for 8-10 health in the aftermath (e.g., with Ginsetsu or Arriet into Shizuru), and you usually can only do this back-and-forth a couple times per game (since the first drawn Behemoth is often used to draw cards, and sometimes you even have to draw with 2xBehemoths), which leaves you right where you started, and Blood doesn’t have a way to give all the followers in its deck Storm, or a comparable amount of chip damage to Evolve Sword. Pain Blood is a sweet deck, and I hope it gets some form of a secondary finisher in the April set, but it simply refuses to function too often to be consistent or remotely competitive in the current Rotation format.

[ps2id id=’haven’/]
Natura Haven
Identifying cards: Sneak Attack, Desert Pathfinder, Destiny Wing Knight, Virtuous Aether, Travelers’ Respite, Featherfolk Punisher, Saintly Squeaks, Feather Sanctuary, Daffodil, Agnes, Charaton, Iceflame Priest.
What does Natura Haven do?
Natura Haven is a proactive midrange deck that utilizes Tree-generating effects and Amulet pay-offs. The primary axis of the archetype is Daffodil, which can generate multiple Trees with its Enhance effect, which not only generate immediate value with Daffodil itself, but also enable Agnes/Charaton/Viridia Magna. Trees also naturally work well for the “Amulets matter” subtheme for Haven cards, enabling effects like Destiny Wing Knight/Saintly Squeaks/Saren that require you to have multiple amulets in play. For that reason, the archetype runs low-cost Amulets like Sneak Attack, Featherfolk Sanctuary and, to an extent, Golden Bell (as in, you don’t really need to have any synergy to run Golden Bell in a Haven deck), most of which slant the archetype in the direction of incremental Storm damage as its primary win condition (with cards like Agnes/Saintly Squeaks/etc.).
Natura Haven has been a fixture of the Rotation format for the last 3 months and was universally considered as the best deck of the format for most of its time in the spotlight, however, after the Agnes nerf and both Craving’s Splendor and Feather Rush rotated out, the archetype has gotten a lot less consistent. Part of the issue is that all 4 of the popular midrange archetypes (Shuten Shadow, Evolve Sword, Lymaga Forest, Natura Dragon) have access to highly impactful Union Burst cards, which specifically swing midrange matchups in their favor, and Haven got, for lack of a better expression, a wee bit shafted with their Union Burst cards: while Saren is not a bad card by any means, it’s a lot more expensive than AoE Union Burst cards in other classes, that typically cost 2-3 mana (e.g., Miyako/Rino/Pecorine/Inori). It’s difficult to justify running a full playset of conditional 5-drops, so when compared to classes like Forest/Sword/Shadow that have 6 cards that get 3-for-1 trades after a certain point in the game, Natura Haven struggles with card advantage, and the more aggressive slant of the archetype means that it’s a lot worse in the current format than it used to be.
Mulligan priority
- Always keep Golden Bell, Desert Pathfinder and Destiny Wing Knight.
- If you’re keeping DWK, also keep a Tree-generating card with a 1-cost Amulet (Bell/Sneak Attack), the Tree-generating cards include Saintly Squeaks/Aether/Respite, in order of priority. In addition to that, also keep Sneak Attack with DWK if you have any 2-card combination of Bells and/or Sneak Attack.
- If you’re not keeping Pathfinder or DWK, keep a 2-drop, this includes Saintly Squeaks/Punisher, in order of priority. Going second against Shadow/Sword/Dragon, Blackened Scripture also works as a 2-drop.
- Keep Kel against Sword/Forest.
- Keep Featherfolk Sanctuary against Rune/Dragon.
- If you have a 2-drop, keep Confectioner against Rune/Dragon/Forest/Shadow.
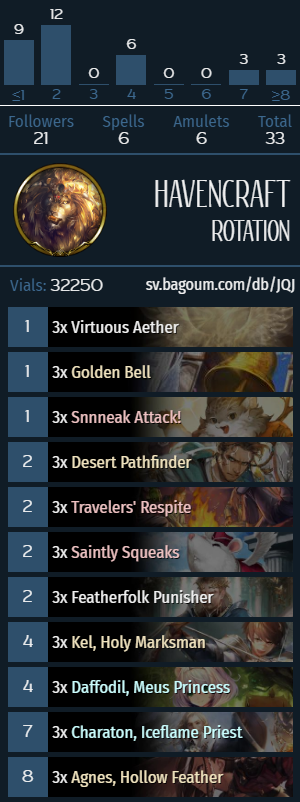
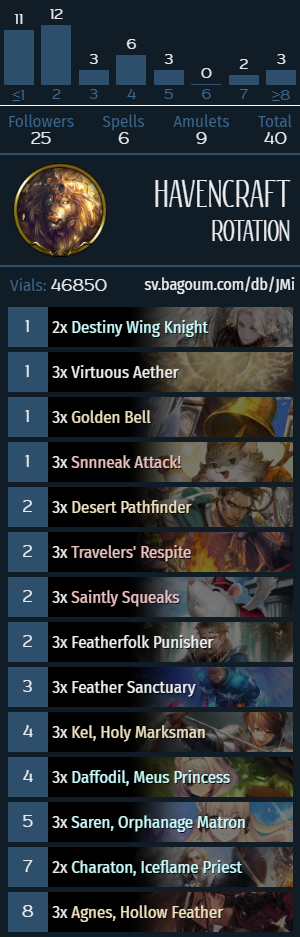
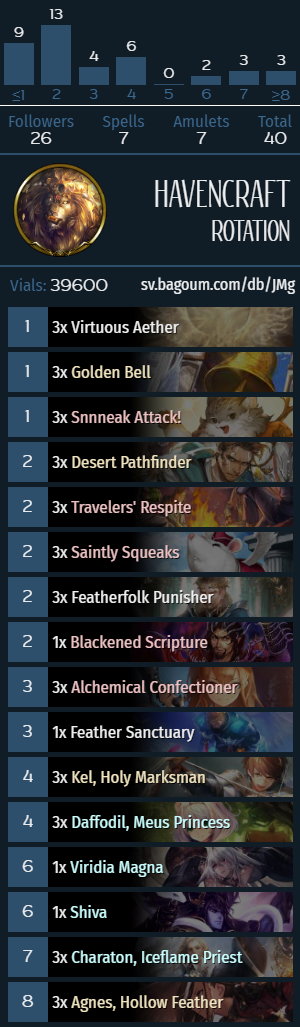
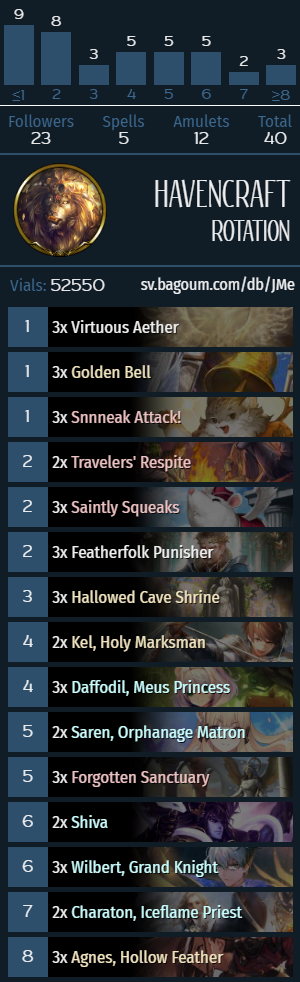
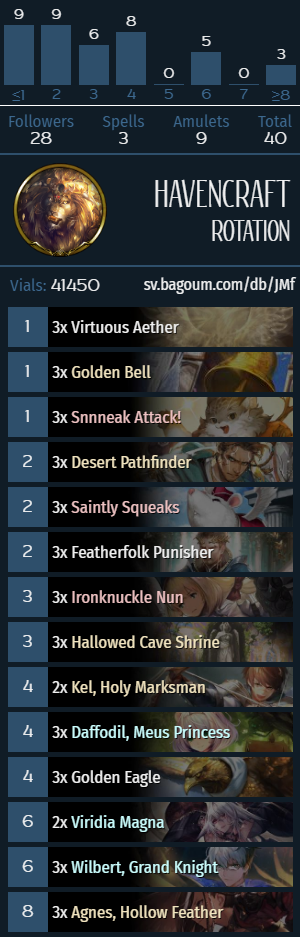
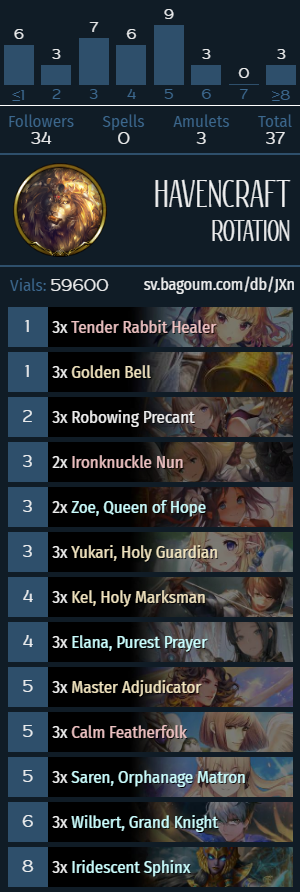
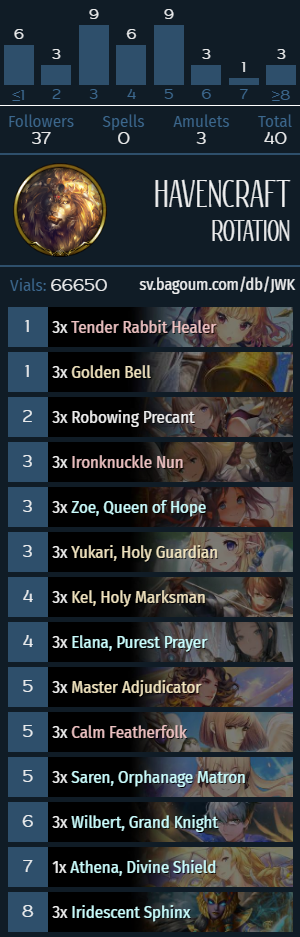
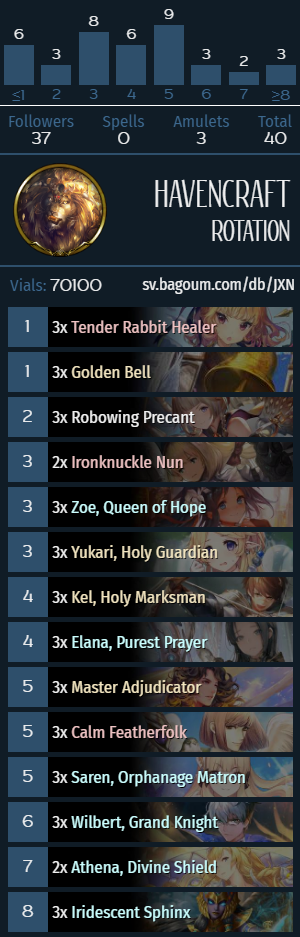
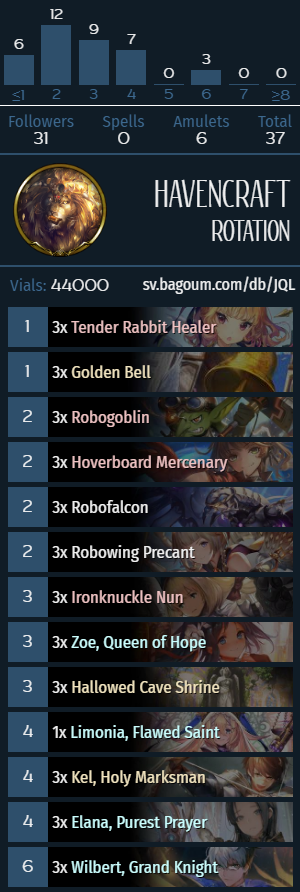
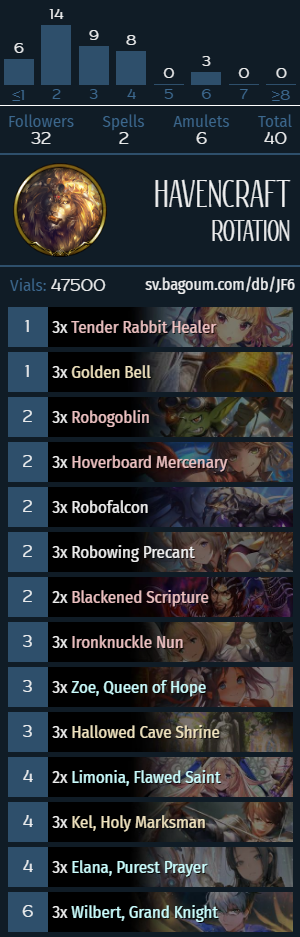
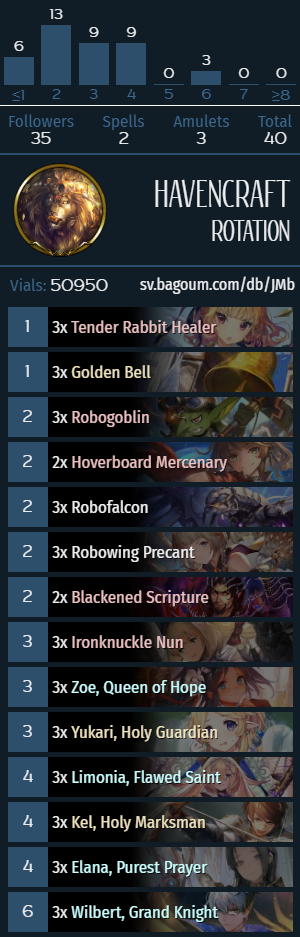
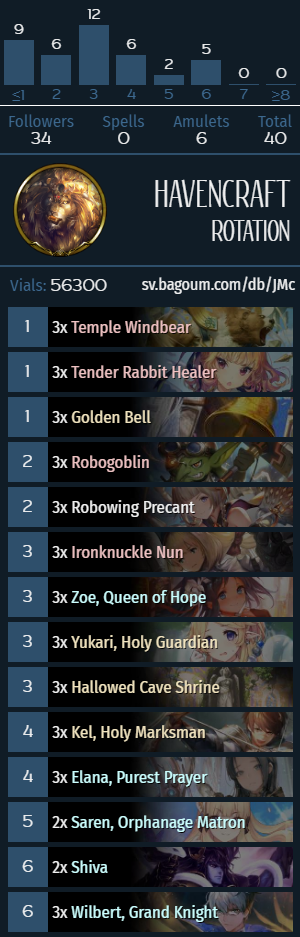
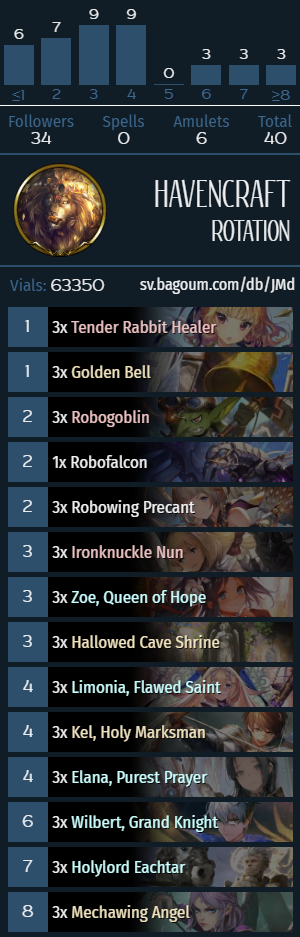
Natura Haven mulligans involve trying to get the early-game highroll cards (Bell/Pathfinder/DWK), and in the case of DWK, try to set up 2 Amulets so that it can come down as a 3/3 either on turn 2 and 3. DWK is a card that rapidly falls off as the game goes on, so, generally speaking, the earlier you can get it into play, the better it is. Scripture is good against Pathfinder decks and Shadow/Sword in general, but somewhat unimpressive against Forest. Kel is an important comeback mechanism against Evolve Sword, Amataz and Lymaga Forest, and while there are cases where keeping Kel ends up being incorrect (against Leod Sword and Control Forest), I generally believe it to be correct for ladder play on average. Kel is somewhat awkward against Shadow, as the deck often doesn’t really go wide around that point in the game. Keeping Confectioner is correct in slower matchups where you don’t have to contest the board early and against decks that play X/1s. Against Shadow, Confectioner can often trade into Kasha/Helio, so it’s not even a huge tempo loss, but Sword can often either get a value trade if you play a 1/2 on turn 3 or turn out to be Leod Sword (in which case the card is not too great anyway), so I would consider keeping Confectioner against Sword a bit greedy.
Optional inclusions and tech cards
- Destiny Wing Knight is an optional inclusion that slants the deck towards a more aggressive game plan. There are 2 main approaches to building Natura Haven after the expansion: you can either make it more highroll-y and aggressive by cutting some of the high-value cards like Viridia Magna/Shiva/Alchemical Confectioner/Charaton/etc., all the while running DWK and a playset of Feather Sanctuaries, which improves the deck’s performance against Dragon and Rune. In my testing, this build of Natura Haven (with Rigze’s list being a good example) has a lot of issues with draw consistency, and can fizzle out when it doesn’t get a good opening. Since this build of the deck runs more Amulets, Saren happens to be significantly better, which has some decent value against Ginsetsu boards, but the 3 damage AoE is woefully insufficient against Kuon boards and often doesn’t do enough against Evolve Sword as well.
- The more conventional build of Natura Haven, similar to the one we’ve seen in December, with 1-2 copies of Feather Sanctuary instead of the rotated cards, is another potential build of Natura Haven. While I don’t think there’s much merit to go over every little detail in how that build of the deck functions since it’s more or less the same deck that it was a month ago, card advantage is an issue for Haven decks in general, so in my testing, Alchemical Confectioner has been incredibly important, and while I don’t really like Shiva for how fast the current format is (and how easy it is to answer for Sword/Shadow/Rune), Viridia Magna still feels pretty solid against decks like Shuten Shadow and Evolve Sword. The build of the deck that I’ve personally had the most success with is similar to しお’s list, with +1 Viridia Magna over Shiva and +2xSaren over the 1-of Scripture and the third copy of Charaton. While Charaton is a 5/5 that often costs 0 and clears a follower when it comes into play after turn 8 (basically, more or less a bad Pecorine), it can be an unplayable brick if you don’t get to play enhanced Daffodil on turn 7, and I personally believe that running 3xCharaton is somewhat greedy due to how popular Rune is. Saren, on the other hand, has utility even before that point, and there are some interesting setups you can do with it against Rune once you get to a low enough Union Burst count, e.g., against Spellboost Rune, when facing down a turn 6-7 Kuon board you can play Saren into Saintly Squeaks on turn 7, then evolve the Saren and clear the board (if the Rune player didn’t evolve one of the 3-health tokens), or at least, most of it. For that reason, I think that Saren is fairly important in the current format, and an argument could be made for cutting Viridia Magna for it altogether.
- Wilbert and Hallowed Cave Shrine “package” has seen some fringe testing in a Natura Haven shell, usually cutting some of the slower synergy pieces like Respite/Charaton. While Wilbert is a solid card in a vacuum, it’s important to be aware that a lot of decks in the current Rotation can get around its effect or minimize its impact, with Union Burst cards being some prime examples of such effects (e.g., Miyako/Pecorine/Shinobu/etc.) as well as the older examples of cards like Fiery Embrace/Valse, that can interact with Wilbert boards without actually coming into contact with them. In addition to that, a significant problem with Wilbert and HCS is the board space issue: the archetype already need 3 open slots to play Daffodil and 0-cost followers like Charaton/Agnes, and both Wilbert‘s Last Words effect and the HCS activate at the start of your turn, often only leaving you with 1-2 board slots to work with, since 1 or the spaces it usually taken up by a Tree, which in turn hamstrings your potential for both proactive and reactive tempo developments. In my opinion, the “Wilbert package” works a lot better in an Elana shell and has little to no merit in Natura Haven.
Regarding Amulet Elana Haven
Identifying cards: Calm Featherfolk, Master Adjicator, Iridescent Sphinx, Saren.
In addition to the “standard” Elana build that runs Machina 2-drops, a more recent version of the archetype (usually) includes full playsets of Calm Featherfolk, Master Adjudicator and Sphinx instead of the early game cards like Robogoblin, Robofalcon, etc., which has a dual purpose: on the one hand, since all of those amulet followers, when played on curve, pop on turn 5, so if you manage to get a Featherfolk into Adjudicator into Sphinx curve (or at least parts of it), it can create an enormous tempo swing on turn 5, which you can often capitalize on with one of your high-tempo 4-drops (Elana or Kel). On the other hand, running a lot of amulets allows you to utilize Saren as both an efficient tempo play (if it pops any of the aforementioned Amulets, with its UB ability, or even both at the same time). After building up a big board with the midgame tempo swing, you can then protect if from AoE with UB Yukari (particularly relevant against Control Forest) or Athena, Divine Shield (the aptly named Neutral 7-drop that gives all allied characters the Divine Shield keyword from Hearthstone).
The deck does not have a lot of variety in terms of play patterns or deck building, but your goal is usually to try and set up a good 1-2-3 curve with Amulets, and then transition from the midgame tempo lead with either Elana buffs or a Wilbert into Athena. If everything goes according to plan, you effectively close out the game on turn 6 in a spectacular fashion, however, if it doesn’t, you usually get outvalued by better midrange decks, which is the spot where all Haven decks in the format reside currently: they can have great early- to midgame draws, but lack a value engine (be it in the form of cycling, or powerful Union Burst cards) to close out games in a timely fashion.
(Traditional) Elana Haven
Identifying cards: Hoverboard Mercenary, Robogoblin, Limonia, Flawed Saint.
What does Elana Haven do?
Elana Haven is a midrange deck with some control elements that revolves around utilizing incremental healing effects in the form of 1-cost healing cards and Repair Mode tokens in order to generate tall boards of 2-3 followers, once Elana’s Prayer is in play. Apart from the “Elana highroll”, the archetype has adopted another angle of attack in Wilbert, which helps transition from an early tempo lead, dealing incremental chip damage and making trading awkward.
Mulligan priority
- Always keep Golden Bell and/or Elana. Going first, only keep 1 Elana, going second, keep up to 2xElanas.
- Keep a proactive 2-drop, which includes Robogoblin/Precant/Hoverboard Mercenary/Falcon, in order of priority. If you’re keeping one of the 2/2s, also keep a Robofalcon going first.
- If you’re already keeping a 2-drop, also keep Ironknunckle Nun/HCS.
- Keep Kel against Rune/Sword/Forest.
Early-game strategy for Elana Haven involves trying to evolve its namesake card on curve, as well as have an aggressive early curve. Despite the deck’s defensive slant, it’s important to recognize that Elana Haven doesn’t actually have a proper inevitability engine and any reach (outside of Wilbert chip damage), so getting an early tempo lead and pushing some face damage at the same time makes the difference between closing out games and running out of gas against decks with full playsets of Union Burst cards or Viridia Magnas (and sometimes, even both). Getting a 2->3->2+2 curve is optimal when going first (which is why Robofalcon is so important to have, as it can either push extra face damage or get a value trade with one of your 2-drops on turn 4), and the 2->3->4+evolve is the optimal curve when going second. Generally, you want to try to go wide early on, and then capitalize on the tempo advantage with either Elana, Limonia, Zoe or Kel, depending on your draw and the board state. In my testing, Wilbert is a card that I always want to draw into by turn 6, but I don’t think it’s responsible to keep Wilbert, since the early tempo is so important, and either Ironknuckle Nun or HCS are better turn 3 plays that Wilbert (mainly, because they trade better and line up against most decks’ early game, respectively), and the card is also better than Nun/HCS in the later stages of the game. Three 1/2-s are better than 2, and a 2/3 trades better that either of them against the majority of 2- and 3-drops.
Optional inclusions and tech cards
- Limonia is an optional inclusion that helps in slower midrange matchups. Generally speaking, I believe that Limonia is not particularly necessary, as it’s often just a 6/5 Rush for 6 that gives 2-3 discounts over the course of the game, however, with the recent emergence of Control Forest, going for the Aegis plan is a pretty legitimate plan against that deck, because 3-4 Aegis hits are usually enough to close out games against Control Forest.
- Blackened Scripture is a tech card against Shadow and Dragon. Being able to cleanly answer Helio and Pathfinder et al. is fairly valuable in and of itself, so Scripture is a sensible inclusion if you’re trying to improve your early game in those matchups. Personally, I’ve found Holy Counterattack to be more or less a strict upgrade over Scripture: sure, you lose the banishing utility, but against Sword/Shadow/Rune, the effect is more or less the same in the early game, as there’s little difference between doing 2 damage and banishing a 3-toughness follower. The big upside of Counterattack is that it’s less of a dead draw in the late game, and can often do 6-7 damage for 2 mana during Kel turns, which is a huge tempo swing, and it also buffs your Wards, which is rarely relevant (since Wards generally have less attack than non-Ward cards), but still constitutes a bit of additional upside, e.g. when going first with an Ironknuckle Nun on 3, you can often get a 2-for-1 trade with the 3 damage and the buff, all while developing a 2-drop alongside it, which is solid tempo.
- Yukari is a tech card against Natura Dragon. The card is not particularly impressive in its other applications, but it can be swapped out for some of the other cards in that mana slot (e.g., HCS) if Dragon becomes popular enough to warrant doing so, and since most of the Wilbert package doesn’t do much against Dragon anyway, Hallowed Cave Shrine could be pretty cuttable.
- The rest of the “Ward tribal” package, with cards like Saintly Leader and Holy Lancer, simply don’t fit into an Elana Haven shell, as the deck doesn’t have enough room to accommodate so many additional midgame cards. Cutting most of the Elana “package” in favor of Saintly Leaders makes it so that you have to really zero in on drawing Wilbert every game. Regular Elana builds have multiple angles of attack: sometimes, you evolve Elana on curve and start making tall boards, in other cases, you get an early tempo lead, then play Wilbert and eke out that last bit of damage from its leader effect, and if you limit yourself to only half of the “highroll” potential by going “full Ward”, the deck becomes too linear and starts to autolose to decks with a high amount of follower removal and comeback mechanics, e.g. Shuten Shadow/Natura Dragon/Evolve Sword/Control Forest, etc. For this reason, I don’t think that the “Ward tribal” Haven build has a high enough card quality of the card pool currently, although I wouldn’t be surprised to see it become a real deck at some point in the future.

Elana Haven is an archetype with not a whole lot of damage behind it, most of which leads me to believe that the archetype has maintained most of its percentages (which were never particularly impressive in the first place), however, its matchups against midrange decks, namely, Evolve Sword and Natura Blood, are a lot worse due to the fact that those decks have gotten some semblance of support, while Elana Haven did not.
I am not entirely sure what to do with the Haven section, as there is very ladder data for Haven (note how there is no Natura Haven matchup section), the decks are not very competitive or exciting, all while being pretty expensive to build. So, if there is one thing I can impart on the aspiring Haven players, it’s the following: Elana Haven is a lot better and more flexible in Unlimited than in Rotation, but if you have no interest in Unlimited, waiting until the next set would be the next best thing.

[ps2id id=’stats’/]
Stats corner