Shisogenius’s Unlimited Meta Insight
“Meta Insight” are a series of articles covering the differences between various Shadowverse deck archetypes, their role in the metagame, common play patterns and tech cards.

Artifact Portal
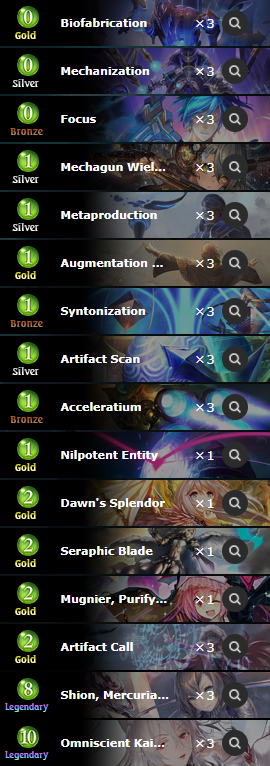
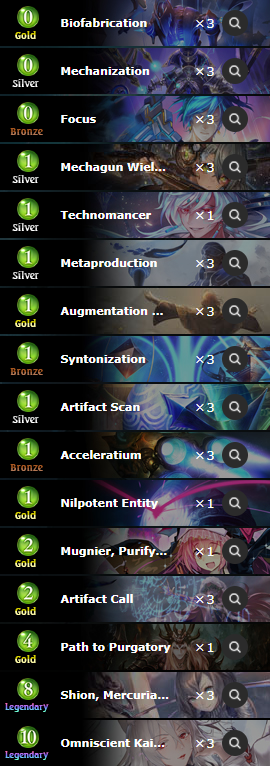
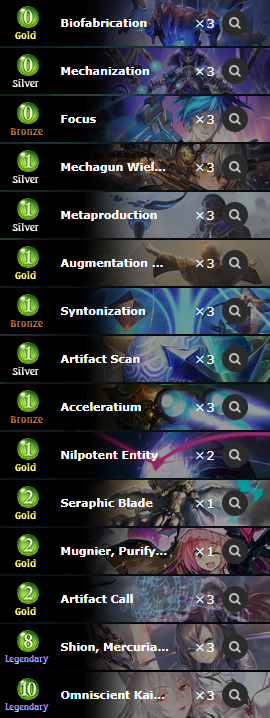
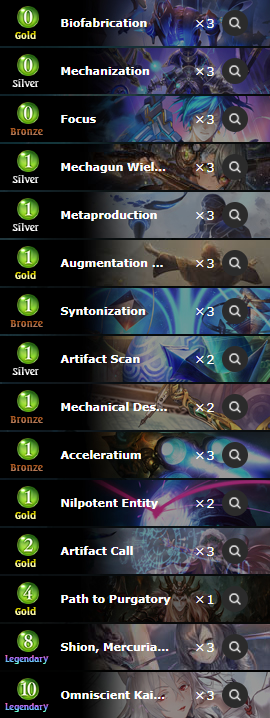
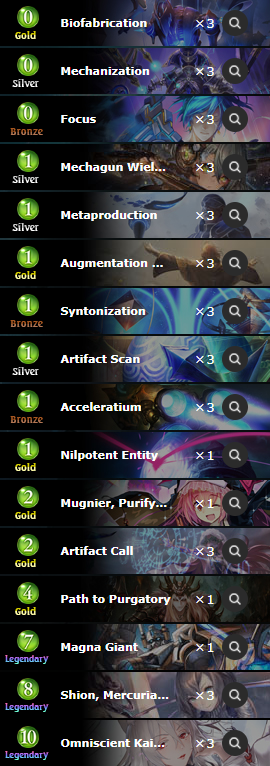
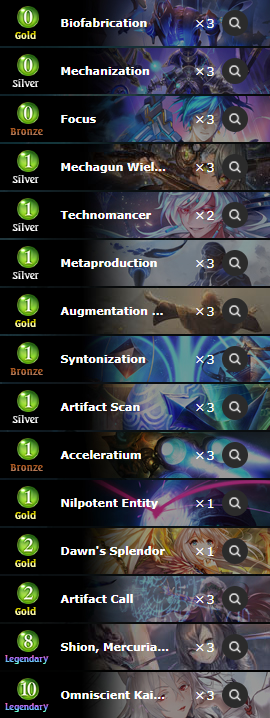
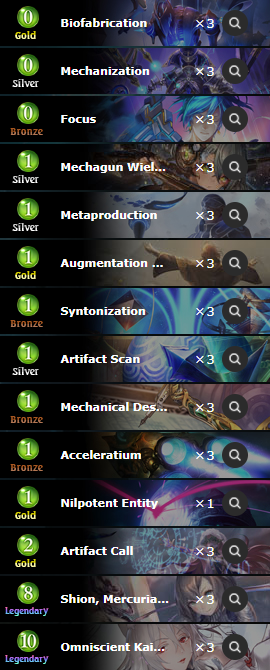
Identifying cards: Mechanization, Biofabrication, Mechagun Wielder, Metaproduction, Artifact Call, Acceleratium, Augmentation Bestowal, Shion, Mercurial Aegis.
Artifact Portal is a tempo deck with some combo elements that revolves around cheating mana costs with Acceleratium/Augmentation Bestowal. The basic “combo” of Artifact Portal is to get 2 mana-refunding effects up (ideally, an Acceleratium and an Augmentation, but the deck can still function, albeit worse, with duplicate enablers) and then play Analyzing Artifacts to clear the opponent’s board and generate a tempo lead by getting mana refunds. The general goal is to end the chain on a Shion (or two), however, there are two specific combo setups to be aware of: firstly, there’s the early-game proactive setup, which involves setting up a 12-14-power board with simply Analyzing Artifacts and a Shion, usually done on turns 3-4. The proactive setup is primarily applicable in matchups against combo archetypes or other decks that don’t generate an early board presence, in other words, in matchups where you have to be aggressor, but it’s obviously not something you can do every game, as you have to have a pretty specific hand for the setup to work. The secondary setup generally requires the opponent to have some semblance of a board that you can trade Artifacts into and involves Radiant Artifacts, so it generally doesn’t start until turns 5-6. The prerequisite for the Radiant Artifact setup is that you have to find a Mechanization to start shuffling Radiant Artifacts into your deck (which you can then clone with Biofab once you get going), and while this iteration of Artifact Portal has existed for so long that there are certainly more comprehensive mathematical theories for this whole Artifact-shuffling process, the basic rule of thumb that I follow is that you have to aim for a 3:1 ratio between Analyzing (or Ancient) and Radiant Artifacts that you’re putting into your deck (the reason for that is that with 2 mana-refunding effects, Radiant Artifacts effectively costs 3 and Ancient Artifacts effectively cost -1, so the 3:1 ratio puts you at parity on average). In practice, this ratio is a bit more slanted towards Radiant Artifacts due to the fact that you generally get extra Analyzing Artifacts from Syntonization/Artifact Scan and can’t always get a Radiant Artifact out of those cards, but it’s a close enough approximation.
I should also note that against aggressive decks like Daria Rune/Aggro Shadow/Summit Haven, it can be correct to go for the defensive combo with Mystic Artifacts instead of Radiant ones if you’re under a lot of pressure: the Mystic/Analyzing setup is a lot less stringent on shuffling specific Artifacts and finding enablers (since every Mystic draws a card), but is somewhat contingent on running an alternative finisher of some sort (e.g., PtP), as a board of 4/5-s can technically be answered with some clever Kel lines of play, for example. In addition to that, a not-so-recent addition to the archetype is Artifact Scan, which makes it so that you can get a Paradigm Shift from Syntonization, pick the Drain Artifact, trade it off into something, and then clone it with Artifact Scan, which can represent 6-10 points of healing and is particularly relevant against burn-heavy decks.
In the early game, the cards that you’re generally looking for include combo pieces (up to 1 copy of Acceleratium or Bestowal), any and all card draw (Focus, Night’s Way, Metaproduction, Syntonization, Mechanical Designs, etc.), as well as 2-card combos between cards that shuffle Artifacts into your deck and cards that draw Artifacts (e.g., Mechanization+Call, or Metaproduction+Mechagun). A somewhat risky setup is Mechanization + Kaiser, which gets a bit better going second (you get to look 2 cards deeper), but can still backfire if you draw 2+ cards that you want to keep, so it requires a bit of finesse (e.g., you can keep cards that aren’t relevant in that specific matchup with the intent to discard them on turn 1, so a specific example is that I’d generally 3-keep a Kaiser + Mechanization + Nilpotent Entity hand against Rune/Haven, but I’d toss Nilpotent against Dragon). It is not uncommon for Artifact Portal to be passing for the first 2 turns of the game, then play Focus on 3, and start going off when it finds 1 (ideally, 2) enabler(s), and it is important to not get baited by early Syntonization/Mechagun Wielder/Artifact Scan/etc tempo-oriented lines of play, as that is the leading cause for the deck fizzling.

Optional inclusions and tech cards
- Anti-combo tech cards such as Nilpotent Entity, Mugnier and Seraphic Blade are played to primarily combat Forest/Dragon/Gremory Shadow and other combo archetypes. Seraphic Blade also has the important defensive utility of answering Summit Temple against relevant Haven decks, and Mugnier can also pick up value in the Portal mirror by silencing the card draw from the opponent’s Analyzing Artifacts and other Last Words effects, as well as the occasional relevant Amulet (e.g., PtP in the Portal mirror or Summit Temple/Elana’s Prayer against Haven). The main purpose of Nilpotent Entity is to prevent Dragon players from resolving Dagons and other Storm cards (or at least, make them have a Seraphic Blade), and it can also serve to delay damage in aggressive matchups with big Storm-based finishers (e.g., Daria Rune, Summit Temple). The anti-combo tech cards are very important for tournament Artifact Portal lists, and I would say that running 3-5 of these cards is fine for ladder (depending on how often you run into non-Portal players), however, these cards do cost you percentages in the Portal mirror and against proactive decks like Daria Rune, as you’re cutting Mechagun Wielders/Artifact Calls to fit in these tech cards, and as such, you are making your deck run worse. If you’re running into a lot of aggressive decks, I would personally recommend a build akin to 佐々木久美’s or ミヤネウロ’s decklists, which run full playsets of Calls and Mechaguns and also include Technomancers to make the archetype really consistent against early game pressure, but that obviously leaves you a bit soft to Dragon/Gremory Shadow.
- The Radiant Artifact setup is not something that you can reliably set up in every single game that you play, so it’s not uncommon for Artifact Portal lists to include 1-2 damage cards that can either contribute to the Radiant Artifact gameplan or compliment the archetype in other ways. The most common choice for this slot is Path to Purgatory, which is fairly easy to activate around turn 6, and is mostly just a big Demonic Strike, but if your deck is spinning its wheels a little too much (as in, you can’t find a Biofab or a Radiant for Biofab), you can sometimes just set up a PtP and play defensively to set up a 2-turn lethal. Path to Purgatory is especially relevant in an aggressive metagame, as you can get away with never actually generating any Radiant Artifacts, and instead focus on building a board of Mystic Artifacts and/or heal with Syntonization tokens, so running at least 1 PtP gives you some insulation against Aggro Shadow/Daria Rune. Other cards once could try in this slot include Ines (basically, a reverse PtP, in that you play Ines first and then start your chain), cards that serve as extra copies of (bad) Shions (e.g., Craving’s Splendor or Keen Enchantment), and so on. All of these cards are pretty interchangeable and mostly depend on player preference/expected meta, but PtP is most likely the best option against an aggressive field, so this is generally the most common option.
- Early-game card draw, such as Magna Giant, Mechanical Designs and Night’s Way, is an alternative to the more conventional early-game cards like Technomancer, that can set up the deck’s gameplan better. These types of effects are obviously redundant with Focus and Artifact Call, and cut into the anti-combo tech card sector, so if you’re not playing 3xCall, you’re probably not going to find a slot for Night’s Way, but if you’re not concerned about the Dragon matchup, some number of Mechanical Designs can improve your percentages in the Portal mirror and against other proactive decks.
- Ancient Apparatus is an anti-aggro tech card, the primary utility of which is providing healing against burn-heavy archetypes like Aggro Shadow/Daria Rune (though the card can also be used to fetch Mystic/Radiant Artifacts if you’re not under a ton of pressure). Dawn’s Splendor is a similar option that is primarily good against Daria Rune in particular, but also does work against Khawy and Necroimpulse, so there is some overlap between it being an anti-aggro tech card that also has fringe utility against Gremory Shadow, with the obvious downside (compared to, let’s say, Nilpotent Entity) of it being a one-shot effect.
Regarding Control Portal
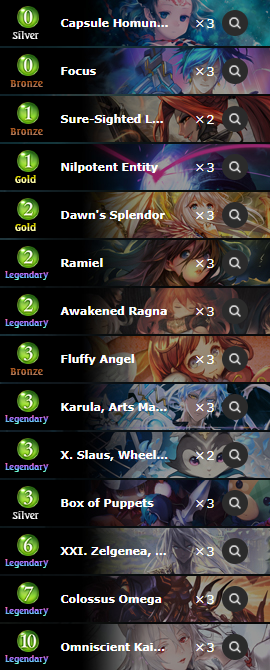
Identifying cards: Slaus, Wheel of Fortune, Ramiel, Colossus Omega, Awakened Ragna, Karula, Arts Master.
Control Portal is a fringe archetype that utilizes the defensive utility of Nilpotent Entity, a disruptive early-game package of Slaus/Box of Puppets/Karula and a variety of defensive Neutral cards (Ramiel/Fluffy Angel/Zelgenea/Dawn’s Splendor/etc.) to utilize its win condition, which is generally a combination of enhanced Awakened Ragna with either Colossus Omega or Zelgenea. The deck’s game plan is generally a bit too slow to consistently race the more unfair decks of the format (if you’re winning on turn 9 and need to set up a Colossus Omega on turn 6, then a turn 3 8/8 with a Zeus friend coming along can get in the way of things), but the deck has some potential against the more all-in combo decks (e.g., Dagon Dragon has a lot of trouble with triple Nilpotent Entity decks) and conventional “fair” aggressive decks (e.g., if you’re playing against Aggro Shadow in Rotation and you have 3xFluffy Angels in your deck, it’s usually a pretty comfortable matchup, and similar ideas apply to aggressive Unlimited decks, as most of them lean heavily on Rivayle cards to function), so Control Portal is a very polarized deck in a ladder setting. The archetype could have potential if it gets more Slaus/Box-style disruption cards in future sets, but the only thing Control Portal really has going for it (over Control Blood) is the surprise factor, as it’s unheard of for an Unlimited Portal deck to not play Acceleratiums. The sheer audacity of this Yuwan bastard!

Aggro Shadow
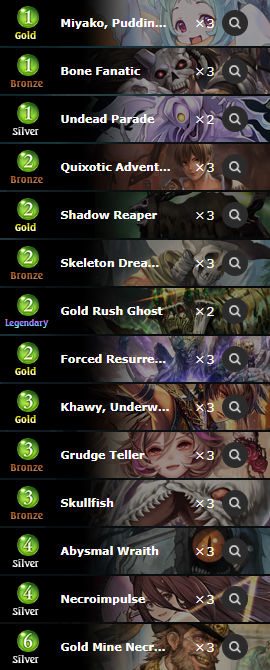
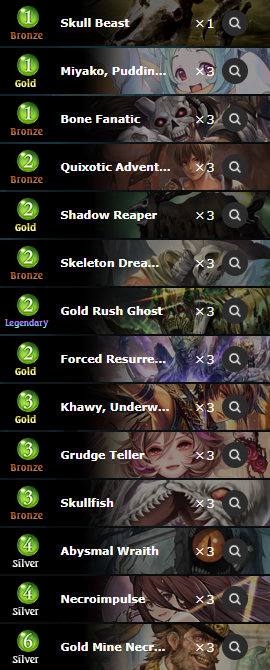
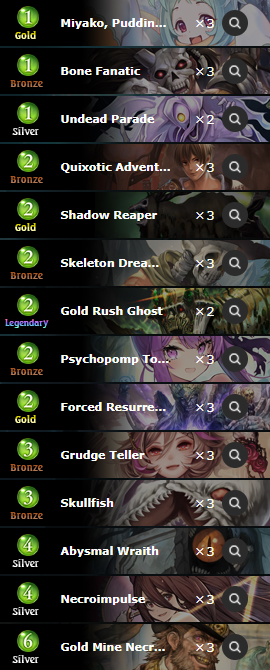
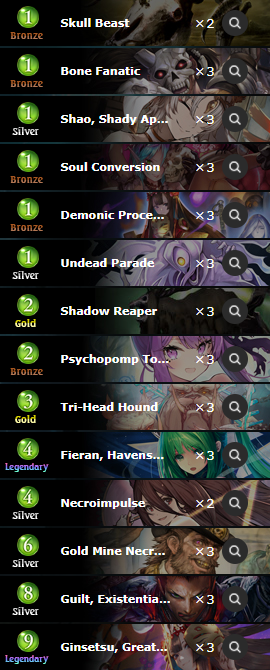
Identifying cards: Miyako, Pudding Poltergeist, Quixotic Adventurer, Skeleton Dreamer, Shadow Reaper, Grudge Teller, Skullfish, Abysmal Wraith, Gold Mine Necromancer, Forced Resurrection, Khawy, Underworld Heir.
Aggro Shadow is an aggressive archetype that is in many ways similar to its Rotation counterpart. The deck aims to have a proactive early-game curve, and closes out games with some combination of Necroimpulse/Khawy/ Abysmal Wraith/Gold Rush Ghost in combination with early-game chip damage, using Forced Resurrection to get through Wards. The deck has some early-game snowballing potential with Shadow Reapers and its suite of 1-drops, which can allow the deck to get under Rune quite well (as Rune can’t really interact with Ambush followers in the early game). Aggro Shadow isn’t the most complex of decks, and its game plan generally involves playing the biggest follower in your hand on every turn, attacking the opponent and trying to avoid trading to the best of your ability.
In the early game, you’re generally looking for a 2-3 curve as a baseline for early aggression, with the ideal 2-drops being Quixotic Adventurer and Skeleton Dreamer, followed by Shadow Reaper. Grudge Teller, and to a lesser extent, Skullfish are the next cards in terms of priority, and if you have a 2-3 curve, you can also keep Abysmal Wraith or a 1-drop as well, with the 1-drop priority being Undead Parade over Bone Fanatic over Miyako. If you’re keeping Shadow Reaper as your 2-drop, it’s fine to keep it with Fanatic/Parade even if you don’t have a playable 3, as Shadow Reaper lines often involve odd developments (like using Gold Mine Necro and/or Parades to pump your Reapers on turn 3), so 3-drops are less of a priority with Shadow Reaper opening, although in my personal testing, I’ve found the Quixotic Adventurer to be the best-performing 2-drop overall, so I get the impression that early-game Shadow Reaper-based lines of play can be somewhat unproductive. The main exceptions to this are high-interaction decks like Artifact Portal, but if your opponent isn’t developing anything proactive in the early game, it’s often better to simply put more stats into play instead of banking on Shadow Reaper.
Optional inclusions and tech cards
- Psychopomp Tour Guide and Guilt are optional inclusions that work well to compliment Shadow Reapers in the early game, and allow the deck to have a bit more card selection. The issue with Soul Conversion-type of effects in Aggro Shadow is that they’re always poor tempo, and in addition to that, the cards you’re generally cutting for Psychopomp are midgame cards like Khawy (with the logic being that if you run more card draw, you’re more likely to find damage, so you can get away with running fewer damage cards). For this reason, I’m not a huge fan of Psychopomp, as the main strength of the deck lies in its fast openings, and if you’re spending your early-game turns destroying your followers for value, you can fall behind on tempo in aggro mirrors.
- Skull Beast and Shao are optional 1-drops that can either compliment or replace Undead Parade. In my experience, Undead Parade is the best 1-drop in the deck, as it attacks for 2 damage on turn 2, and 2 is greater than 1. Shocking, I know. For that reason (and due to Gold Mine Necro/Shadow Reaper considerations), I personally prefer the 3/3/2 Miyako/Fanatic/Parade configuration to any of the 1-mana 1/2-s. Aggro Shadow in general doesn’t have that much variance: for example, out of the 108 Aggro Shadow players in the 2 most recent Unlimited JCG events (at the time of writing), 42 were playing the same exact 40 cards, listed as “al’s Aggro Shadow” (due to the fact that that specific player won one of the tournaments with it), so while there is some room for experimentation with Aggro Shadow’s early game, I don’t think that straying too far from the standard configuration is very productive for a low-curve hyper-aggressive deck like Aggro Shadow.
- An alternative to the “3-drop package” of Grudge Teller/Skullfish/Forced Resurrection is the Rally-based package of Tri-Head Hound, Fieran and Ginsetsu, which often run fewer 2-drops and more Soul Conversion-type effects. The main upsides of Rally-based Aggro Shadow builds are that you have more card selection (which allows you to find your finisher easier) and that your Shadow Reapers can snowball a lot better, but the issue with Fieran decks in general is that they are very weak to Portal and, in the specific case of Aggro Shadow, it’s that you’re cutting a lot of damage from your deck (the Grudge Teller package, Abysmal Wraith/Khawy), so the deck is a lot more reliant on finding its key cards (more specifically, Shadow Reapers and Necroimpulse), which makes it worse at pressuring combo decks in the event where you don’t have an early Shadow Reaper. With the current trend of Artifact Portal being on the rise, Rally-based Aggro Shadow builds seem a lot worse than the “standard” build of the deck.


Atomy Shadow
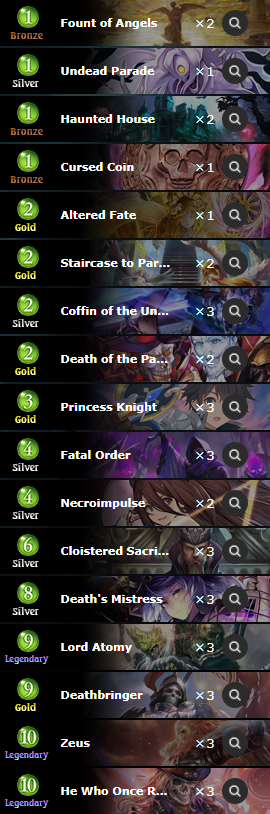
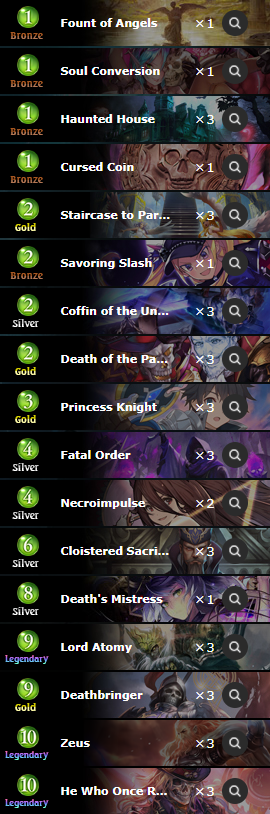
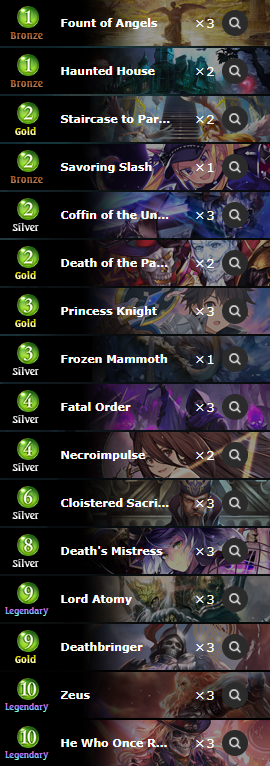
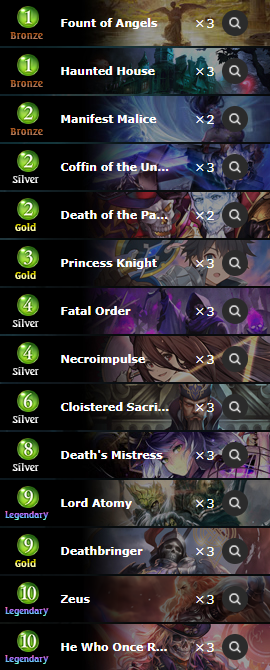
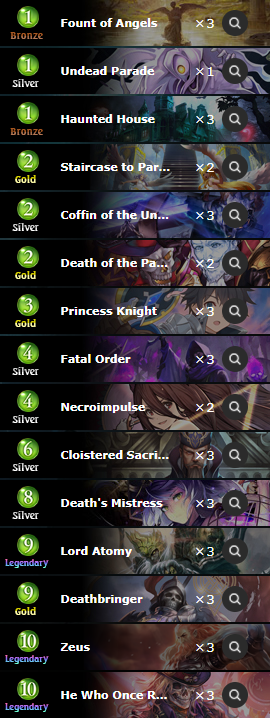
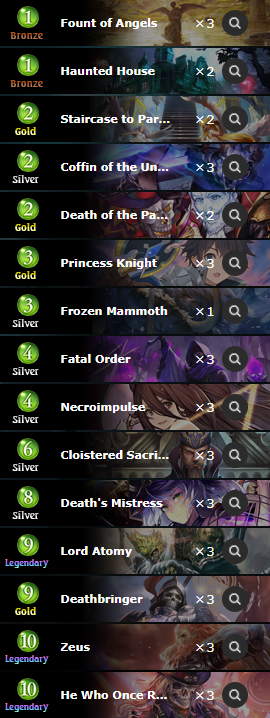
Identifying cards: Fount of Angels, Haunted House, Coffin of the Unknown Soul, Princess Knight, Lord Atomy, Cloistered Sacristan, Zeus, He Who Once Rocked.
Atomy Shadow is a tempo deck that revolves around playing its eponymous card in order to generate a large tempo swing on turns 3-4. An 8/8 on turn 3 isn’t really that great by Unlimited standards in current year, however, Atomy has significant synergy with Coffin of the Unknown Soul and Cloistered Sacristan, which put a lot of stats into play, even more so if said Coffin had a Zeus or He Who Once Rocked to immediately start pressuring the opponent’s life total, or a Deathbringer to control the board. In order to hit Atomy more consistently, the deck generally doesn’t include any Fanfare followers, which allows Princess Knight to always fetch up Atomy in the early game for the turn 4 combo. Some of the key recent additions to Atomy Shadow include Death of the Party (which is an early-game play that replaces itself, gets some extra fodder to activate Atomy easier, and does some chip damage to the opponent), as well as Necroimpulse (which turns the deck into a quasi-aggro deck, in that if you go off on turn 3-4, a Necroimpulse follow-up is generally enough to close out the game on the following turn against non-Portal decks; in addition to that, you can always just use Necroimpulse to simply play Atomy on 4 if you don’t have anything better going on).
In the early game, you’re generally looking for specifically Atomy or Princess Knight if you don’t have an Atomy; and if you have an Atomy or PK, you can also keep Coffin of the Unknown Soul, Death of the Party, Staircase, Fount, etc. If you’re keeping Atomy with a Coffin, also keep HWOR/Zeus to go along with it.
Optional inclusions and tech cards
- Atomy Shadow is generally not an archetype that particularly cares about what the opponent’s trying to do, but a bit of early interaction can still be somewhat useful; this can include Manifest Malice (good against aggressive decks, incidentally also helps activate Atomy a bit) and Seraphic Blade (answers Nilpotent Entity/Summit Temple), which can slot in at 1-2 copies, depending on how aggressive the field you’re playing against is.
- The other avenue which allows a bit of customization is the early-game card draw slots. I am of the belief that Princess Knight should be a 3-of, and I place a lot of value on 1-mana amulets (Fount of Angels and Haunted House, although the latter doesn’t draw cards, but can generate Ghosts with Burial Rite effects), as they make setting up for Atomy a lot easier, but I think there is a lot of potential flexibility in the Death of the Party/Death’s Mistress slots. Some potential options include Staircase to Paradise (which lets you reload after an early Atomy), Undead Parade (sets up Fatal Order and potentially enables a turn 2 Atomy with Haunted House, which is quite silly), Cursed Coin (eats up Necroimpulse Shadows and only draws cards at EoT, but if you chain together BR effects in the early game, it can effectively draw 2-3 cards for 1 mana), Altered Fate (more of a midgame card that can be used to look for Fatal Order or Necroimpulse, also conveniently generates a lot of extra Shadows), and if you want to get even more highroll-y, Frozen Mammoth (doesn’t draw cards, but generates an extra body with Atomy). I have personally been very unimpressed with Staircase and I believe that the card is simply an outdated carryover from old Atomy Shadow builds, so I believe that the most consistent configuration is generally 3xDeath’s Mistress+2-3xDeath of the Party, with some optional flex slots, which depend on the field you’re expecting to see.
Gremory/Tyrant Shadow
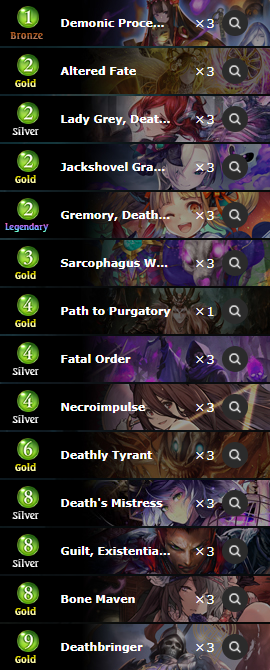
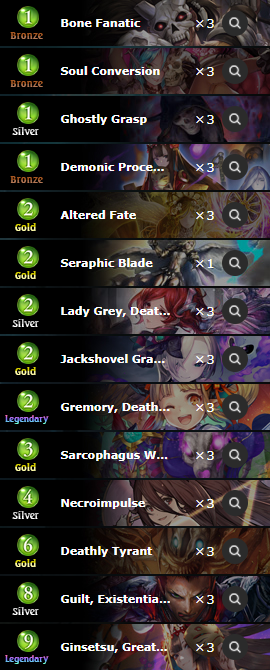
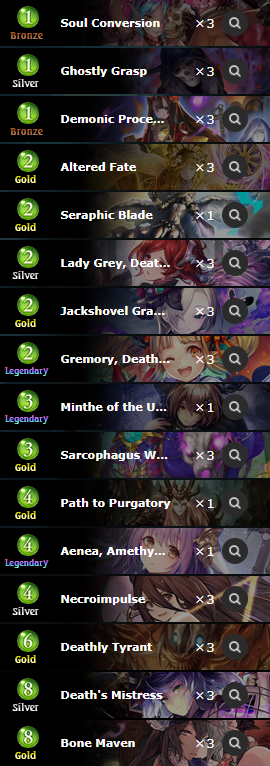
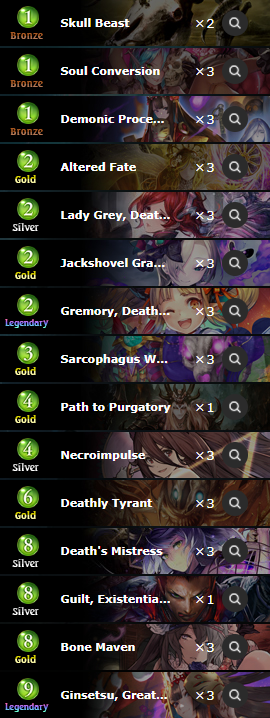
Identifying cards: Jackshovel Gravedigger, Bone Maven, Lady Grey, Deathweaver, Sarcophagus Wraith, Deathly Tyrant Gremory, Death Teller, Path to Purgatory.
Gremory (a.k.a. Tyrant) Shadow is a combo deck that utilizes Gremory refunds to set up lethal with some combination of Deathly Tyrants and Necroimpulse. Previously, the deck used to commonly include Path to Purgatory as its primary finisher, which was enabled using the combination of Minthe and Sonata of Silence to get to the necessary Shadow threshold. In recent times, the format has gotten a lot more aggressive, so the Minthe + Sonata builds have been gradually getting pushed out by Altered Fate lists, as the deck has more than enough damage to close out games with just 3xTyrants and 3xNecroimpulse, and the Altered Fate build is faster (since it doesn’t need to take a 4-mana setup turn) and allows you to fit in more defensive tech cards. The general game plan of the archetype involves trying to get Gremory active on turn 6 and then winning the game on the spot with either double Tyrant or a combination of Tyrant and Necroimpulse.
In the early game, you’re looking for card draw of all shapes and sizes (Procession, Death’s Mistress, Sarcophagus Wraith, Soul Conversion, Guilt), as well as Bone Fanatics (as SoulCon targets) and Jachshovel Gravediggers (as Procession targets or to contest the board). Going second against Shadow/Rune/Haven, it is generally correct to keep Lady Grey, and if you’re keeping Lady Grey, also consider keeping a Jackshovel even if you don’t have a compatible card (Procession/Mistress) for it.
Optional inclusions and tech cards
- Fatal Order and Deathbringer are an anti-aggro package that allows Gremory Shadow to have better outs against decks that pressure its life total with large boards and Storm damage (e.g., Atomy Shadow, Daria Rune, etc.). The deck runs a fair amount of Burial Rite effects between Procession/Mistress/Bone Maven, so it’s often not too difficult to set up for an active Fatal Order by turn 4-5, which can then be used to stabilize (in aggro matchups) and punch through Wards in the post-Gremory stages of the game (against decks like Elana Haven). In addition to that, Deathbringer has the defensive utility of transforming Aggro Shadow’s 3-drops and dealing with evasive Shadow Reapers in the early game, as well as other fringe archetypes in the format (e.g., it stems the bleeding against Atomy Shadow and deals with various snowball-y cards like Rivaylian Bandit against certain tempo decks), so the package has a fair bit of utility even outside of its primary application.
- An alternative to the Fatal Order/DB package is the more old-fashioned Ghostly Grasp build of the deck, which can fit in more proactive early-game cards (e.g., more SoulCon effects, and 1-drops like Bone Fanatics and Skull Beasts to go along with them). With Bone Maven added to the archetype, Gremory Shadow has enough healing against conventional aggressive decks (e.g., Daria Rune) with Lady Grey/Wraiths/Bone Mavens, so there is less of a necessity for the Fatal Order package compared to the pre-mini-expansion builds of the deck. With that said, Ghostly Grasps aren’t going to cut it against the more unfair decks of the format (e.g., Atomy Shadow and Artifact Portal), so I personally prefer the Fatal Order build for the current ladder environment. One of the upsides of not running Deathbringers is that you also unlock Ginsetsu as a defensive tech card, which is relevant against decks like Loxis Forest, for example, but not particularly exciting (at least, in my testing) otherwise.
- Seraphic Blade is an anti-Portal/Haven tech card, and has the utility of answering Nilpotent Entity once you set up Gremory (e.g., Tyrant into Necroimpulse leaves you with exactly 2 mana to deal with Nilpotent), as well as early Acceleratium/Summit Temple. Seraphic Blade has little to no utility against Rune/Forest/Dragon and against non-Aggro Shadow decks, so it’s somewhat narrow in application, and as such is primarily a tournament-oriented tech card.
- Aenea is an anti-combo tech card, primarily intended to be good against Dragon and Forest. The card is pretty slow and doesn’t really contest the board by itself, or at least with a level of impact appropriate for the Unlimited format, and more importantly, playing Aenea on 4 often slows down your Gremory by a turn, which makes it a very narrow tech card in my experience. I wouldn’t really recommend it in Fatal Order builds of the deck, but it’s not too unreasonable in more draw-heavy shells.

Rhinoceroach/Loxis Forest
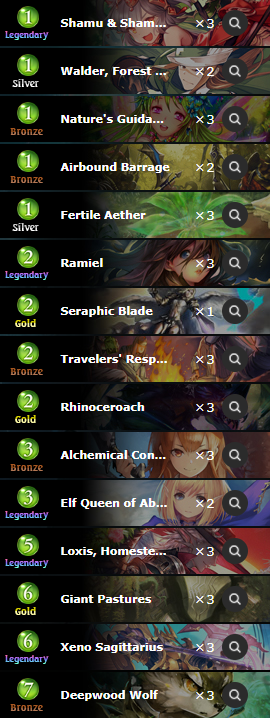
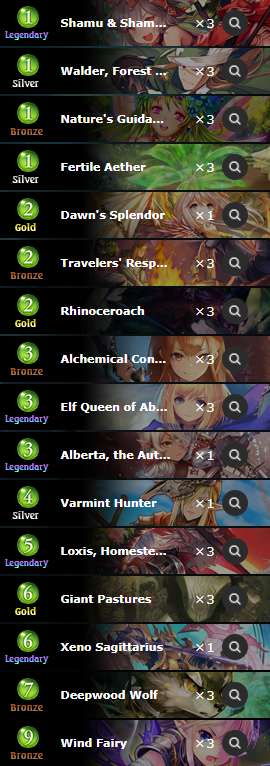
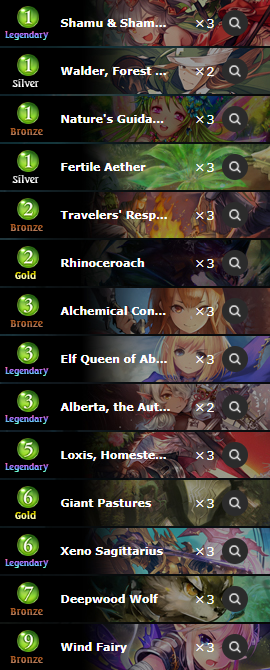
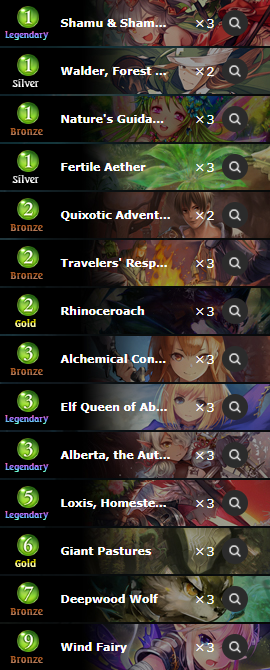
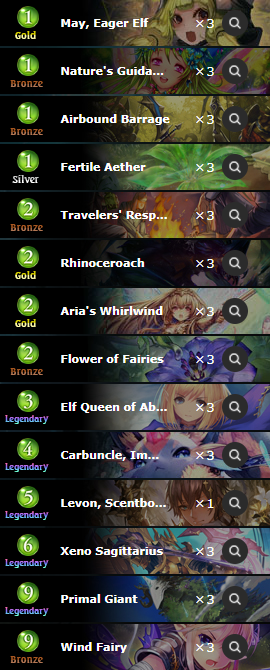
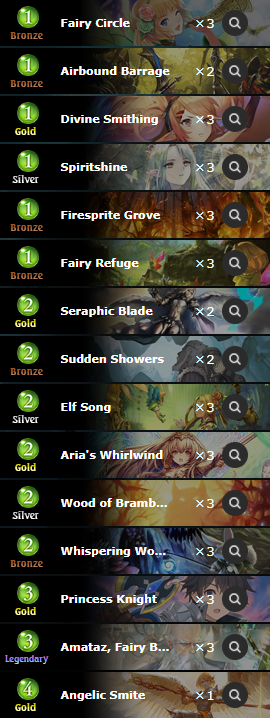
Identifying cards: Alchemical Confectioner, Fertile Aether, Travelers’ Respite, Loxis, Homestead Pioneer, Shamu & Shama, Posh Felines, Rhinoceroach.
Roach Forest (not to be confused with Whirlwind Rhinoceroach Forest) is a blanket term for archetypes that utilize the Tree-oriented package of Fertile Aether/Traveles’ Respite/Alchemical Confectioner to get to a high enough count for played cards in a turn to have the good old Rhinoceroach do similar tricks to what it did back in 2016. The catch with Rhinoceroach combos is that in the context of the Unlimited format, you really can’t afford to do all of that setup: there are certainly ways to build the archetype in a manner similar to a control shell with Flower of Fairies/Aria’s Whirlwind/etc., and just win games with enough Wisps and bounce effects, but that build of the deck is just too slow. The solution to the Roach puzzle comes from the Rotation Forest deck from the very end of 2020, and involves cheating mana with Loxis.
The basic setup for a Loxis combo of any sort is to have one or more of your setup amulets (which can either be a 0-mana Tree from Respite that you played on a prior turn, or a leftover Vehicle from Varmint Hunter/Giant Pastures/etc.), then with a turn 5 Loxis and some Fertile Aether(s) or 1-mana bounce effects, you end up with the amount of mana equal to the number of your total play points substracted by 5 and the amount of setup amulets you had going into the Loxis turn: e.g., if you’re playing Loxis on turn 5 and you played a Quixotic Adventurer and a Respite on turn 4, you end up with 2 mana and somewhere in the realm of 6-8 played cards, depending on how many bounce effects/Fertile Aethers you managed to find. Therein lies the issue, however, as 2 mana and up to 8 played cards isn’t quite enough to close out the game with just a single Roach (at most, you’re doing 14-15 damage if you land all of the buffs on the Roach). For that reason, Unlimited Loxis decks can’t really win on turn 5, so Roach Forest generally tends to be a turn 6 combo deck: you try to keep the board clear and your life total high on turn 5 while doing all of the setup, and then hopefully have enough damage on turn 6 to close out the game. Now, I should obviously mention that the combo isn’t really deterministic, as the amount of damage you’re dealing can vary based on what you draw off your Trees and bounce effects (e.g., if you draw an extra Fertile Aether, that’s a +2 for 0 mana, and if you draw a Shamu and Shama and have the mana to spare, that’s an extra 4 for 1 mana, a Giant Pastures is generally a +2 for 0 mana, but if you used a bounce effect earlier in the turn, that’s at least a +3, and often more like a +4 for board space reasons), whether you have a Walder in your deck, whether you have an Alberta set up, and so on. Long story short, the sequencing is a bit complicated and the deck can be confusing to pilot: you often have to start the Loxis turn without having enough damage and assume that you’re going to find the piece(s) you need in the 3-4 cards you’re drawing, and it can be difficult to follow the correct decision points within the 90 seconds you have to take your turn. I am far from being the most practiced Roach player, of course, but I still keep having games in which I miscounted my damage, and while some of these cases are outside of my control (when you draw a card that changes your sequence, the numbers are obviously going to change accordingly), there is nevertheless a lot of things going on when playing Loxis/Roach Forest, so it’s not exactly an easy deck to pick up, even compared to some of the more convoluted and APM-sensitive decks of the Unlimited format (e.g., Artifact Portal and Axeman Sword, which is definitely a real deck).

Optional inclusions and tech cards
- Xeno Sagittarius, Nature’s Guidance and Airbound Barrage are optional inclusions in the archetype that allow it to combo off more consistently and cycle cards in the early game. I would personally consider Guidance more or less a core card (as it’s almost identical to another card we’re already playing), and Xeno Sagittarius is what ties the whole package together, so it’s more or less a free inclusion if you’re not trying to fit in more defensive tech cards. Barrage does feel a bit overkill, especially considering the fact that some of the matchups where early Xeno cycling is relevant (e.g., Rune/Shadow/Portal) often don’t involve followers on the other side of the board, so Barrage is a bit difficult to utilize, and you’d have to cut Wind Fairies to fit it in (which, in turn, makes Walder worse and makes Xeno worse at drawing cards in the early game). Be that as it may, Xeno is more or less “free” (aside from the board space requirements) during Loxis turns, and with the archetype moving into more of a all-in combo-oriented direction, I don’t really see a significant enough reason not to run a full playset, but the Barrage/Wind Fairy distinction is more meta-dependant (with Wind Fairy generally having more utility against the current Unlimited field).
- Alberta is a tech card against other decks that don’t tend to develop a board presence in the early game, such as Rune/Dragon/Gremory Shadow. Alberta adds a bit of damage to your Loxis setup if you set it up in the early game, and since it banishes itself after attacking, it’s very good at clearing out your board space (which can get clogged up if you’re playing 3xXeno in a deck with a bunch of Tree cards) during the combo turns. The downside of Alberta is that, for most intents and purposes, it is often a worse Confectioner in the early game, and in matchups against proative decks, Elf Queen is often preferrable to play in its place, particularly when going second, as the deck’s early-game setups generally require you to resolve a Travelers’ Respite, so the mana often ends up not quite working out, where Alberta either gets stuck in your hand or you have to ignore the board for a turn (by not evolving Elf Queen) and go all-in on Loxis being able to close out the game with Alberta set up. In addition to that, Alberta is very awkward in multiples (since the effect doesn’t stack), so if you’re running 2 or more copies, you run the risk of having more dead draws, even if the mana situation ends up working out. For these reasons, there has been an observable decline of Albertas in Unlimited Loxis lists over the course of the mini-expansion: the card is clunky and competes with a lot of the deck’s other, higher-priority early-game developments. This doesn’t mean that Alberta is bad in the deck per se: it’s not as if running 1 or 2 copies is a crime, but if you’re playing a highly combo-oriented list (with things like Xeno Sagittarius and Guidances), Alberta can be extremely clunky and difficult to utilize in proactive matchups, so Alberta is comparable to some of the other proactive threats you could be running (e.g., Varmint Hunter, Ramiel, Quixotic Adventurer, etc.), and in my personal experience, the card hasn’t felt too great in the current Unlimited meta. It could be that in a greedier or more midrange-y environment, Alberta has a lot more value, but if you’re trying to compete with the unfair decks of the format, 1 or even 0 copies of Alberta are what I’d personally recommend for general ladder play.
- Speaking of which, Ramiel is one of said proactive threats one could include in Loxis Forest lists. Ramiel‘s primary utility is that it allows you to ramp when going second, and potentially go off with Loxis on turn 5 if you go Ramiel into Respite on 4. The issue with Ramiel is that if you have a Ramiel and 1 setup card (e.g., Respite or Pastures), you end up with only 2 mana to work with during your Loxis turn, which isn’t generally enough to close out the game on the spot (mostly for board space reasons, as you need to either invoke Walder or summon Alberta to clear up space without using mana to have enough to resolve the Roach at the end of the chain), so what often ends up happening with Ramiel curves is that you either go Ramiel into Elf Queen on 5 (with some other setup card along the way) and then do the Loxis thing on turn 6, or if you have a double Loxis hand, you do a half-combo on 5 and setup 2-3 Vehicles to do the big push on turn 6. For that reason, you need to have pretty specific circumstances for Ramiel to enable turn 5 lethals (you’d generally need a double setup, e.g., Respite on 2 and then another amulet on 4, or to have a double Pastures hand without Respites), so it’s a fine inclusion, but not particularly unfair in what it does. Dawn’s Splendor and Quixotic Adventurer are alternatives to Ramiel, in that they give you things to do in the early game and have defensive/offensive utility during the midgame turns. Varmint Hunter is another card that falls into a similar category to Ramiel: it allows you to go for a Loxis on turn 5 (if you have a Respite) when going second, but to really close out the game on 5, you’d have to have more than just 2 setup pieces (read: 2 open mana on turn 5), so it similarly requires you to either have an opening of either double Respite or Pastures. For this reason, Ramiel is generally more versatile than Varmint Hunter, as you don’t go second every game and 4 is less than 2 (thrilling analysis, I know), but some combination of the 4 cards mentioned in this section contribute more to setting up your combo than excess bounce effects or Albertas would. And yes, Dawn’s Splendor is a combo setup card, because not being dead improves your chances of getting your combo off. It’s not nearly as convoluted of a logical leap as saying that Armageddon is a mana fixing spell when you have a Crucible of Worlds in play (as it can allow you to cast a double non-W spell), so it obviously makes sense.
- Seraphic Blade is an anti-Portal/Haven tech card, the main utility of which in the deck is answering Nilpotent Entity, but sniping a lone Acceleratium or Summit Temple when the opportunity arises are also decent applications for its effect. Broadly speaking, Loxis/Roach Forest can theoretically win through a Nilpotent Entity if you deal some early chip damage and/or have a lot of mana to work with, but it’s not uncommon for Portal lists to only run 1xNilpotent, so you can sometimes answer it and then Elf Queen their board and simply go off on the following turn, but most of the time, the strategy for dealing with Nilpotent Entity is “hope they don’t have it” (which is far from ideal, but works more often than it doesn’t against 1xNilpotent lists), so I wouldn’t really recommend Seraphic Blade if the only deck it targets is Artifact Portal, but if you’re also seeing a lot of Haven or aggressive decks in general, it could be a decent 1-of to consider.
- Aria’s Whirlwind is a carry-over from the more control-oriented Roach lists and helps against specifically Artifact Portal and aggressive decks in general. The issue with Whirlwind is that the card uses up your combo pieces, and the card that you’re often looking to cut for Whirlwind is Elf Queen, which is a lot more versatile in non-aggro matchups. I’m not a fan of Whirlwind, as the card has felt very clunky in my experience, and I feel that the more control-based non-Loxis Roach shells as a whole are just strictly worse than its Loxis-based counterpart, so while I’m leaving up a Control/Roach list to demonstrate what I’m talking about, it’s not exactly a deck I’d really recommend, and the same applies to Whirlwind.
Regarding Vehicle/Aggro Forest
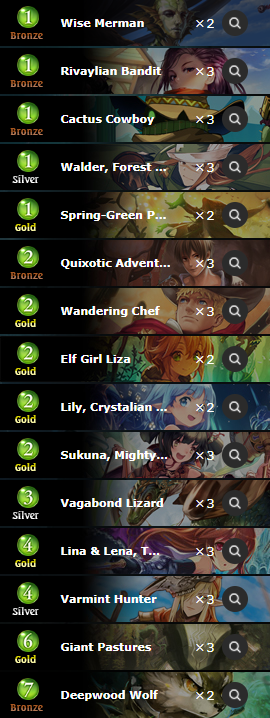
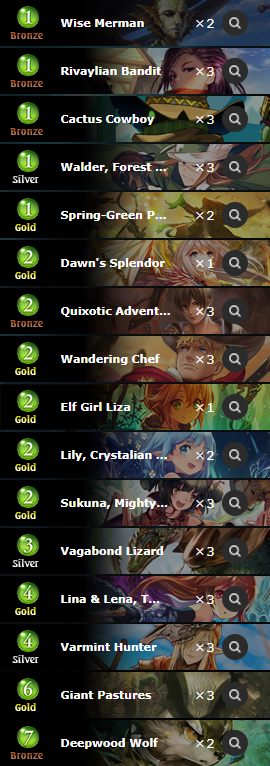
Identifying cards: Spring-Green Protection, Cactus Cowboy, Fita the Gentle Elf, Rivaylian Bandit, Fount of Angels, Vagabond Lizard, Wandering Chef, Lina & Lena, Sukuna, Mighty Malleteer.
Buff/Aggro (a.k.a. Vehicle) Forest is an aggressive tempo deck that revolves around the neutral Vehicle package and utilizes a variety of pay-off cards (e.g., Fita/Rivaylian Bandit/Chef/ Varmint Hunter) and Storm cards (Walder/Sukuna/Lina and Lena/Mallet Monkey) to leverage the early tempo lead and close out games. Rivaylian Bandit is one of the most important cards in the deck, as snowballing an early Bandit is about as unfair as Forest can really get in the Unlimited format. Generally speaking, Vehicle Forest is an aggressive deck that does really well against other aggressive decks (e.g., Aggro Shadow) due to having a lot of Rush-based early developments, as well as Wandering Chef (which can both control the board and stabilize your life total), however, it struggles against the more unfair decks (e.g., Atomy Shadow) and is often not fast enough to pressure Artifact Portal or even Encounter Dragon. The deck performs decently well against Rune, but that is about the only redeeming quality of Vehicle Forest, compared to more well-rounded archetypes like Aggro Shadow/Blood, for example.

Daria Rune
Identifying cards: Blade Mage, Enchanted Sword, Twinblade Mage, Zealot of Truth, Mutagenic Bolt.
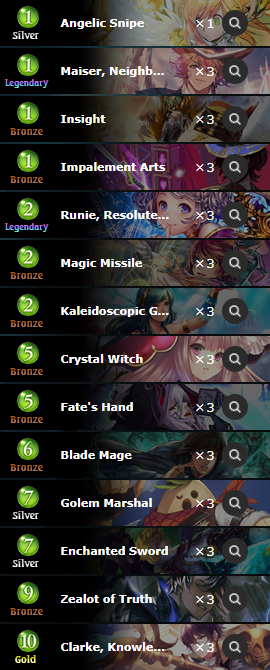
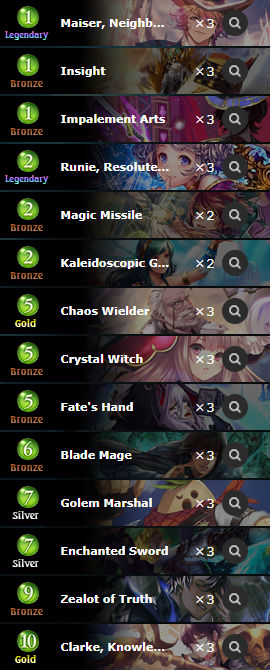
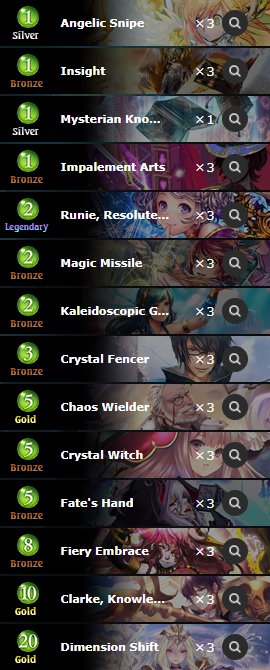
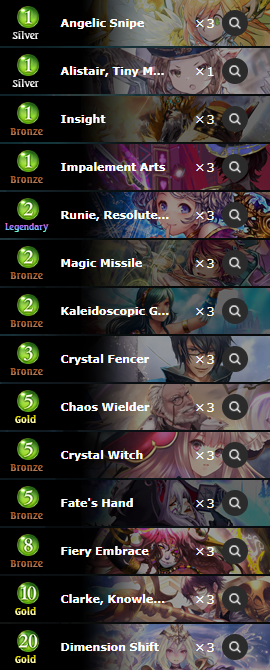
Daria Rune (a.k.a., Follower Rune or Storm Rune) is a tempo deck that utilizes Spellboost synergy and wins by playing a wide variety of Blade Mage variants printed over the course of Shadowverse’s history, which include Blade Mage, Twinblade Mage, Enchanted Sword, Zealot of Truth and the honorary Blade Mage known as Runie, Resolute Diviner. Since a lot of cards in the deck get discounted by getting Spellboosted and happen to Spellboost your hand when played, Daria Rune generally doesn’t tend to generate a lot of early-game pressure, but once it gets to 6-7 Spellboost triggers, the deck can put out 14-16 face damage in a single turn, which usually happens around turn 5-6. While generally Daria Rune is played as more or less a quasi-aggro deck of sorts, I should note that Runie does give the archetype a bit of healing, which is primarily relevant when racing against other aggressive decks, and Runie can potentially allow Daria Rune to play a slower game in a fashion similar to Rotation Spellboost Rune lists: Spellboost Runie 10 times, then Spellboost the copies, and so on. Generally speaking, Daria Rune isn’t very good at this type of strategy, but against slow, healing-heavy decks like Control Blood, chaining Runies can be a valid game plan, as Daria Rune does have a finite amount of damage, but you can get a bit more if you’re under little to no pressure.
In the early game, you’re generally looking for Fate’s Hand, Crystal Witch and Chaos Wielder, and if you have any of those, keeping some early-game action (e.g., Mysterian Knowledge/Shikigami Summons/Kaleidoscopic Glow) is generally fine. I have a tendency to keep Runie against aggressive classes (Shadow/Portal/Rune/Blood/Haven), as the healing is valuable to have sooner rather than later, and I’m also more inclined to prioritize cards that contest the board, like Kaleidoscopic Glow/Shikigami Summons, in aggressive (non-Rune) matchups (Haven/Shadow/Blood), and card draw (e.g., Magic Missile) against Dragon/Rune/Forest. Against Shadow in particular, it is fine to keep Maiser: if you’re going second, you save it to be a Dragon Warrior and try to use it with Crystal Witch, but if you’re going first, you can just play it as a Goblin on 1 and force some trades. In a similar vein, I’d keep Maiser going second against Haven/Blood/Portal.
Optional inclusions and tech cards
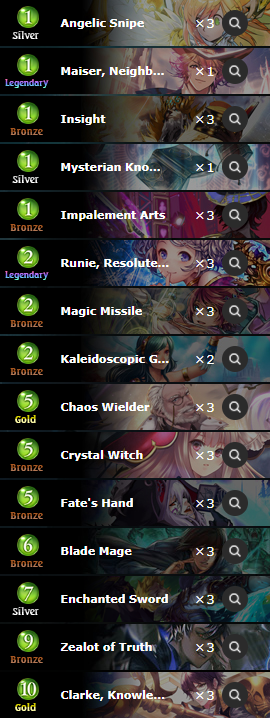
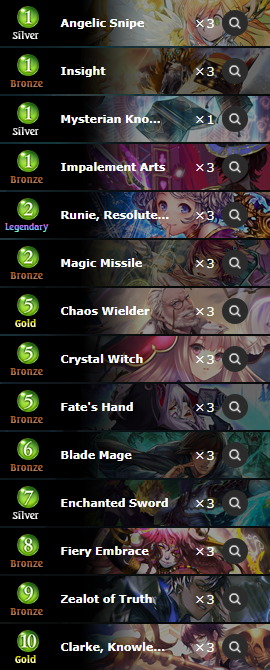
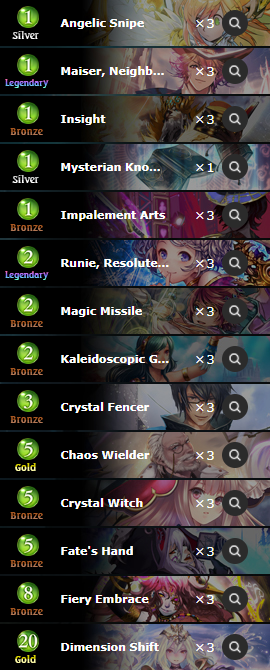
- Maiser and Golem Marshal are an anti-aggro package that help contest the board in the early- to mid-game. The two cards work well with Blade Mage-type effects, as they allow you to get in for some extra damage and Spellboost your hand in the process. The downside of the Maiser/Marshal package is that you have to either trim some of your early-game spells (e.g., Glow/Missile) and/or Chaos Wielders (as they compete for evolves with Maiser), which makes the deck slower in the midgame if you don’t find a Maiser. For that reason, I think that the 2-mana cantrips have a lot of value in Maiser lists if you’re cutting Chaos Wielders, and I am of the opinion that you should be careful about running too little card draw; and if you want to fit in all of the 6-card Maiser package, you have to trim the high-tempo, low-value early-game cards like Angelic Snipe and Mysterian Knowledge first before cutting Chaos Wielders/Magic Missiles/Kaleidoscopic Glow.
- An alternative to the Maiser/Marshal package is the more standard interaction suite of an arbitrary combination of Twinblade Mage and Fiery Embrace, which make the archetype worse against aggro and better against the more tempo-oriented sector of the format (e.g., Artifact Portal/Atomy Shadow/etc.). In the current Unlimited environment, Maiser builds have been showing better results, but if the format gets less aggressive as it continues to develop, it’s possible that the “vanilla” Daria Rune builds could become better suited for the environment.


D-Shift Rune
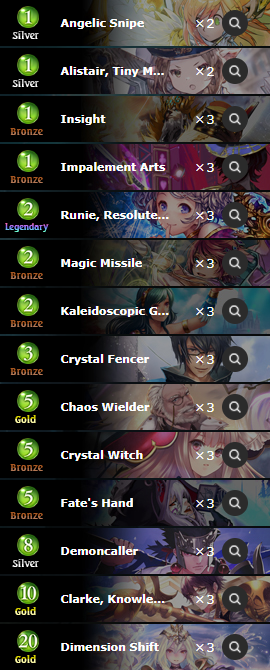
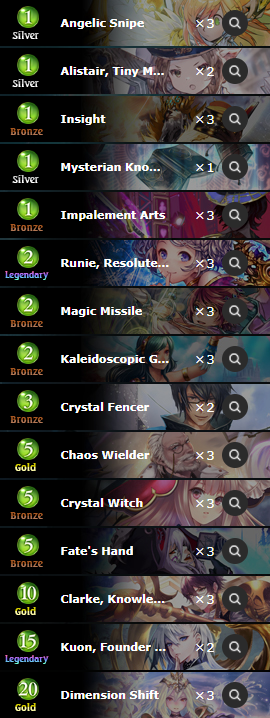
Identifying cards: Alistair, Tiny Magus, Chain of Calling, Demoncaller, Crystal Fencer, Kuon, Founder of Onmyodo, Dimension Shift.
Dimension Shift Rune is a combo deck that utilizes its titular card, Dimension Shift to close out games. The archetype’s primary combo setup generally involves getting to Shelldock Isle range and activating Crystal Fencer (which usually happens around turn 6) and then closing out the game with Dimension Shift, often on the following turn. The archetype certainly has the potential to close out games on turn 6 (particularly on the draw or if you have a Dimension Shift in your opening hand), but as a general rule of thumb, D-Shift Rune is a turn 7 combo deck, so it often plays out games as a quasi-control deck (particularly in aggressive matchups).
In a similar fashion to Daria Rune, the cards you’re generally looking for in the early game are Crystal Witch, Fate’s Hand and Chaos Wielder, and if you have one of those, you can consider keeping Insight/Glow/Magic Missile, although keeping Glow against Portal/Dragon is obviously inadvisable. If you have either multiple Fate’s Hands/Chaos Wielders or a Fate’s Hand with a 1-drop, it’s generally fine to keep those with a Dimension Shift.
Optional inclusions and tech cards
- Alistair is an anti-aggro tech card that does a lot of work against Aggro Shadow/Daria Rune/Selena/Summit Haven, often effectively being a 1-mana removal spell in the early game. It is important to note that you can Glow your own Alistair back to hand to reuse its effect, which is primarily relevant against Shadow/Haven (as they tend to not trade into it in order not to waste damage), which effectively means that you can KaleidoGlow to answer 3-drops. Alistair is an awkward card against Portal, as they often don’t deal damage to your face in the early stages of the game, and the card doesn’t help you advance your game plan (as it doesn’t Spellboost your hand by itself), so Alistair makes the deck run slightly worse on average, but gives you a bit of extra early interaction.
- Demoncaller and Traditional Sorcerer are optional inclusions that serve double duty in the archetype: on the one hand, these types of effects can help control the board in the midgame, and on the other hand, you have to have a certain number of followers to actually be able to close the game off of a Dimension Shift, so Demoncallers can be part of your win condition as well; though I should mention that recent D-Shift builds have been pretty follower-light (with Kuon getting cut from a lot of builds, for example), so the deck often just uses Dimension Shift for extra mana to play Runies with, so the low follower count is not something I’ve personally found to be an issue for the archetype in my testing.
- Maiser is an alternative option in the Fiery Embrace/Alistair/Demoncaller card slots, and unlike Daria Rune, D-Shift decks often have trouble finding Maiser-compatible followers in the early game, so Maiser is almost exclusively a Dragon Warrior in D-Shift lists (as you can’t really use it too well in the early game if you don’t draw multiple copies, and it’s not as if you can really fit in Marshals either). Broadly speaking, Maiser is bad against unfair decks (but so is Alistair, to be fair), so if you’re looking to fit in Maisers, you often have to trim some of the 2-drops as well (e.g., Clarke, Glow, etc.), as Maiser really likes to be a full playset in Spellboost-based decks due to its self-synergy, so it’s not as flexible of a tech card as Alistair/Demoncaller/etc. In a ladder setting, Maiser also has the important utility of masquerading as Daria Rune, which is primarily relevant against combo matchups, since you can force their hand by not showing Crystal Fencers/Demoncallers and other D-Shift-specific cards.
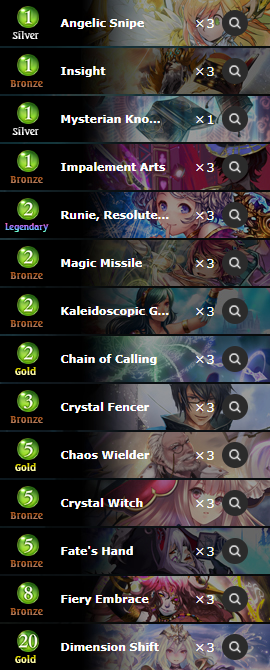
- Chain of Calling/Sorcery in Solidarity are an optional inclusion in follower-light builds of D-Shift Rune: if you’re not playing Clarke and swap out Demoncallers/Fiery Embraces, you can isolate your Chain of Calling pool to just Runies/Chaos Wielders/Crystal Witches and Fencers, which makes the deck a lot more consistent at finding its missing pieces. The drawback of cutting Clarke is pretty negligible, as you’re cutting your 2-mana cantrip (more like 4 mana, even) for a 2-mana one, and as mentioned in the previous sections, there isn’t much of a difference between running Demoncallers or not. The issue with Chain of Calling is that you are limiting your deckbuilding to not include Demoncallers/Alistair/etc., which makes the deck marginally weaker to aggro (although the impact of these changes is obviously debatable, especially if this swap allows you to run more Spell-based early-game action), but also makes you a bit better in Rune mirrors (you go off faster and never give the opponent any Glow targets), so if you’re facing a lot of Daria Rune, these follower-light Chain of Calling D-Shift builds might be something to consider.
Regarding Vehicle Rune
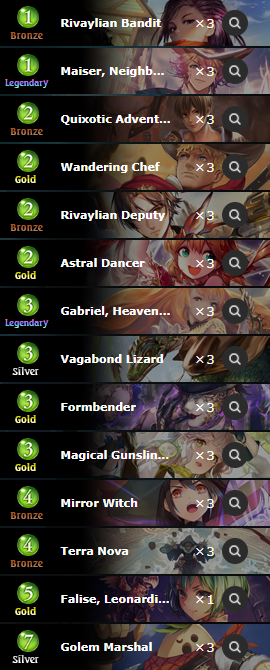
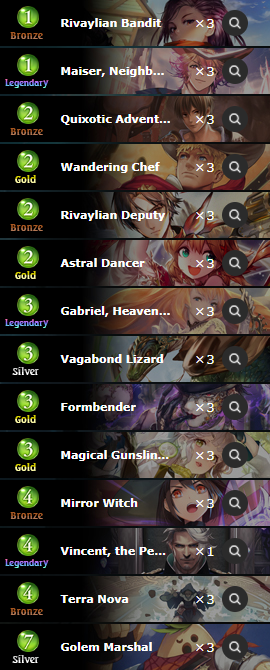
Identifying cards: Rivaylian Bandit, Quixotic Adventurer, Rivaylian Deputy, Astral Dancer, Vagabond Lizard, Magical Gunslinger, Gabriel, Heavenly Voice, Terra Nova, Mirror Witch.
Vehicle Rune is an archetype that is similar in construction to Rotation Vincent Rune, and the deck is often mostly (if not entirely) Rotation-legal, with the main difference being that it doesn’t actually run Vincent itself (it’s generally a bit slow and finding Chefs with Gunslingers is a higher priority in Unlimited), and a notable inclusion in the Unlimited version of the archetype is Formbender, which is primarily an answer for the Atomies and such of the world, and the occasional Falise (which is mostly just a bad Mirror Witch, but sometimes 3 copies isn’t quite enough, so you have to go with the next best thing, as the only Storm cards cheap enough to make the cut here are Mirror Witch, Falise and Europa, and we don’t want to talk about Europa). It is certainly impressive how there are some archetypes that are almost entirely Rotation-legal (Aggro Shadow being the other relevant example) and can still compete in the Unlimited format, which just goes to show that Quixotic Adventurer is the most powerful Shadowverse card to ever exist. I am being hyperbolic. The real culprit is Rivaylian Bandit.

Selena/Summit Haven
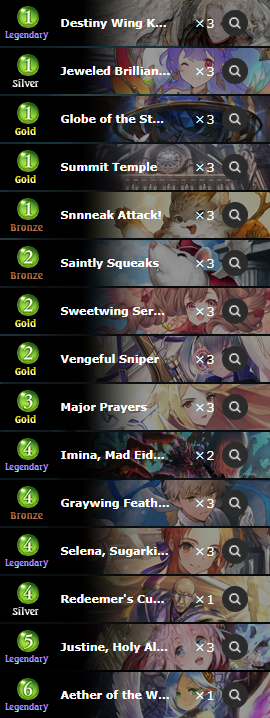
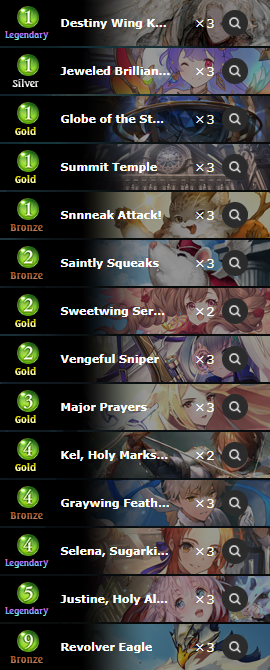
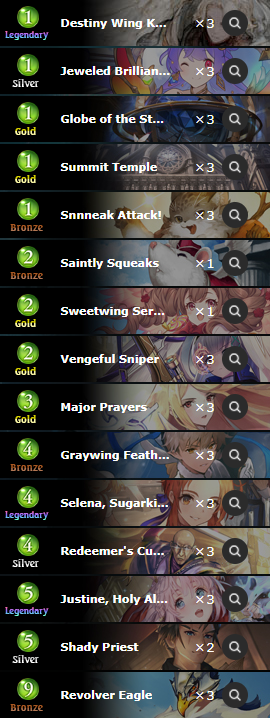
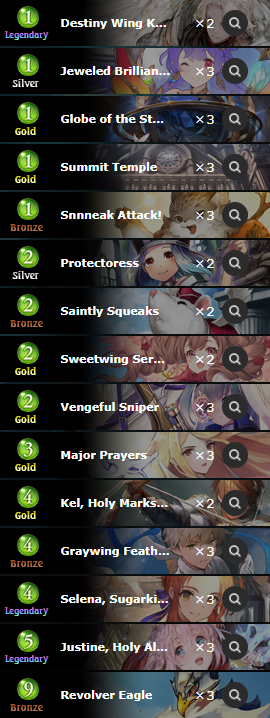
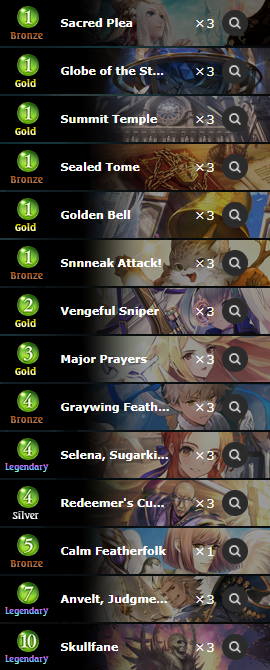
Identifying cards: Destiny Wing Knight, Summit Temple, Sneak Attack, Saintly Squeaks, Sweetwing Seraph, Graywing Featherfolk, Revolver Eagle, Selena, Sugarkiss Assassin, Redeemer’s Cudgel.
Selena/Summit Haven is a return to form of an archetype that has more or less disappeared from the Unlimited metagame after the initial Skullfane changes, and now that Skullfane has been adjusted again to the point of being (mostly) unplayable, the deck is quite similar to its October iterations. At its core, Selena/Summit Haven is a tempo deck that utilizes the “double-Amulet” synergy package, which works particularly well with Summit Temple (as it’s a persistent 1-mana Amulet) and the Globe/Sneak Attack/Jeweled Brilliance tutor package: drawing Globe of the Starways at any point of the game enables Major Prayers/DWK/Saintly Squeaks by itself, and Brilliance has a ~1/3 chance of fetching Globe, and if you already have a Summit Temple in play, it has a much higher probability of fetching a second Amulet. The general game plan of the archetype trying to keep 2 Amulets in play to generate value off of your pay-off effects, and in matchups against decks with a high amount of interaction (most notably, Artifact Portal), it is often important to try to set up a 4-Amulet Selena to get a big tempo swing (and ideally, push enough face damage to set up a 2-turn lethal) around turns 4-5. The archetype has a fair bit of midgame interaction (with Sniper/Cudgel/Kel and Selena tokens), which coupled with efficient early-game threats (e.g., DWK/Major Prayers/Graywing/etc.) can compensate for the tendency of Summit Temple decks to be bad at trading.
In the early game, the cards you’re looking for include 1-mana Amulets or Amulet-fetching effects (Jeweled Brilliance and Globe) as well as Summit Temple. If you have 2 Amulets lined up (e.g., just a Globe, or any playable combination of Summit Temple/Graywing Featherfolk/Jeweled Brilliance of up to 3 total mana in cost), also keep Major Prayers/DWK, and if you’re keeping Globe, it is fine to keep both. Going second against Shadow/Portal/Rune, keep Redeemer’s Cudgel and either Kel or Vengeful Sniper. Despite being the deck’s eponymous card (at least in my coverage), Selena is rarely a card that you can get away with keeping, and it’s only really something to consider if you’re going first against classes that tend to do nothing in the early game, such as Rune/Portal, and if you either have Revolver Eagle with a Summit or Globe/Jeweled Brilliance (although Globe is a bit awkward, as if you Globe on 1 and Sneak Attack on 2, neither of your Amulets make it to turn 4, so you either have to stagger playing your Amulets for more tempo, or settle on getting only a 2-3-Amulet Selena).
Optional inclusions and tech cards
- Kel, Holy Marksman is an anti-aggro tech card that is primarily relevant against Shadow and Portal, but can have utility against Daria Rune as well. The trick with Kel is using Justine with Natura cards on the turn when you evolve Kel, which allows you to get 4+ AoE damage, which is enough to clear most of Aggro Shadow/Artifact Portal, and to a lesser extent, Daria Rune boards. An alternative to Kel is Redeemer’s Cudgel, which has the upside of not needing an evolve point, but has the downside of being a bit difficult to “activate” in conventional lists, meaning that you have to run a bit more cheap Amulets, or rather, due to how the Globe/ Brilliance tutor package works, more Crystallize cards, which mostly means Shady Priest/Calm Featherfolk (the only 1-mana ones that function without an active Selena). Long story short, running Kel means that that there is more of an incentive to run Natura 2-drops (Saintly Squeaks/Sweetwing Seraph), which Cudgel asks you to cut some of those cards for 1-mana Crystallize effects. Imina is a more aggressive alternative to Kel: it provides some interaction and is difficult to trade into, which are significant upsides against decks like Atomy Shadow, but this aspect of the card can be a drawback in some matchups (most notably, against Artifact Portal, Imina gives the Portal player as much space to trade off 1-mana Artifacts as they might want).
- The early-game drops of Selena/Summit decks don’t have a concrete “best” configuration, so there is a fair bit of wiggle room in the DWK/Saintly Squeaks/Sweetwing Seraph card slots, depending on how much interaction you want to include.
- Skullfane is not a card that the standard Selena/Summit lists can afford to run after the balance changes, and running the Skullfane + Anvelt package generally means that you have to have a way higher count of 1-mana Amulets (Sealed Tome/Golden Bell/Sacred Plea/Anvelt) and thus can’t make the Brilliance/Globe tutor package consistent. In addition to that, Skullfane makes the deck a lot more reliant on mulligans and generally weaker against aggressive decks (e.g., Aggro Shadow/Daria Rune), as having a Skullfane in your hand on turn 1 makes or breaks the deck. Certain aspects of the archetype (Selena and Redeemer’s Cudgel) do function a lot better in a Skullfane-based shell, so I wouldn’t completely count out Skullfane just yet. Skullfane can still do very unfair things when the deck runs well, but it’s not particularly consistent currently and can’t really go off before turn 5 (for mana and board space reasons), and as such, can’t get away with lousy card choices the way old pre-nerf Skullfane lists could. I suspect that Skullfane could make a comeback at some point, as every time a silly 1-mana Amulet card that is only limited by its high Countdown (see: Anvelt) gets printed, Skullfane decks get more ammo.


Elana Haven
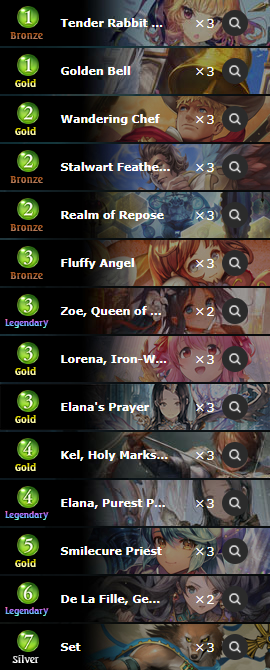
Identifying cards: Will, Underworld Priest, Wandering Chef, Zoe, Queen of Hope, Elana’s Prayer, Elana, Purest Prayer, Reverend Adjudicator, Set.
Elana Haven is a reactive tempo deck that utilizes its namesake Amulet, Elana’s Prayer, to generate tall boards of followers (that have a tendency to have Ward) and keeping its life total high. Elana Haven is not the most complex of decks, and the archetype’s primary purpose is farming aggressive decks that don’t pack enough interaction, so the deck has a more or less an auto-win matchup against aggressive decks like Aggro Shadow and Daria Rune, but struggles against decks that either have infinite removal (Artifact Portal), “tall” tempo decks (e.g., Atomy Shadow) and fast combo decks that pack enough interaction/damage to get through your Wards (e.g., Dragon and Gremory Shadow). Elana Haven wasn’t really a deck before the Skullfane nerf, as it’s quite meta-dependant and bad against Skullfane decks across the board, but the shift of the format towards a more aggressive environment has made Elana Haven one of the big winners of the Skullfane patch: when everyone is trying to play aggro, having a deck that’s chock-full of healing and tall Wards is about as good as it gets. Elana Haven has been falling off after the mini-expansion despite getting access to Smilecure Priest, which allows the deck to do some pretty unfair things in the early game (who would’ve thought that 0-mana cards can do unfair things?), but the deck is still extremely polarized and not exactly something I’d bet on going forward: I can pick up my Artifact Portal list from 5 months ago and it’s still going to be a fine deck, but I can’t really say the same about Elana Haven a month after its initial emergence in the format.
The general game plan of Elana Haven is to get 1-2 Elana’s Prayers in play and then try to generate a threatening board every turn until your opponent is out of damage/cards. For that reason, the cards that you’re generally looking for in the early game are Elana’s Prayer and Jeweled Brilliance, as well as Elana going second; although keeping both an Elana’s Prayer and an Elana is a bit greedy, so I wouldn’t keep both against hyper-aggressive decks like Shadow, and I’d prefer to have a Kel instead of an Elana against Shadow/Rune. Golden Bell is a pretty free keep if you’re playing it, and if you’re already keeping Elana’s Prayer, I’d also keep Chef/Io/Stalwart Featherfolk going first. A lot of the deck’s early game cards are pretty redundant with one another, so I don’t think there’s much reason to aggressively look for 2- and 3-drops, and I’d rather look for more high-impact cards.
Optional inclusions and tech cards
- Tender Rabbit Healer, Stalwart Featherfolk, Robowing Precant, Io, Will, Puresong Priest, Golden Bell and Monastic Holy Water are all optional early-game cards that help enable Elana’s Prayer. I would personally consider the core Elana shell to include Chef/Fluffy Angel/Zoe/Lorena, but the other cards in these card slots don’t really matter, and I’d expect any configuration of 9-15 cards in those slots to serve their role decently well. In my personal opinion, cards that come with bodies of their own are more valuable than plain healing effects, so I would prioritize Featherfolk/Io/Will/Robowing/Rabbit Healer over Set/Puresong Priest/Holy Water, and Golden Bell has the important utility of being playable on turn 1, while still having value in the post-Elana stage of the game, although I’m not married to the idea of Elana Haven decks having to include Golden Bells no matter what in current year, as card quality has improved tremendously since the last time that Elana Haven has been a relevant deck.
- Blind Justice is a tech card against Shadow/Rune/Portal and has the important utility of either anwering cards that are get too big for you to deal with in conventional ways (e.g., Zealots of Truth with Enchanted Swords) and the utility of banishing 3-drops in Aggro Shadow and denying card draw to Portal players. There is an argument to be made that Elana Haven doesn’t have much reason to run Blind Justice, as it mostly helps you in matchups that you’re either very favored or very unfavored in, so it doens’t net you a lot of percentages, but the card can still give you outs to decks like Atomy Shadow and other decks that generate board states that you can’t deal with otherwise, so Justice has a fair bit of value in those fringe matchups.
- Jeweled Brilliance is a tutor for Elana’s Prayer. There was a period where Elana Haven lists didn’t actually run Elana itself and simply had Brilliance with Elana’s Prayer as its only target, but the issue with that approach is that Brilliance obviously doesn’t allow you to run Realm of Repose or whatever other Amulets you might be inclined to include (e.g., Golden Bell), so it does impose a bit of a deckbuilding restriction on the archetype and doesn’t fit into a lot of current Elana builds, or at least, doesn’t allow you to cut Elana from the deck if you want to ever have a shot at beating Artifact Portal.
- Reverend Adjudicator and De La Fille are optional top-end inclusions that help you stabilize in extended games. I’m personally not a fan of De La Fille, because 6 is a very big number for Unlimited, and you’re generally not going to get more than 2-3 triggers out of DLF, as games just don’t last that long. Reverend Adjudicator, while somewhat clunky, does a lot of work to help you stabilize, and if you look at all the ways Aggro Shadow can get through with a turn 5 Reverend Adjudicator, the list is either going to involve some unusual tech cards or be more or less blank, so I’d consider Adjudicator a key inclusion in the deck for its current purpose in the metagame.
- Realm of Repose is a tech card against OTK-based combo decks (e.g., Encounter Dragon, Gremory Shadow) and Artifact Portal. A lot of Portal lists don’t run Mugnier, so Realm of Repose can allow you to set up a board that the the Portal player generally can’t interact with, and set up a 2-turn lethal. The caveat to RoR is that it’s a pretty slow effect (you can’t really pull it off without a Kel, and the 2 mana you need to spend is a very real cost), so it can often be simply too slow to fight Artifact Portal, but RoR at least gives you a chance in that matchup. The other issue with RoR is that the card interacts awkwardly with Jeweled Brilliance, so you can’t really fit a full playset in Brilliance builds, but if you want a better shot against Dragon/Portal, Realm of Repose is the first card to consider.
Regarding Kel/Sanctuary Haven
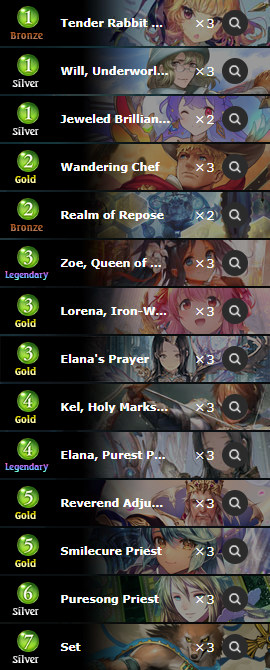
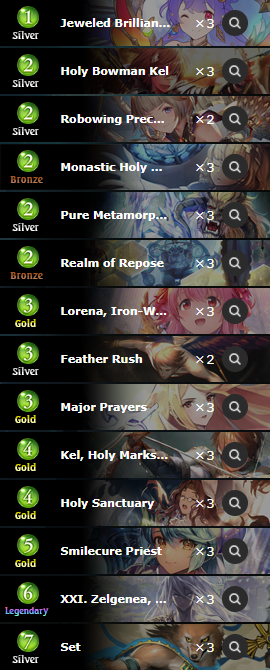
Identifying cards: Alchemical Confectioner, Travelers’ Respite, Holy Sanctuary.
Kel/Sanctuary Haven is a blanket term for control decks that utilize Holy Sanctuary with various effects to control the board and stabilize against aggressive decks, and uses Holy Bowman Kel with cheap healing effects as its primary win condition, though it’s mostly just a control-oriented attrition archetype in most matchups. The idea of defensive Haven decks centered around Realm of Repose (and at some points, Aegina) isn’t exactly novel, but with the introduction of Smilecure Priest, the archetype has a proper win condition that’s faster than the atrociously slow Ra/Zelgenea/Feather Rush game plan. With that said, Haven doesn’t exactly have the best card draw, so the archetype can’t really function as an all-in combo deck and more often works like a grindy reactive deck that attempts to answer the opponent’s threats, all while hiding behind Realm of Repose or Wards from Holy Sanctuary, and eventually closes out the game once it draws enough Kel pieces and/or generates a large enough board presence behind a RoR buff (in relevant matchups). The archetype does well against conventional aggressive decks and OTK-based combo decks that fold to RoR (e.g., Loxis/Roach Forest, Encounter/Dagon Dragon), but struggles against incremental or “infinite” combo decks (e.g., D-Shift Rune and Zooey/Roost Dragon) that can either win through RoR or can outlast your answers by virtue of having more card draw, and the matchups against things like Atomy Shadow and Artifact Portal often come down to having your “silver bullet” answers (e.g., Metamorphosis and the 4-drop Kel, respectively), which you’re not always going to find/play fast enough to stabilize. With these factors in mind, the Kel/Sanctuary archetype is a promising, if narrow archetype, that isn’t too bad in terms of its role in the metagame, but is somewhat inefficient for ladder play due to the slow and reactive nature of its game plan, long story short, the deck loses very fast and takes a while to win games, so it’s only really practical to play in tournament settings, and Control Blood is likely to be a more well-rounded archetype for general ladder play.
Regarding Ward Haven
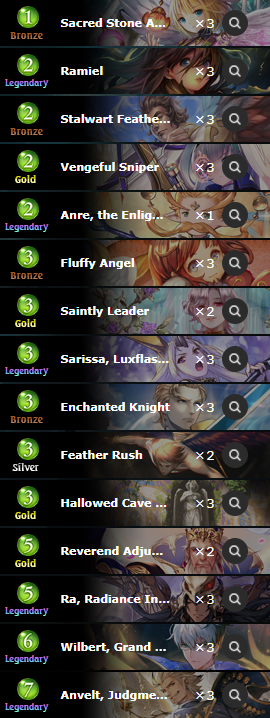
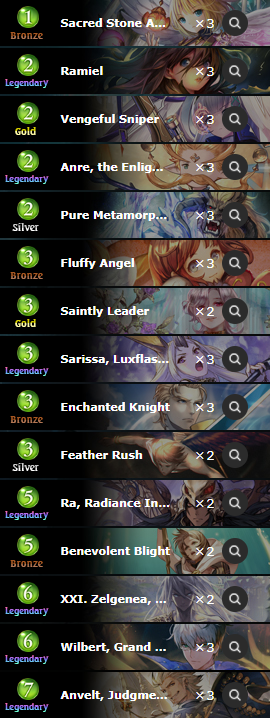
Identifying cards: Sacred Stone Apostle, Ramiel, Anre, the Enlightened One, Sarissa, Luxflash Spear, Enchanted Knight, Wilbert, Grand Knight, Saintly Leader, Feather Rush.
Ward Haven occupies a similar niche to Elana Haven: it’s a defensive tempo deck that does well against aggressive decks, and unlike its Elana counterpart, focuses more on snowballing early treats (such as Sarissa) and less on healing. For most intents and purposes, Ward and Elana Haven have a very similar matchup spread, and while the archetype is better at pressuring the opponent with things like Anvelt/Feather Rush, I don’t think there is much of a difference between playing Ward and Elana Haven, except for the budget aspect: if you’re not invested into Rotation Haven cards, Elana Haven is 2-3 times cheaper to build than Ward Haven, but if you want to play a mostly Rotation-legal Unlimited deck, Ward Haven would be my second recommendation after Aggro Shadow.

Encounter/Dagon Dragon
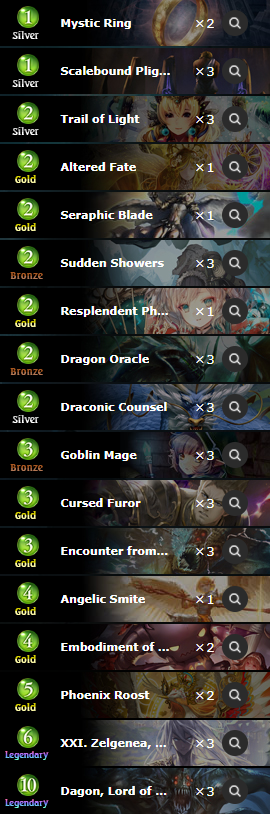
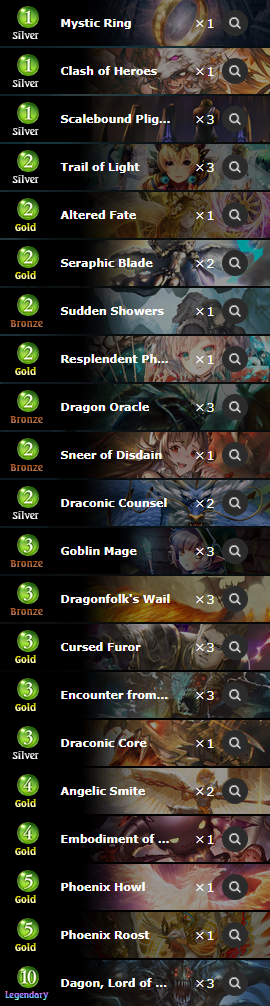
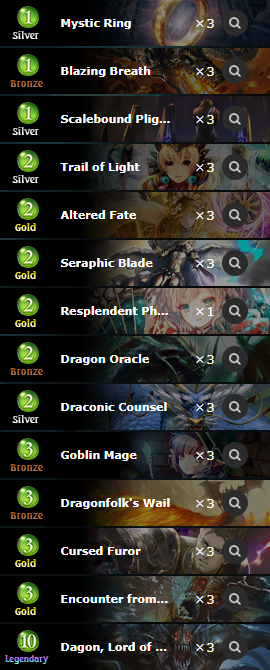
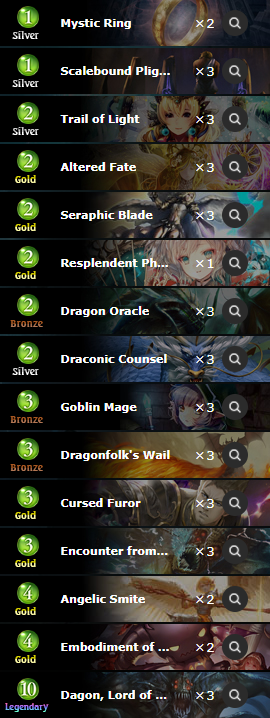
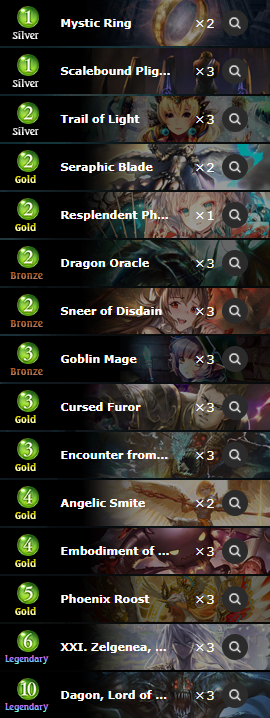
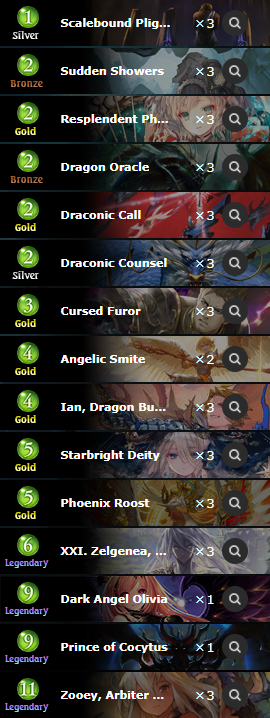
Identifying cards: Mystic Ring, Goblin Mage, Sneer of Disdain, Sudden Showers, Clash of Heroes, Ramiel, Princess Knight.
Encounter/Dagon Dragon is an archetype that revolves around drawing Dagon with its eponymous card, Encounter from the Deep. In order to guarantee that Encounter specifically hits Dagon, the archetype is constructed in such a way that Dagon is the only Dragoncraft follower in the deck. In essence, the Encounter combo needs 3 conditions to be met: firstly, you need to have Phoenix Roost in play, secondly, you need to play Encounter, and thirdly, you need to have at least 1xDagon in your deck. As such, initial builds of the archetype looked a whole lot like conventional Roost Dragon builds that didn’t include Zooey/Zell (or any other non-Dagon Dragon followers). The issue with such a construction of the archetype is that you’re playing a lot of bad cards (e.g., early builds ran Ramiel, Bahamut, Draconic Fervor, Embodiment of Cocytus) and awkward removal spells that don’t do much in the early game against proactive decks, and the big issue is that you needed to start your turn with 7 open mana and a Phoenix Roost in play, which is not terribly realistic for a format as cutthroat as Unlimited.
The solution to these issues is the inclusion of Resplendent Phoenix instead of actual Phoenix Roost. Having 2-drops in your Encounter deck is obviously a questionable idea, so the more recent build of Encounter/Dagon Dragon generally runs 3xGoblin Mage and a singleton Resplendent Phoenix, with the basic game plan of the archetype generally involving trying to resolve Resplendent Phoenix on your first evolve turn, then play Encounter and set up for a lethal Dagon on the following turn. Going second, this setup obviously requires you to ramp once, but the combo is relatively safe (you’re removing two followers from the opponent’s side of the board and you’re not playing Phoenix Roost, so you’re not discounting the opponent’s whole hand) and extremely fast for a combo deck (it’s a 2-card combo that wins after the opponent’s turn 5), although the deck is still pretty vulnerable to hyper-aggro decks.
In the early game, if you’re going first, you’re generally looking for Resplendent Phoenix or Goblin Mage (prioritizing Phoenix), and if you have one of these cards, you can also keep Encounter. Naturally, you’re never passing up a Dragon Oracle/Cursed Furor since you’re playing a Dragon deck. If you’re going first and already keeping 2 cards (e.g., a ramp card and a Goblin Mage/Phoenix), it’s also fine to keep a removal spell for your turn 4, such as Sneer of Disdain against Portal or Sudden Showers against Haven.
Optional inclusions and tech cards
- Mystic Ring is an optional inclusion that draws a card for 1 mana in the early game and has the important utility of shuffling Dagon back into your deck. In my testing, I am yet to draw triple Dagon before my Phoenix turn, but it’s somewhere in the realm of a 2-4% probability depending on how many cards you draw. A lot of Encounter lists default to running 3xRings, which has felt a bit incorrect in my testing (why would you need a full playset to cover for ~2-4% of your games), so trimming the third Ring for some other card draw effect or a removal spell is what I’d personally recommend.
- Seraphic Blade is a tech card against anti-combo tech cards like Nilpotent Entity, and the card can also pick up value against Summit Temple decks. Seraphic Blade is absolutely crucial against Portal, and while it doesn’t have good targets in every matchup, it can still pick up value against decks that play 2-drops. Cards like Angelic Smite are a bit more universal (in that they can get through Wards, for example), but obviously require you to have a lot more mana to deal with cards you’re trying to answer, so Smite can often be a bit too slow.
- Sneer of Disdain is a tech card against Artifact Portal, which can specifically answer the early Acceleratium turns (but obviously folds to Shion-ed boards, but then again, this deck generally folds to a resolved Shion in any of its modes). Running Sneer doesn’t make Encounter Dagon favored against Portal by any means, but it at least gives you an out in the early game, especially when going first.

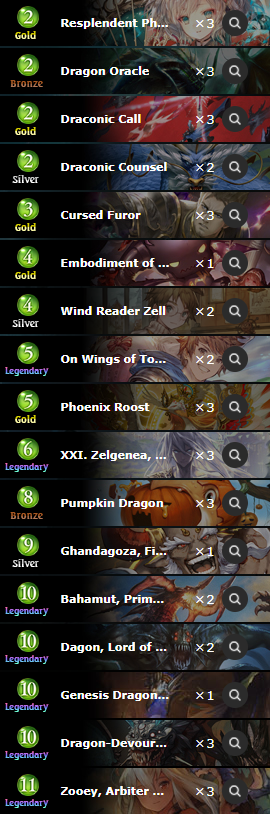
Zooey/Roost Dragon
Identifying cards: Zooey, Arbiter of the Skies, Dragon-Devouring Dread, Genesis Dragon of Disaster, Pumpkin Dragon, Resplendent Phoenix, Wind Reader Zell.
Zooey/Phoenix Roost Dragon is a combo deck that utilizes its eponymous card, Phoenix Roost (as well as Resplendent Phoenix) to repeatedly play Zooey, Arbiter of the Skies, which makes your leader immune to damage. Doing so gives you ample time to set up your win condition, which previously involved either bouncing Zooey with Ian to get more damage, or using the combo of Dagon, Lord of the Seas and Wind Reader Zell to deal 30 damage to the opponent (assuming no anti-combo tech cards), but these days, simply throwing enough 9-10-mana Storm cards at the opponent’s face is often enough to seal the deal. There are two primary builds of the archetype: the Dragon-Devouring Dread shell, which runs Genesis Dragon of Disaster, Ghandagoza and Pumpkin Dragons, which means that the win condition for the DDD shell is generally the storm damage from Ghandagoza/Zooey/Genesis Dragon; and the “vanilla” Zooey shell, which often runs a playset of Ian, Dragon Buster to repeatedly bounce Zooey, which allows it to stall for longer. Generally speaking, the DDD build is a bit better at ramping (since you only need to 2 DDD activations and 1xDragon Oracle to play Phoenix Roost on turn 3), which makes the initial setup way safer (the faster you ramp, the less of an opportunity window your opponent has to kill you on the crackback), but the Ian shell is better against anti-combo tech cards like Nilpotent Entity (you have more time to dig for answers once you’re fully set up).
Zooey/Roost Dragon is a bit of what I would call a “glass-cannon” combo deck, in that your early game setup generally involves playing Phoenix Roost, drawing some cards or evolving Resplendent Phoenix to have a backup against anti-amulet tech cards, then passing the turn and seeing if your opponent can kill you with out-of-hand damage, which is certainly not impossible for some decks (e.g., most hyper-aggro decks and decks like Gremory Shadow) if you’re discounting all cards in their hand by up to 50%. For that reason, there are some decks which are more or less free matchups for any and all Phoenix Roost decks if you manage to ramp at least once and just play Roost on curve (e.g., D-Shift or Daria Rune), but for a lot of other prevalent decks, you either have to ramp twice (primarily applicable to DDD lists) or outpace their big setup turn (e.g., if the Shadow player is about to activate Gremory next turn, or if the Portal player already has a 14-power board on turn 3, it might already be too late to play Phoenix Roost), which makes Zooey/Roost Dragon somewhat draw-dependant. Another thing to note is that if you’re going second and have a somewhat slow-ish hand, you can use the Resplendent Phoenix setup, but it’s obviously somewhat contingent on you not having any of your combo pieces in your hand, so, for example, if your hand is Resplendent, Pumpkin Dragon, Zooey and a Cursed Furor/Oracle, the correct line of play is to save all the card draw until the turn where you play Resplendent Phoenix (that’s right, no Zooey on turn 1!), and then try to go Resplendent into Zooey into Pumpkin (so long as your mana allows for it) in order to maximize your chances of having Zooey/Call on the following turn. So, long story short, if your opening hand has both ramp and Phoenix Roost, you can use your card draw however you want, but if you have a Resplendent Phoenix with no Roost or with (little to) no ramp, you have to be a little more careful about your sequencing.
Naturally, the cards you’re looking for in the early game include Dragon Oracle, Cursed Furor and Phoenix Roost. Going second, you can also keep Resplendent Phoenix instead of Roost. If you’re playing a DDD list, you can also keep DDD with a non-Zooey (do not fuse Zooeys!) fusible card (e.g., Ghandagoza/Genesis/Pumpkin, although you should obviously try not to fuse Pumpkin if you’re going for a Resplendent Phoenix line of play).
Optional inclusions and tech cards
- Angelic Smite is a tech card against Nilpotent Entity in specific (and other miscellaneous damage-preventing amulets, e.g., Realm of Repose in Control Haven), as well as random big Wards (e.g., Shion-ed up Mystic Artifacts, or He Who Once Rocked/Zeus in Atomy lists) that you can run into on occasion. Angelic Smite is run over Resolve because it draws you a card, which Zooey/Roost Dragon gets more mileage than the opponent’s deck, in most cases.
- A similar, if more recent, inclusion is On Wings of Tomorrow, which is more so targeted at follower-based decks, and can help dig for answers or Zooeys (which is kind of a universal answer to most problems, to be fair) and even push 2 extra points of face damage in certain scenarios. Embodiment of Cocytus is similarly a pretty universal answer, the primary utility of which is to have access to early-game healing, but it also has the application of supplying an 8-drop for your DDD-related needs. It is what it is, sometimes you have to pay 4 mana for a Dragon Oracle or to draw 2 cards, don’t laugh.
Regarding Discard Dragon
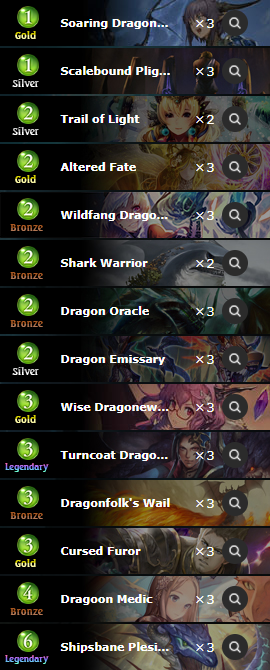
Identifying cards: Wise Dragonewt Scholar, Turncoat Dragon Summoner, Dragoon Medic, Shark Warrior, Shipsbane Plesiosaurus, Wildfang Dragonewt.
Discard Dragon is a midrange archetype that utilizes discard-related synergies (more specifically, Shipsbane Plesiosaurus pings) to control the board and cycle through its deck to find pieces of its combo finisher, which are comprised of Wildfang Dragonewt and Altered Fate. The deck includes Dragon Emissary to consistently have Shipsbane active on turn 4-5, and then starts cycling cards and dealing chip damage to the opponent, eventually setting up for the Wildfang combo. Discard Dragon is a pretty fringe archetype, but it does particularly well against aggressive decks (as it has a lot of efficient tempo tools and healing with Shark Warrior/Dragoon Medic, which allow it to race things like Aggro Shadow quite well), and has the potential speed to close out games on turn 6. The archetype struggles against the more streamlined combo decks and the more unfair tempo decks like Artifact Portal/Atomy Shadow. I don’t think there is much of a reason to really play Discard Dragon in the current Unlimited format, but it is a functional archetype with its own niche in the format.

Control Blood
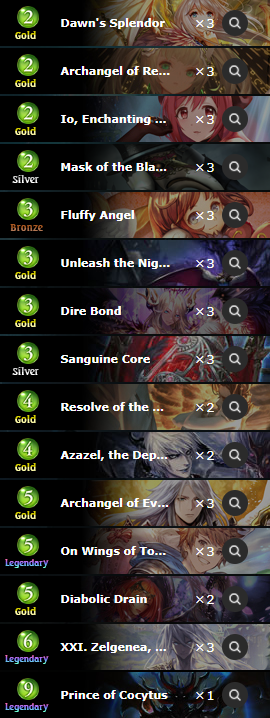
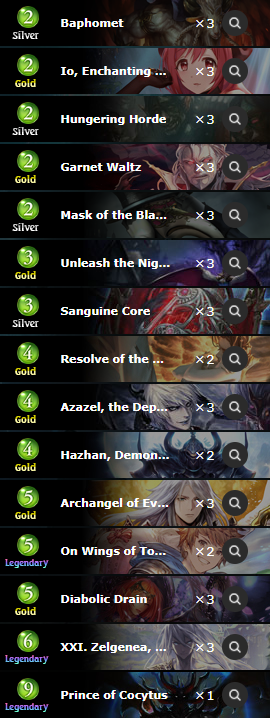
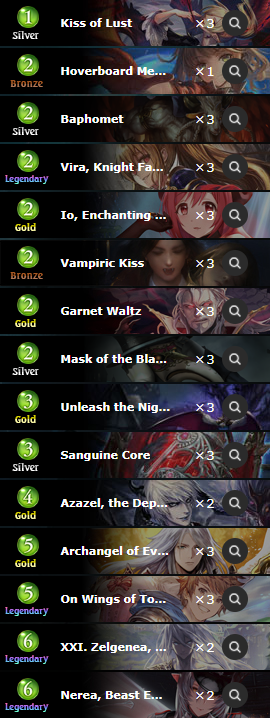
Identifying cards: Hungering Horde, Azazel, the Depraved, Archangel of Evocation, Sanguine Core, Angelic Smite, Resolve of the Fallen, Diabolic Drain.
Control Blood is a control archetype that utilizes the combination of Azazel and Archangel of Evocation to disrupt combo decks and a suite of efficient AoE/removal available to Blood (Io, Nerea, Hungering Horde) to control the board against proactive decks. The win condition of the archetype varies on a build-by-build basis and can include anything from a Ravening Corruption package to Prince of Cocytus. Previously, Control Blood builds utilized the combo of Demon Commander Laura with invoked Zelgenea as a win condition (which was usually enough to close out the game with a Garnet Waltz or two), but that game plan isn’t really on good terms with Archangel of Evocation, so for a lot of the more recent Control Blood builds, it has transformed into a pure attrition deck, where you try to answer every threat the opponent could have and stop them from pulling off game-winning combos with Azazel + Archangels, and then wait for the opponent to either concede out of boredom or go on the beatdown with the random midgame followers (Evocation/Zelgenea/etc.) once your opponent is out of gas. For the purposes of ladder play (and personal sanity), I would recommend running a win condition of some sort that can win the game eventually, but if you have unlimited time (e.g., if you’re preparing for a tournament or if you really like wasting other people’s time), going “full durdle” is something you can definitely do, but not what I would really recommend.
In the early game, Control Blood doesn’t generally do a whole lot, so you’re looking for card draw (Unleash/Dire Bond/Confectioner), as well as matchup-specific cards: Azazel against Dragon/Forest, Hungering Horde against Portal, Io against Portal/Shadow/Haven/Rune.
Optional inclusions and tech cards
- Hungering Horde is an anti-Portal tech card that can answer early-game Shion+Analyzing Artifact setups. Hungering Horde is good to have going first against Aggro Shadow and tempo-oriented Haven decks, but it is a dead draw against Rune/Dragon/Forest. Against hyper-aggressive decks (basically, non-Azazel matchups, such as Aggro Shadow and whatnot), more impactful removal tools (generally, with healing attached) such as Diabolic Drain and Hazhan, or more matchup-specific answers (e.g., Dawn’s Splendor against Rune/Forest, or Archangel of Remembrance against Shadow/Portal) are also something to consider. The most well-rounded option in my testing has actually been Baphomet, which works particularly well if you’re running a lot of Neutral cards, where you can get it to fetch up either Io or Azazel, or at least get close to doing so.
- With the format being as fast as it currently is, Control Blood doesn’t really need an actual win condition outside of invoked Zelgenea, but some number of Prince of Cocytus can be a good backup plan against decks with a lot of healing/reactive threats (e.g., Artifact Portal). I should also mention that although this isn’t really the card’s primary function, Wings of Tomorrow can also get in for 5 damage (you do run just barely enough followers in the deck to theoretically get to 10 damage if you draw most of your deck, but that isn’t particularly practical) in the later stages of the game, so the deck has a bit more threats than it did in its prior iterations.
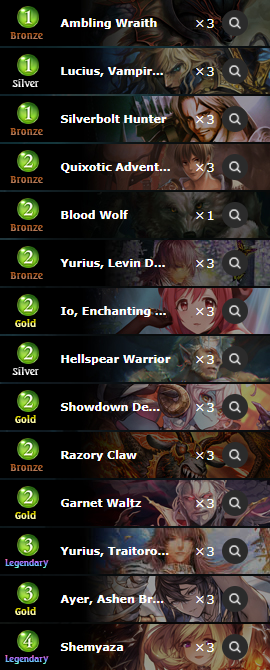
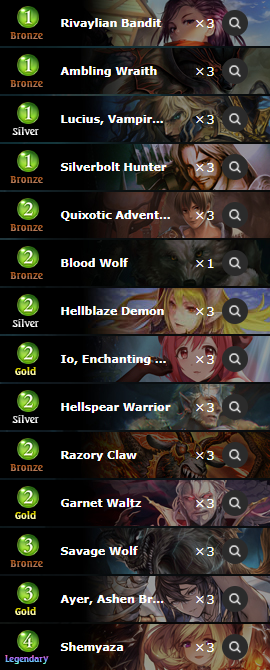
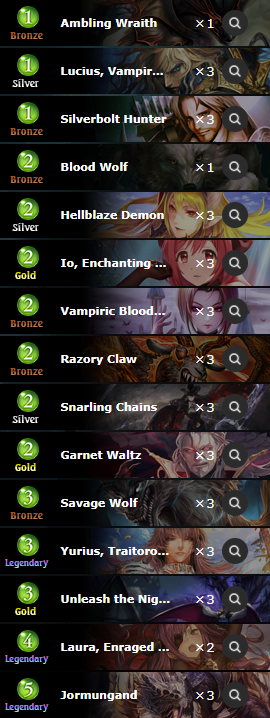
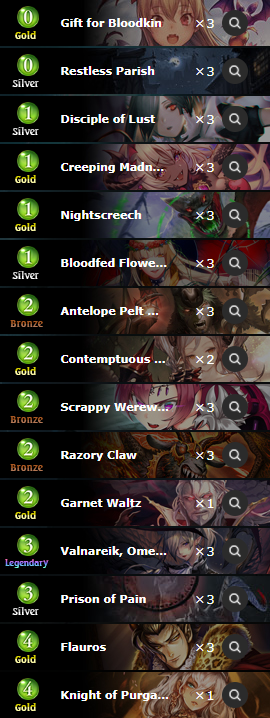
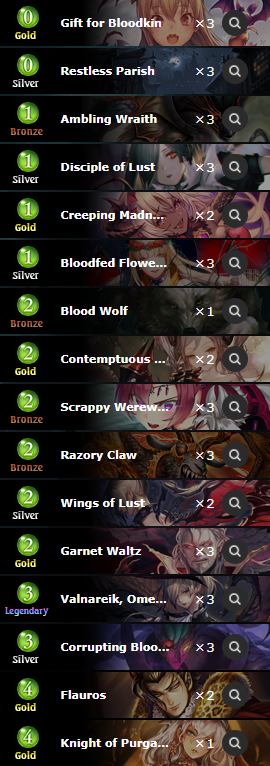
Regarding (Ayer) Aggro Blood
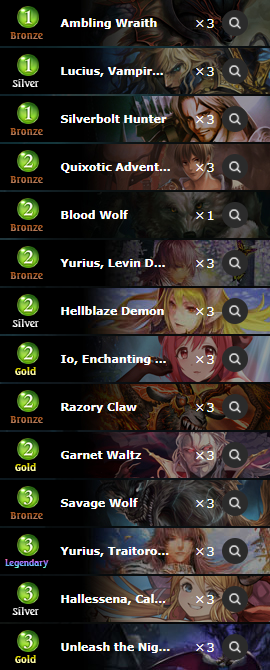
Identifying cards: Lucius, Silverbolt Hunter, Quixotic Adventurer, Hellspear Warrior, Showdown Demon, Yurius, Levin Duke, Yurius, Traitorous Duke, Ayer, Ashen Brawler.
Aggro Blood is an evergreen Unlimited archetype that has been doing exactly what it says on the tin for years: the deck plays a curve of cheap followers and a slew of burn spells/Storm followers that pressure the opponent’s life total and punish greedy openings of various decks. With this mini-expansion, however, the Aggro Blood archetype, fringe as it may be, has undergone a huge transformation with Ayer and Shemyaza being in the picture: these two cards allow the deck to play 9+ 1-drops and 6xRazory Claws, and still have game against the more healing-heavy decks of the format (e.g., Elana Haven) and the utility of Shemyaza as a 4-mana wrath against decks like Atomy Shadow allow Aggro Blood to play the control role in certain matchups and not just be a one-dimensional beatdown deck. The introduction of this highly efficient draw engine has also led the deck to shift away from being as handbuff-focused with Storm cards and evasive threats (e.g., Hallessena) to a more grindy and occasionally Avarice-based build, with cards like Showdown Demon and Hellspear Warrior working particularly well with Ayer/Shemyaza. An important aspect of the archetype is that some of its cards have modular use cases based on the matchup, for example, Garnet Waltz can be used for board control in matchups where you have to play the control role, and it can also go face for 3 against combo decks, and in a similar fashion, once you have the Shemyaza engine going, you can use Quixotic Adventurer to make any of your other cheap followers into efficient Rush-based removal, or you can use it with Blood Wolf/Hellspear for more burn, so the archetype has a lot of variety in its play patterns.
In a metagame sense, Ayer Aggro Blood is more of an aggressive tempo deck than a hyper-aggro deck like Aggro Shadow, so it can struggle against the straight up control decks with out-of-hand win conditions (e.g., Control Blood) and unfair archetypes that can go over the top of it with Storm damage (neither Artifact Portal nor Atomy Shadow are really unwinnable matchups, but you are put into this awkward spot where you have to win the game before they assemble enough Radiant Artifacts or Fatal Orders/Coffins to kill you with Storm damage, but you also have to keep the board clear at all times with Io/Shemyaza), but Aggro Blood is quite good at pressuring slower combo decks with its aggressive early-game curve and abundance of burn damage, and it has a decent amount of interaction to race tempo decks like Daria Rune and Selena/Summit Haven. One of the presented lists in this article is a 6xYurius one, which is heavily teched for the Gremory Shadow matchup (that deck has an awkward time answering these defensively-statted early threats, and the cards that they do play feed the Yuriuses), but there are certainly avenues for the deck to be more aggressive with cards like Savage Wolf and more handbuff cards (e.g., Hellblaze Demon/Vuella), so the archetype still has a lot of room for optimization.
Regarding Turbo Flauros Blood
Identifying cards: Restless Parish, Bloodfed Flowerbed, Disciple of Lust, Antelope Pelt Warrior, Contemptuous Demon, Scrappy Werewolf, Creeping Madness, Prison of Pain, Corrupting Bloodlust, Flauros, Knight of Purgatory, Rouge Vampire, Valareik, Omen of Lust.
Flauros (a.k.a. Pain, a.k.a. Wrath) Blood is an aggro deck that revolves around utilizing Wrath-based synergy effects to get proactive tempo, with the main feature of the archetype being its ability to invoke its eponymous 5/3 on turn 3. A common play pattern for Flauros Blood is to try to set up 4 Wrath triggers on turn 3, which means saving 0-mana Wrath activators (Gift and Parish) with either a Prison of Pain or Corrupting Bloodlust. You need 2 0-mana activators if you don’t have a Flowerbed or any of the EoT-pinging 2-drops (Contemptuous Demon/ Antelope Pelt Warrior), and you obviously need one less 0-mana card for each of the on-board EoT enablers. Alternatively, if you don’t have Prison/Bloodlust, you can similarly try to save a Creeping Madness, but that obviously still requires you to have either an appropriate amount of pinging effects or 0-mana Wrath enablers. Long story short, Flauros Blood specializes in invoking Flauros on turn 3, which in most cases should be enough to get you into Wrath range on the following turn, which in turn enables the rest of your Wrath pay-offs (such as Scrappy Werewolfs/Valnareik for damage, Contemptous Demon/Nightscreech for interaction, Rouge Vampire/Antelope Pelt Warrior, and to a lesser extent, Wings of Lust for healing). Flauros Blood was one of the decks that I was extremely excited about after the EA release, but the deck has 2 major issues in its current iteration: on the one hand, hitting yourself in the face 7+ times to set up your midgame pay-offs is a game plan that Daria Rune and Shadow are very happy to see from their opponents: if you’re going second and get a bit too excited about Flowerbeds, you can literally be dead on turn 4 against Aggro Shadow, and other depressing interactions (e.g., between Shadow Reaper and Gift for Bloodkin) make Flauros Blood an awkward deck for the current Unlimited meta. The deck does pretty well against straight up combo archetypes (e.g., Dragon) and the more scrappy tempo decks (Selena/Summit Haven), but burn-heavy aggro decks are an issue. The second issue with the archetype is the Knight of Purgatory “bug” (could be an intentional interaction, but it’s not really clear), where the Wrath condition is checked before the end-of-turn phase, so if you go into Wrath range with Prison of Pain/Flowerbed or any of the pinging 2-drops, KoP doesn’t get invoked, which means that Knight of Purgatory is often effectively delayed by a turn, which puts a damper on the performance of the archetype. With these reasons in mind, a lot of the more recent Flauros builds tend to be less all-in on the “turbo” aspect of its game plan, and try to be more midrange-y, with extra card draw like Shemyaza/Blood Pact and more midrange threats like Jorm, turning it into more of a scrappy tempo deck and less of a hyper-aggro archetype. Be that as it may, while it could be that once (or rather, if) the format goes back to its more combo-oriented roots, Flauros Blood could be an interesting deck to explore, and it’s possible that the KoP interaction gets fixed at some point (although I obviously wouldn’t count on it, as it’s a pretty fringe interaction and nobody plays Unlimited, so people don’t really complain about it), but at present, Flauros Blood looks like a pretty mediocre deck for the current Unlimited format. Big sad.

Midrange Sword
Identifying cards: Perseus, Shield Phalanx, Latham, Gelt, Resolute Knight, Empress of Serenity, Amelia, the Silverflash.
After the fall of the twice-balance-adjusted Skullfane, the astral and physical worlds were unified, bringing about the influx of long-lost creatures of legend: demonic tiger-like beasts rallying the troops, long-forgotten heroes of Greek myths, Steadfast warriors of the East, donning enchanted armor that made them impervious to harm; legendary castles rose up as if from thin air to serve as the format’s final stronghold against the encroaching scourge of malign undead creatures flooding into the interstice from the astral world. Retelling this story in a less referential manner, the Unlimited format has had a big shakeup after the Skullfane changes, and with the high popularity of aggressive decks (particularly, Aggro Shadow and Daria Rune), there is more room for conventional fair decks to exist in Unlimited, as these types of decks tend to do well against hyper-aggro strategies. This is where Midrange Sword comes in: Sword has a lot of tools to generate wide boards in Unlimited, and a lot of these token-generating cards tend to have Ward (e.g., Wildcat/Shield Phalanx/etc.), so Midrange Sword actually has a surprisingly decent matchup against Shadow and can thus steal match wins in Conquest formats. The primary win condition of Midrange Sword can range from Stroke of Conviction in the more aggressive builds to plain old Regal Wildcat in slower lists; the deck has a decent amount interaction against Elana-type decks with Nahtnaught, and the abundance of Wards (as well as the presence of Arthur, in some lists) make it a passable deck against Storm-based OTK decks (e.g., Encounter Dragon, arguably Roach Forest), so Midrange Sword is a surprisingly playable archetype. Is it the best deck of the format? Certainly not. Does it ever beat Artifact Portal? Theoretically, it can, if the Portal player never draws any of its 6 enablers in its first ~10-12 draws, which comes out to roughly a ~10% probability, which probably reflects the winrate of Midrange Sword in that matchup, and while Sword is likely to retain its meme status in the Unlimited format, Midrange Sword isn’t a laughably terrible archetype: it’s certainly not something I’d recommend playing, but it is very much a playable deck.
Regarding Castle Sword
Identifying cards: Rivaylian Bandit, Everlasting Castle, Quixotic Adventurer, Wandering Chef, Fount of Angels, Princess Vanguard, Angelic Knight.
Castle Sword is a blanket term for Sword decks that utilize Everlasting Castle with a small toolbox of followers with functionality isolated to their specific mana costs, the most relevant of which being Rivaylian Bandit. In essence, you have 6 effective copies of Rivaylian Bandit in your deck that you can put into play on turn 1 and then start snowballing it with various efficient buff cards, with one of the notable inclusions being Armor of the Stars (stops Rune from interacting with it), and the rest of the deck is mostly comprised of various buffs to keep the Bandit train rolling. In addition to the conventional aggressive Bandit builds, there’s also variants of the deck playing a package of Proven Methodology, Unsheathed Blade and Dionne, which limits you to playing only Neutral and Commander cards (to consistently fetch up Dionne with Methodology), but potentially represents a 14+ damage 2-card combo as early as turn 5. Unsheathed Blade lists are less about the Bandit package and run more card draw, but still have some support pieces for Bandits to activate it on turns 2-4. A notable inclusion in most Everlating Castle decks is a 1-of Reinhardt, which you can fetch up in specific matchups (the most relevant of which probably being Daria Rune and Artifact Portal, as a lot of them don’t run Fiery Embrace and Mugnier, respectively), where Rein is difficult to answer and can run away with the game, especially if you give it Ward with Chef or Outlaw Gunner. I think there is a fair bit of unexplored potential in various Castle/Bandit and Methodology/Unsheathed Blade Sword shells, but these decks are mostly unexplored due to the fact that nobody plays Sword in Unlimited, and if there is a more flashy enabler for these Sword packages in the future, it could be a direction for Unlimited Sword decks to optimize.
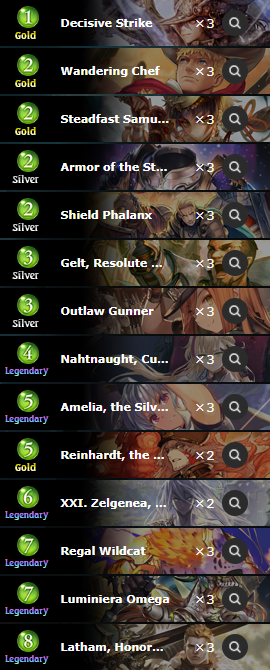
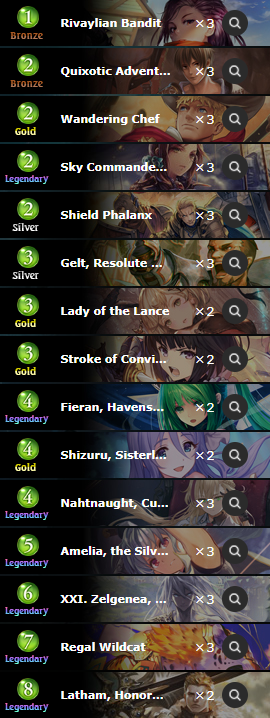
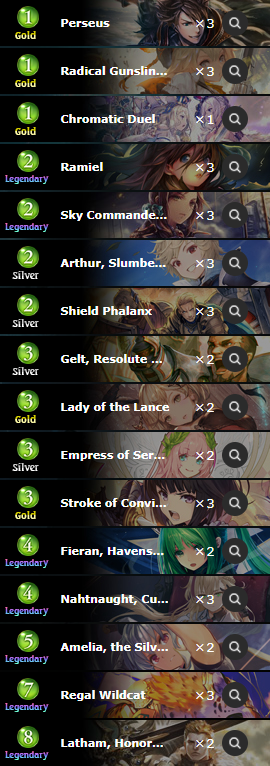

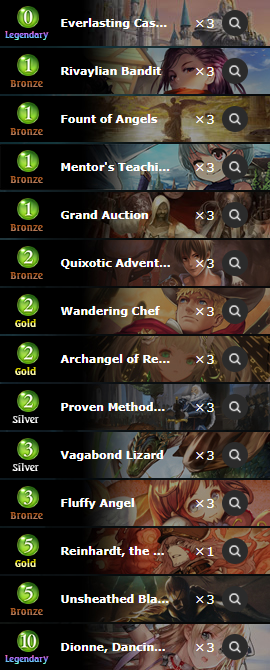
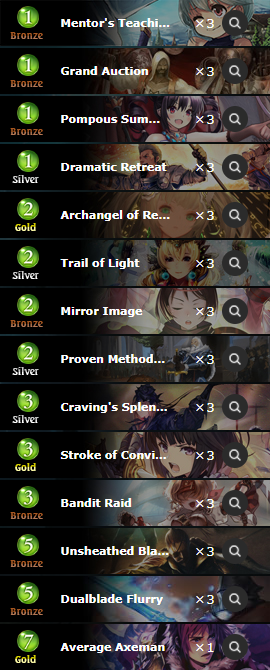
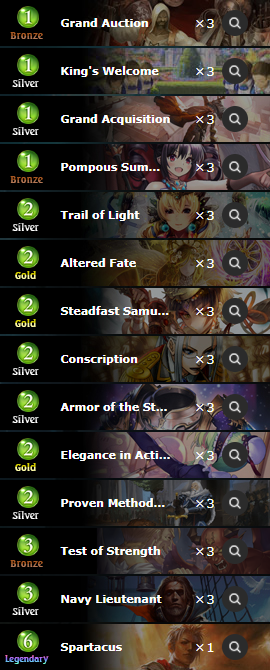
Regarding Average Axeman OTK Sword
Identifying cards: Average Axeman, Dualblade Flurry, Mirror Image, Dramatic Retreat.
Speaking of unusual directions for the Methodology/Unsheathed Blade package, Axeman OTK Sword is a combo deck that runs a single copy of Average Axeman, which it can then either fetch up with Proven Methodology or, in the event that you draw it, either Archangel of Remembrance it back into your deck and then Methodology it on turn 4 if you’re going second or play it on turn 5, then shuffle it back into your deck with Retreat, which you can then fetch up with Pompous Summons or Proven Methodology and set up for a turn 6 OTK with Unsheathed Blade and various buffs (e.g., Craving’s Splendor/Mentor’s Teachings/etc.) and Mirror Image (which, unfortunately for our Average Axeman, summons the base copy of it) to generate extra mana with Dualblade Flurry, which can then allow you to go again with the 5-6 mana that you get from the second Flurry attack, but you obviously have to have either a Mirror Image or a Retreat into Summons/Methodology to generate a new Axeman to apply the buffs on. If you Methodology into Axeman and then Dualblade Flurry it, that’s 12 damage, and if you can then chain together Mirror Images, Retreats into Summons, buffs, and so on, it is theoretically possible for the Axeman OTK Sword to win on turn 5. In practice, if the combo works (which is a pretty big “if”), it’s more of a turn 6 setup at best due to how limited you are by mana on turn 5 and due to how bad Sword card draw is (meaning that you often have to take a setup turn on 5 with Unsheathed Blade into Retreat into Summons/Methodology, and the actual combo starts on turn 6, once you have a 0-mana Axeman). Axeman OTK Sword is inconsistent and non-deterministic with its combo (since Teachings/Retreat draw cards and can thus give you extra damage in the middle of the combo, and if you’re going off counting on drawing the pieces you need it with those cards, you don’t always get enough to close out the game), but it is a pretty spectacular archetype, and with a bit of future support to its buff/tutoring packages, could open up a new combo-based direction for Unlimited Sword decks.
Regarding Spartacus Sword
Identifying cards: Grand Acquisition, King’s Welcome, Conscription, Navy Lieutenant, Test of Strength, Altered Fate, Spartacus.
Spartacus Sword is a blanket name for Sword decks that utilize Spartacus as its win condition. In order to get to casting its big flashy 6-mana Laboratory Maniac, the deck utilizes the combo of Steadfast Samurai, Armor of the Stars and Navy Lieutenant, the pieces of which can be tutored up with King’s Welcome/Pompous Summons (these decks generally run only 1-2xSpartacus, so Welcome is likely to find Navy Lieutenant) and Proven Methodology or the strictly worse version of the effect, Conscription, to fetch Steadfast Samurai. After setting up your defenses, you then proceed to wheel through your deck with some combination of Altered Fates and Grand Auctions/Trails of Light/Grand Acquisitions to fill up your hand with cards. Due to Steadfast Samurai having a 5-mana Enhance effect, you generally need to do your Steadfast Sammy + Armor setup on turn 4, and then Ward up on the following turn, so the deck can just lose to a good aggressive draw when going second, and in addition to that, a lot of decks in the format can answer Steadfast Samurai if they know that it’s coming: Haven decks can snipe it with Kel/Selena tokens, Portal can Syntonization for a Bane token, Rune decks can double Runie it, Gremory decks can Jackshovel through it, Dragon decks can eat it with DDD or snipe it with Encounter, there’s Contemptous Demon in Flauros Blood, and so on, so a lot of decks in the format either have incidental answers to the Samurai lock or are fast enough to race you before you can get your shields up, and the Spartacus win condition itself often takes until turn 8 to actually close out the game, which makes the deck weak to burn as well. This combination of factors, even in the absence of Shady Priest/Anvelt/Skullfane decks, make the archetype more of a complete Sportaflop. RIP Stefan.

Stats corner
The below charts show the performance of various deck archetypes in qualifiers of open JCG events, which follow the Conquest Bo3 ruleset. Deck archetypes are categorized by their popularity (as in, how many players brought said deck) and the average number of match wins of lineups containing the specified deck archetype. For the qualifier performance chart, deck archetypes are sorted in descending order of Score values, where Score is a weighted average of “winrate score” (a linear scale where the 100% represents the maximum number of match wins among deck archetypes with more than 10% meta share, and 50% representing the average number of played matches per player, which is equal to exactly 15/16 for a 4-stage single elimination bracket, but gets adjusted accordingly when not all player slots are filled, as BYEs don’t count as played matches) and the “frequency score” (a.k.a., “relative frequency”, in other words, the ratio of popularity of a deck compared to the most popular deck in the field: e.g., the most popular deck of the format has a relative frequency of 100%, and a deck that is played half as much has a relative frequency of 50%), with the weight of the sum determined by the adjustable “Meta score parameter”, set by default to 80/20, meaning that the default formula for calculating Score is 0.8 * [Winrate score] + 0.2 * [Relative frequency].
For more detailed information on how the archetypes are defined, I’d recommend looking at the conditional clauses in class-specific sections of the qualifier spreadsheet linked below.
JCG qualifiers spreadsheet (EA, mini-expansion)
JCG top 16 spreadsheet (EA, mini-expansion)
JCG open Unlimited events site directory (data source)