Shisogenius’s Meta Insight 12/6
“Meta Insight” are a series of articles covering the differences between various Shadowverse deck archetypes, their role in the metagame, common play patterns and tech cards.

Rally Portal
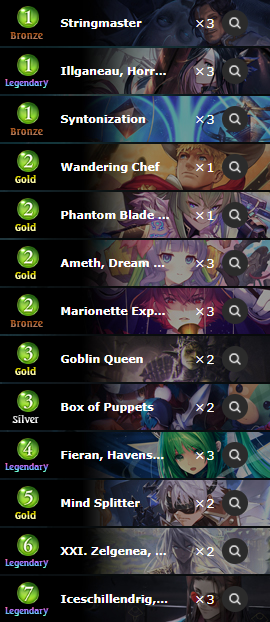
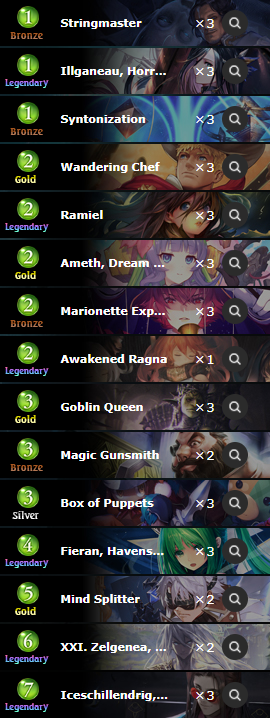
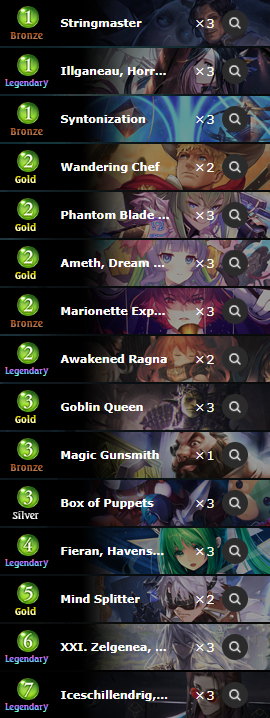
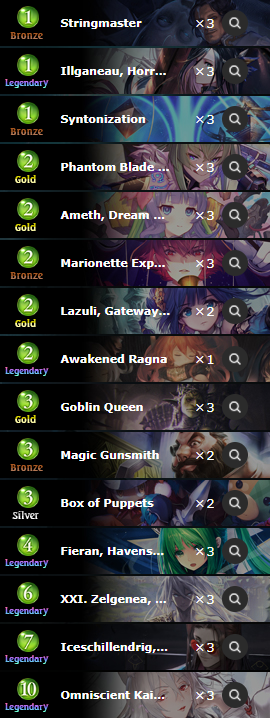
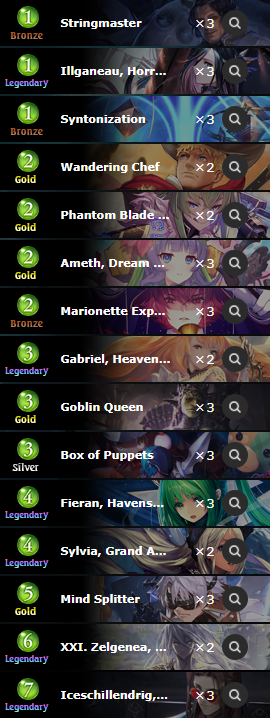
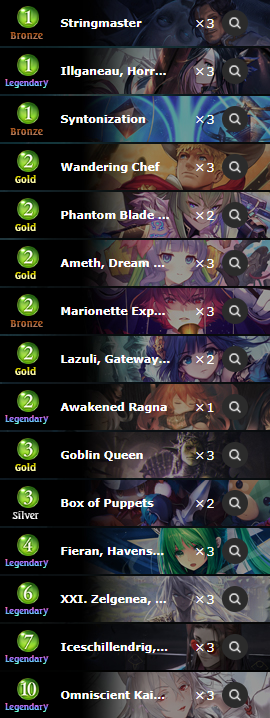
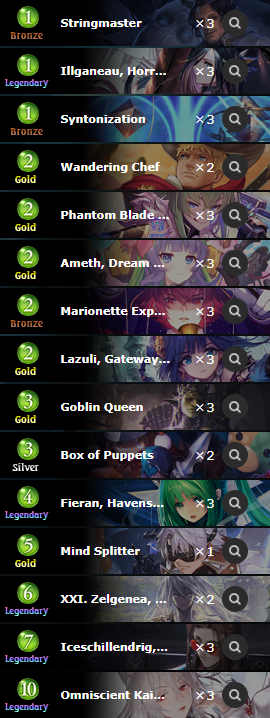
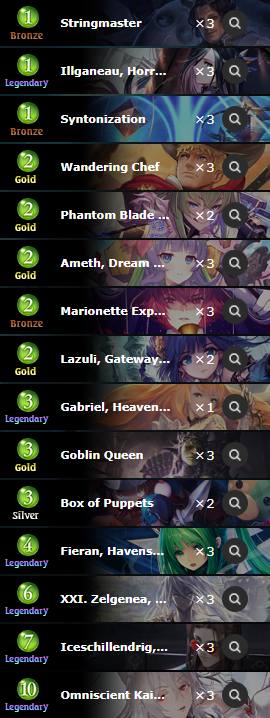
Identifying cards: Marionette Master, Phantom Blade Wielder, Stringmaster, Goblin Queen, Mind Splitter, Wandering Chef, Fieran, Havensent Wind God.
What does Rally Portal do?
Rally Portal is a proactive midrange deck that utilizes Puppet synergies (more specifically, Stringmaster) and efficient early-game Portalcraft followers (Illganeau/Syntonization and the best Portal card of the mini-expansion, Goblin Queen) to have a consistent early curve, which in turns allows the deck to consistently invoke Fieran on turns 6-7, which in turn has synergy with cards like Mind Splitter and Illganeau. After the “Fieran stage” of the game, the deck either wins by generating an overwhelming tempo advantage with undercosted pay-off effects, such as Illganeau/Mind Splitter/Fieran or by grinding out the opponent’s threats with Iceschillendrig and eventually pushing enough damage with followers or setting up for a lethal Lazuli/Kaiser or a fully charged Illganeau‘s Spell token. The deck is fairly straightforward to play, but there is some finesse to managing your number of threats, as the deck only has so many: some Rally Portal lists only play Iceshillendrig as their top-end, and as such, have to rely on either out-tempo-ing the opponent in the midgame or stalling until turn 10 for an Awakened Ragna/Zelgenea combo to close out games. In that sense, there are some differences in game plans of Kaiser lists and Kaiser-less lists, as the former have more answers against midrange decks (due to having more Iceschillendrig activators), while the latter have a bit of a gap in their turn 8-9 plays, which in theory is compensated by having a stronger early game.
In a metagame sense, Rally Portal is one of the least polarized decks of the format. Due to being extremely popular, the format is somewhat warped towards decks that tend to perform well against Rally Portal (including Midrange Sword, Baal Blood and both variants of Forest), so I’m personally of the opinion that Rally Portal is far from being the best deck of the format in a competitive sense. Even with all of that said, this is not to imply that Rally Portal has a lot of “hard counters” in the meta, as some of its poor matchups are at worst in the 45/55 ~ 40/60 range, and its favored matchups (e.g., Shadow/Rune/Ward Haven) more than make up for its possible shortcomings in other matchups. If nothing else, we can at least thank Rally Portal for pushing Ward Haven out of its spot in the limelight, and the deck is still very good at fighting aggressive decks, which has in turn pushed decks like Aggro Shadow/Tempo Forest out of the format. I’ve made similar statements about Ward Haven before the October ballance changes, but a format where Rally Portal is allowed to thrive is a good sign for a potentially diverse metagame, as it’s a deck that punishes highly polarized archetypes (e.g., Aggro Shadow), in other words, a format where Rally Portal is considered a strong deck is a format that allows players a lot of choice.


Mulligan priority
- Always keep Illganeau, Syntonization, Marionette Expert, Phantom Blade Wielder.
- Keep Box of Puppets against Sword/Portal/Haven/Shadow.
- Keep Stringmaster with a Marionette Expert/Phantom Blade/Box.
- Keep Ramiel or Goblin Queen going second.
- If you’re keeping Ramiel going second, also keep Ameth. Against Blood/Portal/Sword, also keep Chef with Ameth even if you don’t have Ramiel.
- If you’re not keeping Syntonization/Illganeau/Phantom Blade Wielder, keep Magic Gunsmith.
- If you’re playing Sylvia, keep it by itself going second and keep it with Gunsmith/Syntonization going first. If you’re keeping Sylvia, also keep Ameth.
- Don’t keep Fieran/Mind Splitter/Zelgenea/Iceschillendrig/Kaiser.
The mulligan strategy for Rally Portal generally involves tryign to have a passable early-game curve, and there are some pairs of cards that work well together (e.g., Stringmaster is insane if you can activate it by turn 4-ish, or how Chef + Ameth is a good combination against decks that pressure your life total), and there are intricacies to cards like Sylvia (which needs a cantrip to trigger on curve when going first) and Magic Gunsmith (which doesn’t always fit into your curve). With that said, since the deck runs roughly 9-12 Invoke cards (with Kaiser being a quasi-Invoke card), it is important to not mulligan very aggressively with Rally Portal, as each extra card that you redraw inches you ever closer to drawing a blank (e.g., Fieran), so Rally Portal mulligans are generally pretty liberal and can be simplified as “if a card does something and it’s playable before turn 4, you should probably keep it”, although there are obviously some exceptions (pay-off cards that do more in the later stages of the game, e.g., Lazuli/Awakened Ragna, Chef/Goblin Queen on the play, and so on).
Optional inclusions and tech cards
- Wandering Chef is primarily an anti-Blood tech card. Rally Portal has a limited amount of healing (more or less just Zelgenea), so having an efficient midgame healing card that can be activated with Fieran/Ameth is a powerful asset to have against Blood, and the card is obviously not awful against generic midrange decks. Phantom Blade Wielder is an altrernative to Chef that is better in the Portal mirror, as it makes activating Stringmaster a lot more convenient, but Phantom Blade Wielder has some tension with Magic Gunsmith. Ramiel is another optional inclusion in this card slot, and after ~2 months of Ramiel being in the format, I don’t think there’s much reason to explain what Ramiel does. The somewhat awkward part of Ramiel in Rally Portal lists is that you don’t have any particularly powerful 6-mana plays, but ramping towards an early Iceschillendrig is decent value in the Portal mirror, as whoever gets to crew the Train first gets to keep the opponent off the 20-follower thresholds for Illganeau/Iceschillendrig. Generally speaking, Ramiel + Chef is the best configuration against Blood, the Phantom+Chef is the most well-rounded configuration for the midrange mirrors, and Phantom Blade Wielder + Ramiel is theoretically the best configuration for the Rally Portal mirror.
- Kaiser and Lazuli are an optional package that gives the deck access to some extra late-game threats. This is primarily relevant against Midrange Sword and Sanctuary Haven, as they not only present a big threat in the late game, but also serve as an extra Train activator (which in Kaiser-less lists usually only includes Zelgenea/Mind Splitter/Syntonization and other copies of Iceschillendrig), so running the Kaiser package generally requires you to trim the third copy of Zelgenea and/or Splitter.
- Box of Puppets is a broad tech card against Amulet-based decks (e.g., Sanctuary and Ward Haven) and Last Words effects. Unlike a lot of other Portal decks, Box is specifically great in Rally Portal as the deck takes advantage of breaking the “symmetry” of the effect, as you get at least +2 to your Rally count out of it, and since Rally Portal generally isn’t that good at running Mugnier (as a lot of your followers have persistent effects), I don’t think there’s any reason to not run at least 2xBox, although the third copy is quite cuttable if you’re not facing a lot of Haven.
- Awakened Ragna is an optional inclusion that gives the deck a late-game out against decks with a high threat density (e.g., Midrange Sword/IMT Shadow) when combined with invoked Zelgenea. Rally Portal is worse at stabilizing than conventional Ragna Portal shells and doesn’t have access to the whole Dominator + Homunculus setup, and since the combo is quite telergraphed, it’s worse than the Kaiser package against Yukari decks. In lists that don’t run Kaiser, 1-2 copies of Ragna is a decent inclusion if you’re seeing a lot of Sword, but I’ve personally not been particularly impressed with Ragna, and in my experience, the Lazuli + Kaiser package generally opens up more lines of play in the early game when the deck is running poorly.
- Goblin Queen puts a 10/10 worth of stats into play for 4 mana, which is an excellent tempo play going second, but Goblin Queen is obviously on bad terms with Ramiel and Sylvia, and the card is pretty mediocre when going first or in the later stages of the game when you run out of evolve points. Mind Splitter occupies a similar spot in the deck, where it can often be a 0-mana 4/4 that draws a card (roughly 1xOmnath), but it’s obviously one of the first cards to get cut if you’re trying to slot in more midgame cards. Splitter has the important utility of crewing Iceschillendrig‘s Train, so it’s not really advisable to cut both Zelgenea and Splitter in Kaiser-less lists, as your Train consistency gets a lot worse if you do.
- Sylvia is an alternative to the best Portalcraft card of the December mini-expansion, Goblin Queen, and has the important utility of activating Ameth when going first. Sylvia likes having access to early-game cantrips (e.g., Syntonization/Gunsmith), as being able to manipulate Resonance going into turn 4 makes a big difference to how good the card is, and as such, Sylvia is a bit awkward to include in Rally Portal, as it pushes you towards taking bad Syntonization lines and encourages you to run medium cards like Magic Gunsmith. Sylvia is not a bad card by any means, but it’s not particularly exciting and doesn’t have significant synergy in the current format to justify its inclusion.


Ragna Control Portal
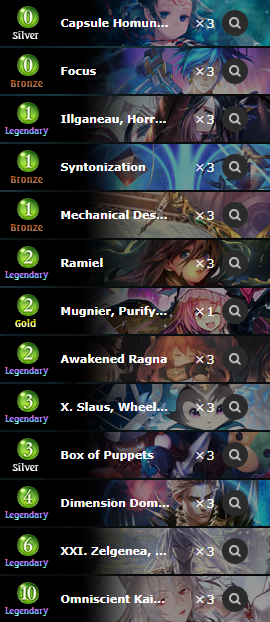
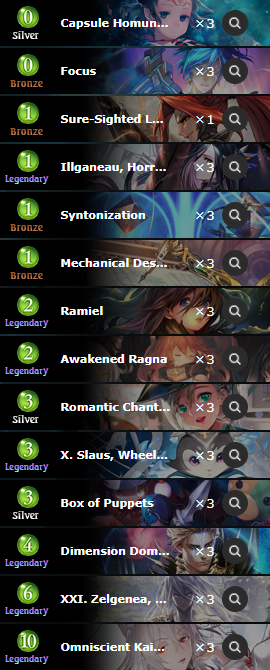
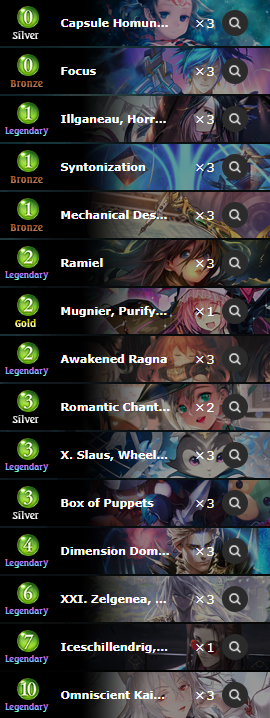
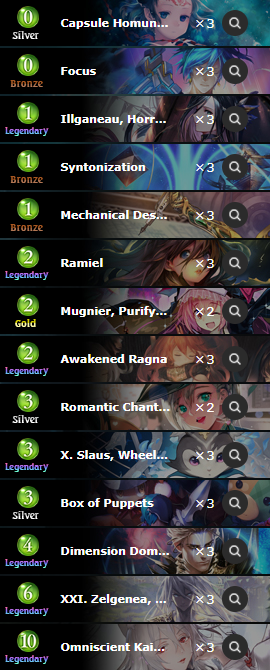
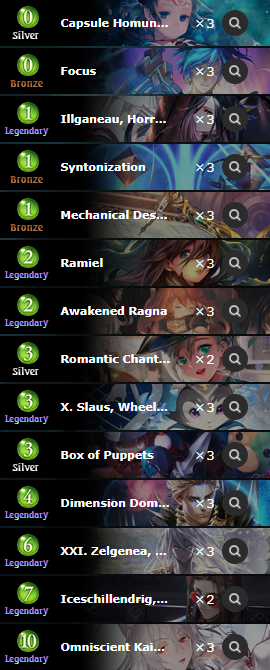
Identifying cards: Mechanical Designs, Slaus, Wheel of Fortune, Dimension Dominator, Boost Kicker, Capsule Homunculus, Karula, Arts Master.
What does Ragna Control Portal do?
Ragna (Control) Portal is a blanket term for reactive Portal decks that don’t rely on Artifact synergy. The archetype’s win condition generally involves casting enhanced Awakened Ragna, picking the leftmost option and consequently doing the rest of the damage using one of two primary setups: on the one hand, if you get to turn 10 and still have a Zelgenea in your deck, simply playing the Ragna‘s token and then attacking something with Zelgenea is enough to seal the deal against any opponent not packing Chanteuse/Yukari. The Zelgenea setup is slow and telegraphed, but very consistent. The secondary (faster) setup is a 3-card combo between Dimension Dominator, Capsule Homunculus and Awakened Ragna, which can close out the game once you get to 9 mana (which doesn’t necessarily mean turn 9 in a post-Ramiel world). For some bizarre reason, Portal cards that use your remaining play points at the end the turn always trigger last and don’t work based on play order (the way all other end-of-turn effects do). Be that as it may, the introduction of Capsule Homunculus into the Rotation format has added a new line of play to Control Portal that allows the archetype to win before turn 10, and despite being a 3-card combo, it is quite easy to assemble using Kaiser, either if you have Dominator with no Homunculus, or if you’re already done with the Dominator+Homunculus setup and can’t find an Awakened Ragna.
Control Portal does well against a lot of the currently played decks. Due to having access to Mugnier and Box of Puppets, the Ward Haven matchup is generally Portal-favored in a ladder setting: in theory, if the Ward Haven player has Yukari for both of the turn 9 and turn 10 Ragna setups, the matchup can be difficult, however, in practice, most Haven players generally mulligan for the Rally Portal matchup and don’t tend to blindly keep Yukari against Portal (which obviously isn’t necessarily the case in an open-decklist environment), so the early-game disruption of Slaus/Box/Mugnier and the non-Rush-based midgame interaction is generally sufficient to answer most of the threats in Ward Haven. The Sanctuary Haven matchup similarly comes down to how many Yukaris the Haven opponent manages to find, as without Holy Sanctuaries, the only pressure in that deck is Ra and Zelgenea damage, which are usually possible to outlast with the Homunculus setup even if the opponent manages to dodge the Zelgenea combo. The Shadow matchup has been moderately unfavored in my testing: you don’t have that much health to work with, so it’s difficult to actually survive to your Ragna turn, so if the Shadow player is teched for the matchup (with cards like Path to Purgatory/Fatal Order), the matchup can be difficult, but if you can disrupt their midgame with Slaus/Boxes, it’s possible to get there with an on-curve Ramiel.
Against Midrange Sword, it is important to be aware of which player’s going first: since both MidSword and Control Portal are (to some extent) Zelgenea decks, going first means that you’re generally hugely favored, however, going second means that you either have to assemble the Homunculus combo to go under the Sword player’s Zelgenea setup, and sometimes, when all else fails, you have to bank on the Sword player not managing to draw a Regal Wildcat in their first 20-ish cards (which is somewhere in the realm of a 20-25% probability for 2xWildcat lists). In addition to that, it is important to be aware of evolved Steadfast Samurai, as it stops both of the Ragna setups if you’re not skilled enough to clear it with the 3 random damage. The Rally Portal matchup generally comes down to answering their midgame board developments and exploiting the archetype’s tendency to board-lock itself, and so long as you answer Illganeau and don’t get run over in the midgame, Rally Portal is a pretty slow deck at actually pressuring your life total, especially if you have an early Slaus to limit their board space. The Loxis Forest matchup generally depends on drawing Slaus and finding your healing, but with sufficient disruption, the matchup is quite manageable, as your win condition is pretty fast. The Baal Blood matchup is generally quite rough, and generally comes down to whether the Blood player has Ravening Corruption on curve; Ragna Portal isn’t very good at healing and developing a board presence at the same time, so it’s not uncommon to just get burned out by Blood. There is a pattern to be observed here: Ragna Portal is generally favored against slower decks in matchups where it has a faster inevitability engine, but it can get overwhelmed by consistent pressure and tall midgame boards. I get the impression that so long as you’re not repeatedly queueing into exactly Blood/Shadow (or decks that you often can’t interact with), most decks in the Rotation format feel pretty beatable for Ragna Portal, which puts Ragna Portal into a similar category to a deck like Midrange Sword: the archetype’s neither very fast nor particularly proactive, but it is consistent at what it does and involves a fair bit of decision making.
Mulligan priority
- Always keep Syntonization, Illganeau, Focus or Mechanical Designs.
- Keep Ramiel going second.
- Keep Mugnier/Box of Puppets against Portal/Haven/Shadow.
- Keep Slaus going first. If you have an early game cantrip (e.g., Syntonization/Mechanical Designs), also keep Slaus when going second.
The general strategy for Control Portal in the early game revolves around trying to draw cards and mess with the opponent’s early developments. Illganeau and Slaus are chief examples of Control Portal cards that don’t do anything particularly impressive, but serve to waste the opponent’s time: if you play a turn 1 Illganeau, and your Ward Haven opponent spends their turn 2 using Scripture/Justice to answer it instead of playing a 2-drop, they are not developing proactive tempo and can’t Sarissa on 3, for example, and if they choose to let it die, you can either keep playing it to force the opponent to make awkward trades, which don’t really matter in the long term for the actual Illganeau setup (as you only need a 1/2 Illganeau to get the full evolve payoff), but every point of damage that is going into your 1/X is a point of damage that isn’t directed at your face. A similar logic applies to Slaus: you’re not always getting the exact trigger that you want, but the factor of occasionally throwing off the opponent’s curve or incentivizing them not to overextend into the -2/-2 can be pretty disruptive. Mugnier and Box are primarily useful to mess up Anvelt and deal with Sanctuary/Illganeau, and the banish/polymorph effects can be used to deny Sarcophagus Wraith card draw (with a common Shadow curve being Confectioner on 3 into Wraith on 4, denying the +4 for Gremory thresholds can be relevant). Unlike a lot of other Ramiel decks, Ragna Portal doesn’t really win faster if you can’t set up for Homunculus, but having more mana to work with is nevertheless valuable in its own right. See Prince Keleseth = keep Prince Keleseth, it’s not exactly rocket science.
Optional inclusions and tech cards
- Mugnier and Box of Puppets, as stated in the mulligan section, are primarily useful as anti-Haven tech cards, however, they can also pick up value in a variety of other matchups, such as against Shadow, and they can also incidentally hose other fringe threats in the format, such as incidental Last Words cards with Illganeau/Vampiric Bloodbinders/Gelt/etc. Sure-Sighted Lancer has also seen fringe play in the Mugnier slot, as it does a lot of work against Rally Portal (Ameth/Fieran) and Amulet-based decks (e.g., Loxis Forest), but it’s obviously a bit mediocre against Blood/Sword.
- Slaus is a disruptive card that I would personally consider a core inclusion, however, Slaus is somewhat draw-dependent and often unnecessary in slower matchups (e.g., against Sanctuary Haven or in the Ragna Portal mirror). With that in mind, it’s possible that running a full playset of Slaus isn’t always a good idea (e.g., it’s bad if you’re expecting a control-heavy field), but the card is invaluable against proactive midrange decks and has a fair bit of self-synergy, meaning that drawing multiple copies of Slaus is significantly better than just drawing a single one because of the board-locking factor. At the time of writing, I am generally inclined to run 3xSlaus, but it’s pretty cuttable if you’re eager to run some other tech card in that slot.
- Kaiser provides card selection and is particularly helpful when setting up the Homunculus combo. With Kaiser, it’s not really a question of whether you want to run Kaiser or not (since it’s the most efficient card selection available to Portal), but it’s more of a question of whether you should be running 2 or 3 copies. The downside of running 3xKaiser is that drawing multiple copies of Kaiser can lead to getting multiples of it stuck in your hand if you have the full combo set up already. The upside of running 3xKaiser is that it makes the Homunculus setup a lot more consistent if you’re wheeling aggressively with Kaiser, and in a more general sense, running more Kaisers means that you can be a little more willy-nilly with looking for “silver bullets” to answer specific threats. I believe that the Kaiser count is somewhat meta-dependant: in the early stages of the SoR expansion, 2xKaiser lists performed better, due to slower decks like Midrange Sword/Sanctuary Haven/etc. having a larger portion of the meta share. After the October nerfs, a greater reliance on the Homunculus setup is the new normal, so 3xKaiser seems to be optimal.
- Syntonization and Mechanical Designs are early-game cantrips that help the deck run more consistently. Designs is faster, but Syntonization is proactive and has the fringe utility of masquerading as Rally Portal for the first 2 turns of a game. Syntonization can often pick up a value trade with the opponent’s 2-drop, and it also has the “Illganeau effect”, where a lot of players see the Last Words effect on a follower and put a bit too much value on banishing/silencing the card draw effect off of it, often negatively affecting their curve in the process. The split between Syntonization and Designs mostly depends on player preference, and Syntonization is generally played a bit more, but the generally correct configuration seems to include full playsets of both.
- Ramiel potentially allows you to go off with the Homunculus combo a turn early if you’re going second. Considering that it’s not really possible to set up for Homunculus every game, Ramiel is somewhat less efficient as a card than in a lot of other Ramiel decks, however, it still has the utility of being a proactive playable 2-drop (which Control Portal doesn’t really have a lot of), and the damage prevention effect can have some fringe usage cases (e.g., against Shipsbane Plesiosaurus/Ravening Corruption pings) even if you’re going first. I do not believe there is much reason not to run Ramiel in a slower deck like Ragna Portal, as the opportunity cost of playing a Veteran Lancer that is also an Aiela in half of your games is pretty negligible.
- Romantic Chanteuse is a tech card that prevents Zelgenea damage (relevant against both variants of Haven, Midrange Sword and both variants of Portal), Ra/Wilbert damage (relevant against Haven), Ravening Corruption (Baal Blood), Shipsbane Plesiosaurus (Discard Dragon) and Valdain (Roost Dragon). Chanteuse stops a lot of damage in the current Rotation format, and the simplest way to think about Chanteuse is that it’s a healing card, primarily intended to beat Sword/Haven, but it can still pick up value as a 3-mana play that locks up a big follower to stall for a turn (e.g., against Rally Portal), so it’s not particularly awful.
- Iceschillendrig is a card that has seen fringe play in some builds of the archetype. In theory, having a symmetrical board wipe in a control deck is a good idea, however, in practice, the card is often simply too slow, as even with a full Dimension Dominator refund, you can’t crew the train out of hand before turn 9; and Ragna Portal isn’t very good at invoking Iceschillendrig either. The big upside of Icey is that it has a big butt against Ravening Corruption pings, so it can tank a lot of damage if you play it out of hand, but you don’t always have enough breathing room to actually resolve it, so even that application of the card is somewhat dubious. I’m not a huge fan of Iceschillendrig in Ragna Portal lists, but it’s not an awful 1-of if you’re trying to do a bit better against Blood/Sanctuary Haven.
Artifact Portal
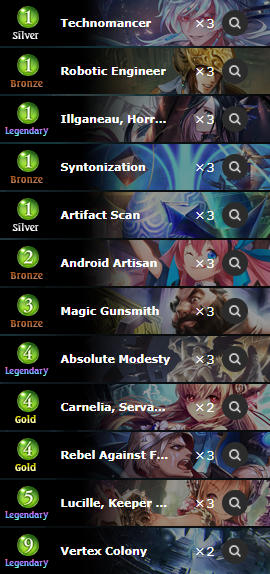
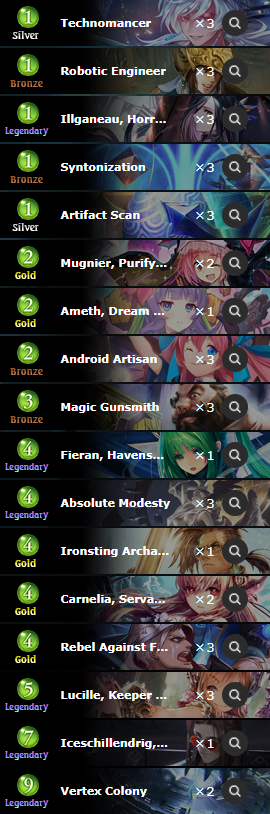
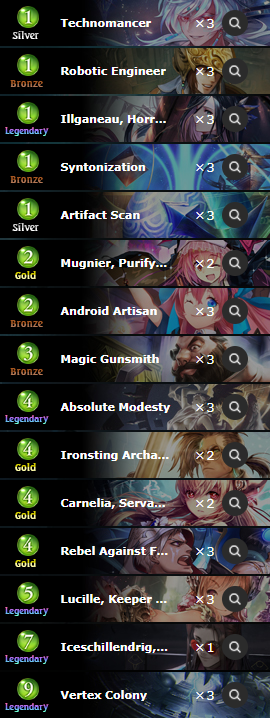
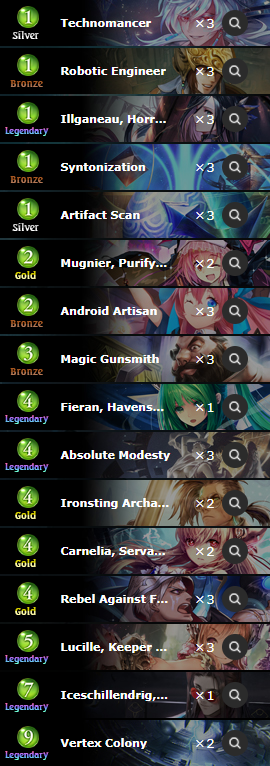
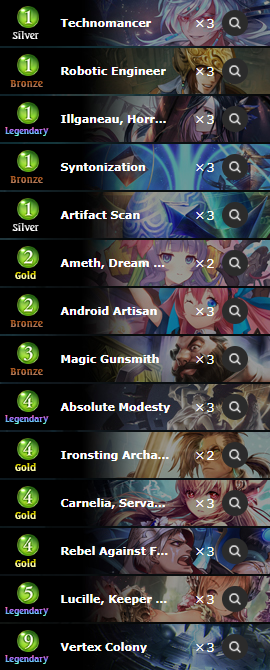
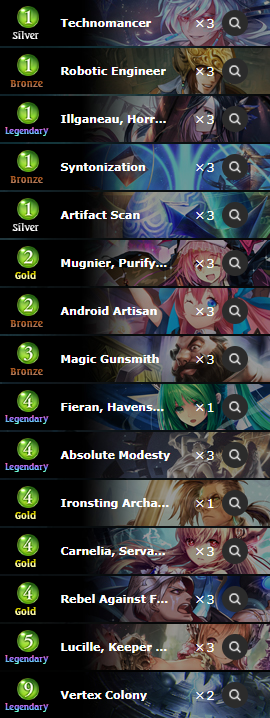
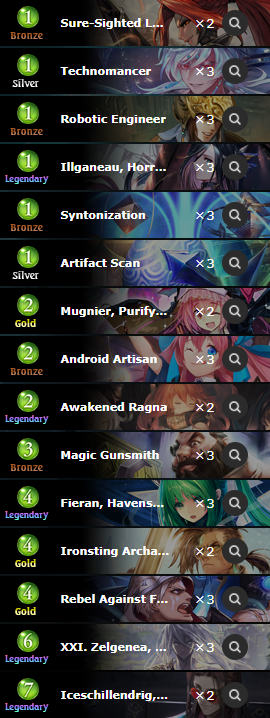
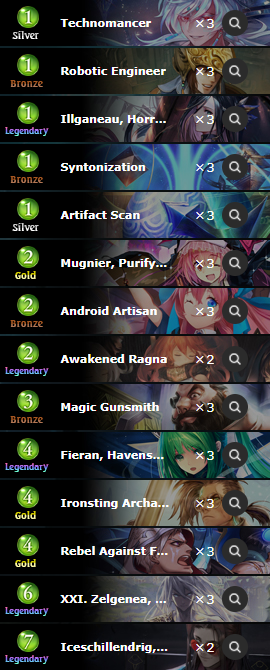
Identifying cards: Vertex Colony, Absolute Modesty, Lucille, Keeper of Secrets.
What does Artifact Portal do?
Artifact Portal is a midrange deck that utilizes Artifact synergies and pay-offs to interact with the opponent’s board state and push chip damage. The basic game plan of the archetype usually involves generating a few Paradigm Shifts in the early game, then attempt do generate as many Artifacts with different names as possible. The archetype generally closes out games with Vertex Colony, which, coupled with an Absolute Modesty ping, does somewhere in the realm of 12-16 damage. An important notion to keep track of when playing Artifact Portal or when playing against it is the concept of redundant Artifacts: e.g., there’s multiple cards that summon Analyzing and Ancient Artifacts, but there’s only one way to generate a Mystic or Radiant ones (since you generally don’t Syntonization for Radiant Artifacts).
With the addition of Carnelia, Artifact Portal is a lot more consistent at getting to the 6-Artifact threshold for its Scan power spike, so despite one of its key cards rotating out (Artifact Duplicator) in October, its relative power level hasn’t been affected too much. Artifact Portal is a pretty well-rounded deck, and does decently well against fair decks like Ward Haven and Midrange Sword, and having access to Mugnier makes it decent at fighting Shadow (at least, compared to Midrange Sword, which generally struggles against Shadow). Artifact Portal is weak to combo-based strategies that have healing and can burn out the Portal player in a sensible time frame, e.g., Spellboost Rune. After the influx of Rally Portal into the format after the mini-expansion, Artifact Portal has been phasing out of Rotation play, and while a lot of its strengths are still there (e.g., it can pressure reactive midrange decks and has a great early-game curve), it has trouble stabilizing against Rally Portal in the midgame, and as your win condition generally involves evolving Absolute Modesty, the deck takes a while to get going. In addition to that, a lot of tech cards that players include to combat Rally Portal (e.g., Elf Queen in Loxis Forest or Radical Gunslinger in Midrange Sword) also incidentally target Artifact Portal, so while the archetype isn’t awful, it hasn’t had any significant developments for well over a month and it is not the most exciting deck of the format from a metagame standpoint. It is a deck that you can certainly play, but I can’t really recommend Artifact Portal over any other midrange deck in the current Rotation format.
Mulligan priority
- Always keep Robotic Engineer, Syntonization, Android Artisan.
- If you’re not keeping Engineer, Keep Illganeau.
- If you’re keeping Syntonization without Engineer or Artisan, also keep Technomancer.
- Keep Mugnier against Haven/Portal/Shadow.
- If you have a turn 2 play (e.g., Artisan, Syntonization with Technomancer), keep Rebel Against Fate going first and Absolute Modesty going second.


Optional inclusions and tech cards
- Mugnier is primarily a tech card against Haven, although it can also pick up value in a variety of other matchups (e.g., Midrange Sword/Rally Portal, as well as Dragon). Dealing with an early Anvelt is the main utility of Mugnier, but even if Mugnier isn’t answering a key game piece (e.g., Holy Sanctuary/etc.), there’re enough followers with some variant of “Last Words: draw a card” in the format that even when Mugnier is not at its best, it can still deny value in a large variety of matchups. For that reason, it is difficult to justify running anything less than 2xMugnier.
- Ironsting Archaeologist and Carnelia compete for the same 4-drop slot. As a rule of thumb, Carnelia shores up more weak spots in the deck, and as such is a better card (which mostly comes down to Artifact redundancy: you have 9xParadigm Shift cards and 6xAncient Artifact cards, while you only run 3xVertex Colony for the Paracelsus Artifacts). For that reason, Carnelia generally has priority over Ironsting. At the time of writing, looking through 526 Artifact Portal lists from JCG qualifiers, the average optimal split appears to be 1xIronsting/2xCarnelia, with the most common variants being 0/3 (238 occurences, 0.92 average match wins), 2/2 (89 decks, 1.112 match wins), 1/2 (62 decks, 1.145 match wins), 1/3 (62 decks, 0.597 match wins), 0/2 (41, 1.049 match wins) and 2/3 (19 decks, 1.421 match wins). The best-performing splits are 1/2 and 2/2 (technically the best-performing is the 2/3 split, but it’s relatively uncommon at 3.61% of Artifact Portal lists, so it’s not particularly well-tested). The big takeaways here is that 1xIronsting/ 3xCarnelia seems specifically wrong, but any other split of 3-4 total of these 4-drops are fine.
- Zelgenea is an optional inclusion in Artifact Portal that is primarily useful because of its late-game pressure. Unlike a lot of other midrange decks in the format, Artifact Portal has a fair bit of healing and 6 mana is a lot for how the deck’s midgame curve often ends up working out, so a lot of Artifact Portal lists don’t include it, but it’s certainly not a crime to run 1-2 copies if you’re not running some other tech card.
- Ameth is a defensive tech card against Storm-based decks, such as Loxis Forest/Aggro Shadow. Giving Ward to an early-game follower (e.g., Illganeau/Engineer) can help dictate trades, and you can generally cycle Ameth around turn 6-ish if you don’t need the effect to protect yourself. Carnelia in specific has decent synergy with Ameth due to having an Evolve follower with a defensive statline. Broadly speaking, Ameth is a tech card against aggro decks that competes with Mugnier: Mugnier is better against Haven and in the Portal mirror, while Ameth is a bit better against aggro decks and fair decks like Midrange Sword.
- Iceshillendrig is an optional 1-of that helps against Sword, Rally Portal and Ward Haven. Artifact Portal is actually pretty decent at generating a lot of followers, and it is often (~40% of the time, in my testing) possible to invoke Iceshillendrig by turn 9, in a similar manner to a slower Fieran (which is also a decent inclusion as a value-oriented 1-of). The issue with Icey is that it’s a bad draw against a lot of decks in the format, however, it is possible to crew the train with Paradigm Shift, so it’s technically possible to use it as a turn 7 board clear with enough Paradigm Shift discounts, although it’s not particularly practical. I believe that Iceshillendrig is a sweet 1-of and I’m really tempted to run the card in the current environment. At the time of writing, 1xIceshillendrig Artifact Portal lists are performing better than 0xIceshillendrig lists in JCG qualifiers, but it’s also important to be aware of the fact that the BO3 Conquest environment allows Iceschillendrig to shine in more matchups than on ladder, so it’s not entirely clear whether it is an optimal inclusion for the current ladder environment.

Loxis Forest
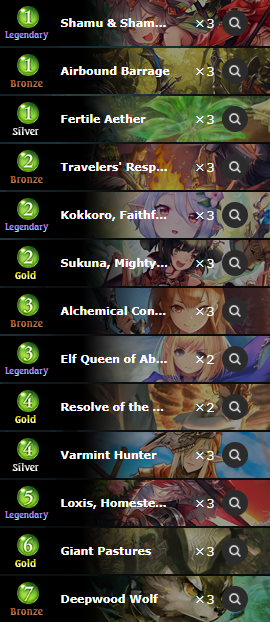
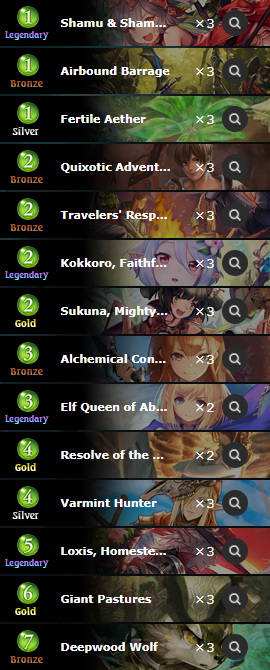
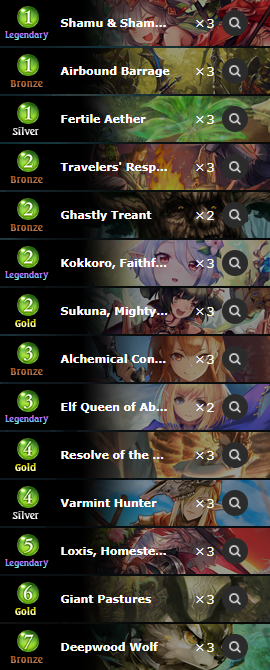
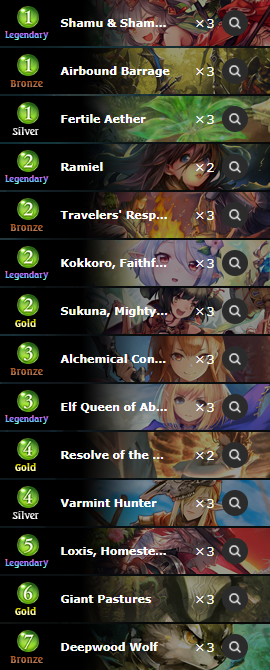
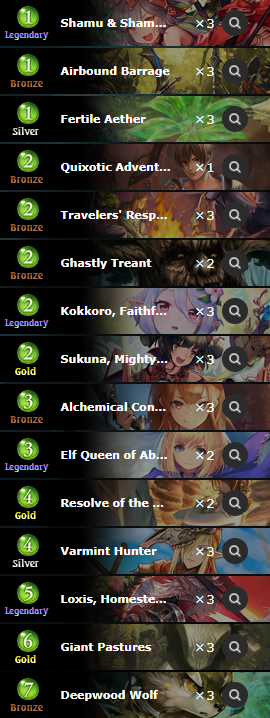
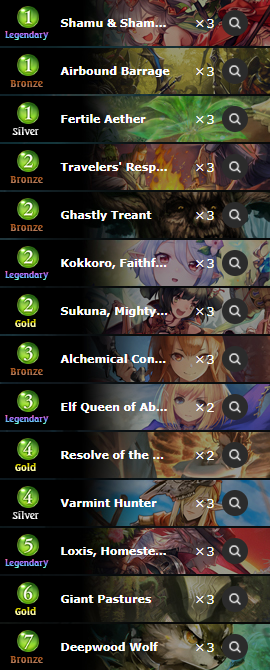
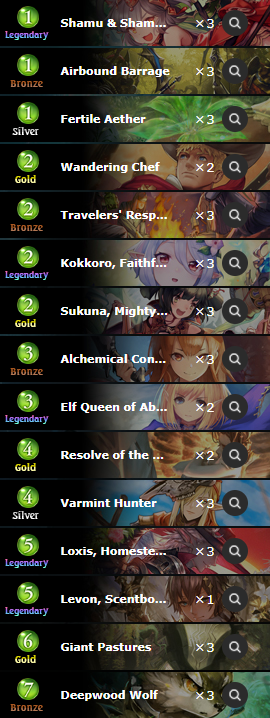
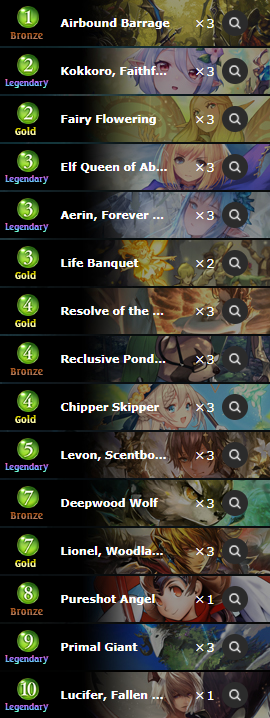
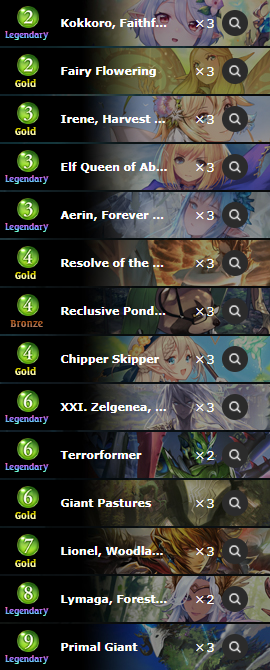
Identifying cards: Alchemical Confectioner, Loxis, Homestead Pioneer, Shamu and Shama, Posh Felines, Travelers’ Respite, Fertile Aether.
What does Loxis Forest do?
Loxis (a.k.a. Loxis/Natura) Forest is a tempo-oriented combo deck that utilizes its eponymous card, Loxis, in combination with Tree-generating spells (Fertile Aether/Respite) to get a high enough number of played cards in a turn to resolve a big Shamu and Shama (or some other follower) and generate a strong tempo swing on turn 5. The basic setup is a 3-card combo of Confectioner, Loxis and Shamu and Shama, although Confectioner is optional (you can just naturally draw into 2 or more Tree-generating cards, but the more the merrier, obviously), and the best “finisher” of the Loxis chain is generally Shamu and Shama, but you can get by with any of your 2-drops (e.g., Quixotic/Chef/Ramiel) or even Sukuna (if you’re not going off on turn 5). To be a bit more specific, the play pattern generally involves setting up a Varmint/Pastures/Respite on turn 4, then playing Loxis on 5 and start playing out your Fertile Aether(s)/ Respite(s) until you get to 3 Loxis triggers in total, after which point you resolve your pay-off effect (Shamu and Shama and its ilk). Basic rules of the game state that each side of the board has 5 slots, so if Loxis is taking up one of them, a Tree is taking up another, and if Loxis triggers 3 times, you’re going to board-lock yourself. For that reason, an important (albeit optional) additional piece of the combo is a bounce effect to return a Tree to your hand and then play your pay-off follower. This is one of the reasons why Shamu and Shama is the best pay-off for what the deck is trying to do: with a Shamu and Shama, you can simply play out Shamu and Shama with 2 Loxis Amulets out, then bounce it and play it again with the final Loxis trigger. After the initial Loxis setup, your game plan changes towards playing 6-ish-damage Sukuna(s) and bouncing them to your hand to get more damage, all while controlling the board with Shamu and Shama tokens, Elf Queens, Pastures and so on in the meantime, in a manner akin to old Roach Control Forest. I should also mention that if your hand doesn’t have a proper pay-off for Loxis to go off turn 5, you can also take a slow Loxis line, where you play Pastures on 6 and then go off with a big Loxis on turn 7 instead, although this line of play is more applicable to lists that run Ramiel.
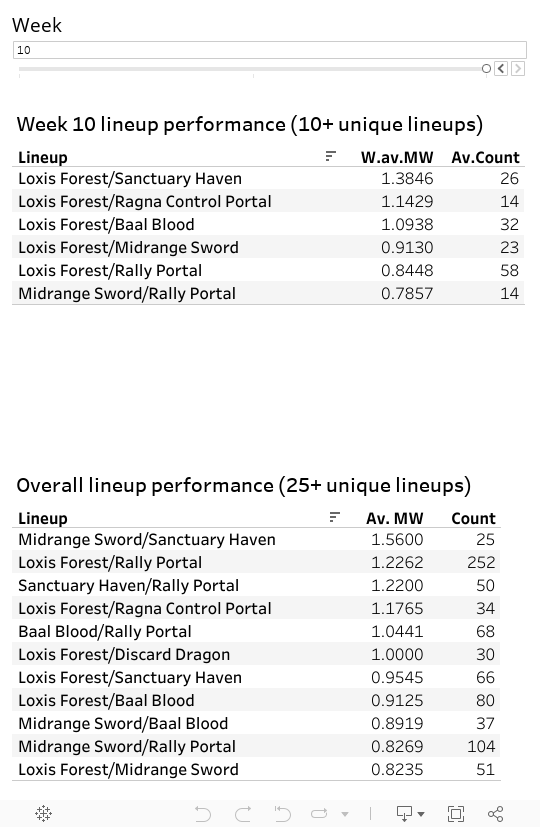
In a metagame sense, Loxis Forest has become one of the most prominent decks in competitive play after the mini-expansion. The reason for that isn’t really related to any newly released cards, but is more of a natural progression of November metagame trends: Loxis Forest took a bit of time to optimize, but it was showing signs of being one of the best decks of the format even before the mini-expansion patch, so the current prevalence of the archetype isn’t entirely unexpected. Loxis Forest doesn’t have any particularly bad matchups in the current format: the deck has enough counter-pressure to race aggressive decks, enough recurring damage to beat control decks, and enough interaction and proactive tempo to stay on par with midrange decks. In my testing, the worst matchup of Loxis Forest has been Ragna/Control Portal (as it’s a control deck with a turn 9 win condition and a disruptive early game), and even then, most of the games that you lose with Loxis Forest feel less about something specific that the opponent managed to do and more about drawing your deck in the wrong order. I am certainly biased (as Roach Forest has been one of my favorite decks during its Rotation legality), but Loxis Forest has been one of my favorite ladder decks after the October balance changes and tournament data shows that it has consistently the best-performing archetype in aggregate data, and at the time of writing, Loxis Forest has become the single most represented archetype in BO3 Conquest JCG events and I’d expect it to start having a bigger share of the ladder meta in the future as well.
Loxis Forest skeleton


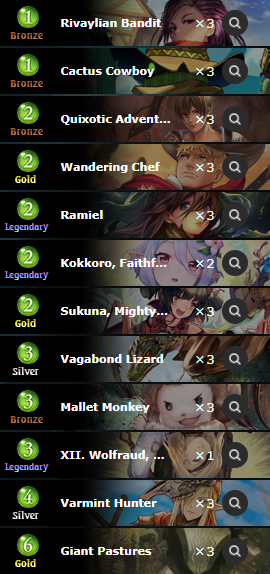
Tempo/Amulet Forest skeleton
Mulligan priority
- Always keep Alchemical Confectioner, Kokkoro, Life Banquet.
- If you’re playing Ramiel, keep it going second. Also keep it going first if you don’t have a Kokkoro.
- If you’re not keeping Ramiel, keep Elf Queen going second against Sword/Haven/Forest/Shadow/Portal. If you have a Kokkoro without a turn 3 play, also keep Elf Queen going first regardless of the opponent’s class.
- If you’re keeping Confectioner, also keep Loxis.
- if you’re keeping Loxis, also keep Shamu and Shama/Wolfraud.
Loxis Forest mulligans aren’t too matchup-dependant, as you’re generally just looking to assemble the 3-card (Confectioner + Loxis + pay-off of some sort) combo by turn 5. To this end, cheap card draw is good to have, and efficient early-game cards (namely, Elf Queen against proactive decks and Ramiel on the draw) are something that you’re generally looking for. Ramiel is also fine when going first (as the deck doesn’t really run 2-drops, and if you can’t get the ramp value out of it, you might as well just make use of it in the early game when its 2/2 statline is relevant), and you can similarly just cycle Elf Queen on 3 if you don’t have anything better going on.
Optional inclusions and tech cards
- Airbound Barrage and Deepwood Wolf are important parts of your Loxis setup, as they open up board space to where you can actually play your followers and get value out of Loxis triggers. You can get away with running 4-5 bounce effects if you’re running a lot of Loxis-compatible followers (e.g., Wolfraud/Banquet) and Ramiel (as Ramiel makes the slow Loxis setup a bit more convenient); but I’m personally not a fan of cutting 1-mana bounce effects as they’re so crucial to have against healing-heavy decks to recur Sukuna for more damage. An important utility of Barrage/Deepwood is that it allows you to deal with Slaus in the Control Portal matchup (which is primarily annoying since it takes up board space and doesn’t allow you to go off with Loxis on turn 5), and I’ve seen enough Control Portal on ladder to where cutting bounce effects is not something I could possibly justify, but your mileage can certainly vary.
- Ramiel is an optional inclusion that enables the deck to play a slower game by curving out into Pastures on turn 5 and then going off with Loxis on turn 6 instead of 5. In my testing, Ramiel has felt at its best when the deck is running poorly, and the polarized nature of the effect (great when going second, mediocre when going first) make it so Ramiel never really feels like a great inclusion, which is not to say that Ramiel is a bad card in Loxis Forest in and of itself, but more that Ramiel baits you into following worse lines of play instead of just running more midgame action.
- Quixotic Adventurer and Wandering Chef are alternatives to Ramiel that have the utility of making your Varmint Hunters better in the pre-Loxis setup turns. The deck needs a certain density of cheap-ish followers to have consistent ways to activate Loxis when you don’t have Shamu and Shama to go off with, and the sweet spot is generally considered to be 2xElf Queen and 2-3 of these 2-drops (Ramiel/Quixotic/Chef). An alternative to these cards is Ghastly Treant, which I’m personally not a huge fan of, as it makes your Confectioners worse (you’re less likely to find Fertile Aether, and as such, it’s more difficult to go off with Loxis on turn 5). Previously, Carapace and Wolfraud were cards played in these card slots, but the optimization of the archetype has lead it away from cards that are purely pay-off effects and more towards cards that offer other types of utility.
- Resolve of the Fallen is an optional tech card against primarily Haven, but can also pick up some value against other midrange decks and Dragon. Shamu and Shama and Sukuna happen to evolve when active, so with a double Shamu (or Shamu with a bounce effect) Loxis setup, it’s potentially possible to activate Resolve as early as turn 6, and you can get to draw cards in the later stages of the game as well. Resolve is specifically good against Ward Haven because it can answer an early-game Sarissa, and since it can interact with big Wards in the later stages of the game without getting Wilbert pings all over your precious life total. In addition to that, Resolve is a clean answer to Holy Sanctuary, Alyaska, Reinhardt and so on, so the card has a fair amount of good targets in the format and doesn’t really compete with Elf Queen, so I personally believe that running at least 2-3x Resolve is necessary in the current format.
Regarding Tempo/Amulet Forest
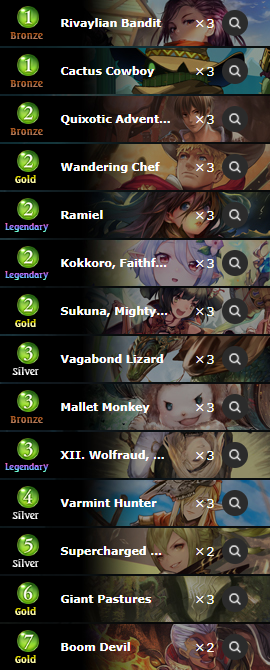
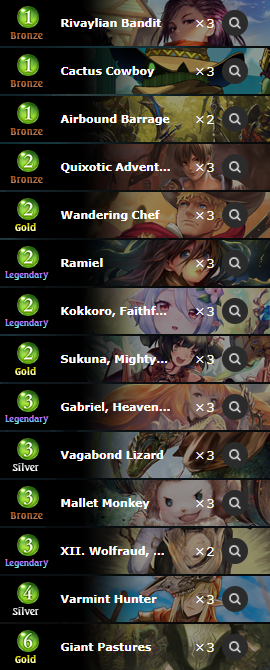
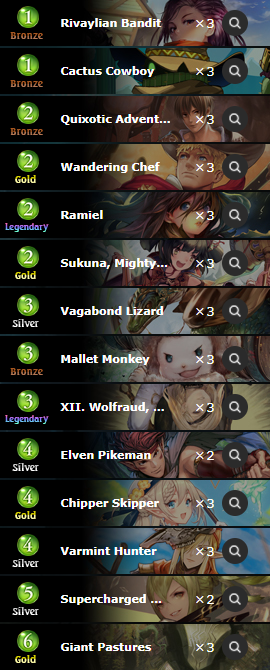
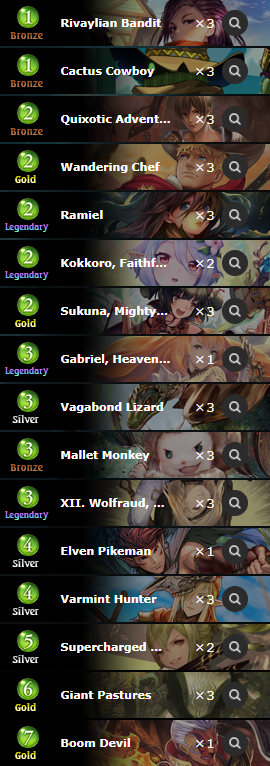
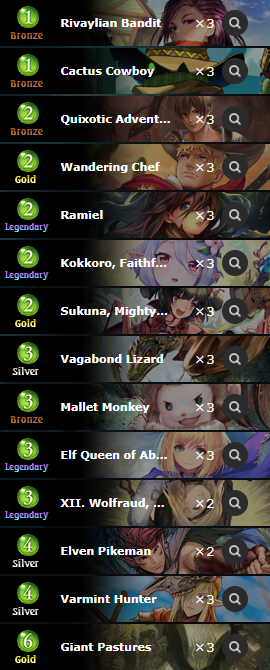
Identifying cards: Cactus Cowboy, Quixotic Adventurer, Wandering Chef, Vagabond Lizard, Rivaylian Bandit, Supercharged Guitrarist, Mallet Monkey, Elven Pikeman, Boom Devil.
Tempo/Amulet (a.k.a. Tempo/Loxis or Aggro/Loxis) Forest is an aggressive tempo deck that utilizes the (predominantly Neutral) early-game package of Amulet synergies in combination with Forest-specific Storm cards (Mallet Monkey/Elven Pikeman) to close out games. The deck has some overlap with the Natura/Loxis deck (namely, Sukuna/Pastures/Varmint/ Wolfraud), but the two archetypes are pretty different in their playstyles. One of the differences between the two decks is that you have to be a little mindful of Sukuna thresholds, meaning that you have to keep track of which Amulets you’ve summoned over the course of the game, which make Wandering Chef (summons the Ward Amulet), Quixotic Adventurer (summons the Rush one), and full-cost Giant Pastures (summons both the Ward and the Rush Amulets) particularly important, as you have a lot of +1/+1 Amulets, but a pretty limited amount of other unique Amulets; all while Loxis does the whole Amulet setup more or less by itself. The importance of Pastures also makes Ramiel a staple of Tempo Forest, as it creates a perfect setup for a turn 5 Pastures. In addition to that, it’s often important to try and land your +2/+0 Amulets on Storm cards (Mallet Monkey/Pikeman) whenever possible, as the deck has a finite amount of Storm threats.
In a metagame sense, Tempo Forest is a generally unfavored against Rally Portal and Midrange Sword, but does decently well against slower reactive decks (e.g., Ragna Portal) and performs better than Aggro Shadow in aggro mirrors due to having a bit more healing/interaction. Tempo Forest isn’t really a hyper-aggro deck, but is more of an aggressive tempo deck that can still take value trades and runs some interaction (e.g., Pastures/Varmint/Chef), even if the general game plan involves pointing as many of your cards as you possibly can at the opponent’s face. As a general statement, you’re not going to outvalue Rally Portal/Midrange Sword once they get to stabilize, but you’re still aggressive enough to where you can punish players for taking bad mulligans and/or playing greedy decks, so the archetype has a niche in the metagame, but it has been on a significant decline after the mini-expansion and is generally not a deck I’d recommend playing if you’re trying to be competitive, mostly due to its polarized matchup spread.
Optional inclusions and tech cards
- Kokkoro is an optional inclusion that helps look for threats. Kokkoro is a bit difficult to activate in Tempo Forest lists, as the deck tends to play its cards on curve, so you often have to save Bandits and Vagabond Lizard tokens to get value, which I haven’t personally been too happy with. Supercharged Guitarist is functionally similar card (draws 2 cards for “2 mana”), and while a lot of Tempo Forest players default to running 3xKokkoro, I’ve personally found Kokkoro to be quite underwhelming in a 2xGuitarist build, so while the basic notion of “see a Forest deck = slot in Kokkoro” holds true for most Rotation decks, Kokkoro is pretty cuttable if you want to be a bit more aggressive.
- Wolfraud is an optional inclusion that helps against Sword and Shadow in specific (since it can’t get Naht-ed/Greatpick-ed), but Wolfraud has a similar problem to Kokkoro in my testing, which is to say that you can’t always find the 2 cards to play alongside it, which personally makes me inclined to only run 2xWolfraud: the first copy that you draw is generally quite good, but I don’t want to draw multiple Wolfrauds in my Tempo Forest games. One thing I should mention is that Wolfraud has the fringe utility of being used as an alternative win condition if the opponent hasn’t played a lot (6-8) of cards by turn 7, which is primarily relevant against Sword: if the opponent managed to stabilize and you’re out of threats, you can run out Wolfraud on 7 if you’re going first or if you had a Gabriel going second. With that said, this strategy gets worse the better your opponent is at the game (as the opponent has perfect information of which cards you have in your hand/deck, and they can control how many answers you’re getting when you copy their hand), and all this is not to say that Enhanced Wolfraud is often a game-winning play: at its best, you’re playing it if your opponent is at 15+ health and you’re either Hellbent or close to it, so you’re turning a 5-10% chance of winning a game into a 10-20%. If you’re playing Tempo Forest in a tournament setting, it is obviously good to play to your outs, but in a general ladder game, this line of play rarely has a better EV than taking the concede and queueing up for another game; nevertheless, the Reversal line is something to be aware of.
- Elven Pikeman is an optional inclusion that makes the archetype a bit more aggressive. Broadly speaking, the archetype already has plenty of Storm cards, and Mallet Monkey/Sukuna are more mana-efficient than Pikeman, which is at its best in matchups where you’re really trying to be the aggressor (e.g., against Midrange Shadow or Spellboost Rune). Generally speaking, available tournament data suggests that the optimal configuration is 2xPikeman, but it’s possible to include other cards for midgame pressure (e.g., a third Wolfraud, Gabriel, etc.).
- Airbound Barrage is a tech card against healing-heavy decks, such as Midrange Sword and Sanctuary Haven. A big utility of Barrage in those matchups is that you can pick up your Mallet Monkey/Sukuna to generate a bit of extra damage, and in the Sword matchup in particular, Barrage is quite important to have as an on-demand (as in, no RNG involved) answer to Steadfast Samurai, which is quite valuable. As a general rule of thumb, Barrage isn’t played in Elven Pikeman lists, so it can be said that the two cards compete for a similar card slot.
- Gabriel is another optional inclusion that can allow you to push a tempo lead when you’re already ahead, and Gabriel does have a bit of cute synergy with things like Chef/Guitarist/Bandit, where you can get a second activation after their initial triggers. In my testing, Gabriel has consistently been pretty medium, but having access to a consistent play at any point of the curve is quite nice (especially if you can pair it up with Bandit for some immediate board impact).
- Chipper Skipper is an optional inclusion that slants the deck into a more aggressive direction. Make no mistake: you’re not running nearly enough Accelerate enablers to use Skipper for its midgame value (you do have Pastures, but that’s about it), and Skipper is mostly played in very aggressive builds of the deck: if you’re already running 3xWolfraud, a few Pikemen, and you’re not interested in any of this card draw nonsense, having access to 1-mana 2/2s in the early game can allow you to dictate early trades by the sheer tempo it can provide, and it’s less conditional than Bandits.
- Boom Devil is another optional inclusion that helps against healing-heavy decks, in a similar manner to Airbound Barrage. In my testing, Boom Devil has consistently been the single worst-performing card in the deck, as it’s incredibly clunky and incidentally gets hosed by Steadfast Samurai/Yukari by the time you can hope to resolve it. I really hate Boom Devil in Tempo Forest lists, but if you’re running into a lot of healing and finding Barrage a bit too low in impact, Boom Devil could be something to consider.
- Elf Queen of Abundant Life is a tech card for aggressive mirrors and against Ward Haven. Generally speaking, Tempo Forest doesn’t have the card draw to make Elf Queen better than a Dragon Warrior in most cases, but it’s a piece of interaction that you can include in your aggro deck and not be too embarrassed. Elf Queen has obvious synergy with Kokkoro, Barrage and other copies of itself, so it doesn’t really fit into every Tempo Forest build, but if you’re leaning towards a more card-draw-heavy direction, Elf Queen does have its value in matchups where its AoE effect is relevant.

Accelerate/Flowering Forest
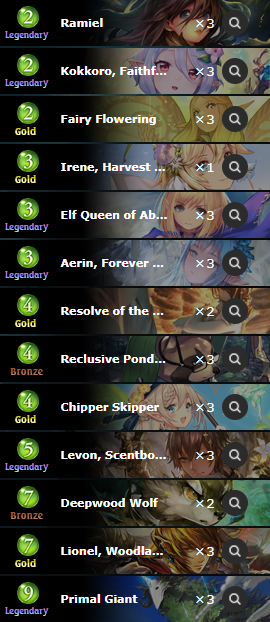
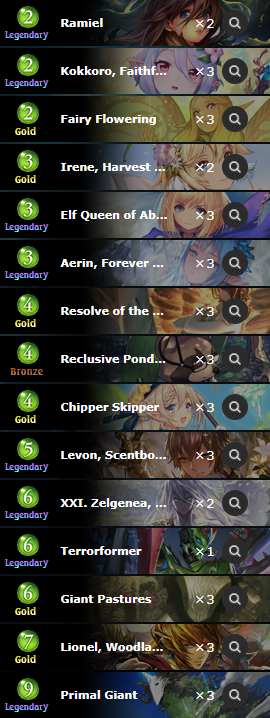
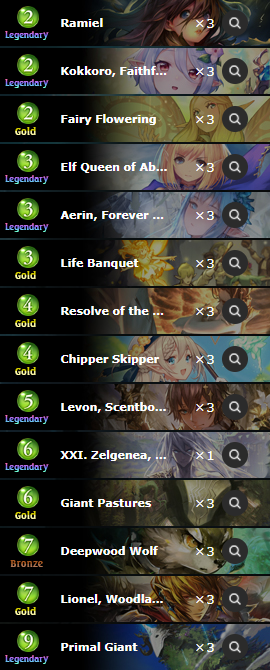
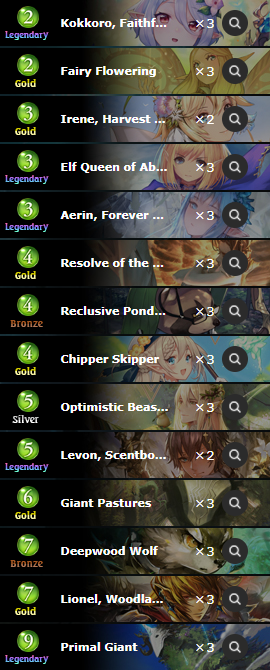
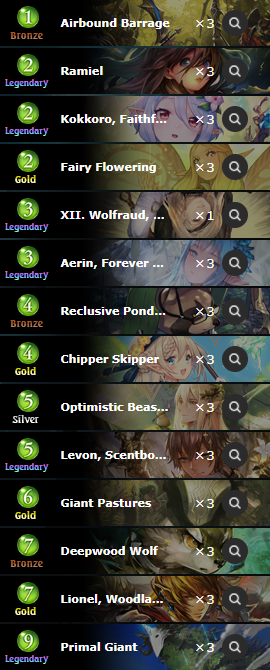
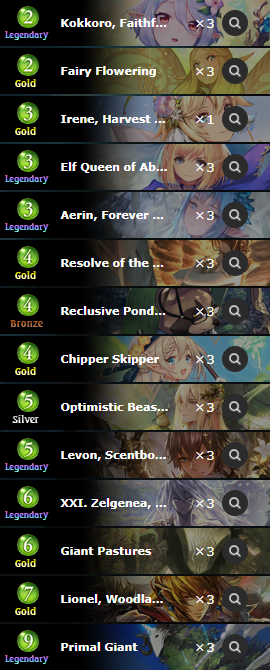
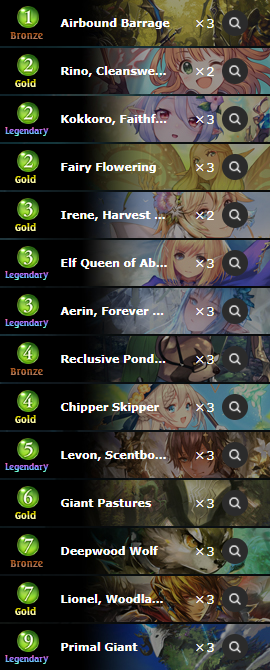
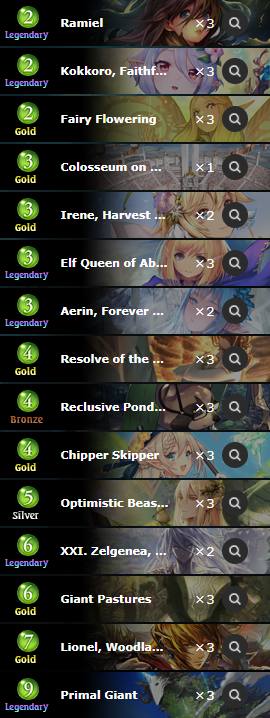
Identifying cards: Reclusive Ponderer, Levon, Scentbound Sword, Aerin, Forever Brilliant, Lionel, Woodland Shadow, Primal Giant, Irene, Harvest Defender, Fairy Flowering.
What does Accelerate Forest do?
Accelerate/Flowering/Control Forest deck is a reactive control deck that utilizes Fairy Flowering as its finisher in combination with with a variety of 1-mana Accelerate cards in a pay-off package of Aerin/Chipper Skipper. Due to having a fair bit of evolve-based synergies (primarily Chipper Skipper and Aerin, but also Fairy Flowering itself and Lionel). The win condition of the archetype generally involves a 2-turn setup with Levon/Irene/Giant Pastures with Fairy Flowering, but with Irene and enough Fairy Flowerings (as well as Giant Pastures tokens and UB Kokkoro(s)), Flowering Forest can deal 20 damage out of hand (though in most matchups that’s not really your game plan, and the Irene OTK setup is primarily relevant in matchups like Sanctuary Haven and Spellboost Rune). The general game plan of the archetype involves playing a quasi-attrition game plan using your suite of removal and then eventually start assembling combo pieces to close out the game, in a manner similar to old Roach Forest builds with the Accelerate package. Levon is part of the setup against proactive decks (e.g., Rally Portal), as playing against creature-based decks allows you to farm a high enough Levon K/D ratio to eventually start presenting 2-turn lethals, but the archetype can still win even without a charged up Levon. An important secondary combo setup that I’d like to mention is the 2-turn setup of Giant Pastures + Fairy Flowering on your 8-mana turn, and then Deepwood Wolf with either an Accelerate card of any sort or a plain old evolve point, which is exactly 20 damage and doesn’t require a lot of setup (aside from activating Flowering) and is primarily relevant against deck with lack of healing.
The archetype still has a lot of room for optimization, as there is a variety of ways to build the deck, but even if its current state, despite being a pretty fringe archetype, Accelerate Forest has been showing some excellent results in my personal testing and available tournament data. The deck has a similar niche in the meta to Loxis Forest, but it does better in the Forest mirror than Loxis Forest (as you have a lot of fast healing with Primal Giant and a way better interaction suite), and in my testing, Flowering Forest was showing a better matchup against Rally Portal than Loxis Forest. The weak matchups of the deck are Midrange Sword (Sword boards get a bit too big to deal with), Baal Blood (you get burned out) and Ragna Control Portal (their combo is faster than yours), while the Haven matchups are about the same for both Loxis and Flowering Forest. This matchup configuration makes Flowering Forest a very promising deck for BO3 Conquest, but whether it’s better than Loxis Forest or not depends on how much Sword/Blood you’re facing. In my testing, Accelerate Forest has been the single best-performing deck that I’ve played on the mini-expansion patch, and while this standpoint is certainly biased, I believe that Flowering Forest has a lot of potential with a bit of optimization, and the deck is being slept on, in a similar fashion to early-November builds of Loxis Forest.
Mulligan priority
- Always keep Reclusive Ponderer, Levon, Elf Queen, Life Banquet, Kokkoro.
- Keep Ramiel going second.
- If you’re already keeping Levon against Portal/Sword/Blood, also keep Deepwood Wolf/Airbound Barrage.
- Keep Resolve of the Fallen against Haven.
The mulligan strategy for Flowering Forest is not unlike a lot of other combo-based Forest decks: you’re generally looking for card draw of all shapes and sizes, and while members of the “Insight on 1 cabal” are likely to get antsy about keeping Reclusive Ponderer, the card has a 1-mana Accelerate, and while there is some downside to playing Ponderer on 1 (mainly, that you’re revealing your deck to the opponent if you’re playing in a ladder setting), charging up Fairy Flowering earlier generally outweighs whatever the surprise factor you could get by (poorly) masquerading as Loxis Forest: the opponent will know that the jig is up after 2-3 turns anyway. Ramiel on the play is a good keep for any deck running Ramiel. Levon is a bit unusual, in that it doesn’t draw any cards, but having an early Levon allows Levon to start collecting dogtags as early as possible, which is especially valuable if you draw multiple copies. Against proactive creature-based decks, keeping 1-mana bounce effects for Levon is also fine. I tend to keep Resolve of the Fallen against Haven assuming that I’m up against Sanctuary Haven, which can certainly backfire a bit if you run into Ward Haven, but even against Ward Haven, Resolve can still answer an on-curve Sarissa, so it’s not exactly terrible.
Optional inclusions and tech cards
- Ramiel is an optional inclusion that I’d personally consider a core card in the archetype. Unlike most of other Ramiel decks, Accelerate Forest actually has ways to regain evolve points with Aerin, so in slower matchups (e.g., against Sanctuary Haven), it is not uncommon to get multiple Ramiel triggers in a single game, and it’s often possible to ramp even when going first. The utility of ramp obviously gets weaker the more ramp you’re getting (as you’re still limited to 10 maximum play points), but the loop between Ramiel and Aerin makes Ramiel one of the best cards in the deck in my testing, and the spell damage immunity also marginally helps you with hemorrhaging your life total against Baal Blood.
- Levon, Scentbound Sword is an optional inclusion that gives the deck a lot of breathing room against Rally Portal in particular and creature-based decks in general. Make no mistake: Levon is really slow and it’s quite mediocre against creature-light decks like Ragna Portal and Sanctuary Haven, so it can’t really serve as a win condition in every matchup, but it is nevertheless a valuable asset in Accelerate Forest’s arsenal against Sword/Portal. Deepwood Wolf is a staple of Levon lists, but if you’re not running Levon, there isn’t much of a reason to run bounce effects. A similar logic applies to Airbound Barrage, but due to not being an Accelerate card, Barrage is generally just worse than Deepwood Wolf for most intents and purposes. Bounce effects have other utility: e.g., they allow you to reuse Elf Queen AoE and Kokkoro‘s UB triggers, but tese applications of the card are quite slow and not something that you’re ever particularly excited about. We’re not (quite) playing Roach Forest here, so there is not as much reason to focus on bounce effects to quite the same extent.
- Irene, Harvest Defender is a tech card against Haven and Rune. The main utility of Irene is that it allows you to assemble a 20-damage combo that doesn’t fold to Yukari or the opponent simply healing back up to 20 every turn. The Irene setup requires you to draw 2 or more Fairy Flowerings (ideally, all 3, but you can make do with a UB Kokkoro and/or Giant Pastures from prior turn in a pinch), so the “Irene matchups” generally involve drawing 30+ cards from your deck and generally take forever. For that reason, you don’t necessarily need to run more than 1xIrene, but to be perfectly honest, running 2xIrene makes your life so much easier that it’s not even funny, and it prevents the nightmare scenario of playing a whole 20-minute match only to have your Irene in your bottom 3-5 cards (which means that you deck yourself with Flowerings/Resolve of the Fallen as each of them draws cards). I don’t think it’s necessarily wrong to run 1xIrene (I did just that for a big chunk of my personal testing), but running 2 copies does make the deck a lot more sensible and less draw-dependant in relevant matchups.
- Life Banquet is an optional inclusion that draws 2 cards for 3 mana. I’ve personally found Life Banquet extremely valuable, as it’s a snap keep in the early game, but it can get a bit clunky once the midgame rolls around, and it’s not really a card that does anything in and of itself, so if you’re looking towards running more specific tech cards, Life Banquet is generally the first card to get the boot.
- Zelgenea, the World is a tech card against primarily Baal Blood, but is also quite valuable against Rally Portal. The deck has a fair bit of incremental healing with Aerin/Primal Giant, but these cards don’t really contest the board particularly well against Blood, more specifically, Bloodsoaked Archdemon, and while you can have other cards to answer Archdemon (e.g., Resolve or 2-card combinations of Elf Queen/Lionel), running even a single Zelgenea turns the Baal Blood matchup from groan-worthy to just slightly frown-worthy. What a terrible description. The important utility of Zelgenea against Rally Portal is that it’s your only answer to Kaiser lists, as you can’t reliably clear a 14/14 in any other ways, but the utility of Zelgenea against Rally Portal is obviously a lot weaker if the opponent isn’t running a Kaiser build.
- Terrorformer is an optional inclusion that primarily helps against Sword and other healing-heavy decks. Terrorformer is mostly just an extra threat in the deck, and I’ve personally found it a bit underwhelming in most matchups, but it does give you an out against Ragna Portal if you draw it early enough and it can potentially outgrow the Irene setup in long games, and it does provide some card selection, but I’ve also felt that the deck doesn’t really have the draw engine to afford fusing everything to Terrorformer, and the value of Terrorformer has generally been outweighed by a second copy of Irene, so I’m not a huge fan of Terrorformer in the deck, if you’re not slanting your deck towards a more Terrorformer-based shell with things like Colosseum on High, for example, and even then, I’d personally prever 2xIrene/0xTerrorformer.
- Optimistic Beastmaster is an optional inclusion that often doesn’t quite make the carry-over from Terrorformer Forest shells. I’ve done a good bit of testing running a 1-of Beastmaster to record how well the card performs, and while it does have its utility, it’s mostly just a slower Aerin: it can dig for Primal Giants in burn-heavy matchups, but it’s just a bit too slow against a lot of the currently played decks, and it’s a bit redundant with Pastures/Skipper/Elf Queen in terms of its AoE capabilities.

Midrange Sword
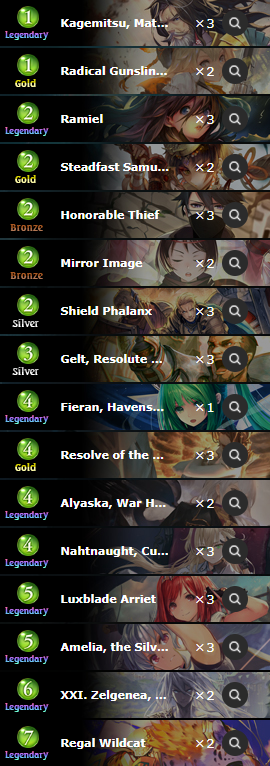
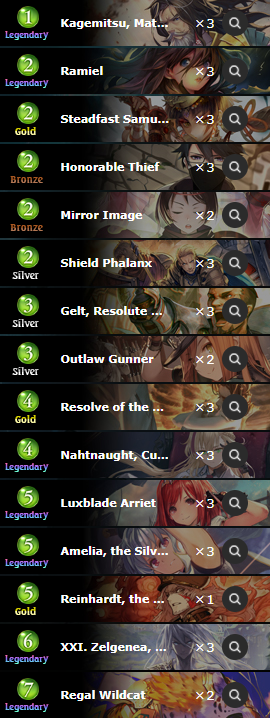
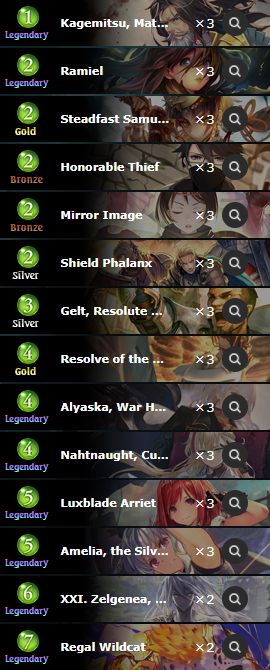
Identifying cards: Ramiel, Amelia, the Silverflash, Alyaska, War Hawker, Nahtnaught, Cursed Queen, Regal Wildcat.
What does Midrange Sword do?
Midrange Sword is a reactive midrange archetype that utilizes efficient Swordcraft followers. The deck has a focus on evolve synergy, with a variety of cards either benefiting from evolving followers over the course of the game (e.g., Kagemitsu, Resolve, Alyaska, Arriet) or evolving without spending evo points (e.g., Kagemitsu, Honorable Thief, etc.). Midrange Sword has a quasi-inevitability engine with Zelgenea, as combo-ing Regal Wildcat with an invoked Zelgenea results in a 17-damage setup, which is the primary win condition of the archetype. With that said, Sword can close out games with Wildcat even before turn 10, either by giving Kagemitsu or things like Arriet or Alyaska‘s token Storm, if you’ve managed to get in for some chip damage in the earlier stages of the game.
The SoR expansion has introduced Ramiel and Nahtnaught into Midrange Sword lists, which effectively means that other evolve-based 2-drops (Levin Beastmaster and Ilmisuna) have mostly phased out of Sword lists, and the addition of Nahtnaught makes Sword a lot more reactive. These changes to the archetype mean that Midrange Sword is generally favored against board-centric midrange decks (e.g., Rally Portal), but is likely to struggle against decks that can go over the top of Sword (chief example among which being IMT Shadow, as a lot of Sword’s removal conveniently doesn’t work against a board of multiple 5/5s that destroy a random enemy follower upon death), which puts Midrange Sword in a somewhat unusual spot: the deck is really well-rounded and has tech card options for most common matchups, which makes it one of the best BO1 decks in the format, but it’s weak to a lot of fringe decks in the format (e.g., Ragna Portal/IMT Shadow), which makes it a bit awkward in a Conquest BO3 environment, so while I personally believe that Midrange Sword is one of the best ladder decks one could play, it has consistently been underperforming in tournament play.
Mulligan priority
- Always keep Gelt and Kagemitsu.
- Going second, keep Ramiel as a turn 4 play.
- Keep a proactive 2-drop, this includes Ramiel, Shield Phalanx, Levin Beastmaster, Steadfast Samurai, in order of priority. Going second, keeping Ramiel with another 2-drop or even double Ramiel is fine.
- Keep Mirror Image with Kagemitsu.
- Keep Nahtnaught against Portal.


Sword mulligans are pretty straightforward: the goal is to curve out and contest the board. Ramiel is obviously great when going second, but it’s also quite decent as a 2-drop, since it doesn’t really do anything in the later stages of the game, unlike your other 2-drops. I like keeping Nahtnaught against Rally Portal, as it’s one of the best Sword cards in the matchup, and Nahtnaught is still fine when played as a simple Dragon Warrior. Midrange Sword has a 2-drop problem (the problem being that you don’t run a lot of them), so keeping a playable 2-drop of some sort is extremely important if you want to have a consistent early-game curve.
Optional inclusions and tech cards
- Mirror Image is an optional inclusion that can clone Kagemitsu, which conveniently lines up well with turn 4 Ramiel. Mirror Image has some other miscellaneous synergies (e.g., with Gelt, Radical Gunslinger or Alyaska tokens), so while it’s generally not necessary to run a full playset (the card is a bit conditional), running 2xMirror Image is what I’d consider a core inclusion.
- Radical Gunslinger is a 1-mana Dragon Warrior, which makes it a decent tech card against Rally Portal, but not a whole lot of much else. Radical Gunslinger competes with Ramiel for evolve points, and while it does have some sweet synergy with Mirror Image, it can be pretty mediocre when going first, so it’s a fine, if unexciting, inclusion in Sword lists if you’re trying to specifically target Rally Portal.
- Pompous Summons is a tech card against primarily Loxis Forest. Summons has the important utility of looking for healing (Arriet) and midgame interaction (Nahtnaught/ Alyaska). Summons doesn’t do anything in and of itself and doesn’t open up any particularly interesting lines of play, but it makes it easier to find follower-based answers, which is not great in every matchup (e.g., it’s pretty slow against Rally Portal), but is valuable against decks dealing incremental face damage over multiple turns.
- Alyaska is a card that has been a staple is Sword lists for a good while, but with the format being dominated by Rally Portal after the mini-expansion, it is not uncommon to see Sword players cutting Alyaska to fit in random anti-Portal cards (e.g., Radical Gunslinger/Outlaw Gunner) that are a bit better at contesting the board. As a general rule, I don’t think that cutting Alyaska actually makes your Rally Portal significantly better (and I also think that Sword is already favored against Portal). What cutting Alyaska does impact, however, is the Baal Blood matchup: Blood has a really hard time clearing Alyaska, especially if you manage to keep it undamaged, and effectively stonewalls 6-card Baals (so long as your Knife Juggler RNG isn’t too terrible). In my opinion, Alyaska is one of the many optimal 2-ofs in Midrange Sword (joining Regal Wildcat/Mirror Image/Zelgenea/ Steadfast Samurai and possibly Radical Gunslinger/Summons, depending on what you’re trying to target), which does feel a bit strange for a midrange deck, but I still wouldn’t really recommend cutting Alyaska if you’re seeing any Baal Blood at all (although I wouldn’t suggest running a full playset either). Sword just has so many good cards that it’s difficult to fit in full playsets of all your pay-offs while maintaining a decent early game curve.
- Lady of the Lance is a card that primarily helps in tempo-oriented matchups, such as Rally Portal. In my experience, LotL doesn’t “activate” consistently enough to justify its inclusion, and it’s ironically a bit redundant with a lot of its enablers (e.g., Nahtnaught and Alyaska), so I’m not a huge fan of LotL, but it’s an acceptable inclusion in you see a lot of aggressive decks and feel like you need to have a more reactive early game.
- Second copy of Regal Wildcat is technically cuttable, however, it is important to be aware of the fact that there are a lot of matchups that come down to whether or not you have Wildcat on turn 10. A lot of players seem to have the memory of playing the archetype with 3 less Commanders (before Nahtnaught) and some number of King’s Welcomes, which made it easier to find a Wildcat with Gelt (and Amelia fetching up Gelt), and made it justifiable to only run 1xWildcat. With that said, even before the SoR expansion, 2xWildcat Sword lists generally performed better in Sword variants that ran fewer than 2 King’s Welcome, so in that context, I do not believe that cutting the second Wildcat is a great idea for what Midrange Sword’s trying to do.
- Reinhardt, the Deathless is a tech card against Ward Haven and aggressive decks that win through incremental damage (e.g., Baal Blood and Discard Dragon). After the Zelgenea nerf, most Sword lists only run 2xZelgenea, so the archetype is a bit light on healing, which makes Reinhardt a more attractive 1-of if you want to improve your matchup against aggressive decks. Reinhardt is a dead draw in the Sword mirror and is often quite mediocre against Portal. It is important to be aware of the fact that even the most aggressive decks in the Rotation format run some semblance of removal or can evolve into Reinhardt to clear it, and against Baal Blood, there is a strange game of cat and mouse, as you don’t want to resolve Rein into a 6-card Baal or Bloodsoaked Archdemon, so it’s often not particularly great against Blood either. A fun play pattern to be aware of against Haven is that if you can’t close out the game with the Zelgenea + Wildcat combo, you can often take a defensive line of play and make a 7/7 Reinhardt (bumping it into a follower, and then getting another buff with the Zelgenea damage), and then protect it with an active Shield Phalanx, which effectively allows you to negate all Zelgenea damage (and conveniently also gets it out of Blight range). Reinhardt is a sweet card and the Zelgenea nerf gave it more of a place to perform, and there are ways to go even deeper on Rein with things like Clash of Heroes if you want to really crush aggro (and, to a lesser extent, Ward Haven) players’ dreams. Is it optimal to run 3xRein/2xClash and cut Zelgenea/Arriet? Probably not, as there is a non-trivial amount of people playing Portal. Would I recommend it? I am certainly biased (Rein is probably my favorite card of the SoR expansion), but oh is it a blast (for some of the parties involved). What’s the matter?! Why aren’t you playing the screaming shirtless red man in your Sword deck? Because it’s bad against Portal. Yeah, that’s a pretty big reason.
Regarding Walfrid Sword
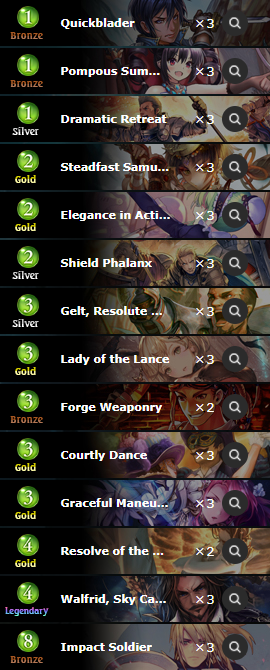
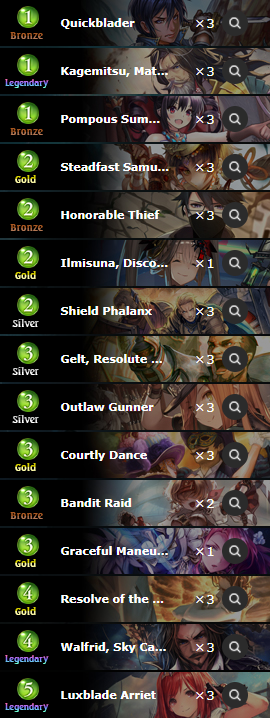
Identifying cards: Quickblader, Elegance in Action, Walfrid, Sky Captain, Courtly Dance, Graceful Maneuver.
Prince Keleseth‘s racist uncle is a bit demanding on the creature types of followers that you’re allowed to include in your Sword deck. The basic win condition of Walfrid Sword is resolving Enhanced Courtly Dance, which hopefully hits Quickblader/Steadfast Samurai out of your deck to deal a good chunk of face damage, however, there is some finesse to building the deck: on the one hand, there is a more Spell-heavy approach (e.g., with cards like Elegance in Action/Bandit Raid/Impact Soldier) which enables Courtly Dance to hit Steadfast Sammy more consistently or outright guarantees it, and on the other hand, you can build a deck with a greater focus on getting value out of Walfrid buffs, with more of a “goodstuff.dec” approach, running cards like Kagemitsu/Honorable Thief/Arriet in a manner akin to conventional Midrange Sword builds. Be that as it may, Walfrid Sword is a highly draw-dependant archetype that has consistently been showing astoundingly terrible results in tournament play, but it could certainly get some support in future sets, as there are certainly some Prince Keleseth fans among Shadowverse players. Captain Walfrid is to Ramiel what Raza the Chained is to Prince Keleseth, which is to say that they’re all garbage card design that I wish wasn’t as prevalent in card games as it currently is, as it leads to obnoxious play patterns, and while Ramiel is a bit more bearable as it’s a Neutral card and has a lower impact on “drawn winrates” in decks it’s played in, Walfrid is just a bad card in all of its facets: not only is it a mediocre card in and of itself, but the card design it represents is very unhealthy for the game (as in, these kinds of high draw variance effects drive players away from playing) if it ever gets properly supported. God, I sure hope not.

Sanctuary Haven
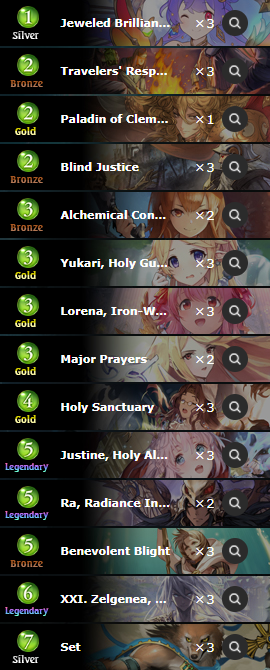
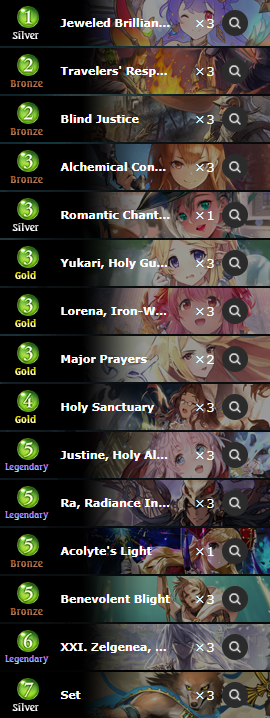
Identifying cards: Jeweled Brilliance, Alchemical Confectioner, Justine, Holy Al-mi’raj, Holy Sanctuary, Set.
What does Sanctuary Haven do?
Sanctuary Haven is a control deck that utilizes its titular card, Holy Sanctuary, in combination with cheap healing cards to generate board control and tempo in the midgame. As a Rotation-legal Havencraft deck, Sanctuary Haven utilizes Ra and Zelgenea damage as its primary win condition, and the attrition game plan of Sanctuary Haven is a logical evolution of the Ra/Control Haven decks that emerged after the September mini-expansion. It’s certainly still possible to play a Ra-based control deck without Holy Sanctuary, but the Sanctuary build is a lot more streamlined and well-optimized. Part of the reason for that is Sanctuary Haven having access to Jeweled Brilliance and Alchemical Confectioner to tutor for its main engine pieces. The Justine/Travelers’ Respite package allows you to activate Holy Sanctuary without spending any mana, which is particularly relevant when combined with expensive spells like Benevolent Blight, and while the preferable play pattern is generally to play Respite and then fuse the Tree to Justine, it’s fine to simply fuse the Respite if you’re hurting for immediate tempo, and if you have multiple Justines in hand, fusing a Respite to one and then fusing it to another Justine is often a necessary line of play.
Sanctuary Haven is an archetype that generally does pretty well against fair midrange decks like Rally Portal, but can get overwhelmed by IMT/Midrange Shadow and decks with a higher threat density (e.g., Midrange Sword). In addition to that, Sanctuary Haven has a finite amount of threats and is a bit soft to anti-amulet tech cards (e.g., Resolve of the Fallen, Mugnier, Box of Puppets, etc.), so it can get outvalued by decks with a stronger midgame game plan. In addition to that, while the archetype does have a good bit of healing, it doesn’t do a whole lot in the early game, so if you’re going first as Sanctuary Haven and don’t manage to stabilize, it is occasionally possible to get overwhelmed by conventional aggressive decks (e.g., Aggro Shadow), although conventional builds of Sanctuary Haven should be pretty comfortably favored against burn-based decks. Due to being a Yukari class, Haven decks of all shapes and sizes are generally favored against damage-based burn decks such as Spellboost Rune, and to, a lesser extent, Baal Blood, but unlike Ward Haven, Sanctuary Haven doesn’t have a lot of helpful defensive tools against neither Loxis nor Flowering/Accelerate Forest (aside from healing), and since both of those decks tend to run 2-3xResolve of the Fallen, even if there are some Forest draws that Sanctuary Haven can beat (more specifically, Forest draws with 0xResolves in their first 20-25 cards), Storm-based combo decks are nevertheless often a rough matchup for Sanctuary Haven. These factors put Sanctuary Haven in a somewhat complicated position: the archetype does fine against Rally Portal and Baal Blood, but can struggle against Sword and Forest, which makes it a good deck for Conquest lineups (where Sword is a lot less common), but a somewhat polarized ladder deck. Be that as it may, Sanctuary Haven does better than its Ward counterpart in a Box-heavy metagame, so even if Haven is far from the first class I’d recommend for players trying to be competitive on ladder, Sanctuary Haven is not a terrible archetype if you’re facing a lot of Portal (or to be more specific, more Portal/Blood/Rune than Forest and Sword).

Mulligan priority
- Always keep Jeweled Brilliance, Holy Sanctuary, Alchemical Confectioner, Major Prayers.
- Keep Blackened Scripture and Blind Justice against Portal/Sword/Blood/Shadow.
- If you’re playing Pure Metamorphosis, keep it against Haven/Portal.
- If you’re playing Ramiel, keep Ramiel going second.
Sanctuary Haven doesn’t do a whole lot in terms of proactive early-game developments (as most lists don’t run any proactive 2-drops), and the general goal of the deck in the early game is to find one or more copies of Holy Sanctuary to transition into the midgame. To that end, you’re generally looking for early card draw and tutors. I am never really excited about keeping Lorena despite it being a passable turn 3 play and I generally try to look for something a bit better than a delayed cantrip, and Lorena can pick up more value in the later stages of the game. Scripture/Justice are important to deal with early board developments, especially against all sorts of “Last Words: Draw a card”-type effects, which include Illganeau/ Marionette Expert/Bloodbinder/Gelt/etc. Metamorphosis is relevant against Anvelt and in the Sanctuary Haven mirror, and has similar utility to Banish-based removal effects against Portal. Ramiel has obvious synergy with Sanctuary when going second, and I don’t think I need to explain why Ramiel is a good card to have on the draw.
Optional inclusions and tech cards
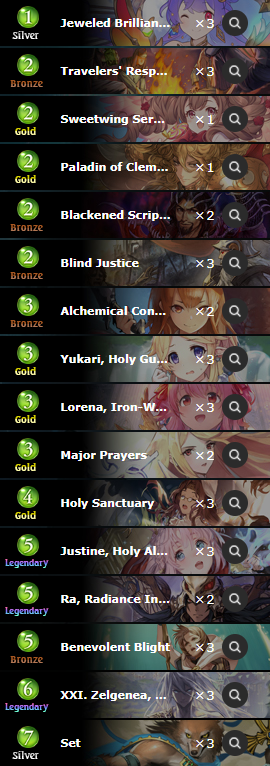
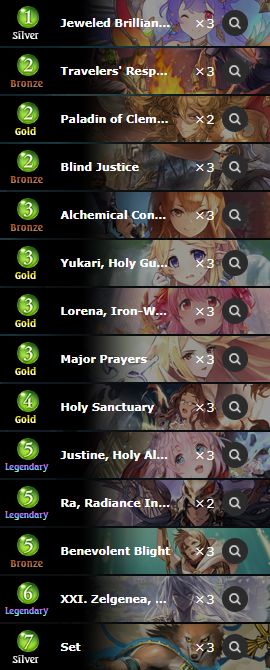
- Paladin of Clemency is an obvious addition to Sanctuary Haven from the mini-expansion patch, and the main utility of Paladin is that it’s a midgame card that draws 2 cards, putting it in a similar spot to a slightly more flexible (albeit less efficient) Major Prayers: unlike Prayers, you can use Clemency with Sanctuary on turn 4 when going second, but it’s also not a card that you can really play in the early game due to its mediocre statline. Generally speaking, a Sanctuary Haven list should run 7-8 of these “draw 2” effects, and based on my testing, the trickle priority is generally Major Prayers > Confectioner > Paladin of Clemency, and as such, I wouldn’t recommend cutting Major Prayers/ Confectioners and I’d only run Clemency with a 3/3 split of its 3-mana compatriots, and it’s one of the most cuttable cards in the deck if you’re looking to run more early-game interaction (as Paladin of Clemency really doesn’t a whole lot of good in that stage of the game). The best performing split of Clemency/Prayers/Confectioners in tournament data are 2/3/3, 2/3/2 and 3/3/2, in declining order, so there is some wiggle room in the Confectioner/Clemency slots, and you can’t really go wrong with most configurations so long as you run a full playset of Major Prayers. If Paladin of Clemency was a Sword card, it could’ve definitely evolved for free with its Enhance effect, but Haven cards are just built different, for obvious reasons.
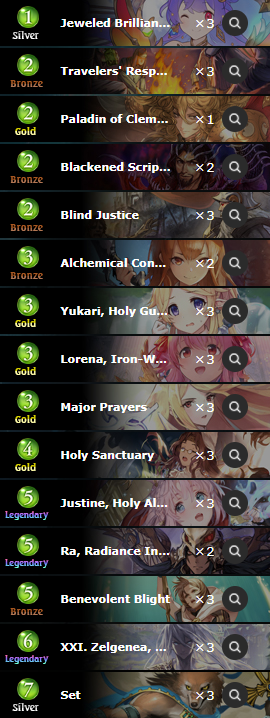
- Blackened Scripture and Blind Justice serve a similar function in both Ward and Sanctuary Haven, however, Sanctuary Haven is about as far from a tempo deck as its gets, so Sanctuary Haven naturally tends to favor Justice over Scripture. Another card that should be mentioned in the context of messing with Anvelt is Pure Metamorphosis, but Meta has obvious downsides in a format with a non-negligible Forest presence, and it does look quite silly against any type of deck with “Rally” in its name.
- Sweetwing Seraph is a 1-of tech card against Rally Portal and Loxis Forest that helps Sanctuary Haven fight through Box of Puppets/Resolve of the Fallen. The awkward part of Sweetwing is that it’s a Natura card, which inadvertently makes Confectioners a bit worse, as you have a non-trivial probability (5/28 = 17.86%, assuming all 7 of your Natura cards are in your deck at the time) of not finding Justine with Confectioner, which is specifically relevant when going first. Because of its tribe tag, it is difficult to justify running more than 1xSeraph (as it makes Confectioners that much worse), and the card is not great against Sword/Blood or in the Haven mirror, so it is somewhat matchup-dependant, but if you’re specifically trying to target Rally Portal, a 1-of Sweetwing Seraph goes a long way towards having your engine pieces operational.
- Romantic Chanteuse is a tech card for the Haven mirror, that also helps against a lot of leader-based damage effects in a variety of other matchups (e.g., Absolute Modesty, Shipsbane Plesiosaurus in Discard lists, invoked Zelgenea against Sword, etc.). As a rule of thumb, Chanteuse is a better fit in faster archetypes, so despite being a pretty common tech card, Romantic Chanteuse is one of the single worst-performing Sanctuary Haven cards in tournament data, and I personally do not believe it is particularly well-suited for the current environment.
- Acolyte’s Light is a tech card against Shadow/Forest/Ward Haven that can return some of the health you’ve lost to IMT, fast Loxis setups, and it also lines up to be an on-curve answer to an early Anvelt (which stops Sarissa recurring Anvelt). In most cases, Blind Justice is more flexible, but you can only run 3xJustice and Acolyte’s Light is a Shadowverse card in current year. Acolyte’s Light has been showing some decent results as a 1-of in tournament play, and it has some decent synergy in the deck, but it’s not exactly a card I’d recommend against a general ladder field, as it’s not great against neither Rally Portal nor Sword.
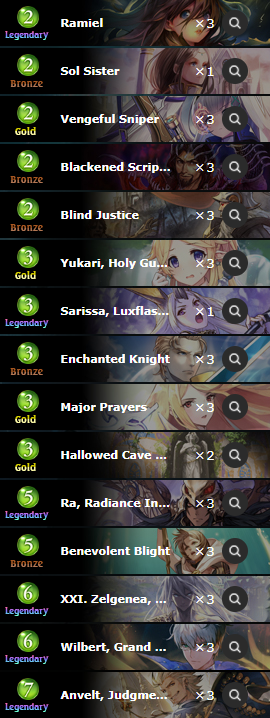
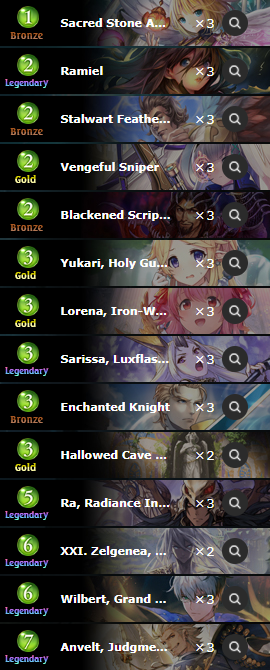
Ward Haven
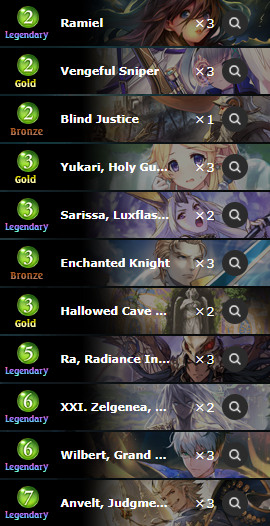
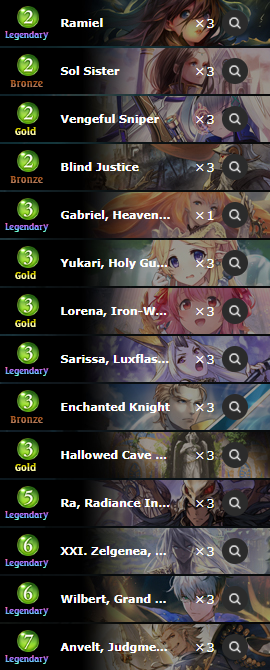
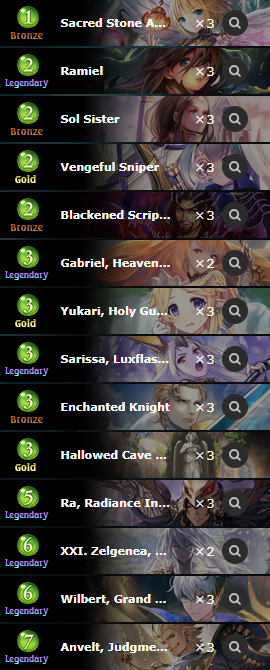
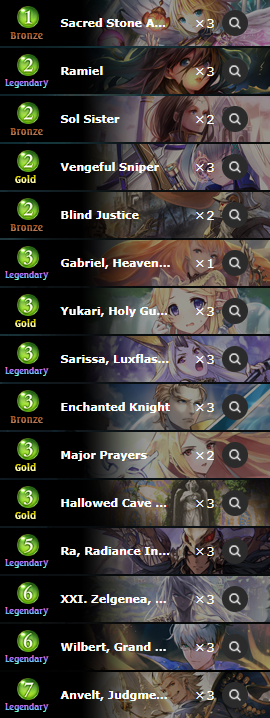
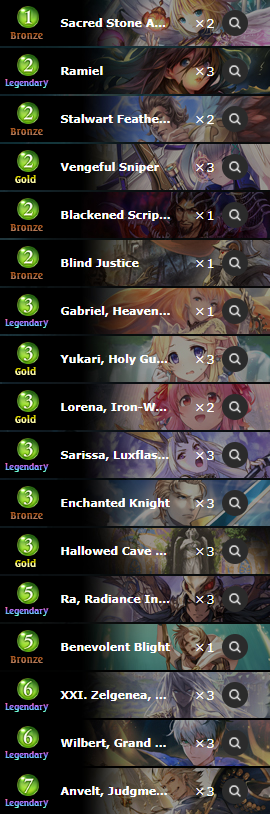
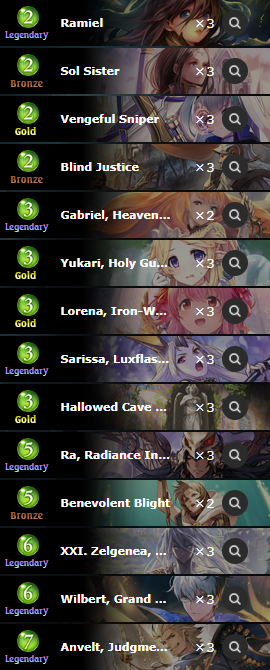
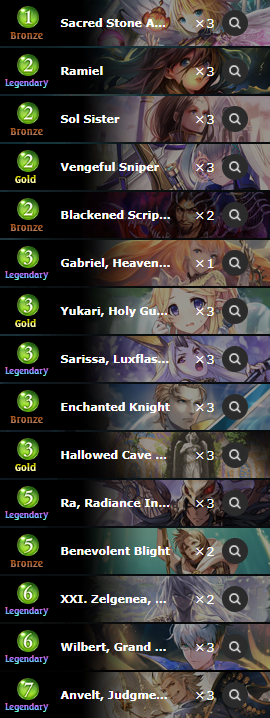
Identifying cards: Sacred Stone Apostle, Enchanted Knight, Sarissa, Luxflash Spear, Hallowed Cave Shrine, Wilbert, Grand Knight, Anvelt, Judgement’s Cannon.
What does Ward Haven do?
Ward Haven is a proactive midrange archetype that revolves around Ward synergies, namely, Enchanted Knight, Anvelt and Sarissa. The deck can play games like a conventional tempo deck against archetypes that can’t answer a snowballing Sarissa, and it also can play almost like a bad control deck with chip damage from Ra, Wilbert and Zelgenea, using its arsenal of Ward followers and Yukaris to protect itself. Ward Haven is pretty light on threats compared to other midrange decks like Midrange Sword/Artifact Portal, however, there is room in the archetype to include more card draw, so the deck can also lean into a more control-oriented direction.
Ward Haven is very weak to anti-amulet tech cards (e.g., Mugnier, Box of Puppets, Pure Metamorphosis) that can deal with Anvelt in its amulet form, and, to a lesser extent, to silence effects (e.g., Mugnier) and banish-based removal spells (e.g., Blind Justice, Mystic Absorption, etc.) that prevent Sarissa from reanimating Anvelt later in the game, and, to a lesser extent, prevent Sarissa from snowballing in the early- to mid-game. Broadly speaking, Ward Haven performs well against aggressive decks (due to running a bunch of Ward followers) and damage-based combo decks (due to running Yukari to block out Awakened Ragna combos, Runie, etc.), but can struggle against healing-heavy midrange decks (e.g., Midrange Sword) and removal-heavy tempo decks (e.g., Loxis Forest). That is not to say that Ward Haven autoloses to Sword, for example, as even the unfavored Ward Haven matchups are at worst somewhere in the realm of 40/60 and depend on your tech card choices: e.g., if you’re running a lot of early-game followers (e.g., Apostles/Sol Sisters), leaning into a more aggressive direction, you’re going to do worse against Sword, but if you run cards like Benevolent Blight/Major Prayers/Lorena, you can definitely improve some of these percentages.
After the mini-expansion patch, the influx of Rally Portal into the meta makes it so that there is a non-trivial portion of the format against which you can’t really resolve an early Anvelt, so Ward Haven has a tendency to fall behind against Box of Puppets decks. In addition to that, after the optimization to Loxis Forest (more specifically, the adoption of Resolve of the Fallen/Elf Queen), that matchup has similarly became a lot worse for Ward Haven. With these factors in mind, even if the archetype can still show decent results as this strange quasi-burn deck against slower decks in the format (e.g., Shadow/Rune/Discard Dragon), Ward Haven feels like an archetype that doesn’t really have decidedly favored matchups against currently prevalent decks, and as such is a difficult deck to recommend for players trying to be competitive on ladder, although it can still target some fringe lineups in a Conquest setting.
Mulligan priority
- Always keep Anvelt.
- Keep Ramiel going second.
- Keep Scripture and Blind Justice against Haven/Portal/Sword/Forest.
- Keep Sarissa against Forest/Dragon/Rune.
- If you’re keeping Sarissa, also keep Sacred Stone Apostle and proactive Ward 2-drops, which include Stalwart Featherfolk, Ramiel, Sol Sister and Vengeful Sniper, in order of priority.
- If you’re keeping Ramiel and going second, also keep Wilbert.
A turn 1 Anvelt allows you to get away with a lot of weaker early-game curves, and if you both have an Anvelt and a 2-3 curve, popping Anvelt on turn 4-5 can allow you to further push a tempo lead, and you can always stagger the Anvelt activation to get value out of its AoE effect in the midgame. Sarissa is a bit more complicated, as it does need a bit of help to get going, and as the format developed, more and more decks are prepared for the turn 3-4 Sarissa, with the only exceptions (in my testing) being Forest, Dragon and Rune, which either don’t run good enough early-game answers or don’t have interaction period. Having Ramiel on the draw is good for most decks running Ramiel, and while it is a bit ambitious to keep a 6-drop with Ramiel, the more I play Ward Haven, the more I realize that the early game of the deck doesn’t really matter, and Wilbert in particular is a fine keep with Ramiel because even if you brick very hard and have nothing playable in the early game, you can at least Wilbert on 3, which is not particularly exciting, but then again, nothing about Ward Haven really is. There is an argument for keeping Yukari against Rune, but I personally believe that in the Rune matchup, the onus is on the Haven player to be the beatdown. After the balance changes, I generally don’t keep Enchanted Knight, as in matchups where the opponent has weak early-game interaction, I would much rather look for a Sarissa.
Optional inclusions and tech cards
- Blackened Scripture and Blind Justice are tech cards for the Haven mirror and against other proactive follower-based decks, such as Rally Portal/Midrange Sword/Baal Blood/etc. The primary purpose of these cards is to have a banish-based answer to followers with relevant abilities, such as Anvelt in the Ward Haven mirror (so that it can’t get recurred with Sarissa), Illganeau against Rally Portal, Gelt against Sword, etc.; generally speaking, having some interaction is quite useful against most proactive decks. Of the two cards, Scripture makes the deck lean into a more tempo-oriented direction, while Justice also has the important utility of dealing with some of the nonsense Shadow decks put into play, although the unconditional removal does come with a cost (that is pretty tangible for a deck that wins through chip damage). Pure Metamorphosis is an extreme version of anti-Anvelt tech card, and while it does solve the problem before it ever takes root, Metamorphosis is pretty mediocre against Portal/Sword, and aggressively terrible against Forest (makes Sukuna better, and doesn’t have a ton of targets in the matchup overall), so it doesn’t seem optimal. With the current direction of the format, Blind Justice is the closest to being a no-brainer inclusion (as it answers the specific problems the archetype has). Lorena is also a card that is up to consideration in these card slots, and while it doesn’t have the Banish utility, Lorena does more than Scripture against Midrange Sword and midgame Rally Portal boards, and it’s never really embarrassingly unplayable against control decks the way Scripture can be, so Justice/Lorena is what I’d consider the most well-rounded interaction package, but there are merits to other cards discussed in this section if you’re trying to be more proactive.
- Major Prayers is a tech card for the Haven mirror and other slower (non-combo) matchups. Aggressive builds of Ward Haven have a tendency to run out of gas easily, so Major Prayers adds a bit of extra value. You shouldn’t expect to “activate” Major Prayers in a deck with 5-6 amulets, but drawing 2 cards for 3 mana is not a terrible rate. Major Prayers gets better with running more cheap interaction (e.g., Blind Justice/Scripture/etc.), as it allows you to dig for specific answers, but it’s also not terrible in a completely “vanilla” Ward Haven build, where you can still find key midgame cards like Sniper, Ra and Wilbert.
- Benevolent Blight is a tech card that is primarily intended for the Shadow matchup, but can also pick up value in the Haven mirror and against other midrange decks. Blight is a pretty underwhelming AoE card in a vacuum, however, if you can line up your Anvelt activation with the 3-damage AoE, Blight can actually deal with a lot of midrange boards. Both Major Prayers and Blight have been phasing out of Ward Haven lists after the mini-expansion, as you can’t really afford to coast on the back of Anvelt‘s AoE as a comeback mechanism, and it’s often preferable to simply run better answers (Lorena/Justice/Scripture) or proactive early-game cards than trying to build Ward Haven like a control deck.
- Sacred Stone Apostle, Sol Sister and Stalwart Featherfolk were staples in the early-October builds of Ward Haven, that have been getting dropped from a lot of Ward Haven list in late October, however, after the balance changes, these early-game Ward followers are very important to have against proactive decks like Rally Portal, as you have to contest the board in the early game. Apostle and Sol Sister are pretty interchangeable, and you can even run both if you’re low on interaction. Apostle is a bit more aggressive, while Sol Sister is a bit more value-focused (due to its Enhance ability, which certainly isn’t good every game, but can be relevant in some small fraction of games where your deck isn’t running well, and a 2-mana 2/2 is a better statline than a 1-mana 1/1). Stalwart Featherfolk has some very marginal upside compared to Sol Sister in the early game, but the 1-2 points of healing you’re going to get out of a Stalwart are generally less frequently relevant than the 5-10% of games where you’re happy to cast an Enhanced Sol Sister. Gabriel is another flexible early-game card that can help you snowball a Sarissa, but Gabriel costs 3 mana at the very least, so it’s generally a bit lower on the totem pole and rarely gets run as anything more than a 1-of. Naturally, if you’re thinking of cutting Sarissa in order to include more interaction, all of these early-game Ward followers also go down in value.

Baal Blood
Identifying cards:Hellspear Warrior, Nightprowl Vampire, Ravening Corruption, Vuella, Unblemished Wings, Baal.
What does Baal Blood do?
Baal Blood is an aggressive tempo deck that revolves around the synergy between Baal and Ravening Corruption, which, combined with Garnet Waltz and the honorary copies of Garnet Waltz (Hellspear Warrior and Vuella), can generate enough chip damage to close out games. Baal Blood has access to powerful Blood-specific interaction in Io and Lucius, and in addition to that, setting up for a 6-card Baal can answer most boards in the Rotation format, so despite the nomenclature I’m using (“aggressive tempo deck”), Baal Blood can play a fair midrange game until the point when you have enough burn damage to close out the game, so while it can definitely win games on turn 6-ish if the opponent stumbles with their midgame curve, it also has enough gas and removal to play a longer game as well. After the mini-expansion, Bloodsoaked Archdemon has led to the archetype predominantly transitioning towards a Confectioner-based shell (as it’s a bit better at cycling and finding Archdemons than the Nightprowl Vampire builds of the deck), and as such, the deck is a bit more value-oriented.
Nevertheless, the role of Baal Blood in the metagame is that of an aggressor: it’s not quite an aggro deck per se, but it’s still very good at punishing decks that are low on healing (e.g., Ragna Control Portal) and deck constructions that don’t run sufficient amounts of Zelgeneas/Chefs (primarily applies to Rally Portal, and to a lesser extent, Loxis Forest) and cards like Alyaska (in Midrange Sword). Baal Blood is a safety valve for grindy “glass cannon” decks such as IMT Shadow and Ragna Portal, so the deck is a fixture of the ladder metagame and Conquest lineups, as there is always a non-trivial amount of decks that get stopped dead in its tracks by a 6-card Baal. I wouldn’t say that Baal Blood is the most compeitive deck of the format, but it’s at a level where it’s never embarassingly terrible and I don’t see it ever losing its niche throughout the duration of the mini-expansion patch.
Mulligan priority
- Always keep Vampiric Bloodbinder, Alchemical Confectioner/Nightprowl Vampire and Bloodsoaked Archdemon.
- Keep Lucius as a 1-drop against Shadow/Dragon/Rune.
- Keep Io going second against Portal/Sword/Forest.
- If you see a proactive 2-drop (e.g., Bloodbinder/Hellspear Warrior/Corrupted Bat/Showdown Demon, in order of priority), keep it with Tyrant of Mayhem/Vuella, in order of priority.
- If you’re not keeping Nightprowl/Confectioner, keep Ravening Corruption.
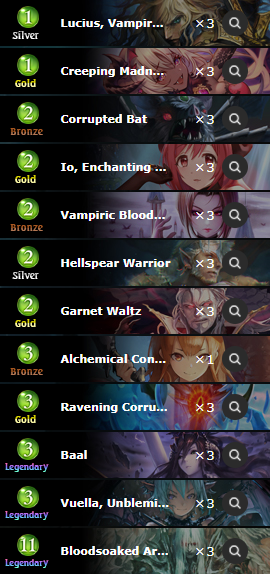
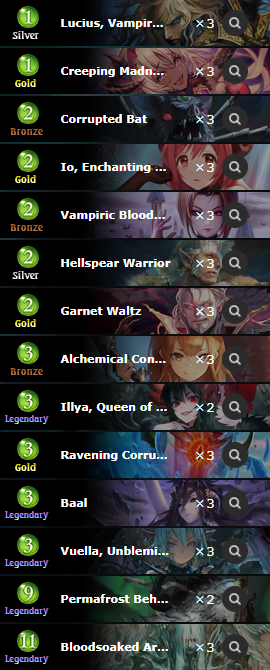
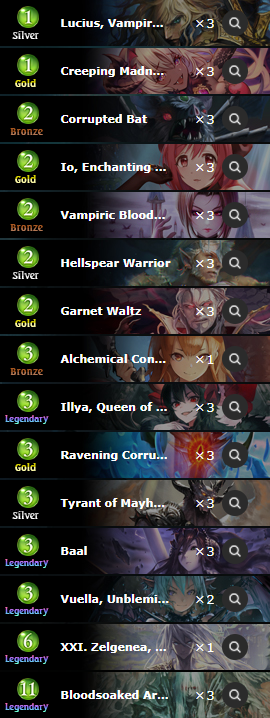

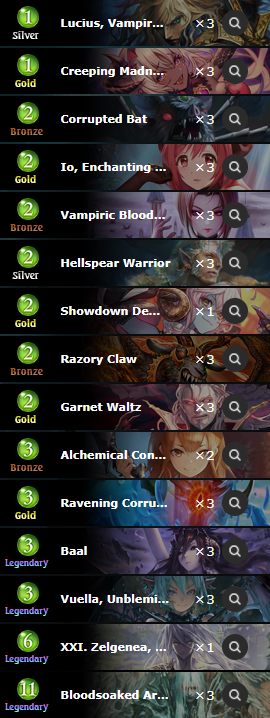
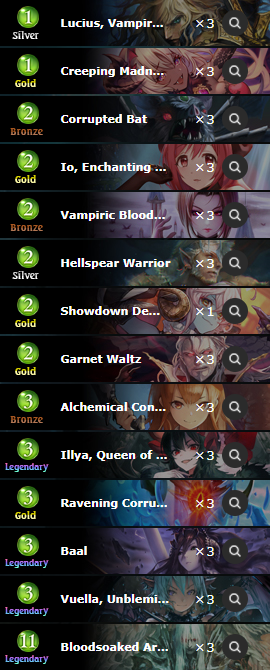
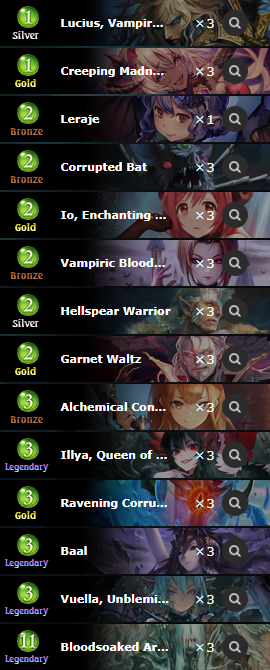

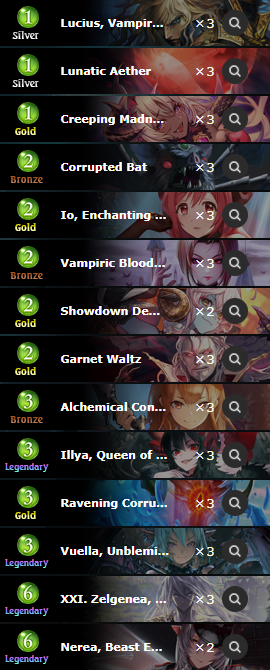
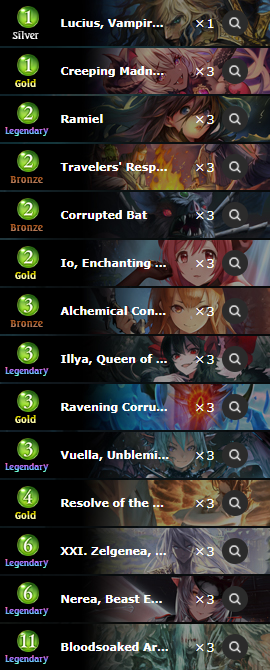
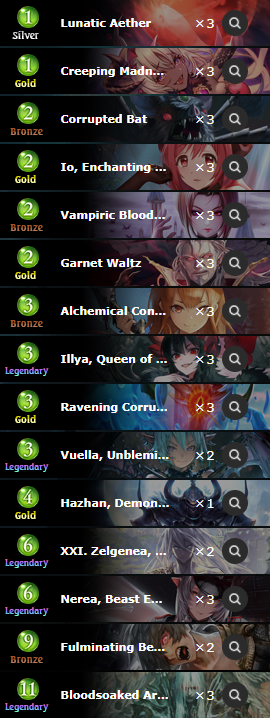
The mulligan strategy for Baal Blood generally revolves around trying to curve out and looking for your key midgame cards, with the basic idea being that you ideally want to set up Ravening Corruption (or Io in relevant matchups) for your first evolve turn. While it’s generally not a strategy that you want to apply against a lot of the midrange decks in the format, having a Goblin on 1 is good in matchups where the opponent doesn’t contest the board in the early game, which includes decks like Discard Dragon, IMT Shadow and Spellboost Rune. Bloodsoaked Archdemon gets better the earlier you start cycling it, so while the “Insight on 1 cabal” is likely to be a bit miffed with this recommendation, there isn’t really a matchup where I wouldn’t keep an Archdemon. I am not a huge fan of keeping Permafrost Behemoth, as you rarely get to play it in the early game, but if you’re offered, for example, a hand of exactly a 2-drop, Nightprowl and Permafrost Behemoth going second, I would probably keep all 3 cards against midrange classes, but that is a pretty specific setup and I’m not sure how to word it in a way that would make sense as a concise rule, but if you can play Ravening Corruption with any Amulet out, it generally makes your life a lot easier.
Optional inclusions and tech cards
- Illya is an optional inclusion that started to see play after the mini-expansion patch. Unlike Razory Claw, Illya is more Baal-compatible and with a lot of Baal Blood lists cutting Zelgenea (as you need Showdown Demons to make it less clunky), Illya also has the important utility of providing healing. I haven’t been terribly impressed with Illya in my testing, and available tournament JCG data shows that there isn’t a huge difference between 3xIllya and 0xIllya lists, so it’s one of the most cuttable “staples” of the archetype.
- Permafrost Behemoth is an optional inclusion that helps power out 6-card Baals in the earlier stages of the game, and the card also has the fringe utility of activating Ravening Corruption‘s Fanfare effect. Permafrost has the slight issue of getting stuck in your hand, but it’s cheap enough to a point where you’re rarely unable to go Permafrost into Baal, and in a similar fashion to Zelgenea, Permafrost Behemoth gets better with Showdown Demon.
- Showdown Demon is a card that has already been mentioned a few times in the earlier sections of the archetype, as it offers a pretty unique functionality of hiding un-Baal-able cards out of your hand to enable Showdown > Baal lines of play to redraw 7-8 cards. Showdown Demon enables Zelgenea, Permafrost Behemoth and Razory Claws, and even in completely “vanilla” Baal lists, it can still get rid of spare Confectioners/Garnet Waltz, so it’s a decent inclusion at 1-2 copies even if you’re not trying to run Zelgenea.
- In the context of 2-drops, a card that has been consistently showing some of the worst results of any card in the archetype is Leraje. In and of itself, Leraje isn’t too offensive: it replaces itself and is fusible to Baal, however, I am yet to see a Baal Blood list where the inclusion of Leraje is optimal, as there is always something a bit better you could find to run in the Leraje card slot: consider Showdown Demons, Permafrost Behemoth, maybe some Tyrants of Mayhem, a 1-of Zelgenea, and so on. Please don’t play Leraje in Baal Blood, it’s not based at all, and dare I say, pretty cringe. I’m a decade too old to use such lexicon, aren’t I. How do you do, fellow kids?
- Alchemical Confectioner and Corrupted Bat have become a fixture of Baal Blood lists after the mini-expansion, as they allow you to run Creeping Madness. Confectioner is not a reliable tutor effect for Ravening Corruption, so I don’t think that a full playset of Confectioners is really necessary (as it can get pretty clunky if you’re trying to set up a Baal or if you’ve wheeled through a big enough chunk of your deck where you no longer have 2 Natura cards in your deck), but I’d consider running at least 1-2 copies necessary, with the third copy being a somewhat debatable inclusion.
- Nightprowl Vampire is an alternative to the Confectioner package that is played as a 1-of to ensure it doesn’t hit other copies of itself. Running Nightprowl opens up 6-8 card slots, which in turn potentially allows you to include Razory Claw and Showdown Demons, so Nightprowl Vampire lists can get more aggressive than Confectioner variants of the deck. There isn’t a whole lot of data on Nightprowl Vampire Baal lists, as a lot of Blood players seem allergic to Razory Claw, but it could be a direction to explore in future iterations of the archetype.
Regarding Control Blood
Identifying cards: Lunatic Aether, Travelers’ Repose, Ramiel, Resolve of the Fallen, Nerea, Beast Empress.
Control (a.k.a. UB/Burn) Blood is another Blood deck that primarily wins through Ravening Corruption damage, however, instead of adopting Baal and all of the deckbuilding limitations baggage that Baal brings with it, it instead runs Nereas, Zelgenea and Resolve of the Fallen to capitalize on the removal suite available to Blood. Control Blood doesn’t have a lot of data behind it, and the only real advantage it has over its Baal counterpart is the surprise factor in ladder play (most opponents are going to mulligan for Baal Blood and not play around Nerea and whatnot), which isn’t much of an advantage in an open-decklist environment. Control Blood is similar to Sanctuary Haven in a lot of its applications, but Blood doesn’t have access to Yukari, which makes Control Blood a lot more vulnerable to Ragna Portal and Spellboost Rune, so even if some of the Control Blood packages could have potential for exploration in the context of incorporating them into Baal Blood, in and of itself, there isn’t a lot of merit to playing Control Blood if you’re trying to be competitive.

Discard Dragon
Identifying cards: Reggie, Rockback Ankylosaurus, Springwell Dragon Keeper, Turncoat Dragon Summoner, Dragonfolk’s Wail, Dragoon Medic, Shipsbane Plesiosaurus, Darkprison Dragon.
What does Discard Dragon do?
Discard Dragon is a midrange deck that utilizes mana acceleration by ramping into Shipsbane Plesiosaurus to generate incremental value, then cycling through your deck with Draconic Counsel, Scalebound Plight and Turncoat Dragon Summoner tokens, trying to set up enough damage with Darkprison Dragons in combination with various sources of chip damage. After the mini-expansion, Discard Dragon has access to a bit more burn with Georgius (which incidentally also allows you to play DPD with impunity), so the archetype is in a similar spot to Baal Blood: it aims to exploit greedier (read: people cutting Chefs) builds of Rally Portal as a quasi-burn deck, and can potentially race reactive decks like Sanctuary Haven. Discard Dragon is generally unfaroved against Midrange Sword and Loxis Forest, so in a metagame sense, Discard Dragon is mostly just a “bad” Baal Blood (although that is obviously a bit of an oversimplification).
Mulligan priority
- Always keep Dragon Oracle and Cursed Furor.
- If you’re going second and are alredy keeping 2 ramp cards, keep Shipsbane Plesiosaurus/Draconic Call. If you’re going first and keeping 1 or more ramp card, keeping a Shipsbane/Call is also fine.
- If you’re playing Reggie, keep it going second or if you have a Wyrmfire Engineer to pair it with.
Dragon mulligans are very consistent between decks and formats (although there are some obvious differences, e.g., Dragon Emissary in Unlimited decks and Dragon-Devouring Dread/Whirlwind Pteranodon in Roost Dragon lists): when playing Dragon decks, you’re generally looking for mana acceleration in the early game, and if you have enough ramp to have a productive early game, keeping one of your pay-offs is pretty safe. This is not to say that if you’re not drawing ramp, you’re not going to do anything in the early game: Discard Dragon has a lot of proactive early plays, but most of them are pretty redundant with one another, so I don’t believe there is much merit to keeping 2-drops instead of aggressively mulliganing to find more ramp.
Discard Dragon skeleton
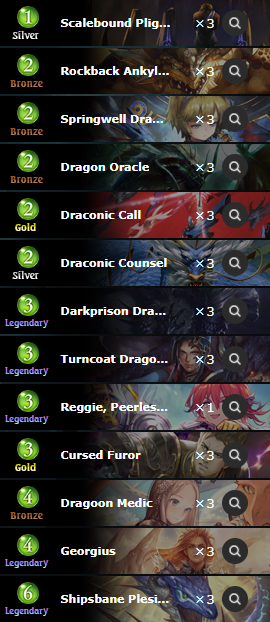
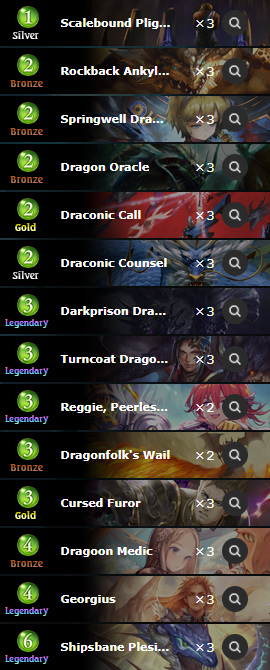

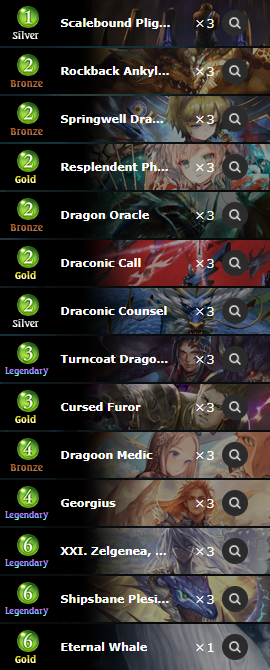
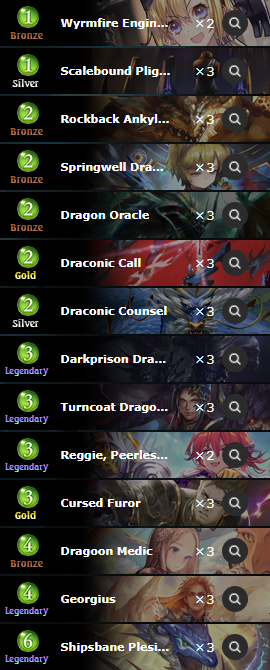
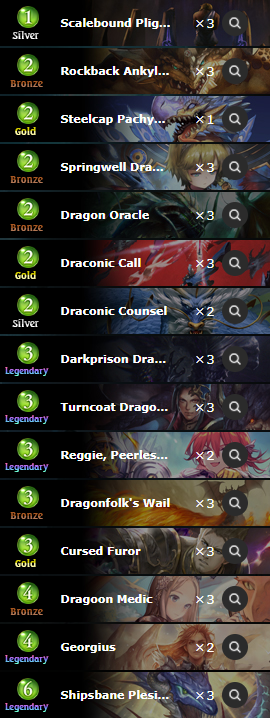
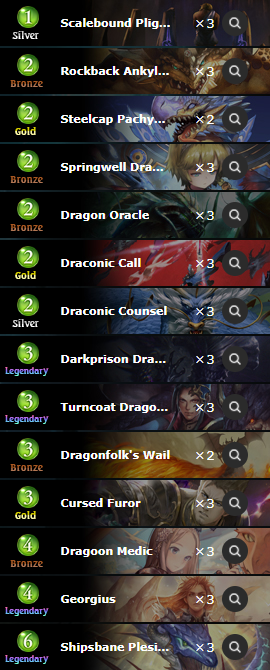
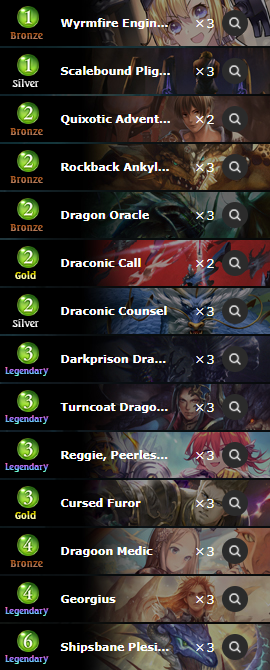
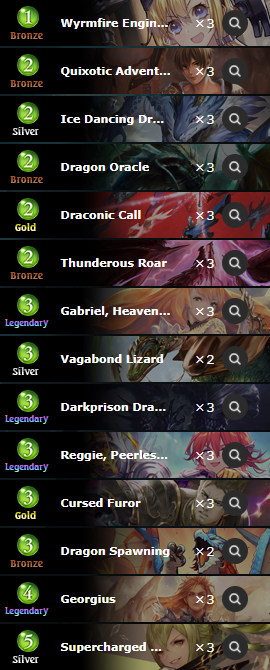
Roost Dragon skeleton
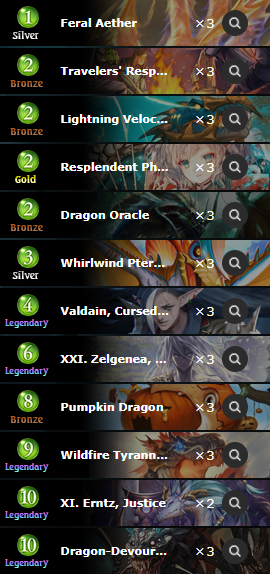

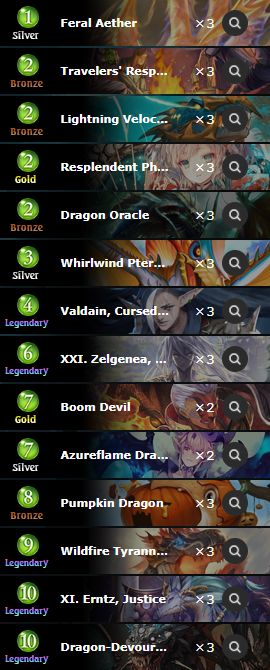
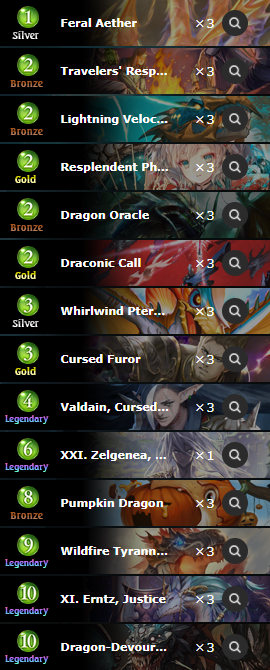
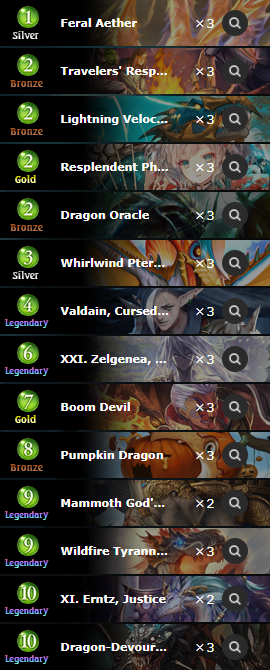

Optional inclusions and tech cards
- Reggie is an optional inclusion that has the dual purpose of being a passable early-game ramp card (as Dragon decks can’t run Ramiel for religious reasons, except for the cases where they do) and a medium damage card in the late game. In pre-mini-expac builds of Discard Dragon, Wyrmfire Engineer also used to be a fixture in Reggie lists, but the optimization of the archetype (and to a lesser extent, the addition of Georgius pinching down on available card slots), Wyrmfire is one of the most cuttable cards, as it’s not really very impactful, especially if you’re only running 1-2xReggie.
- Dragonfolk’s Wail is an optional discard pay-off that allows the deck to run a bit better. Wail competes with Wyrmfire Engineer, as it’s yet another card that doesn’t really do anything by itself and only shines when it’s used in combination with Discard effects, but you obviously have more cards that combo with Wail than Engineer, so I’d personally consider a full playset of Dragonfolk’s Wail necessary, but it’s certainly cuttable. Steelcap Pachycephalosaurus falls into a similar category of cards to Wail: it’s a fine 1-of if you’re not running Engineers, but it’s also one of the most cuttable cards in the deck.
- After the October balance changes, Zelgenea went from a fixture in Discard Dragon lists to a somewhat uncommon 1-of. The card notably does have some cute synergy with Wyrmfire Engineers, but Zelgenea is generally a bit too slow for the current builds of Discard Dragon, and as such is generally only included as a 1-of if it’s played at all.
- Eternal Whale and a playset of Resplendent Phoenixes is an optional package that helps against Sword/Haven. The glaring downside of Whales and, to a lesser extent, Resplendent Phoenix is the high frequency of Box of Puppets/Resolve of the Fallen in the current Rotation format, which makes the package pretty atrocious against Rally Portal. I personally don’t believe that the Whale package is worth running with Georgius being in the picture (as you’re inclined to cut DPD if you’re running Whales, and DPDs are very good with Georgius). Notably, Zelgenea also becomes a lot easier to include if you’re running Resplendent Phoenix, so you do get a lot more staying power against Sanctuary Haven. With all that said, if you’re not seeing a lot of Rally Portal, Whales might be something to consider if you’re trying to target Sword, although that does beg the question of “if you’re trying to target Sword, why are you playing Discard Dragon?” variety, but that’s besides the point.
Regarding Vehicle/Tempo Dragon
Identifying cards: Quixotic Adventurer, Vagabond Lizard, Gabriel, Heavenly Voice, Ice Dancing Dragonewt, Thunderous Roar.
Vehicle/Amulet/Tempo Dragon is an aggressive spin on Discard Dragon that revolves around the synergy package of Reggie enabling consistent ramping by way of running a bunch of on-curve Reggie enablers (Wyrmfire/Quixotic) and utilizing the synergy package of Georgius/DPD/Thunderous Roar. The easiest way to describe Vehicle/Tempo Dragon is that it’s basically Tempo Forest, but instead of developing the board in the early game, you’re trying to ramp since you’re playing Dragon and that’s what Dragon does. There could be merit to the Georgius/DPD/Roar package, but I haven’t been very convinced by the performance of the archetype in a Rally Portal/Midrange Sword/Loxis Forest meta. This archetype could have potential with efficient Storm cards and further Georgius support in future sets, but this type of deck is a bit underwhelming in the current meta.
Regarding Roost Dragon
Identifying cards: Dragon-Devouring Dread, Pumpkin Dragon, Whirlwind Pteranodon, Feral Aether, Lightning Velociraptor, Travelers’ Respite, Wildfire Tyrannosaurus, Valdain, Cursed Shadow, Erntz, Justice.
Roost Dragon is a combo deck with some control elements that revolves around Resplendent Phoenix and its Tree-based cycling engine, which conveniently also enables the deck’s win condition (Valdain). The archetype utilizes a somewhat unorthodox ramp package of Dragon-Devouring Dread (which has synergy with Wildfire Tyrannosaurus/Pumpkin Dragon, which are already cards you’re inclined to include for their Accelerate effects). The archetype generally doesn’t include Cursed Furor for religious reasons, but even with just Dragon Oracle/Pteranodon/King Dedede, the deck still has plenty of ways to accelerate into Resplendent Phoenix with a card draw effect on the same turn (e.g., Pumpkin Dragon and/or the third DDD fusion), which then allows you to start going off on the following turn. The archetype is naturally somewhat weak to aggressive decks (e.g., Baal Blood/Aggro Shadow) and Box of Puppets decks, but the deck does relatively well against slower midrange decks so long as you manage to stabilize after skipping the first few turns of a game. As I’ve already mentioned in the Discard Dragon section in the context of Eternal Whales, playing a Resplendent Phoenix in a format with a high presence of Rally Portal is a bit unwise, which makes Roost Dragon a bit polarized, but the archetype does decently well against Midrange Sword/Sanctuary Haven, so it’s not an awful deck on ladder and has applications in Conquest lineups, but the Box matchups are a bit frustrating to face, and the deck has an unfortunate issue of getting incidentally hosed by anti-Sanctuary Haven tech cards, which does put a hamper on the popularity of Roost Dragon after the mini-expansion.
Mulligan priority
- Always keep Dragon Oracle, Cursed Furor, Whirlwind Pteranodon and Resplendent Phoenix.
- If you’re keeping Pteranodon, also keep Feral Aether/Respite.
- Keep Dragon-Devouring Dread with a fusible card.
The mulligan strategy for Roost Dragon is quite straightforward and generally involves looking for your mana acceleration and Phoenix (which enables your deck to function properly). Some of the ramp cards in Roost Dragon are conditional, so you need a Tree on 3 for Pteranodon (which means that Aether/Respite work for it, but not Tyrannosaurus/Lightning Velociraptor), and DDD needs (ideally, 2) fusible card(s), so I wouldn’t keep a naked DDD: to give a more concrete example, you have ~15 fusible cards in your deck, and you’re looking through 4-5 cards, which gives you an upper cumulative hypergeometric probability of drawing 1 or more fusible cards of 86.16% (for the 15/4/40 configuration), and the probability of drawing 2 or more is 48.41%, which means that if you’re keeping a DDD by itself, you’re more or less betting on a coinflip (which I’m personally not super comfortable with) that your ramp card does what you want it to do, but if you only need 1 fusible card, the odds are roughly in the ~85% range. Naturally, I am oversimplifying tings, and you can do your own math for your exact deck construction, but the general range of values should be pretty consistent for most DDD configurations. If you’re a professional Aggro Shadow player and you are very confident in your ability to win coinflips on command, you can certainly throw caution to the wind, but it’s not something I’d recommend for your average Joe/plain Jane.
Optional inclusions and tech cards
- Cursed Furor is an optional inclusion that allows the deck to ramp more consistently in the early game. Generally speaking, Furor is a bit redundant with the DDD package, but if you choose to go for a lighter DDD package (e.g., by running more spell-based card draw), Cursed Furor is a sensible inclusion in the deck (which does make the Dragon-Devouring Dread mulligan math a bit worse), particularly with Draconic Call (which is a quasi-fusible card for DDD in the early game).
- Unfortunately for Roost Dragon, Zelgenea didn’t quite get nerfed to 7 mana, so the inclusion of the card is something that you still have to justify. Based on available JCG data, 3xZelgenea Roost Dragon lists are the best-performing variant of the archetype by a significant margin, so if you want to have a decent shot at beating Haven, 3xZelgenea seems like a necessity, but you can certainly try to get away with running fewer copies if you’re good at landing Erntz coinflips.
- Boom Devil, Azureflame Dragonewt and Mammoth God’s Colosseum are optional inclusions that help enable Dragon-Devouring Dread. The “baseline” DDD package is 12 cards (Pumpkin/Wildfire Tyrannosaurus/Erntz/DDD), which isn’t quite enough to consistently have enough fusible cards to make it work, so these are some options to fill up the 3-4 remaining card slots based on your preference. Boom Devil does damage, Azureflame is a big Ward, Mammoth God is a quasi-boardclear, but generally speaking, there isn’t a huge difference between the effects of these cards in most matches. Broadly speaking, Boom Devil and Azureflame Dragonewt are the most broadly applicable of the bunch, and the best-performing configuration in aggregate tournament data is 2xBoom Devil/1-2xAzureflame Dragonewt/0xMammoth God’s Colosseum, but there is certainly room for customization based on player preference.

Midrange Shadow
Identifying cards: Legendary Skeleton, Jackshovel Gravedigger, Death Fowl, Alchemical Confectioner, Night of the Living Dog, Invincible Monster Trio, Zelgenea, the World.
What does Midrange Shadow do?
IMT/Midrange Shadow is a blanket term for midrange decks that revolve around setting up an active Gremory around turn 7-8, and consequently cheat on mana costs with Invincible Monster Trio (abbreviated to IMT in other parts of this article), Path to Perdition, Legendary Skeleton and Necroimpulse. The archetype is a natural evolution of the Burial Rite/Reanimate Shadow lists, but it has more of a focus on getting through the midgame stages of the game to set up Gremory as early as possible, with cards like Death Fowl and Confectioner (to fetch up Wraith and Night of the Living Dog, the least bad of Natura cards you could possibly include to enable Confectioner).
Midrange Shadow beats up slower midrange decks with waves of 5/5s, and loses to aggressive archetypes that can go under Shadow (basically, threaten lethal damage over Wards by turn 7-8-ish). Shadow isn’t that great at contesting the board pre-Gremory, since a big chunk of its cards aren’t castable if you’re just short of activating Gremory (e.g., Legendary Skeleton, Necroimpulse, Shuten-Doji, etc.) and a significant portion of the deck is dedicated to card draw and cycling (e.g., Guilt, Procession, Confectioner, Wraith, etc.), but once the IMT-printing machine gets going, follower-based midrange decks start to have trouble keeping up. For that reason, Midrange Shadow does well against Midrange Sword, but isn’t particularly great against Rally Portal (as it tends to run out of threats) and Loxis Forest (as it can’t stabilize fast enough without proper tech cards). There have been some developments in IMT Shadow lists to attempt to target the deck’s weaker matchups after the mini-expansion patch, more specifically, there are lists that run Deathbringer with Fatal Order/Bonenanza Necromancer, which are very good at stabilizing against Loxis Forest, and there’s also the experimental Ginsetsu/Thoth/Milteo build, which wins through playing Accelerated Ginsetsus throughout the game to activate Thoth, then setting up a turn 9 combo of enhanced Sacrophagus Wraith into Legendary Skeleton into enhanced Milteo, which puts the opponent at 2 health, which is a decent game plan against Rally Portal, but makes you lose a lot of percentages in the Forest matchup. IMT Shadow is in a strange spot, in that you can build it to do well against Forest (with Deathbringer) and you can build it to combat Rally Portal, but it’s not really possible to target both at the same time, so the deck is quite polarized and inconsistent in the current Rotation environment.
Mulligan priority
- Always keep Sacrophagus Wraith, Alchemical Confectioner, Demonic Procession and Jackshovel Gravedigger.
- If you’re running Death Fowls, keep up to 1 Death Fowl.
- Keep Savoring Slash and Greatpick Corpse against Haven/Sword/Portal/Forest.
- If you’re keeping Jackshovel or Confectioner/Wraith, also keep Guilt.
IMT/Midrange Shadow skeleton
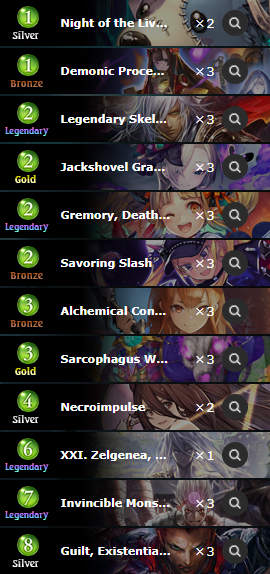
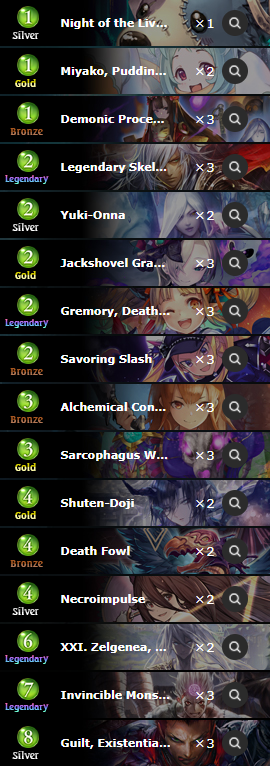
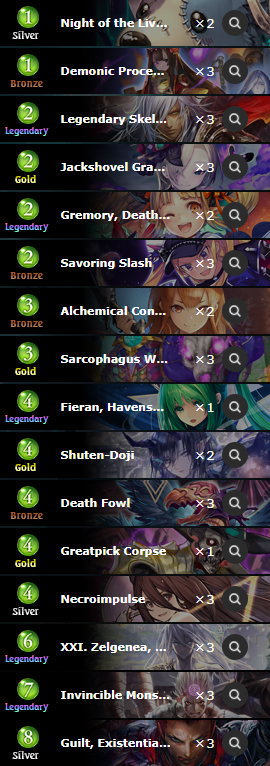
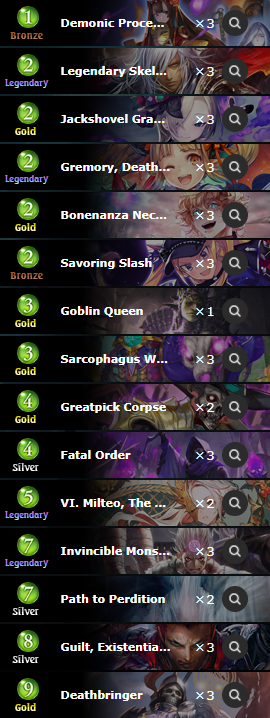
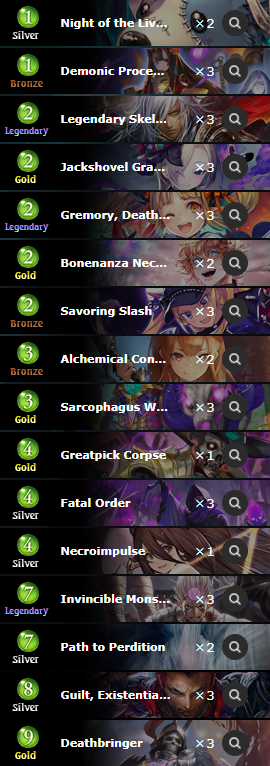
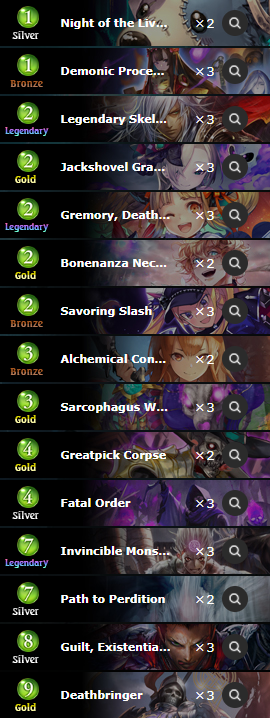
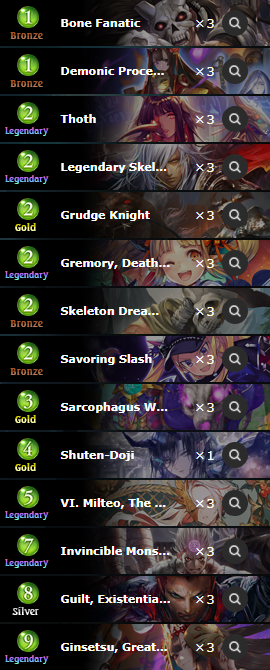
Aggro Shadow skeleton

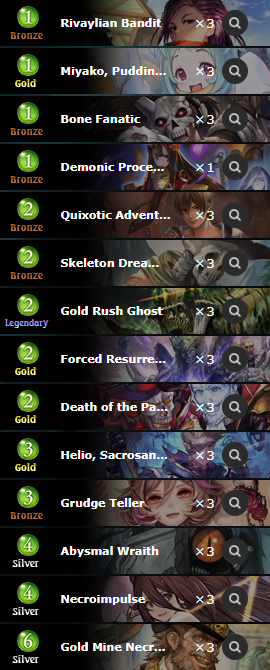
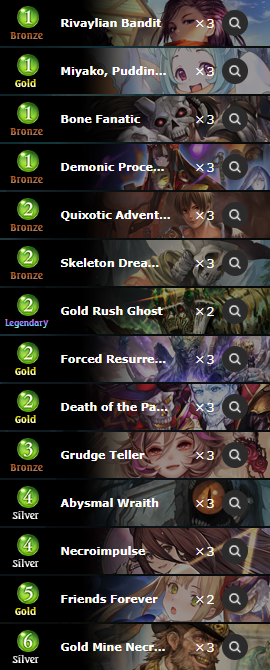
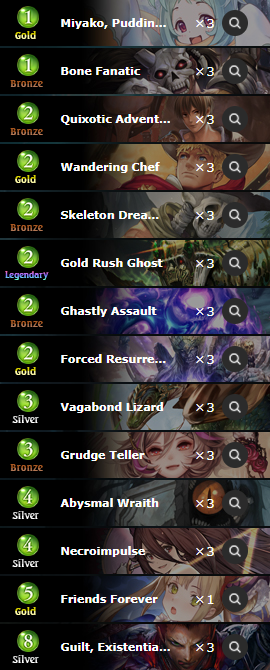
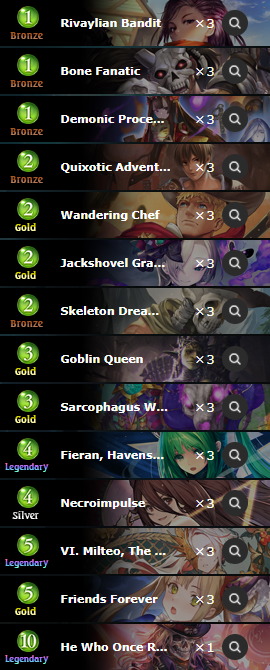
The goal of Midrange Shadow in the early game generally involves trying to draw through its deck and generate Shadows along the way. To that end, getting the card draw effects out of the way as early as possible gives you more information to work with going into the midgame. Death Fowl doesn’t really do anything in terms of tempo (well, neither does the majority of Shadow’s early game), but makes the turn 7 Gremory setup a lot easier to achieve, so it’s generally a fine keep. Occasionally you have to contest the board, so keeping Savoring Slash and Greatpick Corpse in relevant matchups helps with that. Imagine playing followers and developing proactive tempo before turn 7, how very pedestrian.
Optional inclusions and tech cards
- Alchemical Confectioner and Night of the Living Dog are an optional package in IMT Shadow lists that makes the deck run better. Sarcophagus Wraith is such a good card in the deck that a Sarcophagus Wraith that always draws another Wraith is actually just good. The standard split is 2xDog/2xConfectioner/3xWraith, as you don’t actually have any synergy for Night of the Living Dog, so the cheapest card (that conveniently also works with Procession and has the best usage case with Guilt) is picked, which is exactly Night of the Living Dog. Well, but why don’t we run a more playable Natura card, like Bone Cranes that isn’t a dead draw outside of Confectioner? I’m sorry, but that is too radical of an idea, the thought police are on their way; and if I hear any word that starts with “Ka” and ends with “sha”, you’re definitely going straight to the thought gulag. Don’t you know that 2 is greater than 1? It’s not rocket science.
- Greatpick Corpse is a tech card that is primarily useful against Ward Haven to answer an early Sarissa or Anvelts, but can pick up some decent value against other midrange decks as well. Shuten-Doji is functionally similar to Greatpick, however, Shuten is specifically worse against Sarissa, and the awkward 8-Shadow cost can make Shuten a bit tricky to resolve without setting yourself too far back on the Gremory thresholds, so Greatpick generally has priority over Shuten-Doji, although the latter still has some late-game utility with Legendary Skeleton, of course.
- Path to Perdition is an anti-combo/control tech card that is specifically good against reactive decks that don’t play a lot of Wards, such as Ragna Portal, for example. Perdition is functionally similar to Bonenanza Necromancer in old Reanimate Shadow lists. Fatal Order is generally required to make Path to Perdition good, so the Path to Perdition is a bit clunky, and usually requires you to cut midgame cards like Greatpick Corpse and Death Fowl, making the deck worse against Ward Haven in particular and proactive board-centric decks in general.
- Zelgenea is the go-to healing card in standard Midrange Shadow lists, which is necessary to have if you want to have a decent shot at stabilizing against the chip damage in Haven or Baal Blood, and, to a lesser extent, aggressive decks like Aggro Shadow. After the Zelgenea nerf, the card is a bit more clunky (you often can’t really afford to resolve it pre-Gremory), so while it’s generally still a staple in standard IMT Shadow lists, it’s obviously cuttable in versions of the archetype that are trying more specific decks.
- An alternative to Zelgenea is the Deathbringer/Fatal Order/Bonenanza Necromancer package, which is similarly clunky to the Path to Perdition “package” (and can often include Perdition itself, as you’re running Fatal Order already, so you might as well run a Perdition or two). The package is a bit draw-dependant (in that you have to have a Burial Rite effect on Deathbringer and then exactly a Fatal Order to stabilize against decks like Loxis Forest), and generally requires you to cut midgame cards like Greatpick/Death Fowl/etc. to fit in all the ~10 cards necessary to make Deathbringer work. In that sense, Deathbringer makes the deck worse at activating Gremory, which is slightly compensated by having more overall damage (due to having a greater incentive to run Path to Perdition). An important piece of Deathbringer utility is that it can deal with Illganeau in the early game with its transformation effect, although it’s random, so it doesn’t work quite as well when going second, for obvious reasons. In my testing, the Deathbringer shell has performed better than the “standard” variant of IMT Shadow, but that obviously depends on how much Forest (and to a lesser extent, Blood), you’re seeing. The current observable trend appears to be a decline in Rally Portal and a gradual rise in Loxis Forest, so I’d expect the Deathbringer package to perform better as the meta continues to develop, but this is obviously meta-dependant speculation.
- Necroimpulse is a card that is functionally similar to Fatal Order, in that it can push face damage once you’re fully set up. The weak point of Necroimpulse is the board space limitations, as Gremory usually takes up a board slot once it’s active, and the sequencing with Guilt doesn’t always work the way it would with an actual Soul Conversion.
- Death Fowl is a 1-drop that generates 5 Shadows, which makes the Gremory setup a lot more consistent. Drawing Fowl at any point of the game past turn 4 is generally not that great. Available tournament data suggests that it’s optimal to run no more than 2 copies of Fowl, and it’s not unreasonable to cut it altogether if you’re trying to fit in a Deathbringer package, for example.
Regarding Aggro Shadow
Identifying cards: Miyako, Pudding Poltergeist, Bone Fanatic, Quixotic Adventurer, Rivaylian Bandit, Death of the Party, Grudge Teller, Vagabond Lizard, Abysmal Wraith, Forced Resurrection, Gold Mine Necromancer.
Aggro Shadow is an aggressive deck that utilizes efficient early-game followers, the Grudge Teller/Forced Resurrection/Gold Mine “3-drop package” and Storm cards such as Abysmal Wraith and Necroimpulse. The archetype is very linear and doesn’t have much strategy to it: the main goal of the archetype is to curve out in the early game and try to get away with as little trading as possible, leveraging your life total as a resource. Aggro Shadow is generally good against decks with weak early game, as decks like Spellboost Rune often don’t really survive the 1-2-3-Abysmal Wraith–Necroimpulse curve, and Aggro Shadow can certainly steal games against midrange decks that take a bad mulligan (e.g., Aggro Shadow is on average unfavored against Sword, but if you win the coinflip to go first and the Sword player doesn’t have a 2-drop, you have a pretty good shot in that matchup). In that sense, Aggro Shadow exists to punish decks with greedy construction/tech choices, and it has the surprise factor of being a very different deck from Midrange Shadow, which can throw off opponents’ mulligans on ladder. After the mini-expansion, Aggro Shadow has gotten itself a new unfavored matchup in Rally Portal, and one of the newer and more fringe decks, Accelerate Forest, make short work of Aggro Shadow, or rather than state that “Accelerate Forest beats Aggro Shadow”, it might be more correct to say that Aerin is hilariously difficult for Aggro Shadow to deal with, and more or less beats Aggro Shadow by itself. In that sense, Aggro Shadow is not a particularly competitive deck and not something I’d recommend playing after the mini-expansion, although it does have some potential applications in a Conquest setting.
Mulligan priority
- Always keep Bone Fanatic or Miyako (prioritizing Fanatic).
- Always keep Grudge Teller.
- If you’re keeping a 1-drop without a Grudge Teller, also keep Helio/Vagabond Lizard.
- If you’re keeping a 1-drop and a 3-drop, also keep Abysmal Wraith. Going second, keep Gold Rush Ghost in this position.
- If you have a 1-drop, keep Rivaylian Bandit with a Quixotic Adventurer/Skeleton Dreamer.
The mulligan strategy for Aggro Shadow generally involves trying to hit a smooth early-game curve, with priority going towards cards that you’re running the fewest amount of (1-drops and 3-drops). As a rule of thumb, I don’t really keep 2-drops, as the deck has a lot of redundancy in 2-drops, and while you can certainly 3-keep a Miyako–Quixotic–Grudge hand, for example, (if you want to be really safe), but the downside of having a slightly worse 2-drop doesn’t seem to outweigh looking 1 card deeper into your deck to find a Wraith. Both going second and trading are pretty lame and I would prefer not to ever do either given the opportunity, but evolving Gold Rush Ghost is a fine play on 4, as it can add to your clock and/or replace itself, and if you find something better to do on 4, you can always Gold Rush on 5 to push some face damage. The only scenario in which I keep 2-drops is when it can activate Bandit on 3, which is a strong proactive play, and I get it: trading, yuck, disgusting, never do it, but developing a 3/4 or a 4/3 on 3 alongside a 2-drop is a solid tempo play even against an empty board. This is quite obvious, but Fanatic is better than Miyako early as it works better with Guilt/Gold Mine Necro and Miyako is better at carrying buffs from Quixotic/Dreamer due to having Divine Shield (as in, the Divine Shield “keyword” from Athena, Divine Shield and not any other source, of course), so it’s marginally better when saved for the later stages of the game.
Optional inclusions and tech cards
- Death of the Party is an optional inclusion that adds a bit of extra value. At its worst, DotP replaces itself and deals 2 to the opponent, which is a bit slow (doesn’t contest the board), but is not the worst thing you could be doing on turn 2. Broadly speaking, DotP is not a good 2-drop, but the card does do a lot of synergistic things for just 2 mana. The big downside of Death is that it takes up a board slot, so it drawing the second copy of the card makes your Necroimpulse (and the bad Necroimpulse, enhanced Gold Rush Ghost) worse at pushing damage, and sure, missing out on 2 damage from one Impulse still puts you at parity with the second activation of Death of the Party, but you generally have better things to develop at that point, so I’m not a fan of running 3xDotP, which is a build a lot of players gravitate towards, and I’ve had better results running 2xDeath.
- Rivaylian Bandit is an optional inclusion that works well with all the Amulet-based 2-drops the deck tends to run (and hell, you can activate it with Necroimpulse in a pinch). Bandit adds a lot of powerful early-game openings in combination with Quixotic/Dreamer, and while a 1-mana 1/1 is not that great, you can play it on turn 1 as a bad Goblin if you don’t have a real 1-drop. Wandering Chef is a functionally similar card to Bandit that you can play in this slot, and while Chef is better in aggressive mirrors (because of the healing it brings), the two cards represent more or less the same function in the early game, and as a rule of thumb, if you can do something for 1 mana, it’s generally better than doing the same thing for 2 mana.
- Vagabond Lizard is an optional inclusion that makes your Forced Resurrection and Gold Mine Necromancer a bit more consistent. In a deck with effectively zero card draw, you can’t always find a 3-drop in your first 10-ish draws, so while Lizard is a bit worse than Grudge Teller when Reanimated, it can still push a comparable amount of damage if you can get the +2/+0 on a Storm card, and there is value to having an on-demand Bandit activator. Helio is functionally similar to Lizard, but has a worse initial statline. In my testing, I’ve found Vagabond Lizard quite necessary, but Helio has been a bit underwhelming: it doesn’t trade well, and due to the odd timing of its token spawning (end of the opponent’s turn), it doesn’t trigger buffs from Quixotic/Dreamer, so it’s a bit worse at pushing face damage than it would seem at first glance.
- Gold Mine Necromancer is an optional inclusion that makes the “3-drop package” a bit better, and also has some other fringe synergies (generates 2 Shadows for 1 mana, making it easier to activate Necroimpulse, pops Lurching Corpse from Gold Rush Ghost, etc.). Guilt is a functionally similar inclusion that doesn’t do anything proactive in and of itself, but digs deeper through your deck to find Necroimpulse. Demonic Procession is functionally similar to Guilt, however, based on my personal testing, Procession has been extremely clunky (you don’t always have an appropriate follower to pitch to Procession), and unlike Guilt, you can’t find Necroimpulse (or reach in general, the only good hits are Wraith and Grudge Teller) with Procession the way you can with Guilt, and even with the whole “muh deckthinning” argument, Procession doesn’t have a high enough density of 1/X or X/1 followers to really function in the deck.
- Ghastly Assault is an optional inclusion that helps in aggressive mirrors. Generally speaking, Aggro Shadow is not that great at interacting with the opponent, but Assault also represents an extra point of damage later down the line and has synergy with Guilt/Gold Mine Necromancer, so it’s a fine inclusion if you’re facing a lot of aggro mirrors.
- Friends Forever is an optional inclusion that generally brings a bit of extra damage. The bad part of Friends Forever is that it generally doesn’t contribute to building Shadows for Necroimpulse (4 Shadows go in, 5 Shadows come out), but if you can set it up in a way where it brings back Abysmal Wraith, it’s a decent proactive play that can potentially set up for a Necroimpulse/Gold Rush as a follow-up.

Spellboost Rune
Identifying cards: Runie, Resolute Diviner, Shikigami Summons, Chaos Wielder, Fiery Embrace, Kuon, Founder of Onmyodo.
What does Spellboost Rune do?
Spellboost Rune is a blanket term for midrange Rune decks that revolve around Spellboost synergy, most notably, they tend to utilize the play pattern of recurring Runie with multiple Spellboost triggers. The archetype should be quite familiar to players that have seen previous iterations of the deck, as while the deck does run some new tech cards (e.g., Crystal Fencer/Scorching Blast), after the experimental phase of trying to run Vincent/Golem Marshal, which placed some deckbuilding constraints on the archetype (namely that Vincent puts a big incentive on running 3-ofs of all Spell/Accelerate cards, which makes the inclusion of tech cards a lot more difficult). After the mini-expansion and the addition of Pursuit of Truth, Spellboost Rune has a greater emphasis on Crystal Fencer lines of play, as you can more conveniently get down to 20-card thresholds. Broadly speaking, Pursuit has two main modes: you’re either playing it for no effect to Spellboost your hand for 1 mana (possibly banishing 2 cards from your deck if you already have a Runie in hand) and the “Fiery Embrace with an attitude” mode, and while there could be some playstyle-based differences, in my testing, the majority of the time Pursuit is optimal to play for no effect as early as possible. Something to be aware of in matchups against healing-heavy decks such as Sanctuary Haven and Accelerate Forest is that there is a non-trivial probability of decking yourself if you’re careless with Pursuit, especially if you still haven’t drawn your key pieces (Runie, Crystal Fencer and Authoring Tomorrow in the later stages of the game). It is certainly still possible to play pre-Pursuit Spellboost Rune lists if you cut Fencers, but the merits of doing so don’t really justify the downside of missing out on unfair Crystal Fencer lines of play.
In a metagame sense, Spellbost Rune is a bit weak to aggressive strategies that either build a wide board early (e.g., Rally Portal) and/or pressure the Rune player’s life total (e.g., Loxis Forest and Baal Blood). The deck does decently well against slower decks, such as Midrange Sword/Flowering Forest, but these matchups generally don’t outweigh the combined presence of Rally Portal/Loxis Forest/Baal Blood, so I’m personally of the opinion that Spellboost Rune is a playable, if not particularly competitive ladder archetype, however, it’s quite weak in a Conquest setting (as it has at least one unfavorable in most common lineups).
Mulligan priority
- Always keep Chaos Wielder(s), and (up to one of each) Runie, Kuon and Authoring Tomorrow.
- If you’re keeping Chaos Wielder/Kuon/Runie, keep a proactive turn 2 play, with the general priority against proactive classes (Haven/Sword/Portal/Forest/Blood) being Authoring/Sorcery in Solidarity/Shikigami Summons/Magic Missile. Against reactive classes (Dragon/Rune/Shadow) the priority is generally Solidarity/Authoring/Magic Missile/Shikigami Summons, it is also pretty safe to keep a 2-mana cantrip with an Authoring (as a turn 3 play) if you have a Spellboost payoff.
- If you’re keeping 1 or more Spellboost pay-offs, keep Insight.
- Keep Kyoka when going second.
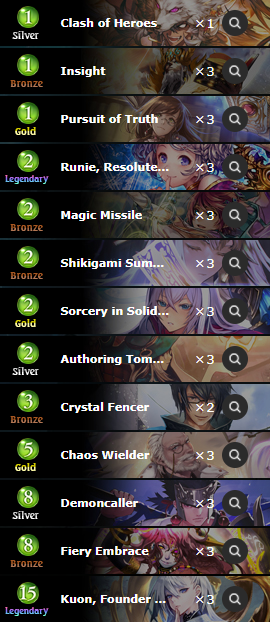
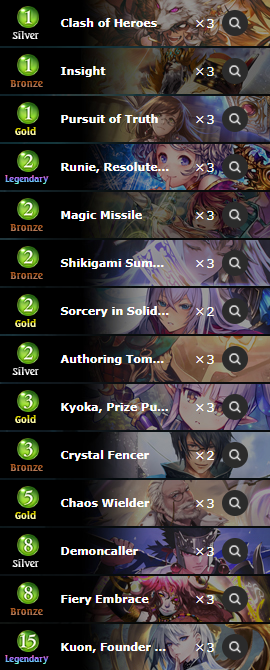
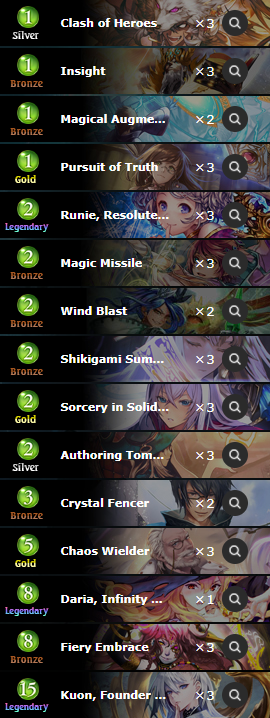
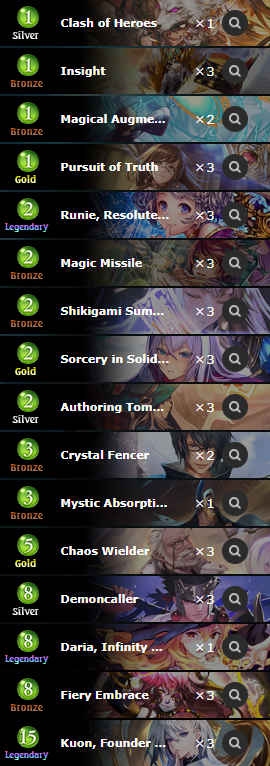
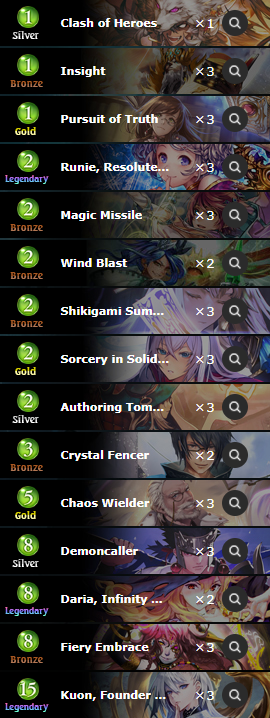
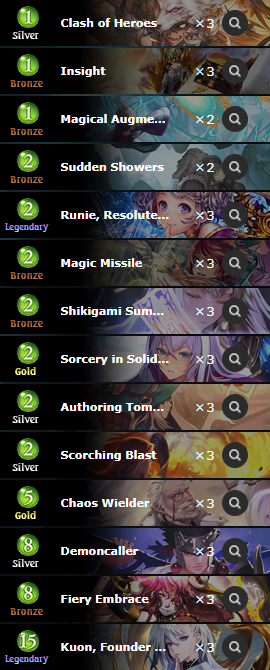
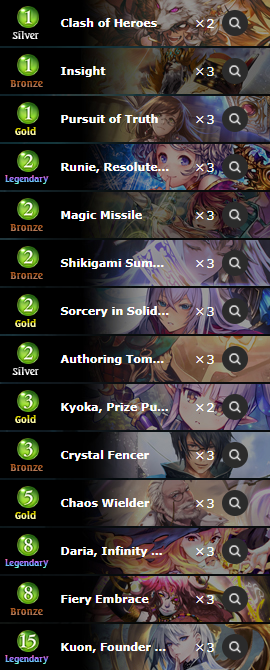
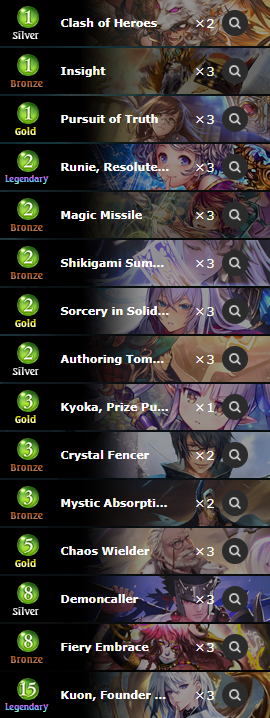
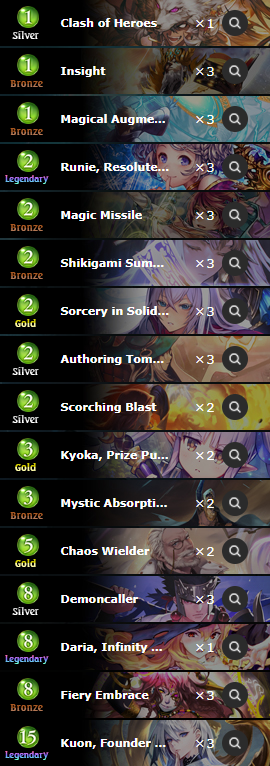
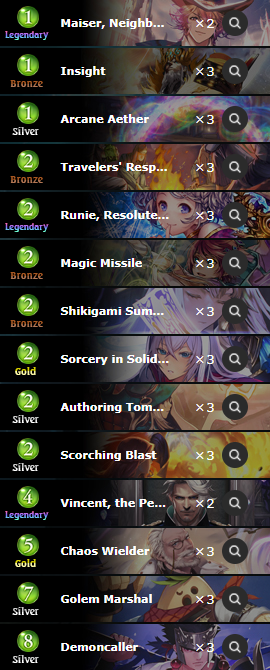
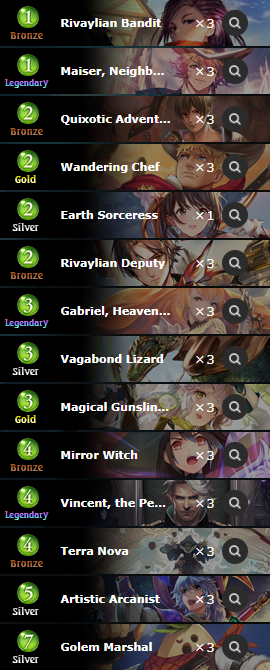
Optional inclusions and tech cards
- Kyoka is an optional inclusion that helps you contest the board against proactive decks, especially when going second. Kyoka competes with Crystal Fencer as they do more or less the same thing in the early game, and after the addition of Pursuit of Truth, I’d personally consider 2xCrystal Fencer a core inclusion, and Kyoka competes for slots with your other early-game interaction cards.
- Said early-game interaction is generally comprised of Wind Blast, Scorching Blast and Mystic Absorption, all of which do similar-ish things against proactive decks in the early game. The two Blasts are generally the most commonly played as they cost 2 mana (and Scorching Blast can even get to cost 1 in the midgame), but Absorption has a fairly important utility of answering Illganeau and an early-game Sarissa, alongside other common Last Words followers, and Absorption is also important to have against Sword in the midgame, as it’s one of your cleanest answers to Alyaska. Magical Augmentation and Clash of Heroes also compete for the early-game interaction slots and have value against Rally Portal in specific by making the deck faster at reaching relevant Spellboost thresholds.
- Daria, Infinity Witch is an optional inclusion that can serve as an extra Chaos Wielder. Daria is a bit slow and can introduce some hand size issues (which are relevant as it’s good to have 4 open card slots when going through your Runie loop). With the addition of Pursuit of Truth, Daria has gotten a bit better, as, on the one hand, it’s easier to dump cards from your hand now, and on the other hand, since you’re running a bit more Spellboost cards with Pursuit, Daria tends to draw a bit more than in previous iterations of the archetype. Depending on how aggressive of a field you’re facing, 1-2xDaria can be a great asset to have against Midrange Sword, but be aware that running Daria does make you marginally weaker against Rally Portal and Baal Blood.
Regarding Vincent (a.k.a. Amulet) Rune
Identifying cards: Quixotic Adventurer, Rivaylian Deputy, Vagabond Lizard, Terra Nova, Supercharged Guitarist, Artistic Arcanist.
Vincent Rune is a blanket term for the variety of Rune decks revolving around Amulet-based synergies and its namesake engine piece, Vincent. There is a variety of ways to build Vincent Rune, with the two main directions being a Spellboost-heavy shell akin to a hybrid build between a Spellboost deck (usually cutting Kuon and using Runie as your primary win condition); and a more proactive Amulet-based shell that uses Artistic Arcanist/Bandits/Terra Nova to get (up to) 3 Vincent triggers after evolving Vincent, which is quite similar to a less aggressive Tempo Forest of sorts, where Vincent is more of a source of AoE/face damage. Generally speaking, Vincent lost a lot of value after the October balance changes, so while there is certainly some room for experimentation in Vincent-based Rune shells, the deck is not particularly well-refined and in my testing, the hybrid Spellboost/Vincent shells have not been particularly great after the October balance changes. Vincent Rune is neither a particularly consistent nor competitive archetype, and while there could be some potential to the shell if it ever gets support in future sets (will it?), it’s not a deck I’d recommend playing.
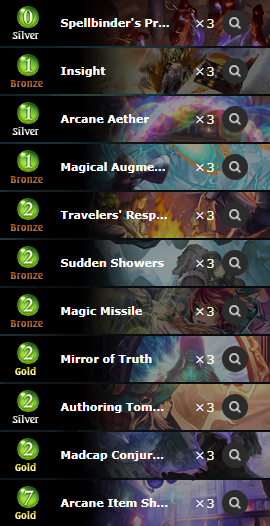
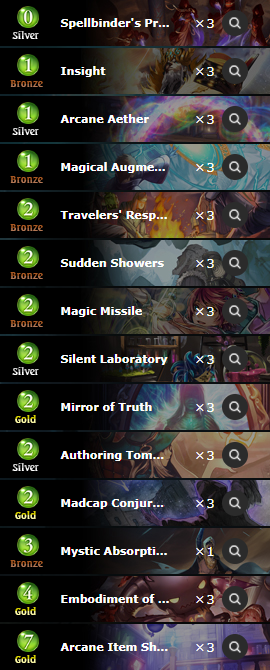
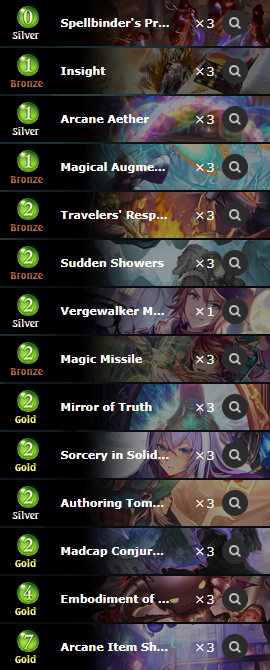
Item Shop Rune
Identifying cards: Sudden Showers, Silent Laboratory, Embodiment of Cocytus, Arcane Item Shop.
What does Arcane Item Shop do?
Item Shop Rune is a combo deck that utilizes Arcane Item Shop in a deck that either doesn’t include any followers to begin with, or has a way to tutor them out of your deck so that Arcane Item Shop refunds you mana whenever you play a card. The basic combo setup for Item Shop Rune is to have a 0-mana card (e.g., Spellbinder’s Preparation or a 0-cost Tree from Travelers’ Respite) and an Arcane Item Shop going into turn 7, and then start chaining together cards that either generate mana (e.g., Prep and Arcane Aether) and cards that effectively refund themselves after being played (other 1-mana cards and Travelers’ Respite), eventually findng a Madcap Conjuration to reload and continue going off with the chain.
The role of Item Shop Rune is to be a counter to Midrange Shadow. The widespread usage of Ramiel in decks of all shapes and sizes, as well as the prevalence of Yukari and Romantic Chanteuse make Item Shop Rune a bad deck for ladder play, however, it has seen some decent results before the October balance changes. Item Shop Rune is an extremely polarized deck and is generally vulnerable to more tempo-oriented midrange archetypes like Rally Portal and Baal Blood, as well as straight up aggro decks like Aggro Shadow/Tempo Forest. As the format developed, the archetype has more or less disappeared from the Rotation format, so it’s not exactly a deck anyone should be playing, and the rest of this section is more or less legacy coverage, as Item Shop Rune doesn’t really beat any real Rotation deck that isn’t exactly some slow combo deck like Ragna Portal/Flowering Forest/Roost Dragon.
Optional inclusions and tech cards
- Sorcery in Solidarity is a key inclusion in builds of Item Shop Rune that include followers. While Solidarity builds have generally fallen off due to the role of Item Shop Rune in the current format (you’re not really looking to interact with the opponent when playing Item Shop Rune), there are 2 primary Sorcery in Solidarity Item Shop builds: the traditional Vergewalker Magician variant, which is a bit better against proactive mirdange decks (e.g., Ward Haven and Midrange Sword), as well as a Magical Gunslinger+Ramiel variant, which is better suited to fighting against slower and/or reactive decks (such as Sanctuary Haven and Ragna Portal), where going off a turn earlier (when going second) is a powerful asset. Creture-less builds of Item Shop Rune generally include some number of Silent Laboratory in the Solidarity slot.
- Mystic Absorption is a tech card, the primary purpose of which is answering an early-game Sarissa in Ward Haven. Cards that cost 3 or more mana are generally difficult to justify in Item Shop Rune, as they are very expensive to cast in the post-Shop stage of the game, so running more than 1 copy of Mystic Absorption is a bit tricky, but the first copy of the card has shown some decent winrate correlations in available tournament data, so if you’re really keen on playing Item Shop Rune (are you really?), I would recommend trying a 1-of Absorption.
- Embodiment of Cocytus is one of the reasons why the archetype has mostly stopped running the Solidarity package, and Embodiment has a similar functionality to Ramiel in, you know, normal Shadowverse decks, where it’s great when going second and mediocre to bad when going first. A fringe interaction to be aware of with Embodiment is that you can use double Embodiment to enable Madcap Conjuration as a board clear, which can be relevant against Haven/Sword, and a similar play pattern works in Solidarity shells (and you obviously only need 1xEmbodiment if you’ve already found the one/last follower you’re running).

Stats corner
The below charts show the performance of various deck archetypes in qualifiers of open JCG events, which follow the Conquest Bo3 ruleset. Deck archetypes are categorized by their popularity (as in, how many players brought said deck) and the average number of match wins of lineups containing the specified deck archetype. For the qualifier performance chart, deck archetypes are sorted in descending order of Score values, where Score is a weighted average of “winrate score” (a linear scale where the 100% represents the maximum number of match wins among deck archetypes with more than 2% meta share, and 50% representing the average number of played matches per player, which is equal to exactly 15/16 for a 4-stage single elimination bracket, but gets adjusted accordingly when not all player slots are filled, as BYEs don’t count as played matches) and the “frequency score” (a.k.a., “relative frequency”, in other words, the ratio of popularity of a deck compared to the most popular deck in the field: e.g., the most popular deck of the format has a relative frequency of 100%, and a deck that is played half as much has a relative frequency of 50%), with the weight of the sum determined by the adjustable “Meta score parameter”, set by default to 80/20, meaning that the default formula for calculating Score is 0.8 * [Winrate score] + 0.2 * [Relative frequency].
For more detailed information on how the archetypes are defined, I’d recommend looking at the conditional clauses in class-specific sections of the qualifier spreadsheet linked below.
JCG qualifiers spreadsheet (mini-expansion patch)
JCG top 16 spreadsheet (mini-expansion patch)
JCG open Rotation events site directory (data source)
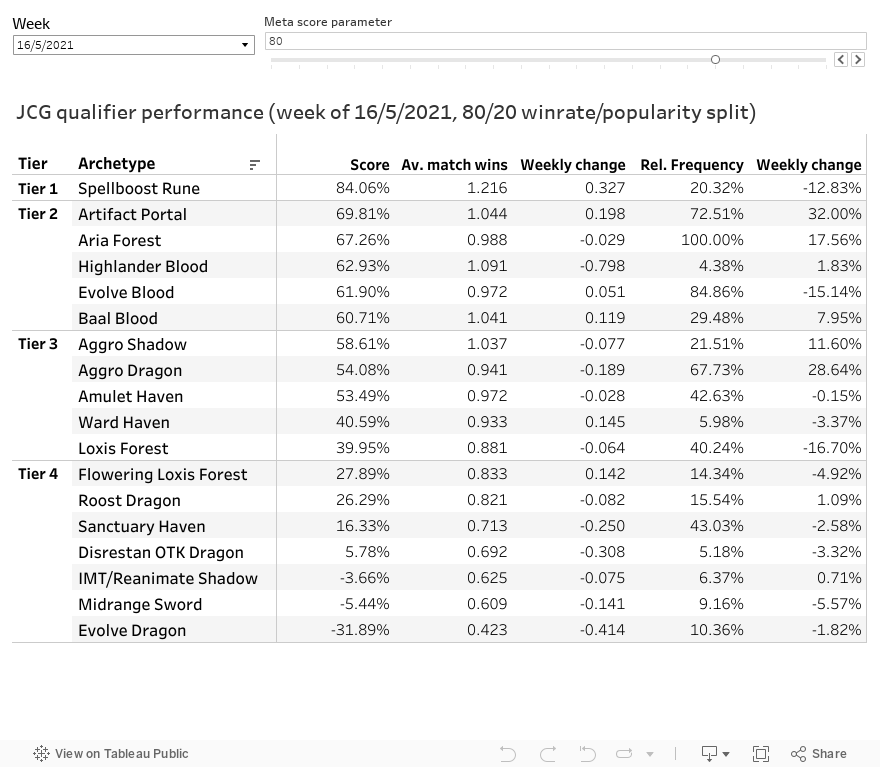
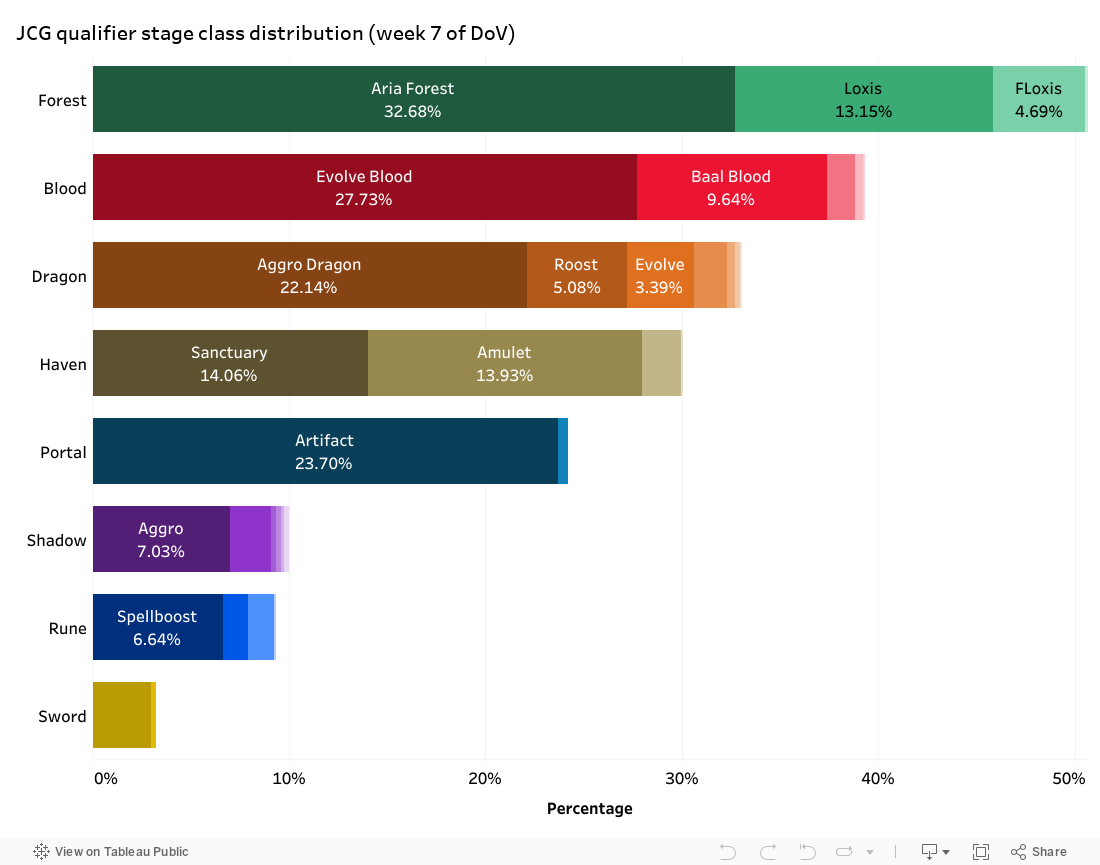
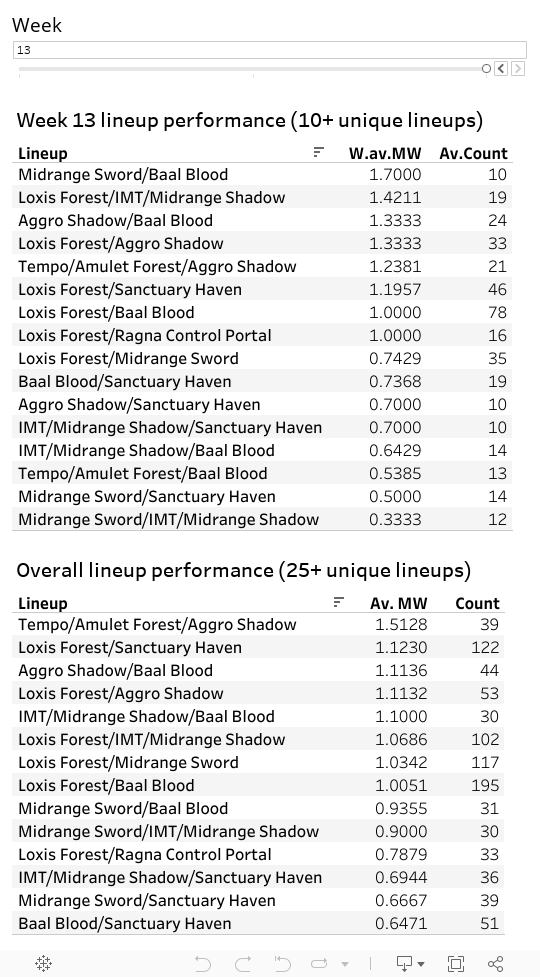
Legacy lineup charts and spreadsheets (November and October patches)
JCG qualifiers spreadsheet (November patch)
JCG top 16 spreadsheet (November patch)
JCG qualifiers spreadsheet (October patch)
JCG spreadsheet (October patch)