Shisogenius’s Meta Insight 06/09
“Meta Insight” are a series of articles covering various Shadowverse deck archetypes with matchups statistics, as well as brief commentary on specific tech choices and play patterns.
[ps2id url=’#sword’]Sword[/ps2id] [ps2id url=’#haven’]Haven[/ps2id] [ps2id url=’#shadow’]Shadow[/ps2id] [ps2id url=’#rune’]Rune[/ps2id] [ps2id url=’#blood’]Blood[/ps2id] [ps2id url=’#portal’]Portal[/ps2id] [ps2id url=’#dragon’]Dragon[/ps2id] [ps2id url=’#forest’]Forest[/ps2id] [ps2id url=’#stats’]Stats corner[/ps2id]

[ps2id id=’sword’/]
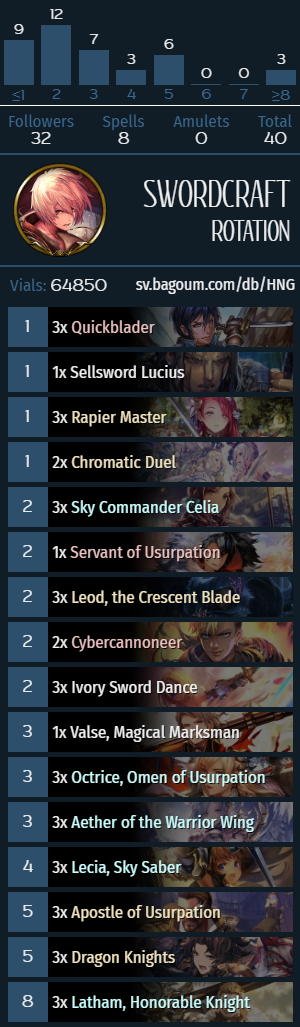
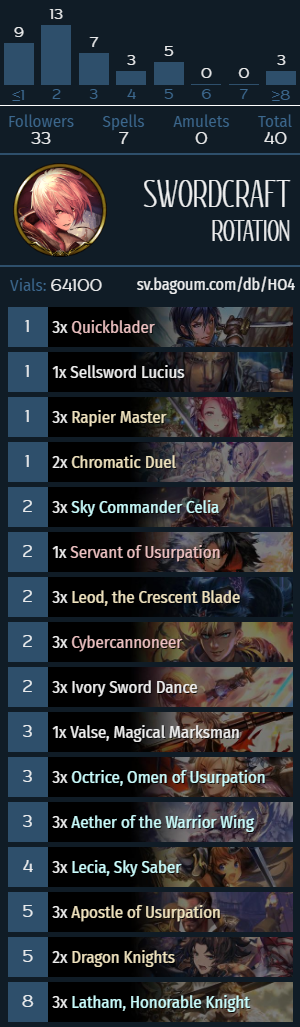
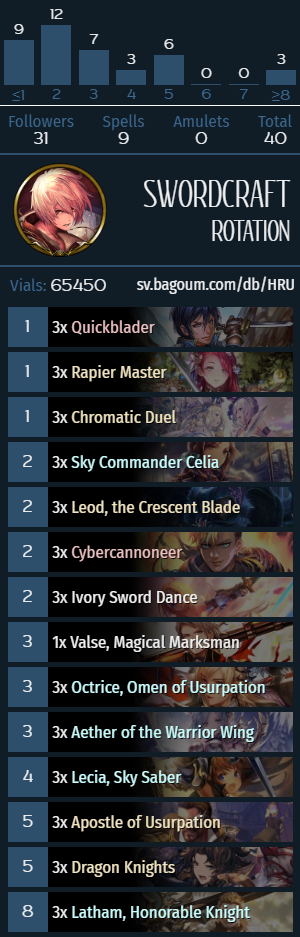
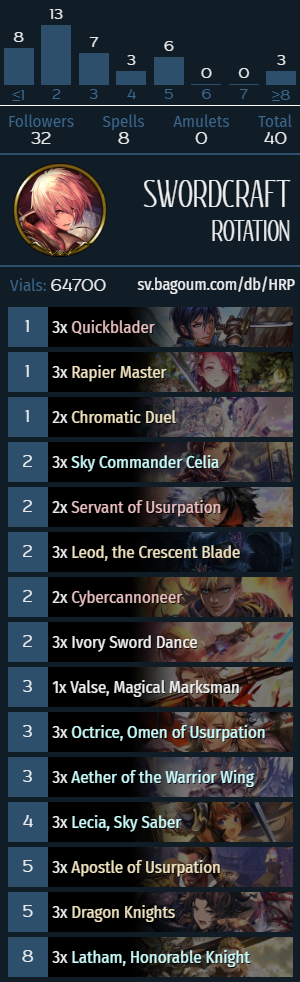
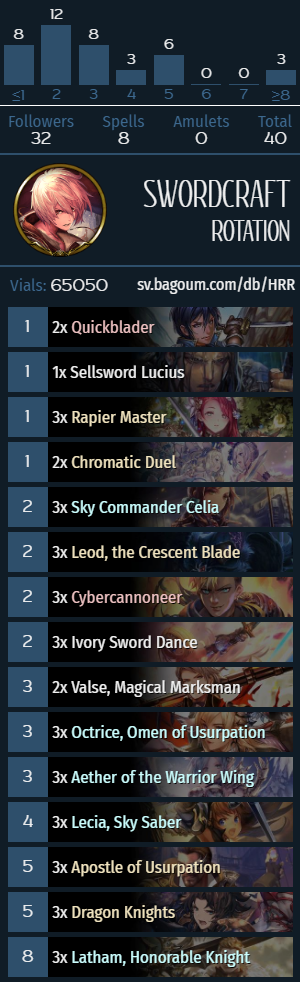
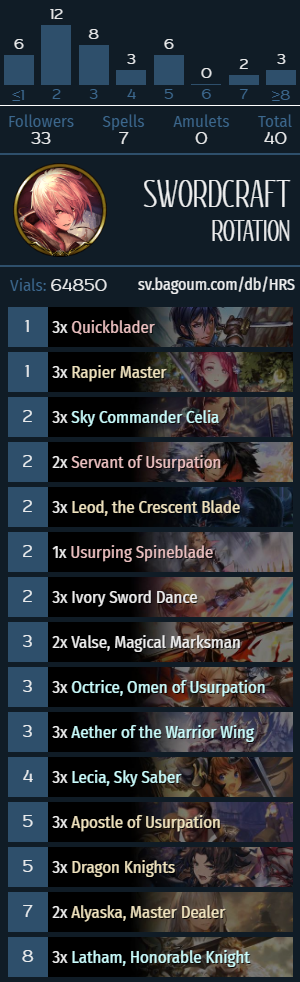
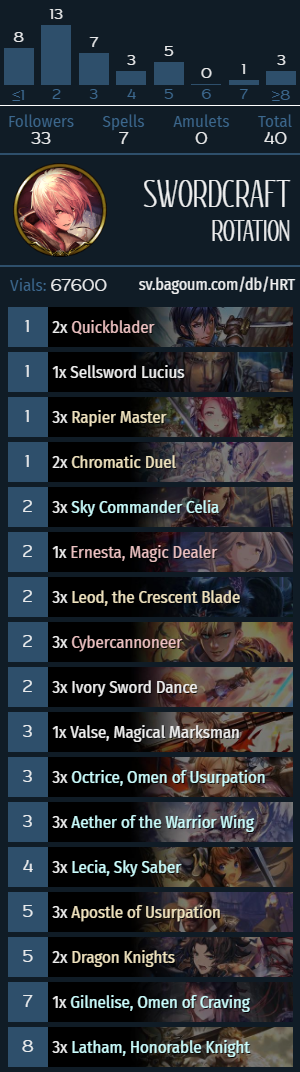
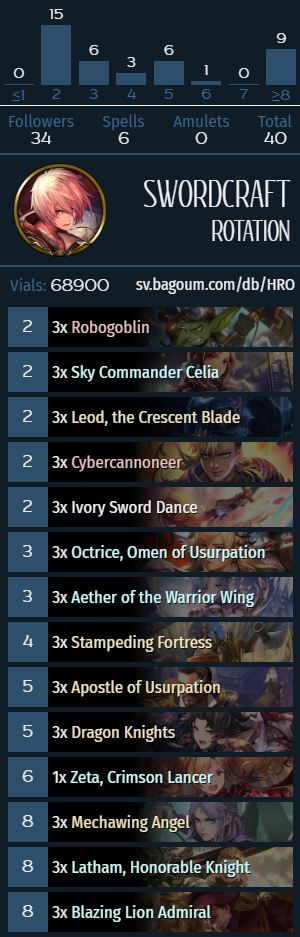
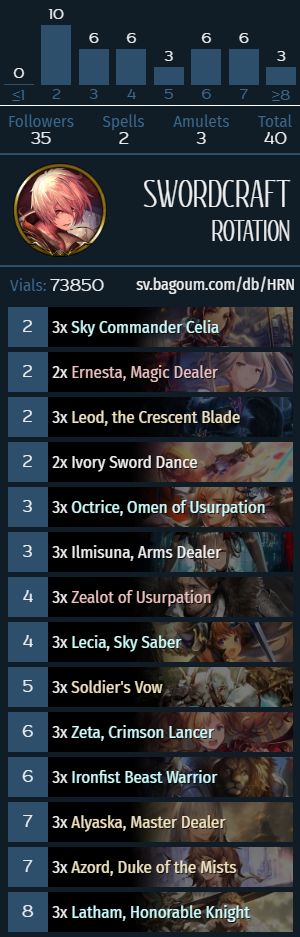
Midrange Sword
Identifying cards: Quickblader, Octrice, Lecia, Apostle of Usurpation.
Mulligan priority
- Always keep Valse, Aether, Leod.
- Going first, keep Chromatic Duel or Cybercannoneer as 4-drops. Against Shadow/Sword/Haven also keep those cards when going second.
- Against Shadow/Blood/Portal keep Octrice.
- Against non-Rune/Portal decks keep Servant of Usurpation.
- Going first against Rune/Portal, keep Quickblader as a 1-drop.
MidSword mulligans are something that I’ve changed my opinion on over the course of the expansion’s life cycle. Sword has an incredibly versatile early game and it’s more or less guaranteed (probability of having a 2-drop in your first 5 cards is ~90% with 14 2-drops in the deck) that you have something to play on turn 2, however, the archetype’s weak turns are 3 and 4, so keeping good cards for these turns is important. In addition to that, most of Sword’s 2-drops can get more value in the later stages of the game, so squandering some of those cards (most notably, Celia) can come back to bite you in the mid/late game.
Octrice is good against decks that play Last Words followers in the early game (this includes things like Armored Bat/Deadly Dreamer/Nicola/Bone Drone/Flauros/Junk). It’s debatable whether you should keep Octrice against Rune since stealing Orichalcum Golem is a big deal, but on ladder the OriGolem build of Rune is usually less prevalent than the “regular” Spellboost build, so it’s a gamble that is usually not in your favor; if you somehow know that you’re playing against specifically Dirt Rune, keeping Octrice is good. Against Rune and (Lishenna) Portal early pressure is often valuable, keeping Quickblader often results in 2-3 face damage; doing so is obviously a terrible idea in the majority of other matchups, however. Servant is good against midrange decks, but is weak to Magic Missile/Vesper and doesn’t pressure the opponent if it can’t bump into anything. Ivory Sword Dance is an important card against decks like Aggro Blood/Forest, and there is merit to keeping it when going second since you can play a 2-drop, evolve it and Sword Dance for 4 damage, but it’s awkward since it doesn’t work with Cybercannoneer and you don’t really want to play Celia on 4; I personally think that keeping it in the mulligan is a big gamble that backfires too often.
Tech cards and optional inclusions
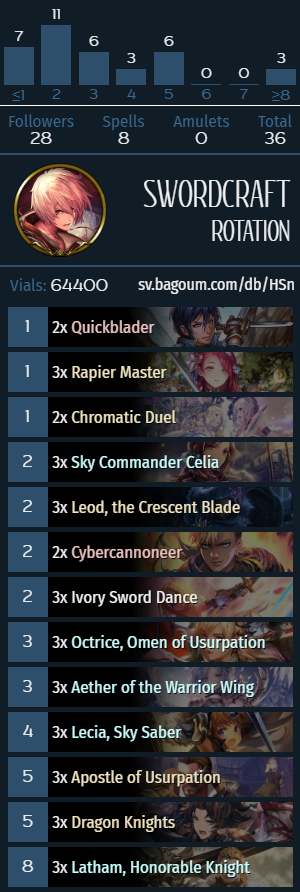
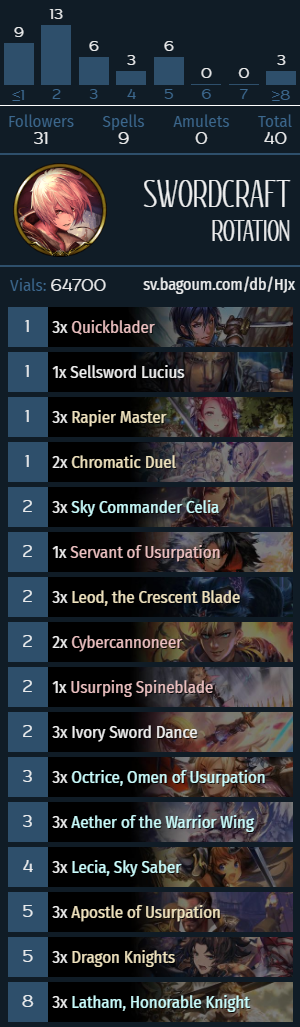
- Cybercannoneer, Servant of Usurpation and Usurping Spineblade are optional 2-drops that improve the archetype’s matchup against midrange decks. Of the 3 cards, Cybercannoneer is the most consistent and versatile option, mainly because it is extremely flexible: the card can be played on turns 2/4, and gains a ton of value after with Latham‘s leader effect, which makes it good in the early game and (arguably) the 3rd or 4th best topdeck in the late game, after Celia/Rapier Master. Servant has gotten a lot worse with Rune coming into prominence, but it’s still a solid card against Machina decks and Forest. Spineblade has most of the same connotations as Servant, but it’s more reactive and often can’t be played on 2. Sword 2-drops have refined over the course of the expansion: when the set just came out, the most popular 2-drops were Spineblade and Servant. A good reference point here is the RAGE qualifiers (start of May, basically, a month later), where the MidSword lists that made it to playoffs had on average 1.09x Servants, 1.85x Cybercannoneers, 0.53x Spineblades and 0.44x Ernesta. After the mini-expansion, looking through the lists in this article, there are 2.46x Cybercannoneers, 0.46x Servants, 0.15x Spineblades and 0.08x Ernestas. There is some selection bias and the sample size is pretty small, but it does appear that there is a trend towards Cybercannoneers.
- Valse is a tech card against primarily Machina Shadow (since it’s a very efficient answer to the Aenea token) and Lishenna Portal. Valse is generally a solid card against midrange decks, it often gets cut from lists that play triple Duel and Cybercannoneer because it fulfils a similar role in the deck of being a flexible early game card that can still get value in the late game. The amulet-banishing aspect of Valse doesn’t come up too often because of how little card draw Sword has, but it is a potential out against Destruction in Black.
- Sellsword Lucius is a tech card against Rune and Machina Shadow that can answer Adjudication tokens and Fleeting Joy boards. A play pattern against Machina Shadow is that you play Latham on 8, then the Shadow player plays Fleeting Joy on their turn 9, and the Sword player can go Lecia into Lucius, which clears both the 6/6 idiots (with Lecia‘s Bane token), and clears the Bone Drone leftovers with the Knight. This sets up a board that can be followed up by angry Celia next turn or (if the Sword player is going first) gets the Lecia AoE spell. Lucius can also enable Lecia in the midgame, much in the same way as other Sword 1-drops would. Lucius commonly sees play as a 1-of.
- Zeta is a tech card against Machina Blood and (to an extent) Machina Shadow. The card is specifically good against Machina Blood because it cleanly answers Slayn and pressures the Blood player’s life total. Zeta also clears an on-curve Skull Lord. Zeta only sees play as a 1-of because it’s pretty clunky and has anti-synergy with itself.


What does Midrange Sword do?
Midrange Sword is a midrange deck that utilizes powerful midgame Swordcraft followers to establish board control and a tempo lead that would allow to close out the game. The defining characteristics of MidSword are the flexibility of its cards at all points of the curve, strong board control effects like Ivory Sword Dance/Apostle of Usurpation/Lecia and access to a significant amount of reach with Latham‘s leader effect.
Miscellaneous notes
- Midrange Sword is an extremely straightforward archetype, but there is a card that still causes sequencing errors (even in competitive play), which is Celia, particularly in the post-Latham stages of the game. Some common mistakes include missing lethal setups with things like Cybercannoneer, Ivory Sword Dance, defensive Celia, etc. Even without a Latham effect, Sword can still set up turns with Quickbladers (for example, if you have X followers stick on the board, Quickblader into angry Celia into Quickblader is X+5 burst damage since it doubles down on the Quickblader damage).
- Against Machina Shadow, it’s extremely important to play Latham on 8 because it opens up a lot of your removal options. A rule of thumb here is that if the Shadow player has an Aenea by turn 8 and resolves Fleeting Joy on 9 while you don’t have a Latham effect going, it’s impossible for the Sword player to come back from that tempo disadvantage. To this end, it’s often correct to save an Aether until turn 7 if you don’t have a Latham in your hand by turn 4-ish.
- Against Shadow in general, the specific cards to play around include: Big Soul Hunter (e.g. if you buff an evolved Leod with Ivory Sword Dance and the Shadow player has 6 Shadows, you have to attack the opponent to cash in on the face damage), Gilnelise (try to minimize the number of followers in play if you’re going into Shadow’s turns 7-9; this can mean leaving more power in play against things like Bone Drone) and Cerberus/Ceres (which means that you should try and set up a board state where playing a 5-drop and evolving it is awkward, this can be done by playing a defensive Celia or a Vane if you’re going first). Different Shadow lists can run different cards, e.g. Machina Shadow is less likely to have Ceres and more likely to have Bone Drone or Orthrus, but most of the midgame Shadow shell is generally consistent between the 2 Shadow archetypes.
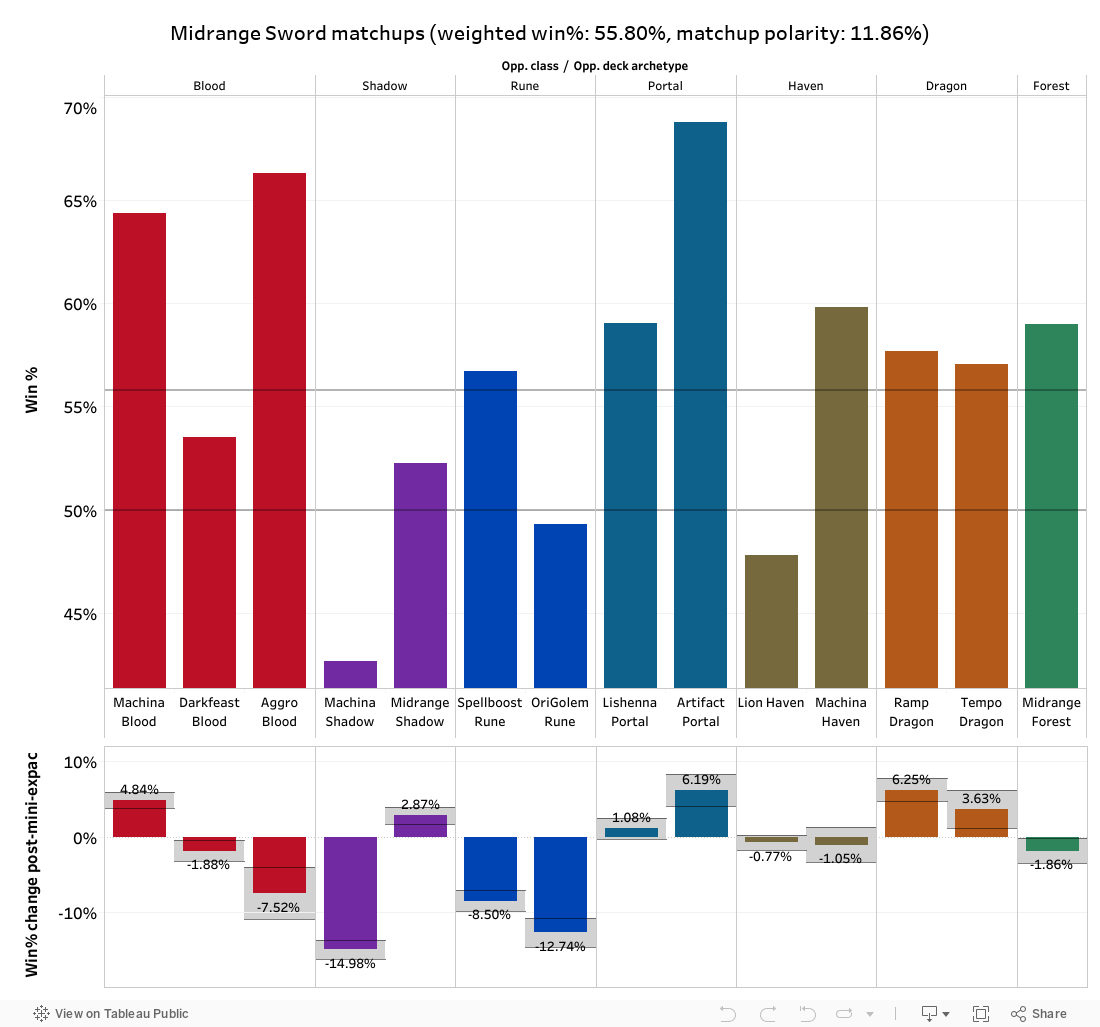
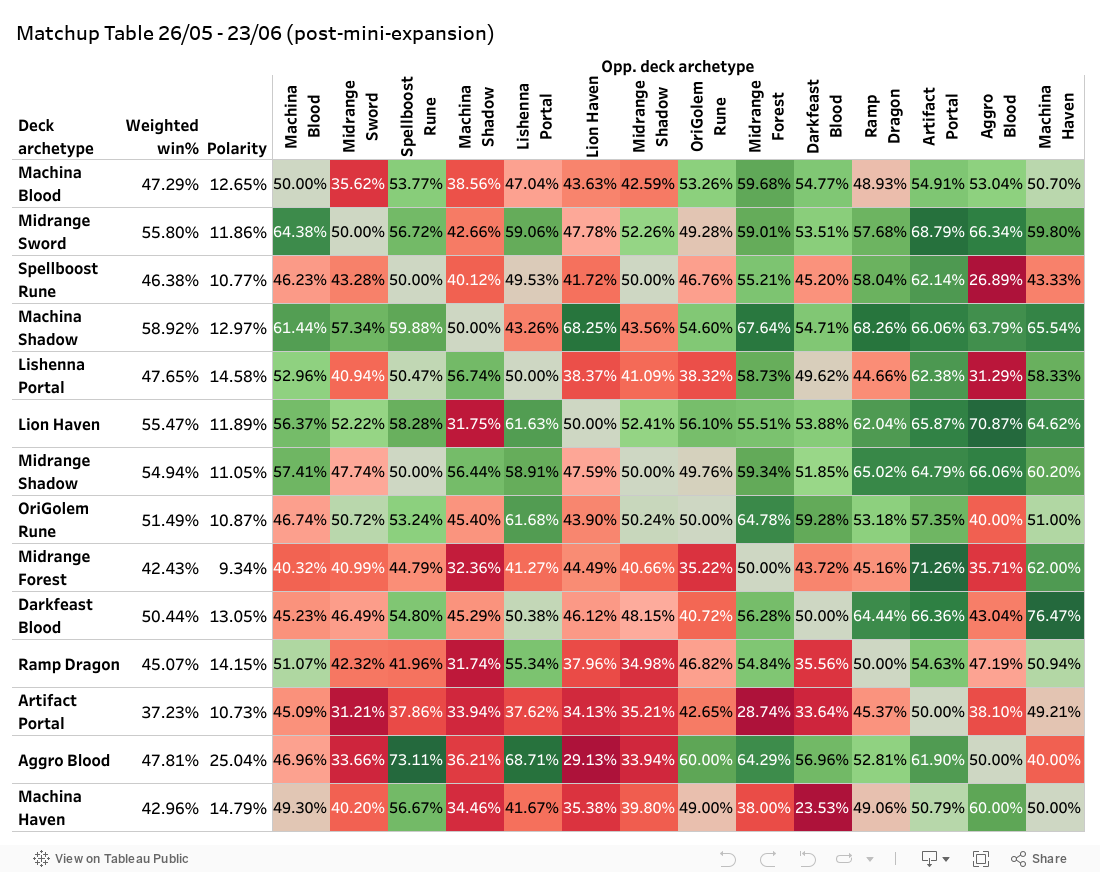
Midrange Sword is a deck that is currently universally considered the best competitive deck of the format (alongside Lion Haven), primarily because it does reasonably well against the field and doesn’t have matchups that are particularly terrible, with the only exception being Machina Shadow. Midrange Sword also does very well against 2 decks that are very common on ladder (but not particularly competitive), namely Machina Blood and Lishenna Portal. With that in mind, Midrange Sword is still one of the best decks of the format, even if the overall matchup polarity of the deck on ladder is quite high.
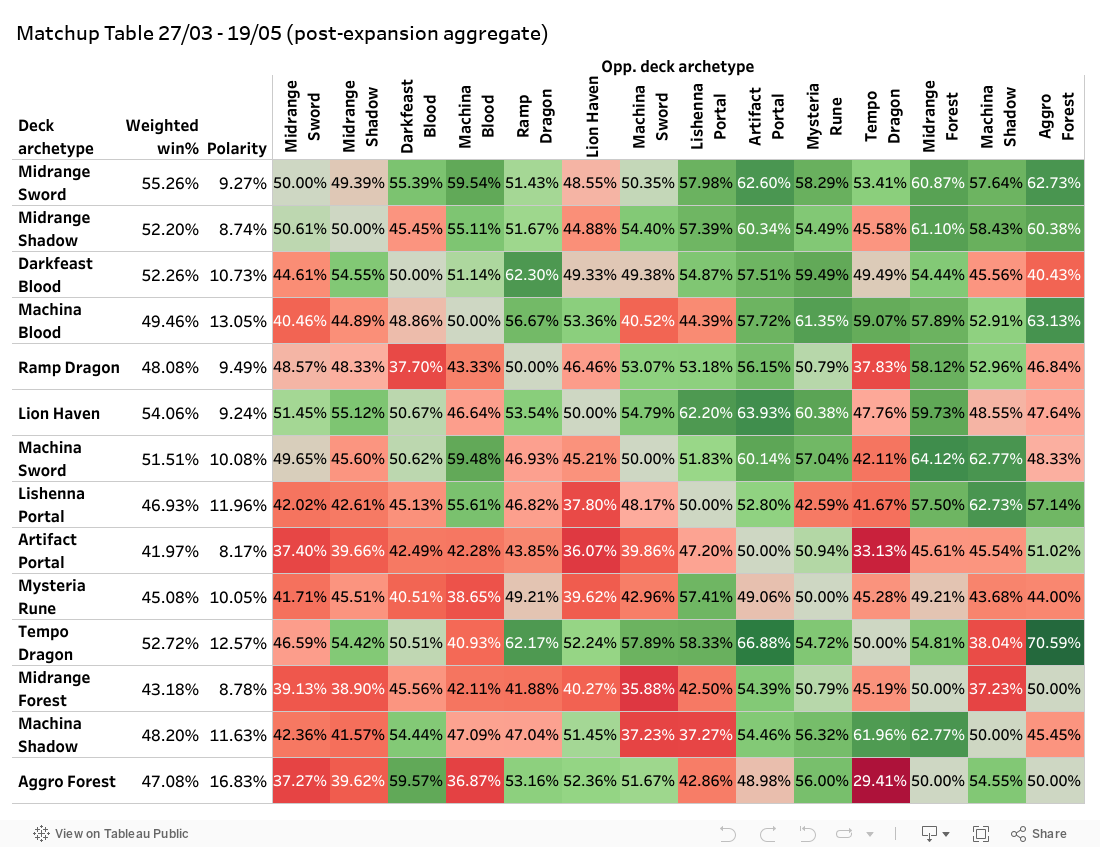
Compared to its pre-mini-expansion iteration, Midrange Sword appears to do a lot worse against both types of Rune and Machina Shadow (for obvious reasons), but other matchups of the archetype have not undergone an observable change (within margin of error).

[ps2id id=’haven’/]
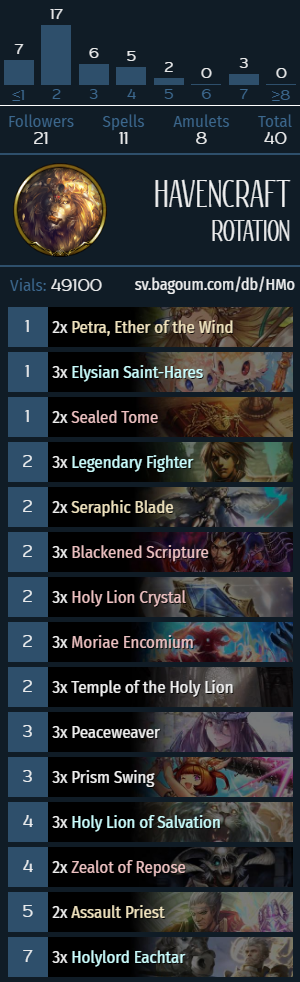
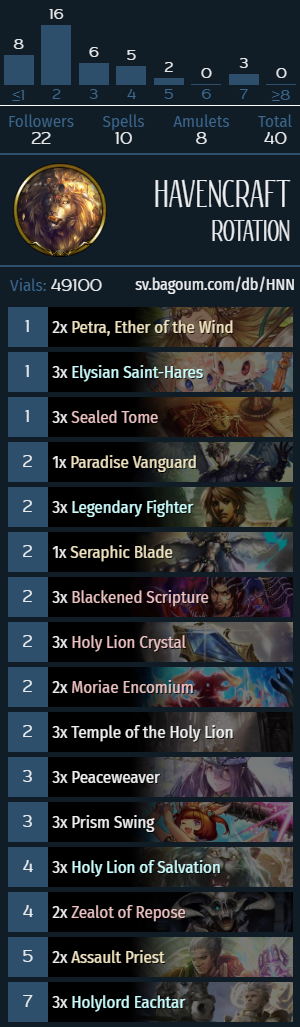
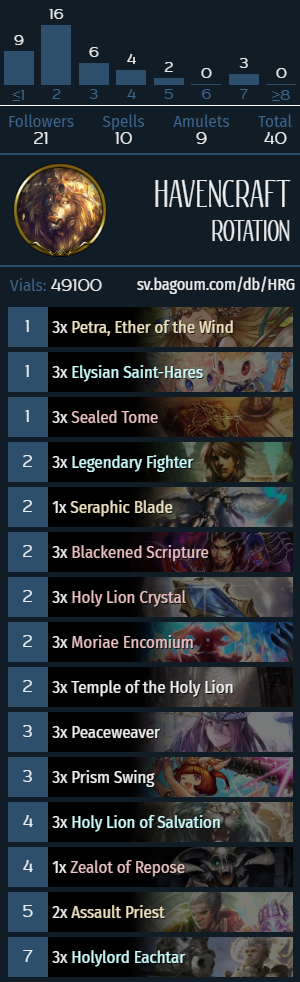
Lion Haven
Identifying cards: Legendary Fighter, Holy Lion Crystal, Temple of the Holy Lion, Prism Swing, Holy Lion of Salvation.
Mulligan priority
- Always keep Sealed Tome, Holy Lion Crystal, Temple of the Holy Lion.
- Keep Moriae Encomium against non-Shadow/Sword classes.
- Against Sword/Shadow/Blood, keep Scripture/Prism Swing.
- Against Sword/Shadow/Blood, try to keep a proactive 2-drop (basically, any 2-cost card except for Scripture/Seraphic Blade), especially when going first.
- Going second, keep Holy Lion of Salvation or Elysian Saint-Hares as a 4-drop. Going first, keep Saint-Hares if you have a 2-drop.
- Against Portal/Rune, keep Petra as a 1-drop.
- Against Blood/Haven, keep Seraphic Blade.
Mulligan strategy in Lion decks is quite straightforward: the goal is to find the “Egyptian God card”, Temple of the Holy Lion, as well as attempt not to lose too much tempo in the process, so it’s good to keep card draw and good early game cards. In addition to that, it’s a poor idea to keep removal spells that won’t have a target in the matchup you’re playing. A mistake I often see is people playing out Elysian Saint-Hares in the early game (before turn 4), and while it can occasionally be fine (e.g. if you only run 1xPetra and drew two Hares, or if you have a good early curve with Holy Lion of Salvation), in the overwhelming majority of cases it’s a mistake. Zealot of Repose is a card that I personally don’t like keeping in the mulligan, but it can be fine if you’re going first and expect to be playing against a deck that goes wide in the early game (e.g. Machina Sword or Forest in general).
Tech cards and optional inclusions
- The way Conquest tournaments work in this set is that an overwhelming majority of players bring MidSword/Lion Haven, for that reason a lot of popular Lion lists have tech cards for the Lion mirror, the most common of which being Seraphic Blade (because they’re intended for tournament play). Seraphic Blades are fine in a vacuum and can answer key threats (e.g. >6 Adjudication tokens against Rune, Latham in MidSword, etc.) in a lot of matchups and problematic 2-drops (e.g., evolved Vira and Mono), but the card can also rot in your hand against decks that don’t actually have any board presence after a certain point (Arcus Shadow) or at any point of the game (Lishenna Portal).
- Paradise Vanguard and White Hart are optional inclusions in Lion Haven that help improve the archetype’s early game against Sword/Shadow. These cards are played instead of one of the Sealed Tomes/Moriae Encomium/Seraphic Blades.
- Zealot of Repose and Assault Priest are both tech cards against proactive midrange decks, such as Midrange Sword, both builds of Shadow and Machina Blood. The split is usually 2/2, but it depends on your other tech choices, e.g. Assault Priest is redundant with Seraphic Blade/Moriae, and if you’re running a bunch of early game tech cards (Seraphic Blades/Paradise Vanguards), Zealot of Repose goes down in value. Personally, I prefer the 1/3 split, in part because in my personal stats playing the deck over the course of the last 2 months, Zealot of Repose has the lowest played winrate of any “standard” card I have tried (which obviously is a biased statistic since it’s a heavily matchup-dependant comeback mechanism).
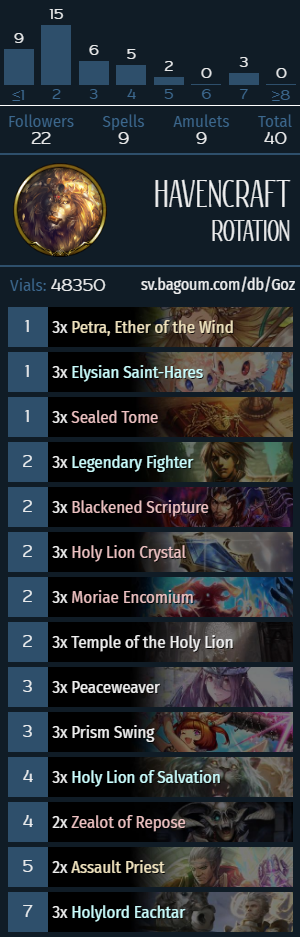
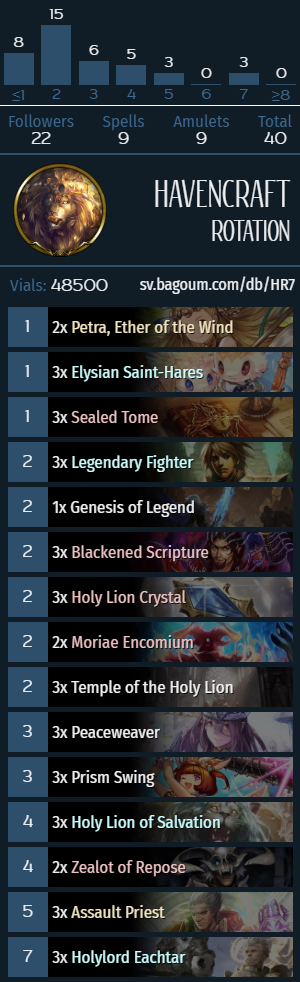
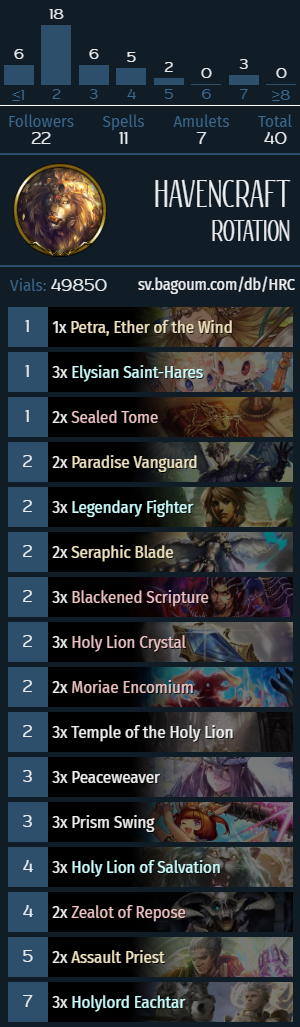
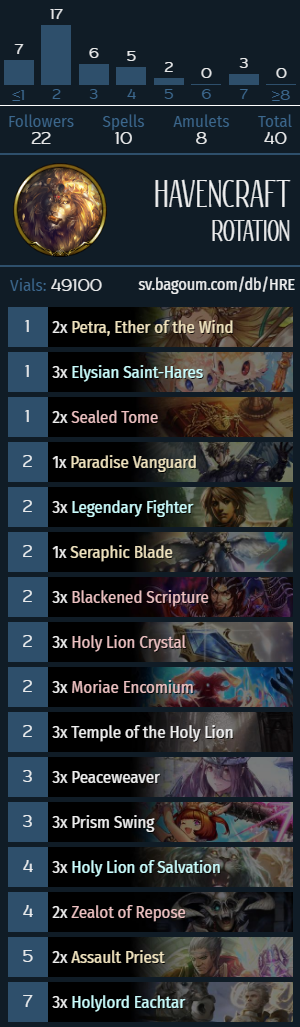
Lion Haven skeleton


What does Lion Haven do?
Lion Haven is a deck that utilizes the tempo-centic suite of midrange Haven cards, in combination with the 15-card “Holy Lion package”, which includes 3 copies of every single card that comes up in the collection manager when you type “Holy Lion” into the search bar without any other filters. The archetype has 2 primary angles of attack: on one hand, it can naturally get ahead on tempo with cards like Elysian Saint-Hares/Assault Priests/various 2-drops/etc. and then threaten lethal damage with Holylord Eachtar, and on the the other, the deck can play Holy Lion Crystals up until the third-degree Lions start getting summoned. The archetype doesn’t have actual inevitability (since it can’t do 20 damage out of hand), but Lions are an effectively inevitable engine for generating Storm damage and board presence.
Miscellaneous notes
- In the past 6-7 months of Lion Haven existing in its current iteration, the one new card in the archetype is Elysian Saint-Hares, which still causes some confusion and misplays among players new to the archetype. Hares introduce a pretty unique (outside of Artifact Portal and Slay the Spire runs) card game concept of putting extra cards into your deck and how it’s not necessarily a good thing. Hares are a card with an “expiration date”, meaning that it has a specific window when the card is impactful, and as a rule of thumb, said window is generally turns 4-7. You don’t want to play Hares without the Enhance, and you don’t want to clog up your draws with bunnies in the late game. What this means in a practical application is that as a Haven player, it’s necessary to avoid having the Hares stick on the board for too long, either by trading them off whenever it’s favorable or by holding back on playing more bunnies after turns 6-7, because it leads to drawing air instead of crucial removal cards, Eachtars and additional Holy Lion Crystals. A particularly egregious mistake I’ve seen multiple times in ladder games and in SVO qualifiers is a board state where someone has a Petra and a Hare in play, and they trade off Petra instead of the bunny. Just because a card is doing some animation every turn, it doesn’t mean that it’s better than the card that isn’t doing that animation!
- After playing 5-6 Holy Lion Crystals, the deck’s priority turns from having tempo and card advantage to having enough total life and board space. Naturally, the exact point of transition depends on whether you have a Temple or not, but it usually happens around turn 8. To this end, you have to plan ahead and try not to clog up the board with 2-drops (e.g., Legendary Fighter) or Amulets (e.g., Moriae), because it can mean that you miss out on 2-4 points of damage. In addition to that, you also have to plan to “cash in” some of the awkward Crystal generators in time, namely Prism Swing (e.g. against Arcus Shadow you can have multiple turns after Arcus is played where you have no targets for the thing) and Holy Lion of Salvation (e.g. against Lishenna Portal, where you don’t really need it as a Ward, you have to find a turn where you float 1 mana to get the Crystal).
- The one exception to the previous “rule” of trying to not clog up the board with bad cards is the Machina Shadow matchup. The matchup is generally quite miserable for Lion Haven because Aenea‘s token summons a lot of tall idiots that the Haven player can’t really clear too well. In addition to that, one of the idiots has Ward, which is obviously cheating. A way to counteract this abhorrent cheating is to play Moriae Encomium or two on turn 7, which means that you can have a fighting chance if you get a good dice roll. With 2xMoriae, you have a 50.5% chance (66.6% if Robozombie doesn’t get pulled/gets traded off) to kill off the Ward, which allows you to potentially race the Shadow player. If the Shadow player has Aenea on curve, the matchup feels like a 20/80, but this trick can improve it to ~33/67. It’s not great, but it’s better than nothing.
![]()
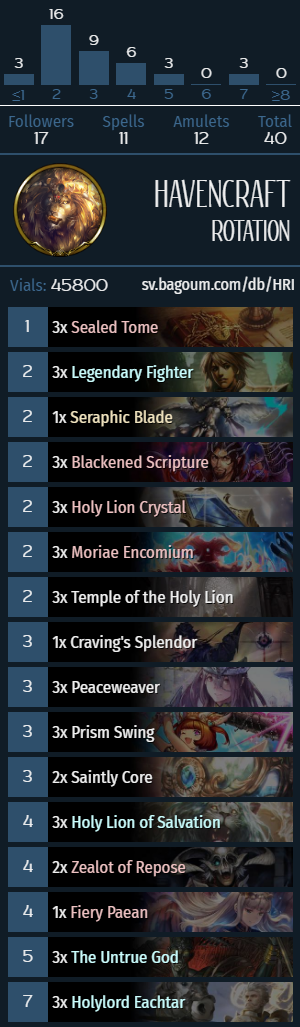
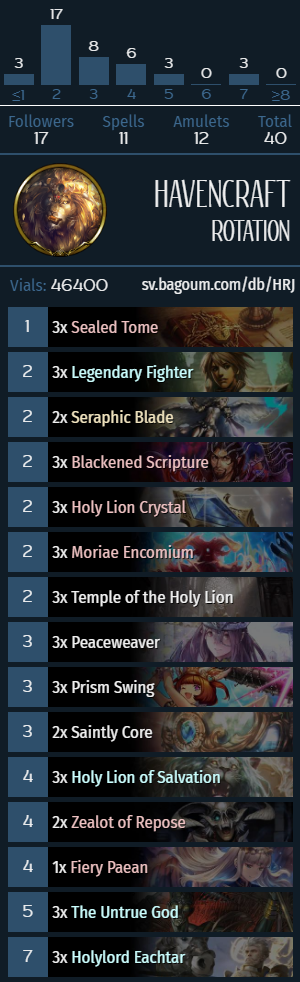
The Untrue God package
What does The Untrue God do? The card follows a binomial distribution in its random rolls (it works the same way as the XYZ cards), or at least that’s what I assume it does. There have been no official clarification on how the card works, but I’ve done testing over the course of 100 resolved Untrue Gods and came out with 13-48-39 split of outcomes (for 0/4, 1/3 and 2/2 results, respectively), while the probability masses for a binomial distribution with these parameters would give a 12.5%/50%/37.5% distribution. Doing a simple 3×2 Chi-square test results in a p-value of 0.9608, which means that The Untrue God follows a binomial distribution (basically, flips 4 coins and assigns X to the number of heads and Y to the number of tails) with a probability of roughly 96%. If you do not trust the level of rigidity of my testing or basic math, you are more than welcome to do your own testing. I punched those numbers into my calculator, it makes a happy face.
Moving along from the topic of high school algebra, what does Untrue God actually do in a game of Shadowverse? In the Rotation format, there are no 0-cost Amulets, and the only 4-cost Havencraft Amulet that actually does something with Untrue God is Fiery Paean. The 3-cost Amulets are Saintly Core, Whitefang Temple and Featherwyrm’s Descent, the latter two of which are obviously not particularly great when pulled with Untrue God. The 2-cost Amulets are the bee’s knees, Moriae Encomium and Temple of the Holy Lion, the 1-cost Amulet is Sealed Tome. Lion Haven lists naturally run Sealed Tomes/Moriae/Temple, and looking at the probability profile of Untrue God, the 1/3 outcome is a lot more common than the 0/4, so the tested versions of the package usually run 2xSaintly Core and 1xFiery Paean. Long story short, 12.5% of the time Untrue God is a 3/3+4/4 for 5 (so long as you haven’t drawn your 1-of Fiery Paean, which works ~80% of the time by turn 5), 50% of the time Untrue God is a “weaker” Assault Priest (less stats, no Ward, the card draw is not immediate, although the targeting can be better), and 37.5% of the time Untrue God puts two of either Temple/Moriae into play, which is a lot of value, but clogs up the board and can be slow (if you roll double Moriae). This is great and all, but the opportunity cost of having 3 bad cards in your Lion deck mean that the deck is generally slower than its standard counterpart and usually means that you have to cut the Hares/Petra package. Untrue God is potentially a powerful (albeit random) effect, but the 3- and 4-cost Amulets are currently too terrible to make the card good in the Rotation format.

Lion Haven is widely considered the second best deck in competitive play. and with good reason: the archetype consistently does well against most archetypes in the format. The one exception to this is Machina Shadow, but looking at the common competitive archetypes (MidSword, MidShadow, both builds of Rune and DFB Blood) the deck is moderately favored against all of those decks, and it even has an edge over Midrange Sword in the Rune matchup. This makes Lion Haven one of the best decks for ladder play, even if it may feel somewhat samey. That said, if the current trend of Machina Shadow climbing in popularity continues, the overall winrate of the archetype could go down. For example, if the current popularity of Machina Shadow increases twofold, the overall winrate of Lion Haven would be 52.04%, which is lower, but still extremely competitive. Even still, Lion Haven is an archetype that has the potential to beat any deck in the format with the right draw: very few (read: no) decks can reliably beat a double Temple of the Holy Lion opening, so the archetype will likely continue to see competitive play until it rotates out in July.
Apart from the notable observable change to the Machina Shadow matchup (for obvious reasons), it’s notable that the Machina Blood matchup has improved from moderately unfavored to highly Haven-favored. This is caused by the fact that current Machina Blood builds can’t reliably deal with Lion Haven boards because Machina Blood lists have been cutting the evolve package.
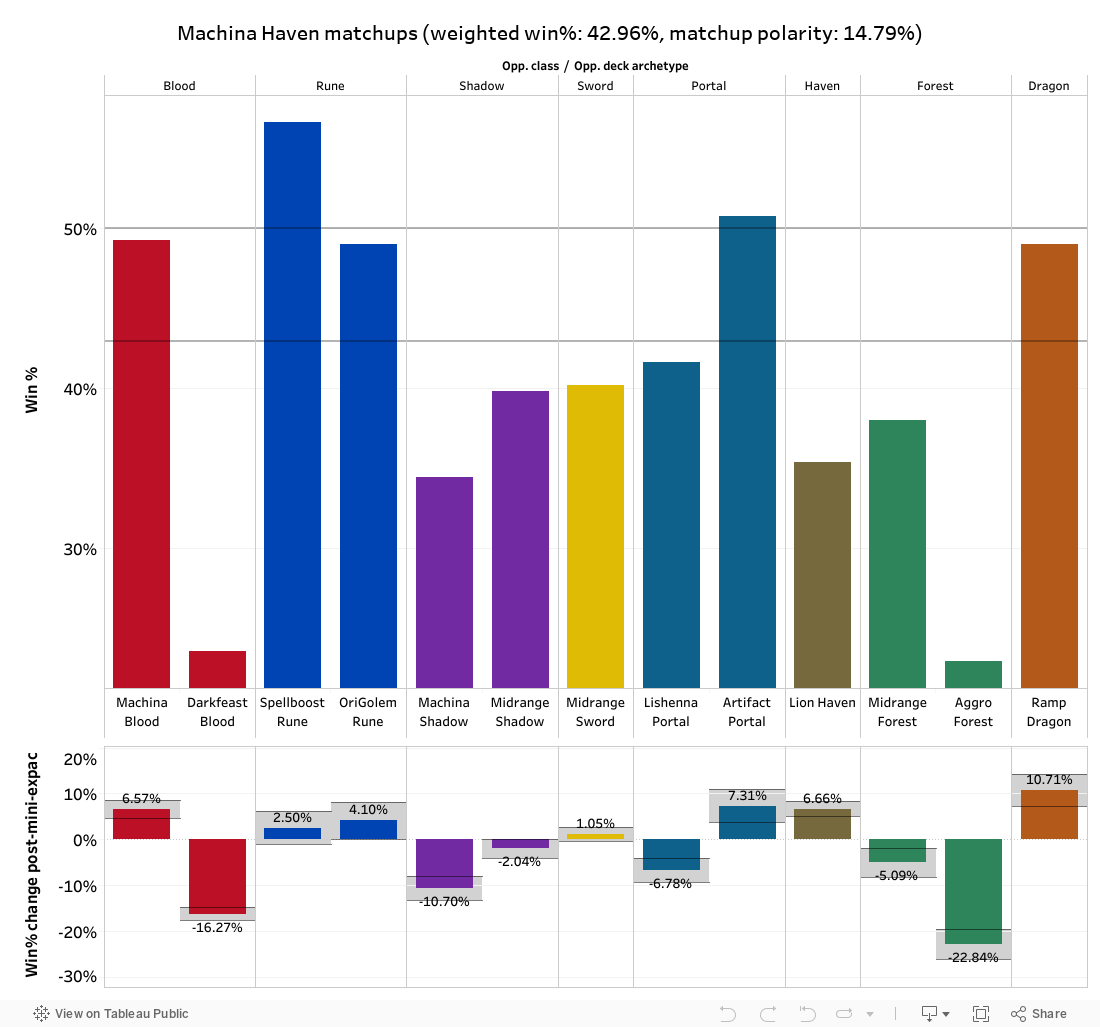
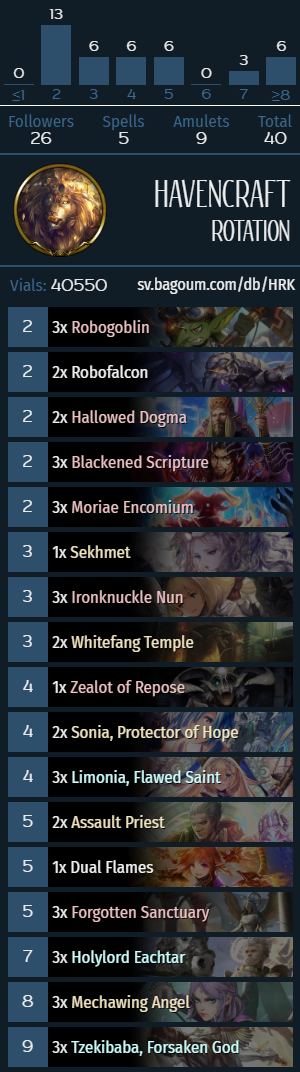
“Machina Haven” is a Shadowlog category that refers to a variety of Limonia decks, the most common of which is probably Tzekibaba Haven. For most intents and purposes, Tzekibaba is basically a less consistent Machina Shadow (it can’t close out games “out of hand” with Gilnelise and the summoned board is worse). Similar to Machina Shadow, the archetype does well against Sword and struggles against Lishenna Portal (because of Destructive Refrain). That said, the fact that the archetype’s Ward only has 4 toughness means that it can’t actually race Lion Haven (4 is an important breakpoint against Lion Haven) and not having a card like Ferry doesn’t help either. While the deck isn’t particularly great currently, with Lion cards rotating out, Tzekibaba Haven could become the “default” Haven deck instead. It does lose Moriae and Whitefang Temple, but even without any new amulets, it can still run 3xSealed Tome, 3xForgotten Sanctuary, 1xDual Flames and 1-2xFeatherwyrm’s Descent to get a full Tzekibaba board, so the archetype (likely) isn’t going anywhere.
The new addition to the archetype is Sonia, and since the deck already plays the Barong Amulet, it does reasonably well against both builds of Rune. Since Rune decks have some new tricks up their sleeve, the matchup isn’t too different from the pre-mini-expansion numbers, however.

[ps2id id=’shadow’/]
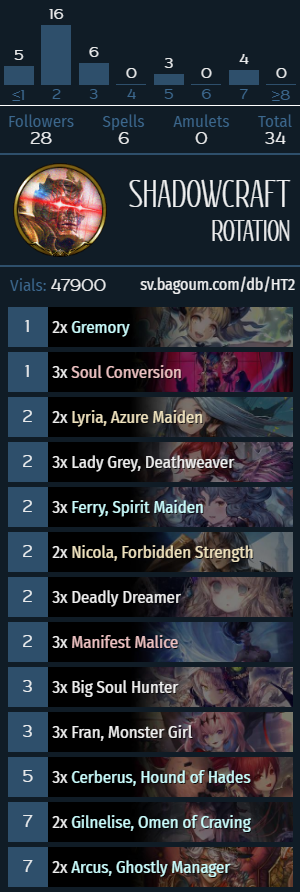
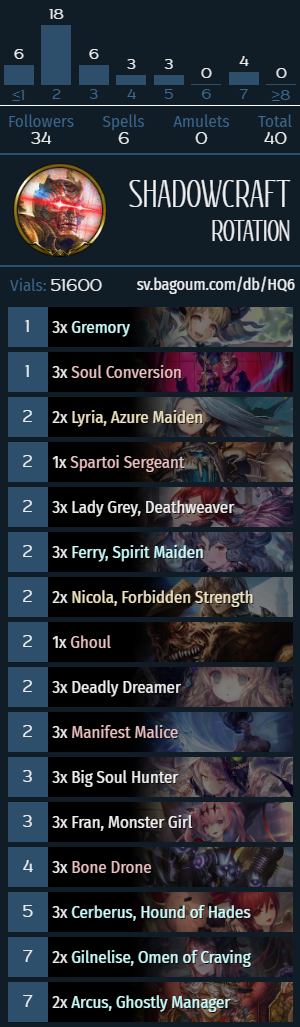
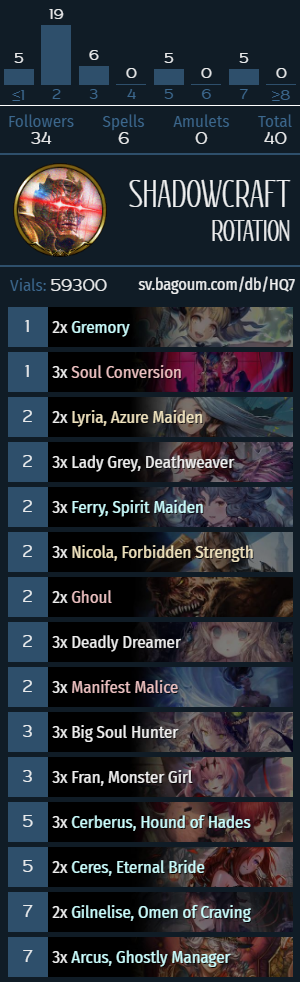
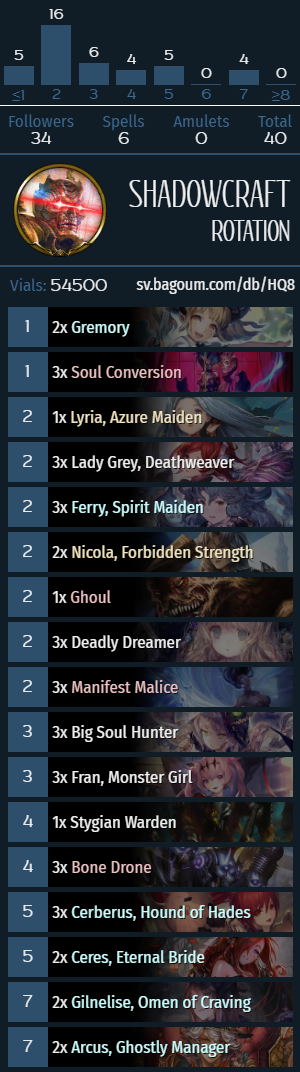
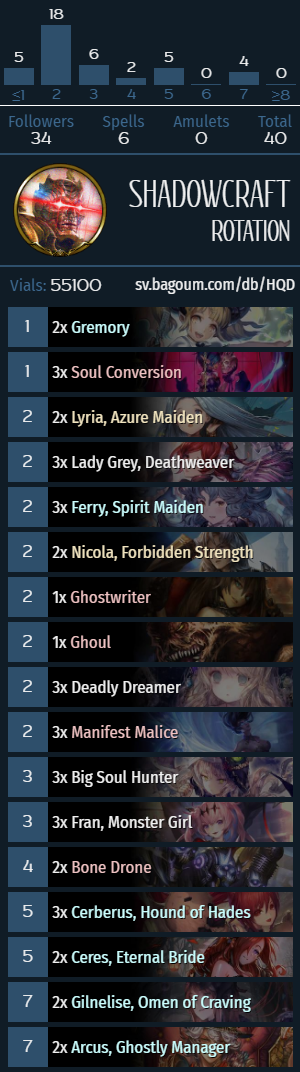
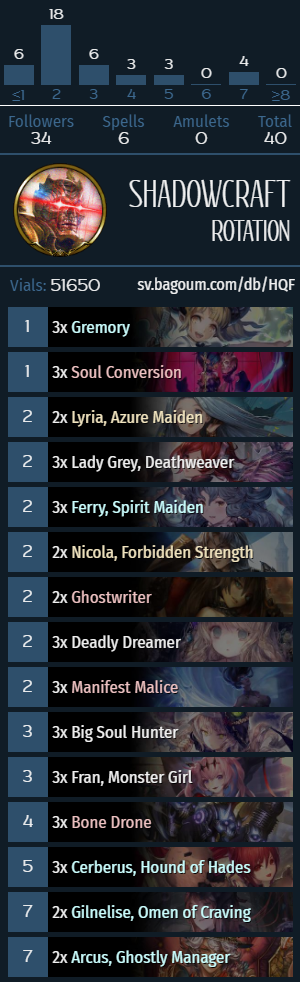
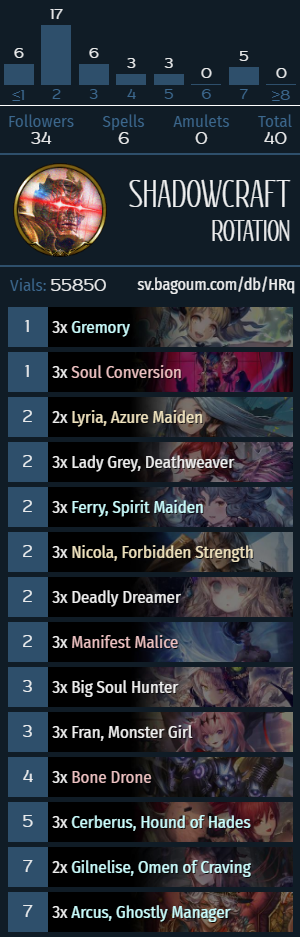
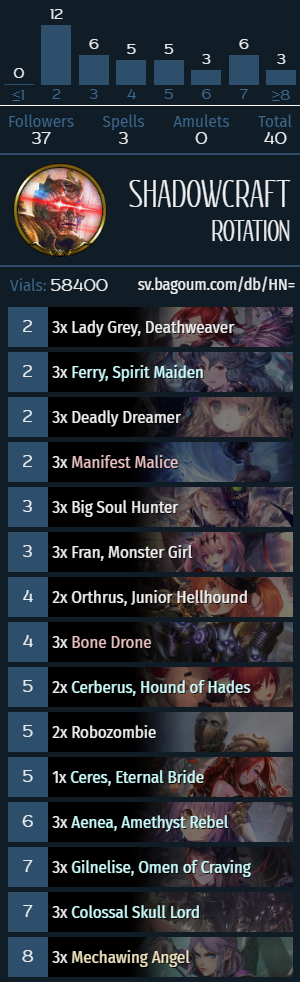
Midrange (a.k.a. Arcus) Shadow
Identifying cards: Soul Conversion, Ghoul, Nicola, Forbidden Strength, Lyria, Spirit Maiden, Arcus, Ghostly Manager.
Mulligan priority
- Always keep Deadly Dreamer, as well as either Fran or Big Soul Hunter.
- Going first, keep Bone Drone.
- Keep Manifest Malice against Sword/Shadow/Haven/Blood. If you’re going first, also keep a proactive 2-drop (Dreamer/Ghostwriter/Ferry/Lady Grey, in order of priority).
- Against Rune/Portal, keep either a Soul Conversion or a Ghoul.
- If you’re keeping a 2-drop and going second, also keep Lady Grey.
- If you’re keeping 2 cards already, keep either Cerberus or Ceres, depending on what your primary win condition is in that matchup (e.g. against Sword, Ceres is preferable, against Rune Cerberus is slightly better).
The mulligan strategy for Midrange Shadow involves trying to have a smooth early game, which mostly means having a 2-3 curve. Shadow’s weak turns are specifically 4 and 6, and while there are certain cute plays (e.g. Ghostwriter+Lady Grey) you can try to aim for to cover this weakness, it’s not a particularly high priority, though it does depend on the specific list you’re playing. Regarding the topic of 5-drops, the basic idea is that Cerberus is generally a better tempo play than Ceres, but if you’re playing a 3xArcus list or facing either Midrange Sword or a Technolord deck of some sort, then there is merit to prioritize Ceres instead.
Tech cards and optional inclusions
- Ceres is an optional inclusion that improves the archetype’s matchups against midrange decks. Ceres is somewhat weak against Rune and (Lishenna) Portal because it doesn’t really pressure the opponent. As a rule of thumb, lists with 3xArcus/Nicola want to include 1-2xCeres, while lists with 2xArcus can get by without Ceres. After the resurgence of Rune following the mini-expansion, Midrange Shadow has gone back to its roots and shifted away from the Arcus-centric build. While lists with Cerberus/Gilnelise have seen fringe success throughout May, the “standard” MidShadow build ran 3xCeres/Arcus because the “deck to beat” at the time was Midrange Sword. This paradigm shift has made the archetype less draw-dependent and generally more consistent since there is less reliance on finding Ceres/Arcus/Ferry for key turns of the game.
- Optional additional 2-drops such as Ghostwriter/Spartoi Sergeant are optional inclusions in the archetype that improve its matchups against midrange decks. Shadow has a lot of other 2-drop that have seen play over the course of the expansion, but generally the two things that MidShadow is looking for in a 2-drop include: being good post-Arcus (which makes cards with Enhance abilities like Buffalo Bones awkward) and a 2/2 statline that can pressure the opponent while not dying to Magic Missile (which makes already mediocre cards like Danua out of the equation). Paradise Vanguard is also a potential inclusion in much the same way, but Ghostwriter is generally strictly better for most board states (since 1 damage is more relevant than the Banish effect and since it enables Ghoul and Soul Conversion).
- Bone Drone is an optional Shadow 4-drop that is actually playable when going first. The card is also fine when going second and has the added benefit of being quite sticky since it comes with 3 bodies, which feeds into things like Big Soul Hunter, sets up for a good Cerberus follow-up and speeds up the “Nicola quest”. Bone Drone also adds a slight element of surprise to the archetype on ladder: since Machina Shadow is generally more popular than the Arcus build, the opponent can sometimes be tricked into believing that you’re playing Machina Shadow if you never play any of the Arcus-specific cards (Nicola/Soul Conversion/Ghoul/etc.). Generally, it’s not all that relevant because most decks have the same plan against both of the two Shadow builds, but it’s a cute aspect of Bone Drone.
- Stygian Warden is a tech card against Blood (more specifically, DFB) that can answer evolved Vira. Shadow has no good way of clearing an on-curve Vira, especially with Wings of Lust, so Warden sees play whenever this interaction is relevant. For most intents and purposes, Warden is basically a Shadow-specific Seraphic Blade that is worse against Lion Haven and is overall redundant with Big Soul Hunter in most matchups.


What does Midrange Shadow do?
Midrange Shadow is an archetype that is characterized by playing midrange Shadow cards on curve and closing out games using either the leader effect of Arcus or by setting up a Gilnelise on prior turn and using Ferry‘s turn 10 effect to do triple damage. The basic Gilnelise setup involves playing the card by turn 9, then playing Ferry into either Gilnelise or Gremory for 15 damage. The basic Arcus setup involves either saving a Lyria or discounting any 2-drop with Ceres‘s Spell token, then generating 2 Ghosts on turn 10, then playing Ferry into either Gremory or Gilnelise, which does a variable amount of damage from 20 to 25. In addition to that, Arcus‘s leader effect allows to play Nicola over and over, generating 2xGhosts for every 2 mana spent and getting the Forbidden Art tokens, which can set up a 14-damage turn 10 that dodges Wards, so long as you can amass 19 Shadows.
The defining characteristics of the archetype include the inevitability engine of Ferry and the interaction of the Nicola-Arcus “loop”. Unlike other midrange decks, Midrange Shadow isn’t good at developing a board in the later stages of the game, but has a lot of reach to compensate for it.

Midrange Shadow is generally considered the third or fourth best competitive deck in the format (fairly close with Rune) and is probably the most consistent Rotation deck overall. Midrange Shadow’s winrate on ladder is somewhat exaggerated since the most popular matchups of the archetype (Machina Blood and Lishenna Portal) are extremely good matchups for the deck. In competitive play, the deck can struggle against archetypes with faster win conditions, most notably Lion Haven and Dirt Rune, which can win games before turn 10. Generally, Midrange Shadow has a lower “high-roll ceiling” than decks like Lion Haven and both types of Rune, but the “floor” is also a bit higher since Midrange Shadow has less draw variance than those decks; which makes it a flexible and highly competitive archetype.
After the mini-expansion, the majority of MidShadow matchups have not changed (within margin of error), with the only exception being both builds of Rune (which got better across the board) and Darkfeast Bat Blood. The archetype has become better against DFB because it started to include more proactive cards like Bone Drone and Cerberus that generate multiple bodies; DFB lists have a limited number of answers (read: Evil Eye Demon) to wide boards and MidShadow now has an easier time running DFB Blood out of answers.
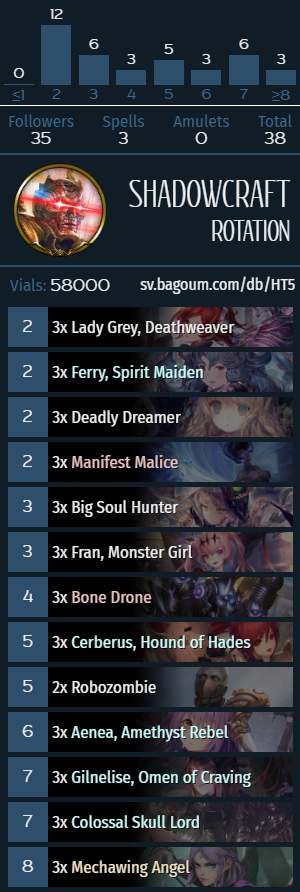

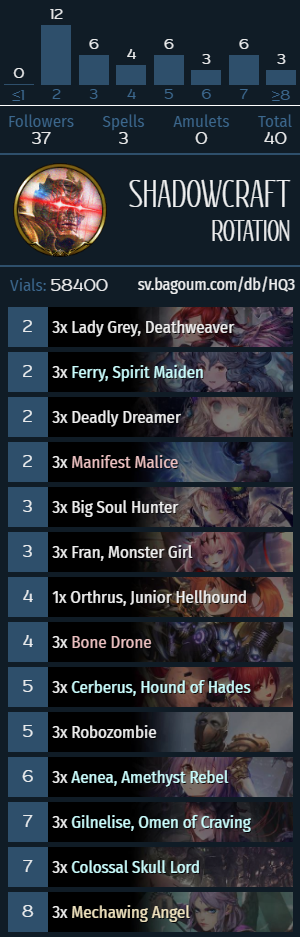


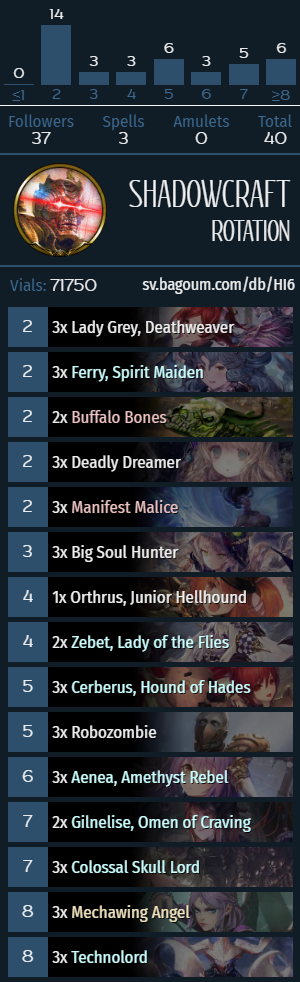
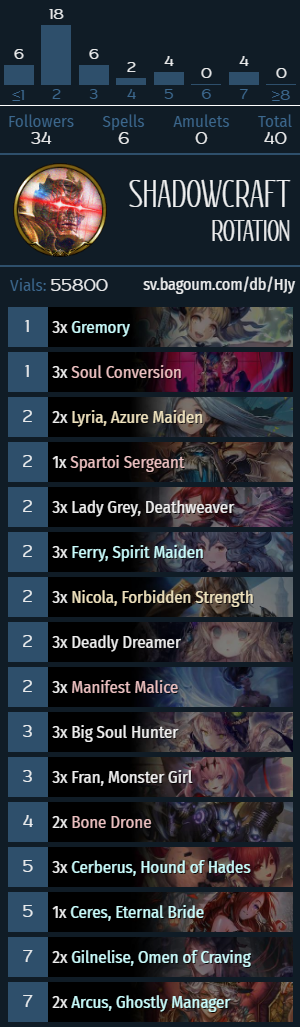
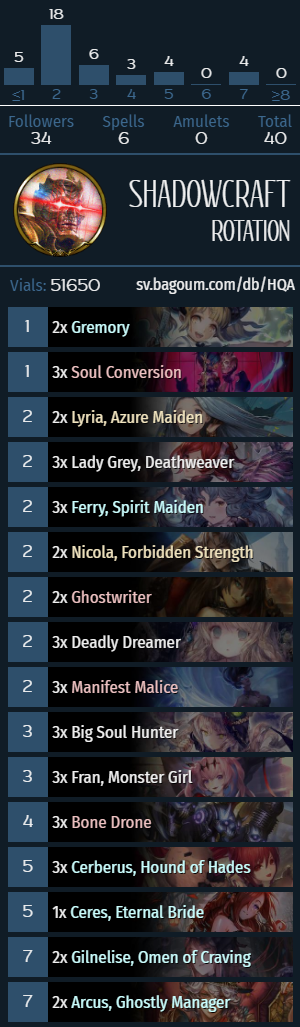
Machina Shadow
Identifying cards: Mechawing Angel, Aenea, Robozombie, Colossal Skull Lord.
Mulligan priority
- Always keep Deadly Dreamer, Fran or Big Soul Hunter.
- Going first, keep Bone Drone.
- Against Sword/Blood/Shadow/Haven, keep Manifest Malice.
- If you’re already keeping a card, keep Cerberus/Ceres.
- Against Sword/Haven/Blood keep Aenea.
- Against Sword/Shadow, keep Orthrus.
Machina Shadow mulligans are basically a simpler version of Midrange Shadow, the main difference between the two decks is that Machina Shadow has more playable 2-drops (because it doesn’t run Lyria/Nicola/Ghoul but has Mechawing Angel), so keeping 2-drops isn’t a high priority. Since the deck has so many conditional and high-cost cards, I personally tend to mulligan 2 or more cards the majority of the time and only keep cards that fill specific points of the curve (turns 3 and 4) or cards that are good in the matchup. The deck has a bit of a “Lishenna effect” where most of the cards in the deck don’t really have any strong function or particular synergy, and some cards are either matchup-dependant (e.g. Aenea) or cards that you don’t want to actually ever draw from you deck (e.g. Robozombie).
Tech cards and optional inclusions
- Orthus is a tech card against Midrange Sword and both builds of Shadow. Compared to Arcus Shadow builds, Machina Shadow has an easier time generating enough Shadows for Orthrus (e.g. Mechawing Angel gets 3 Shadows by itself), and the effect is powerful if you can consistently have it active on curve.
- Ceres is a tech card against midrange decks and Dirt Rune that can trade fairly efficiently and provide a bit of extra healing. Since Machina Shadow usually doesn’t run any sort of card draw and the neither of the deck’s 2 win conditions (Fleeting Joy/Gilnelise) can be discounted with Ceres‘s Spell token, the value of Ceres is quite limited and the card is primarily run for its main body.
- Technolord is a card that used to be run in the Colossal Skull Lord card slot as part of the “Aenea package”, and if you cut Bone Drone, you can still include Technolord to get a bit of extra oomph out of Fleeting Joy. There are 2 problems with this idea: on one hand, Bone Drone is a good early game card so you shouldn’t really cut it, and on the other, the card that feeds the most into Technolord‘s damage is actually Bone Drone, so this build of the deck doesn’t quite tick and only makes the deck more susceptible to bricking.
- Gremory is an optional inclusion in the archetype that makes the Aenea wincondition slightly more consistent. The play pattern with Gremory is that you resolve a Fleeting Joy or try to stick 2 or more Assembly Droids on turn 9. Following that, you can play Ferry into Gremory on turn 10, in a similar fashion to what Arcus Shadow sets up with Ghosts. Unlike Gilnelise, this line of play lets you clear a Ward with 4 or less toughness, which can be relevant against things like Dragon Knights and defensive Celia. The problem with Gremory in Machina Shadow is that it does less than Gilnelise by itself and has awkward anti-synergy with Colossal Skull Lord (since they’re both EoT effects and Skull Lord usually goes off first).
Miscellaneous notes
- Machina Shadow has 2 primary macro play patterns that it can follow: the plan involves playing either Fleeting Joy or Gilnelise on turn 9 (or possibly earlier with Gilnelise) and then closing out the game with Ferry and/or Gilnelise on turn 10. Sometimes you don’t really get a choice and have to play whichever win condition you were dealt, but when you have both an Aenea and a Gilnelise, you can choose the plan based on matchup and play accordingly. The basic idea is to try to go for the Aenea win condition against midrange decks like Midrange Sword and Lion Haven that can’t answer a 15-power board, and to set up for Gilnelise against decks with efficient removal options (e.g. both builds of Rune and Ramp Dragon) and saving Fleeting Joy to prevent yourself from dying to burst damage (usually not particarly relevant, but can save 2-3 points of health against a big Adjudication, for example). This is by far the most complicated part of playing the archetype and takes a bit of time to get used to if you’re familiar with Midrange Shadow.
- This is more relevant for Machina Shadow builds, but if you’re playing Shadow and setting up Gilnelise as a finisher and don’t have a Ferry yet, it’s important to dump cards from your hand down to 3 to maximize the chances of finding the card you need. In a similar vein, against Rune you often have to look for Big Soul Hunter in the same scenario (to answer the Adjudication token), and the same logic applies.
- When playing against midrange decks, if you’re going for the Fleeting Joy plan, try not to board lock yourself on turn 8, especially if you have a Ferry in hand (since you need to discard 2 followers for Ferry). With that said, if you have both a Fleeting Joy and a Gilnelise in hand, it’s fine to overextend on turn 8, because if the opponent leaves your board up, Gilnelise can push a lot of face damage.
- Against decks that can answer Gilnelise with random damage, you have to sometimes preemptively evolve it to play around that. This is specifically relevant against Belphomet decks to play around the Belphomet token that does 5 random damage and can occasionally be relevant against Technolord decks and Ivory Sword Dance if the 5-damage breakpoints line up for the opponent.
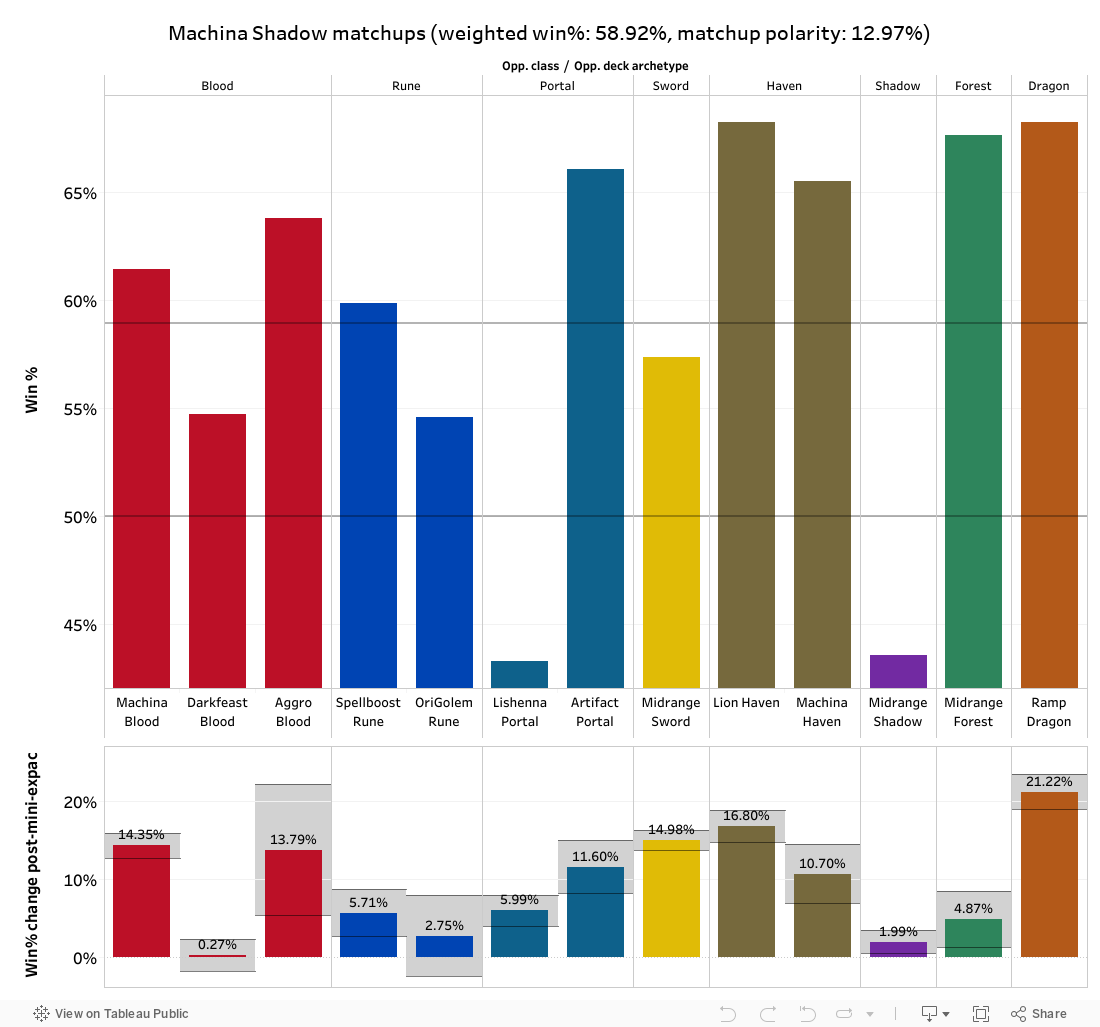
Machina Shadow is currently the best-performing ladder deck of the Rotation format, although winrates in specific matchups seem somewhat fishy. It does make sense for the deck to be favored against midrange decks like MidSword and Lion Haven, but the 60/40 Rune matchups don’t really line up with my personal data based on playing the matchup from both sides of the table. In my experience, Dirt (Golem) Rune is heavily favored against Machina Shadow because it can capitalize on Machina Shadow’s weak turn 8 by saving 1-2xZealots of Truth with an Adjudication for that moment, which is usually backbreaking for Machina Shadow. It does make sense that Machina Shadow would have a high winrate in ladder games because the deck is extremely linear and simple to play, but a lot of the deck’s matchups do seem somewhat eyebrow-raising.
Currently it seems that Machina Shadow is a reasonably competitive (though less so than Midrange Shadow) deck, and it’s likely that the archetype will become the “default” Shadow deck after Arcus rotates out. The deck has its weak points, however, which include its rigid deckbuilding (since the “Aenea package” takes up so many card slots, there isn’t much room for tech cards), high draw variance (the deck runs no card draw and needs to find specific cards to win games) and low amount of relevant decision-making (Machina Shadow is mind-numbingly boring to play); these weaknesses are holding it back from tournament viability, although it has seen some fringe success already and will likely see more of it in the upcoming weeks once players start to find lineups to fit the deck into.

[ps2id id=’rune’/]
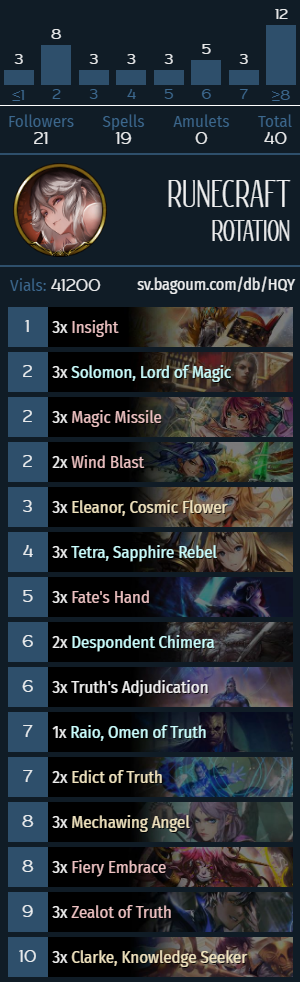
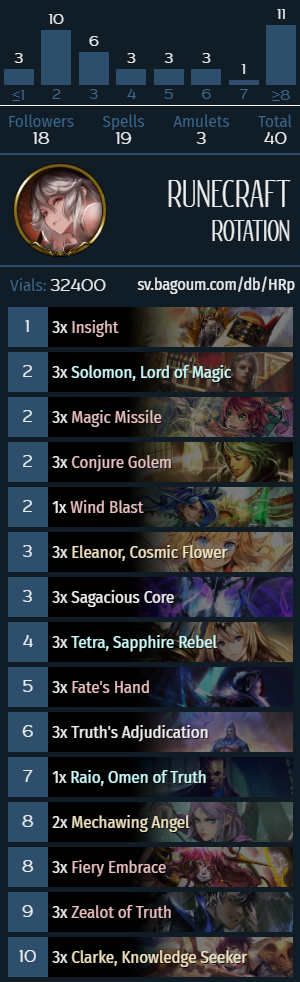
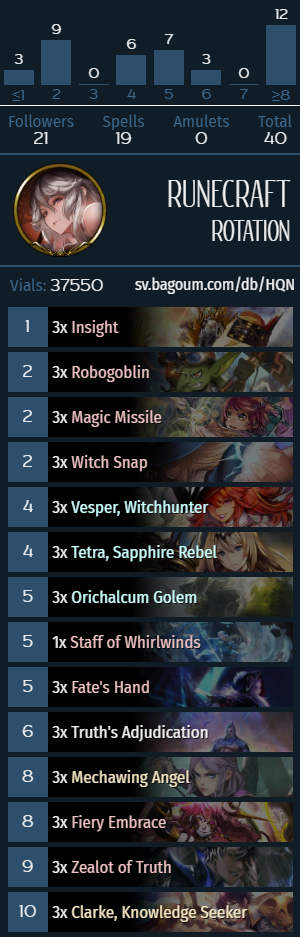
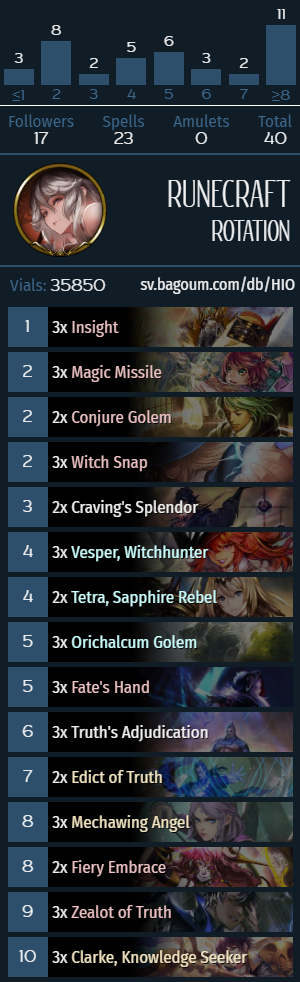
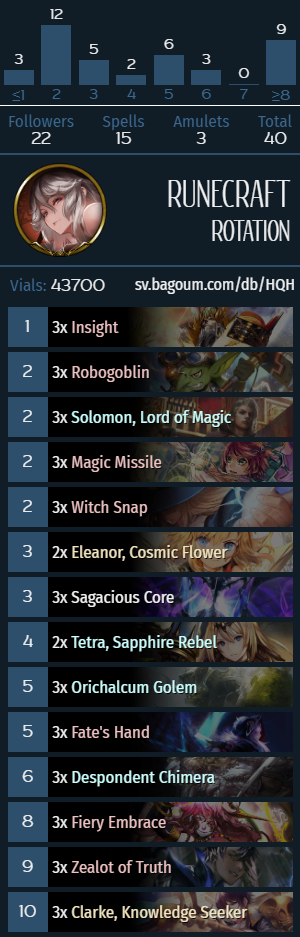
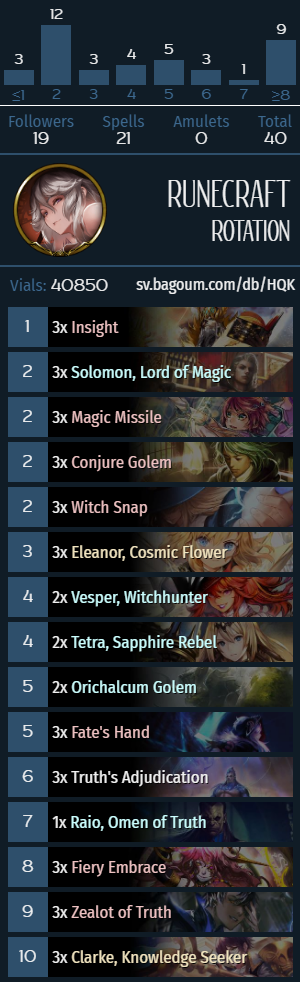
Spellboost Rune
Identifying cards: Solomon, Lord of Magic, Conjure Golem, Sagacious Core, Raio, Prophetess of Creation.
Mulligan priority
- Always keep Insight, Solomon, Fate’s Hand.
- Going second, keep Sagacious Core. Against slower decks (Rune mirror/Portal/Haven/Dragon) keep Sagacious Core even when going first.
- Going first, keep a proactive 2-drop (Solomon/Mechawing Angel/Conjure Golem/Clarke). Against Rune/Portal, Magic Missile is also a fine keep.
- Going second against Sword/Shadow/Blood, keep Tetra/Eleanor. If you have a 2-drop and are going first, it’s fine to keep Eleanor as a 3-drop as well.
The mulligan strategy for Spell-based Rune decks involves trying to find card draw and contesting the board. Solomon is generally a fine play on 2, but if you have a different 2-drop, it’s better to play it off-curve for more flexibility later in the game. In the Rune mirror, you want to find card draw even more, which makes cards like Sagacious Core a higher priority. Sagacious Core is generally not a card that I like to keep, because even in the absolute best-case scenario (Core on 3 into Tetra on 4 going second) you often end up burning one of the Insights if your 2-drop wasn’t exactly Mechawing Angel/Conjure Golem/Wind Blast.
Tech cards and optional inclusions
- Conjure Golem is an optional 2-drop that improves the deck’s matchups against midrange decks. Spell-heavy Rune decks often have a problem where their “2-drops” are not really playable on turn 2 (e.g. Wind Blast/Magic Missile/Clarke) and Conjure Golem helps fill that hole in the curve when going first. Previously, Robogoblin has also seen play in that card slot, but Robogoblin is slower than Conjure Golem in a lot of cases.
- Prophetess of Creation is an optional inclusion in the archetype that provides inevitability aganst decks with a lot of healing (namely, Lishenna Portal). Prophetess usually needs some additional 7-drops (Raio/Edict of Truth) because Solomon requires so much setup. Prophetess can’t really come into play before turn 10 because, on one hand, the card is at most a 1-of, and on the other, because Rune doesn’t really have any 10-drops that it can cheat into play (with the exception of Seal of Solomon for 10, which takes a lot of setup and is a bit of a waste), and playing both Prophetess and Flame Destroyers in the same list is way too clunky. Prophetess is generally considered too slow and overall unnecessary.
- Raio, Omen of Truth is an optional 1-of that works really well with Solomon. Spellboost Rune has a unique ability to run “toolbox” followers, meaning that you can run a specific follower for each mana cost, which guarantees that Solomon can fetch exactly what you need when it’s good for the matchup. To this end, Raio is a fine 1-of that adds a lot of value to the deck and takes very little card slot investment. Raio works particularly well with his “signature” spell, Edict of Truth, although regular card draw effects like Fate’s Hand go up in value as well. The opportunity cost of playing a 1-of Raio is extremely low and while the card is optional, it feels like a waste not to run.
- Edict of Truth is an optional inclusion and basically a bigger Fate’s Hand: 9 is more than 5, but Edict also draws 1-2 more cards than a Fate’s Hand and never overdraws any cards! Being a “free” spell itself, Edict can set up bigger Adjudications and discount crucial pieces like Fiery Embrace and Zealot of Truth. Edict is commonly played at 1-2 copies.
- Spellboost Rune has other “greedy” tech options, e.g. Flame Destroyers/Despondent Chimeras. Even a fully Spellboosted Despondent Chimera is quite clunky since it still costs you 3 mana and Flame Destroyer can get stuck in your hand depending on the board state. There certainly are matchups where Flame Destroyers can really shine (e.g. Lion Haven/MidSword) if you set up a big tempo swing turn, but I personally really dislike both of these options because they’re bad in the mirror and generally increase the draw variance of the deck.
- Witch Snap and Magiblade Witch are both possible inclusions that improve the consistency of having early plays. Both of these cards shouldn’t be played as more than 1-ofs because Spellboost Rune doesn’t actually have any possible way to get rid of the Sigils (outside of fringe cases where you played Raio and redraw a new hand with Clarke, which is rarely actually good and doesn’t come up often). Clogging up the board is not a particularly big problem, but hand size management can be a real issue, so I personally really dislike Witch Snap, but a 1-of Magiblade Witch can be fine.
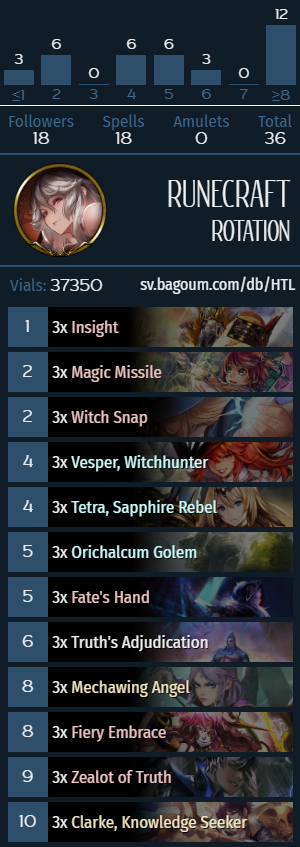
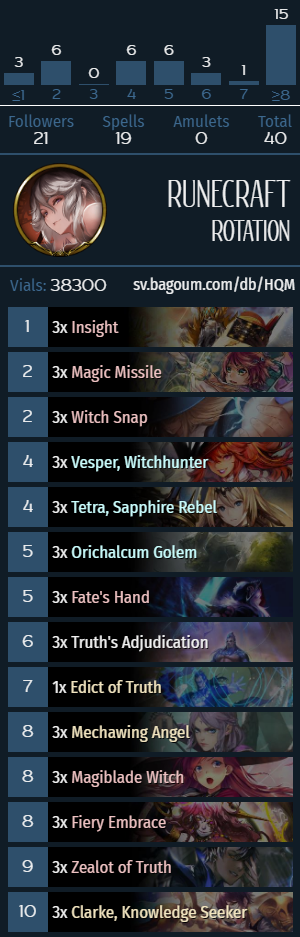
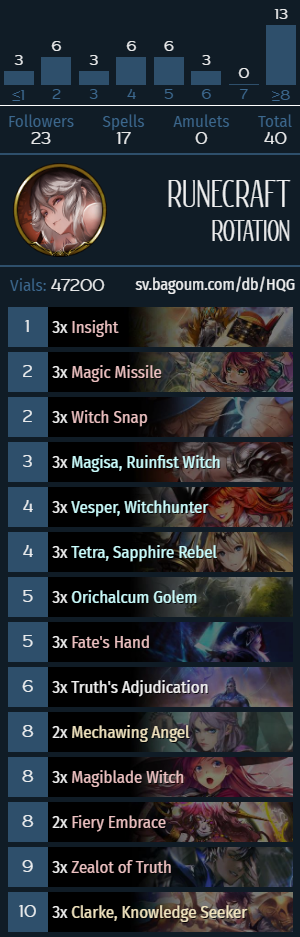
Spellboost Rune skeleton
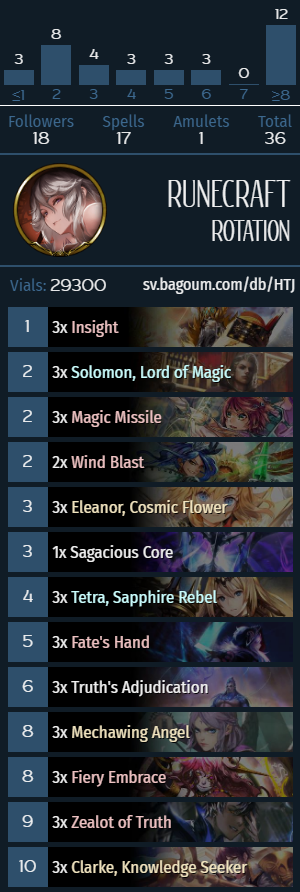
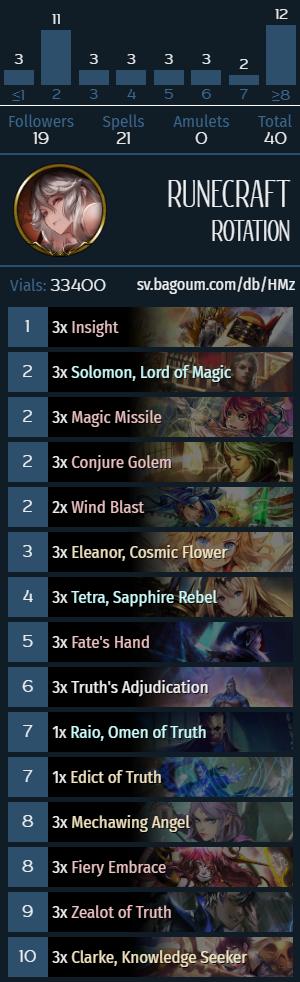
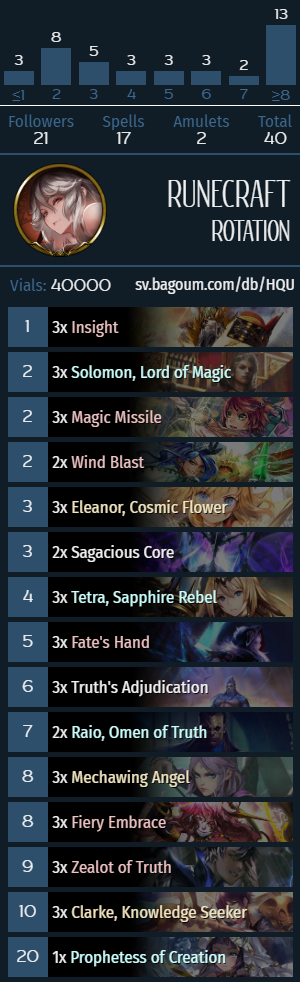

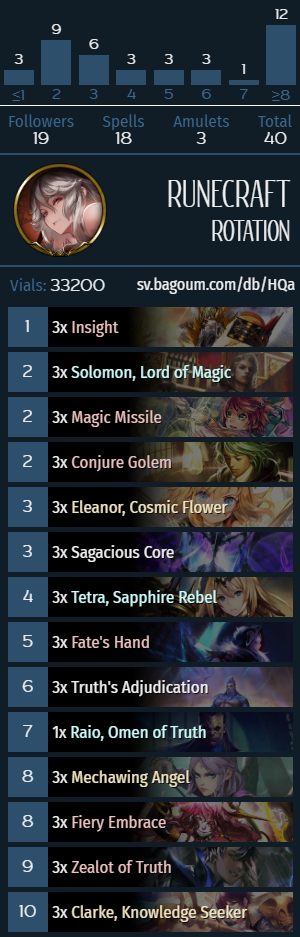
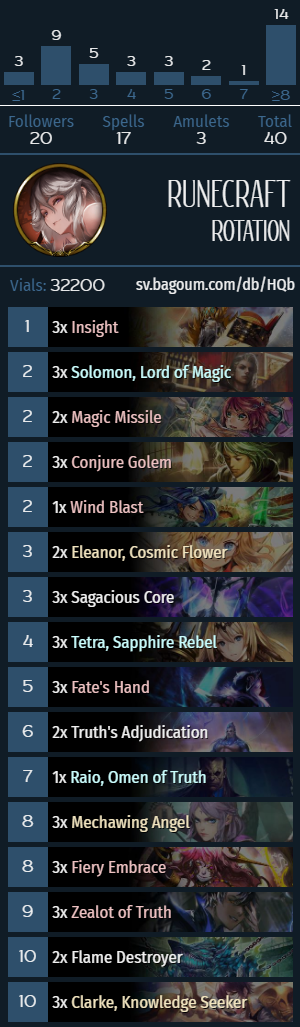
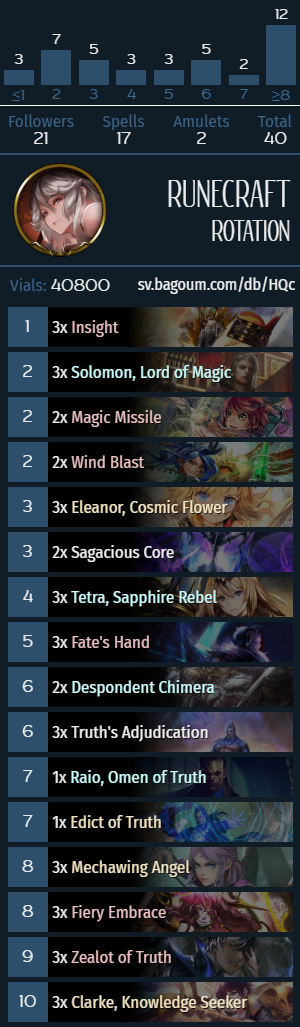
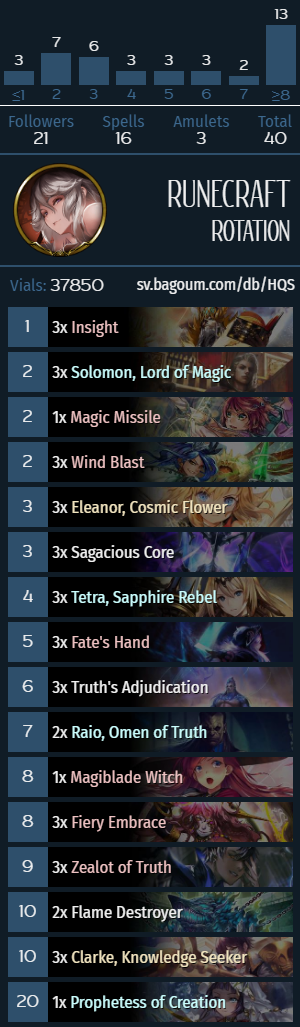
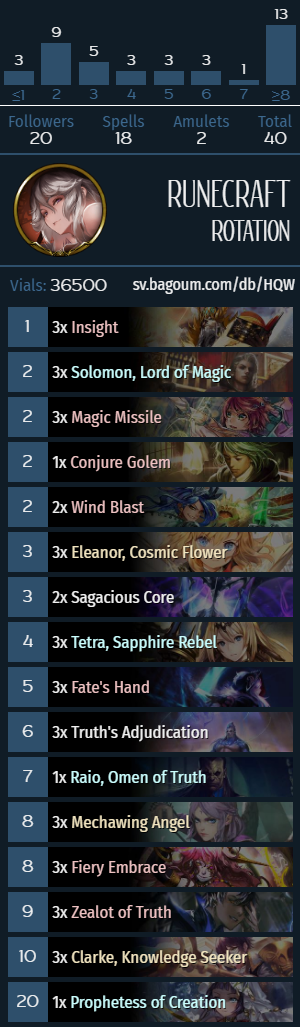

What does Spellboost Rune do?
Spellboost Rune is a reactive tempo deck that utilizes synergy between Spellboost cards and cheap spells (as well as Accelerate effects). The main win condition of the archetype is combining burst damage from Truth’s Adjudication, Zealots of Truth and Clarke, often set up over 2 or more turns with multiple Adjudications. The defining characteristics of the archetype include high amount of card draw, powerful tempo swing turns and a suite of high-tempo Runecraft removal.
Miscellaneous notes
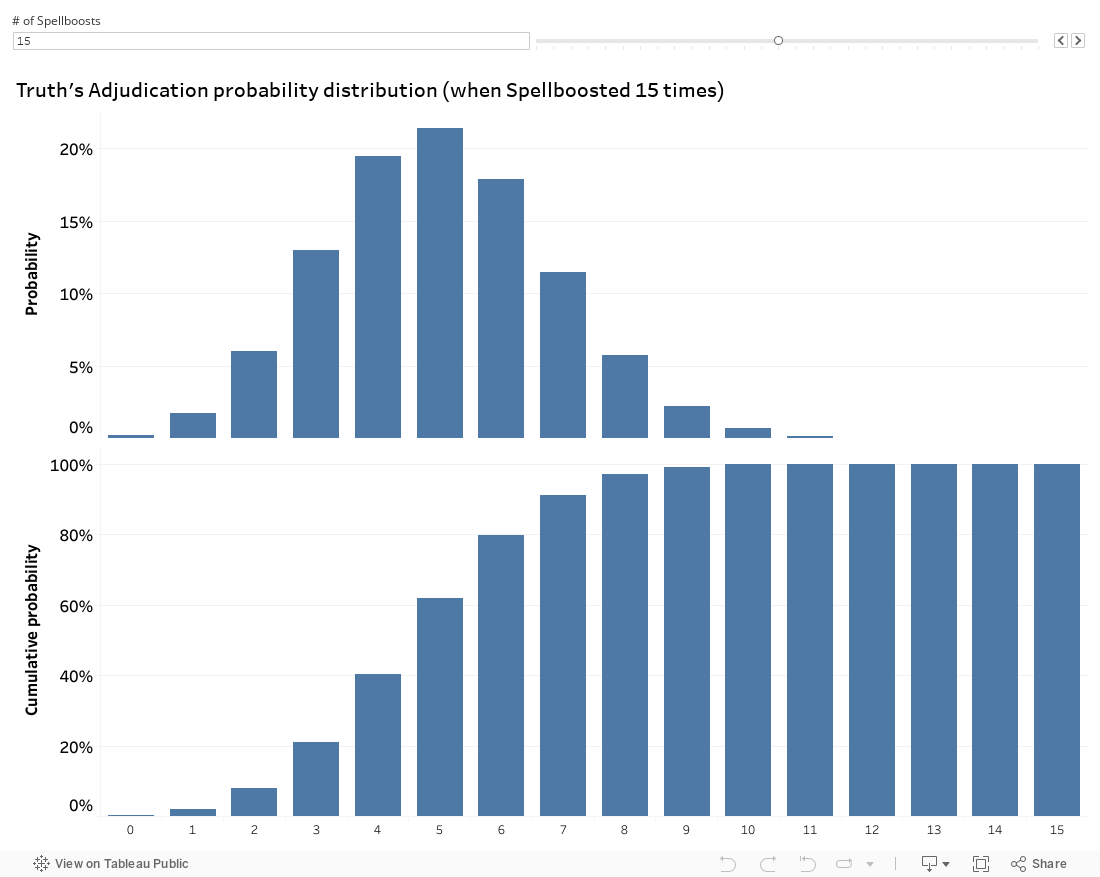
- Rune decks in general have some random variance to their win condition, in the case of Spellboost Rune this is caused by Truth’s Adjudication dealing a random amount of damage. The exact probability distributions for the card can be found in Addendum 1, but a simple estimate is that each of the (N times Spellboosted) Adjudication outcomes is on average equal to N/3, with a sigma of ~0.47 multiplied by square root of N; a simple heuristic here is that the standard deviation of Adjudication outcomes is a square root of N divided by 2. For example, if an Adjudication is Spellboosted 16 times, it is going to do 5.33±2 damage, or if it was Spellboosted 9 times, it will deal 4.66±1.5 damage. 68.2% of the time, it works every time!
- With the previous point in mind, it is important to count how much damage you need to close out the game and plan accordingly, taking into account how much healing or Wards (if any) your opponent has access to. Spellboost Rune is generally a pretty reactive deck, but against decks with an obvious clock (like Midrange Shadow or DFB Blood) it’s extremely important to start planning 2-3 turn lethal setups to close out games. Picking the right moment to switch gears is extremely matchup-dependant and is by far the most difficult part of playing Spellboost Rune.
- Solomon is one of the more skill-testing cards in the archetype since it requires you to keep track of what you have in your deck and what you’re trying to find depending on the matchup. Generally, the best followers to aim for are Raio and Mechawing Angel, but there are fringe cases where you can settle for a Tetra (if the original Solomon was Spellboosted 3-4 times), Zealot of Truth (if you need more damage) and even Clarke (comes up very rarely and takes a lot of setup, but can create opportunities for powerful 15+ mana turns, so long as you don’t discard your hand accidentally). A more general point with Solomon is that (in my experience), unless you desperately need a 2-drop, it’s better to only play Solomon after you Spellboost it 3-4 times, which is pretty easy to do in the early game with Eleanor in particular.
- In Rune mirrors or when playing against Rune in general, it’s important to keep track of how much Seal of Solomon costs (displayed in the Battle Log when Solomon is played) and how many times it has been Spellboosted while in the Rune player’s hand. There are some uncertainties caused by Eleanor, but having more information is indisputably an advantage if you’re trying to be competitive.
- Tetra is a card with a bit of interesting associated sequencing. Most of the time, you evolve the card, make the attack and then either heal it with Repair Node or use Delta Cannon to clear a 2-toughness follower. Restoring 3 health to a follower is (usually) more valuable than restoring 1 to your leader, primarily because of the age-old adage: “tempo = good”, and healing your leader is more or less 0 tempo. Regarding Delta Cannon, the condition very rarely comes up, but is something to watch out for with Tetra into Tetra curves, of in the specific case of going first and have a Sagacious Core in play with Tetra and Mechawing Angel in your hand on 5.
Addendum 1: Truth’s Adjudication probabilities
Below is a simple histogram that shows the probability of having a specific number of a particular outcome from Truth’s Adjudication based on the number of times the card has been Spellboosted. The number of Spellboosts can be adjusted in the upper right corner. The upper chart shows the probability of having exactly X as one of the outcomes, while the lower chart shows a cumulative probability profile, meaning the probability of having X or less be the outcome.
Spellboost Rune matchups
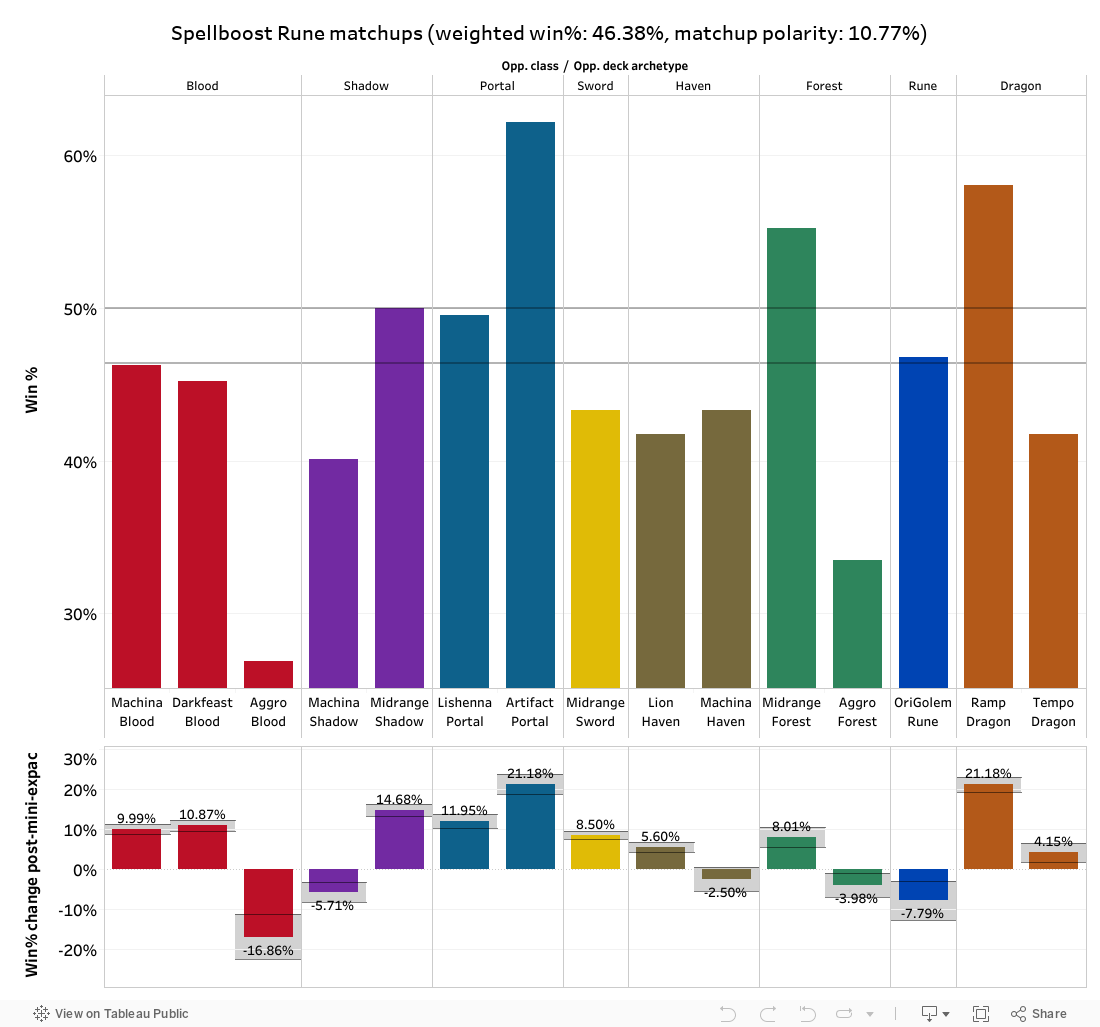
“Machina Rune” is the primary designation for Spellboost decks on Shadowlog, and ladder data suggests that the archetype is weak to all types of Blood decks, Machina Shadow and Lion Haven. Most of these matchup percentages make sense, but the Machina Shadow matchup is a little questionable (in my opinion). Spellboost Rune is seeing relatively frequent success in tournament play, primarily because it’s favored against Midrange Sword, about even against Midrange Shadow and mildly unfavored against Lion Haven. This makes the archetype good for the Conquest format, because Rune has a good shot of taking a match off of Sword.
It should also be mentioned that Rune data is quite limited because of Shadowlog not having proper category names for these types of Rune decks, so it’s quite likely that the ladder data doesn’t tell the whole story. This factor, combined with the (relatively) high skill ceiling and abundance of tech options, makes it so that the winrates of Spellboost Rune are a lot higher in practice than its ladder numbers would suggest. In my opinion, Spellboost Rune is the 4th (or 5th) best deck of the Rotation format and only really loses to highly-polarized decks like OBK Blood and Aggro Sword when piloted optimally; although it could simply be that both builds of Rune are (pardon the F-word) extremely fun to play so I’m inclined to practice Rune more than other decks, which causes bias in my perception.
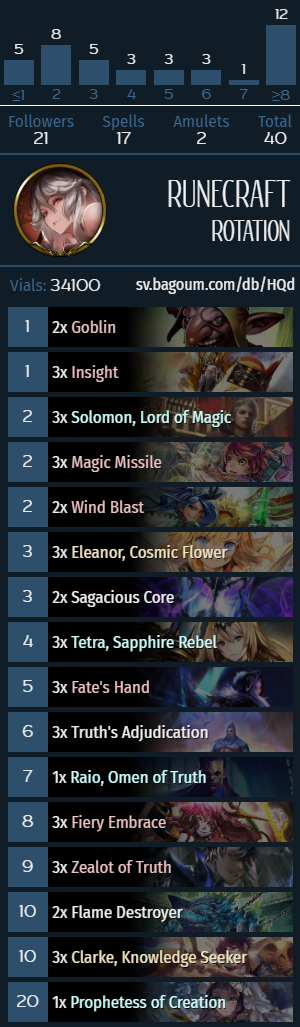
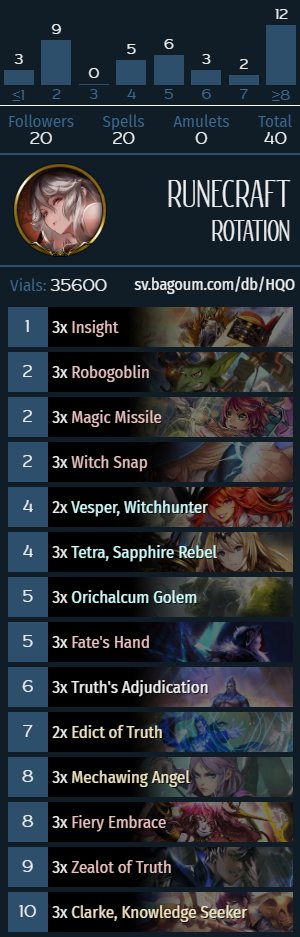
Dirt Rune skeleton

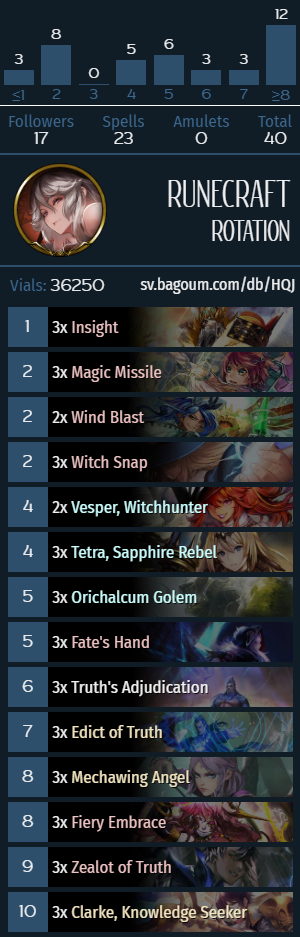
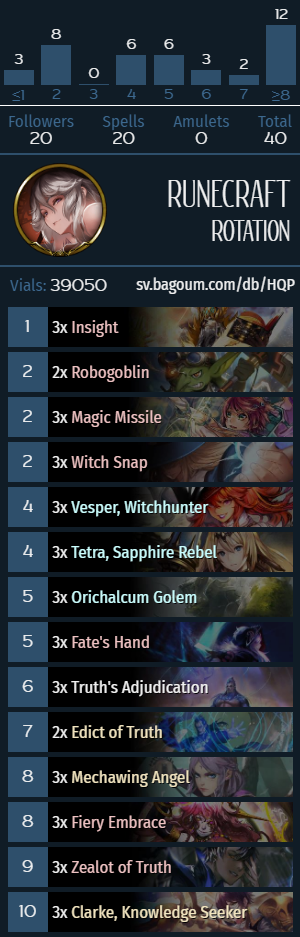
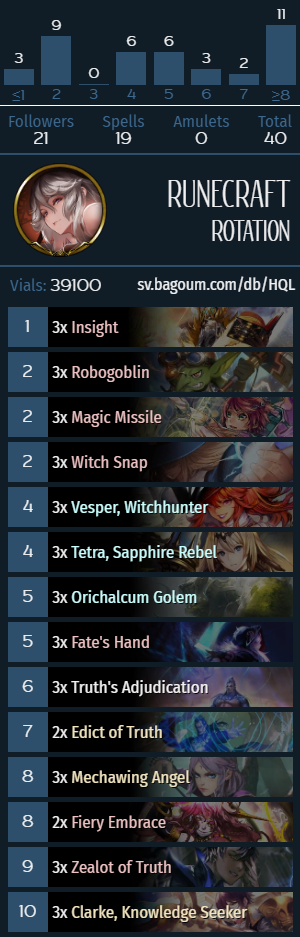
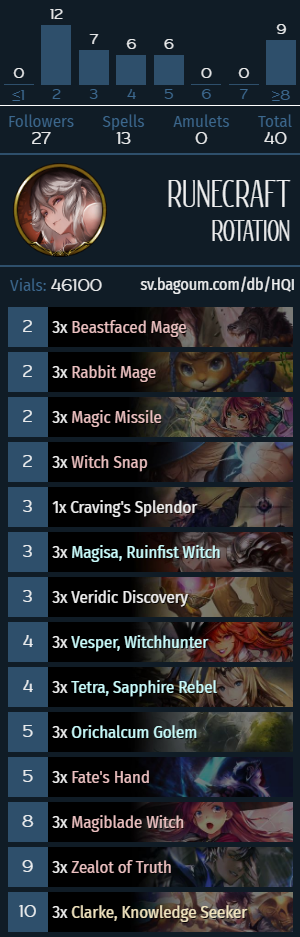
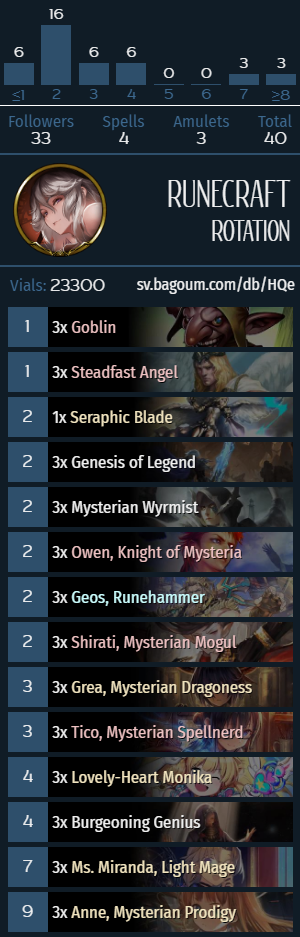
Dirt (a.k.a. Burn a.k.a. Orichalcum Golem) Rune
Identifying cards: Witch Snap, Magiblade Witch, Vesper, Orichalcum Golem.
Mulligan priority
- Always keep Insight and Fates’s Hand.
- Against non-Sword/Haven classes, always keep Orichalcum Golem.
- Against non-Rune/Portal classes, keep Witch Snap.
- Going second, keep Tetra.
- Going first, keep a playable 2-cost card (Clarke/Mechawing Angel/Robogoblin/Magic Missile/Vesper, in order of priority).
- Against Sword/Shadow/Haven, keep Wind Blast/Eleanor.
- If you’re already keeping OriGolem, also keep Magiblade Witch/Vesper.
The mulligan strategy for Dirt Rune is slightly more straightforward than in the Spellboost build, primarily because Dirt Rune is a lot more proactive in the early game. Orichalcum Golem is a key card in the archetype because it creates a large chunk of necessary damage and clears out the Earth Sigils that you can’t really get rid off otherwise. The general plan is to keep OriGolem, play it on turn 5, then play out the leftover Earth Sigils (from Witch Snap, for example) and then use the Accelerate. With that said, you don’t want the OriGolem do get Banished or, even worse, stolen by Octrice, so you have to either not avoid keeping it in the mulligan or never play it for 5. It’s debatable whether keeping OriGolem is a good idea against Portal, but most Lishenna lists don’t run Lococo, and on the off-chance that you’re playing against Artifact Portal, you get more than enough time to set up Earth Sigils in the conventional manner and should obviously avoid playing it as a follower.
Tech cards and optional inclusions
- Magiblade Witch is an optional inclusion that I personally consider core as at least a 2-of. Magiblade Witch speeds up the deck’s clock by a lot since it generates more damage with OriGolem and discounts your expensive Spellboost cards like Zealot/Adjudication/Fiery Embrace. The downside of playing Magiblade Witch is that the card costs 8 while in your deck, which makes the deck’s curve ugly when you export the decklist. Strictly worse than Commence Experiment!
- Wind Blast and Eleanor are tech cards against Midrange Sword and Lion Haven. Depending on the local meta you’re facing and how afraid you are of these matchups with your build of the deck, it’s good to play 1-3 copies of these cards. There is no shame in borrowing tricks that work in the Solomon deck if it makes the deck’s bad matchups more tolerable.
- Edict of Truth is a sweet 1-of that helps with the deck’s tendency of not having OriGolem on time. Edict salvages games in which you have 2-3 Sigils in play without any way to cash them for anything, effectively making you board-locked. In those cases, you can just dump as many cards as you can, then Edict on 7 (even without the mana refund), which usually either finds you the OriGolem or enough gas and/or damage to actually do something. I personally think that playing more than one copy of Edict gets extemely clunky, but a 1-of Edict is more or less core in my opinion.
- Magisa is an alternative way to cash in a lot of Earth Sigils for some damage. The problem with my Magisa in my experience is it’s worse than OriGolem for most intents and purposes: it costs more, doesn’t Spellboost your hand, and doesn’t add two Sigils by itself and the damage profile is worse. With N Sigils, OriGolem on average does 1.66N damage and summons 0.33N Clay Golems; with Magisa, the damage distribution is 0/0/3/6, meaning that it does less than OriGolem at every point of the distribution and has a way lower ceiling (OriGolem can get up to 12 damage with 4 Sigils, for example). The cool thing about Magisa is that you can evolve it for 2 extra damage, which is relevant against Portal and in the Rune mirror, however, I still think that Magisa squanders Earth Sigils and is a bad play more often than not.
What does Dirt (or Burn) Rune do?
Dirt Rune is a more aggressive variant of the Spellboost archetype that plays various Earth Sigil generators and Orichalcum Golem as its secondary source of reach. Since Dirt Rune has access to the same amount of damage aside from OriGolem (with Zealots/Adjudication/Clarke), it generally does better against midrange decks since it has a faster clock, although the random variance on OriGolem does add a bit of inconsistency to the archetype. The defining characteristics of Dirt Rune are the abundance of reach, tempo-oriented midgame turns and the random variance on both of its primary “win conditions” (Orichalcum Golem and Truth’s Adjudication).
Miscellaneous notes
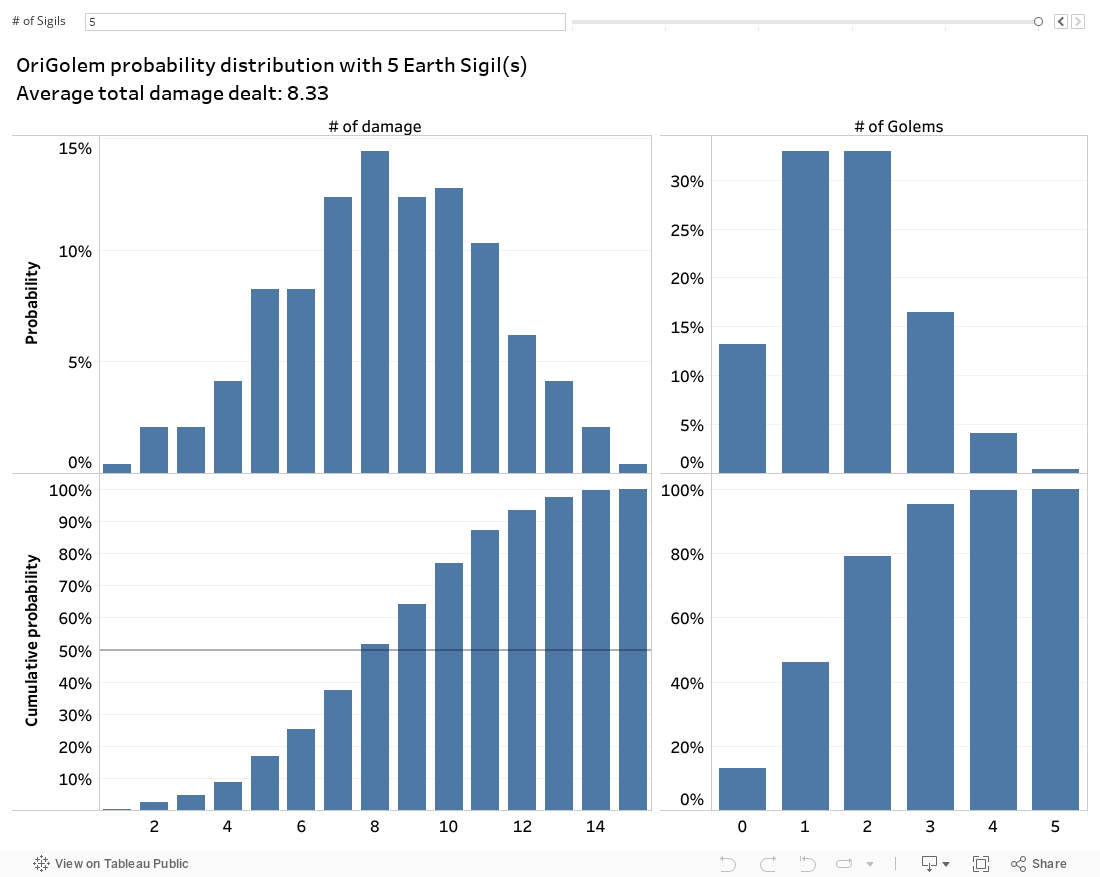
- A lot of the same points regarding Adjudication variance, mentioned in the Spellboost section, also apply to Dirt Rune. The factor that differentiates the two archetypes, however, is the OriGolem variance. The probability distribution for OriGolem outcomes can be found in the Addendum 2, but a simple estimate tells that Orichalcum Golem on average does 1.66 points of damage per Earth Sigil, which basically means that playing OriGolem for 5 before using its Accelerate gives you 3.33 extra points of damage.
- Hand size management is generally less of an issue in Dirt Rune, but it’s important to be aware of how many cards you are adding to your hand when playing OriGolem. This is particularly relevant with Vesper‘s Cauldrons. Thankfully, the effect goes off in order of “OriGolem adds Veridic Rituals to your hand”, then the Cauldron gets popped and you draw a card, and burning cards from your deck is not a particularly big issue. The problem, however, is that you can sometimes miss out on damage if you play OriGolem with 8 or more cards in hand because of poor sequencing.
- Against Lishenna Portal, try to save enough damage to deal 11 damage and hold back on putting your opponent at 10 (or 8 with a Destruction in White in play). Generally, Lishenna decks play 3xInventor, and since each Inventor is 3 extra points of healing and Apostle of Destruction can copy the healing Amulet, potentially healing for 6 or even 9 (since all the Invention tokens go off during the same phase). Portal decks can also run Catherine, Epicurean Angel, but it’s usually a 1-of, so it’s usually fine not to play around Catherine and instead focus on things you have actual agency over.
- In a similar vein, against both builds of Shadow, there are specific ways to deny healing as well, which is primarily relevant with Cerberus and Lady Grey. Against Cerberus, if the Shadow player is at 20 life, you should try and clear the 1/2 token, and, conversely, in the later stages of the game, you can leave the 1/2 token up and not play cards that the 1/2 can be traded into. The way you get punished for this is specifically Gilnelise/Gremory doing 3 extra damage, so you should also keep track of how close you are to dying to Gilnelise-type effects and how much damage you have. Midrange Shadow players can also eat the 1/2 with Soul Conversion/Ghoul/Fran, however, it is a tempo loss. Against Lady Grey, you should avoid setting up board states where Lady Grey is a good Evolve target, which usually means healing Tetra and not leaving up Assembly Droids for no reason.
Addendum 2: Orichalcum Golem probabilities
Below is a simple chart that shows the probabilities of specific OriGolem outcomes, the left part of the chart shows the damage distributions, the right part shows the possible number of Clay Golems. The upper half of the charts shows the probability of getting a specific amount (X) of damage and Clay Golems, while the lower half of the charts is the cumulative probability distribution for these variable (getting X or less).
The number of total Earth Sigils can be adjusted using the slider in the top right corner of the chart (denoted “# of Sigils”).
Dirt Rune Matchups
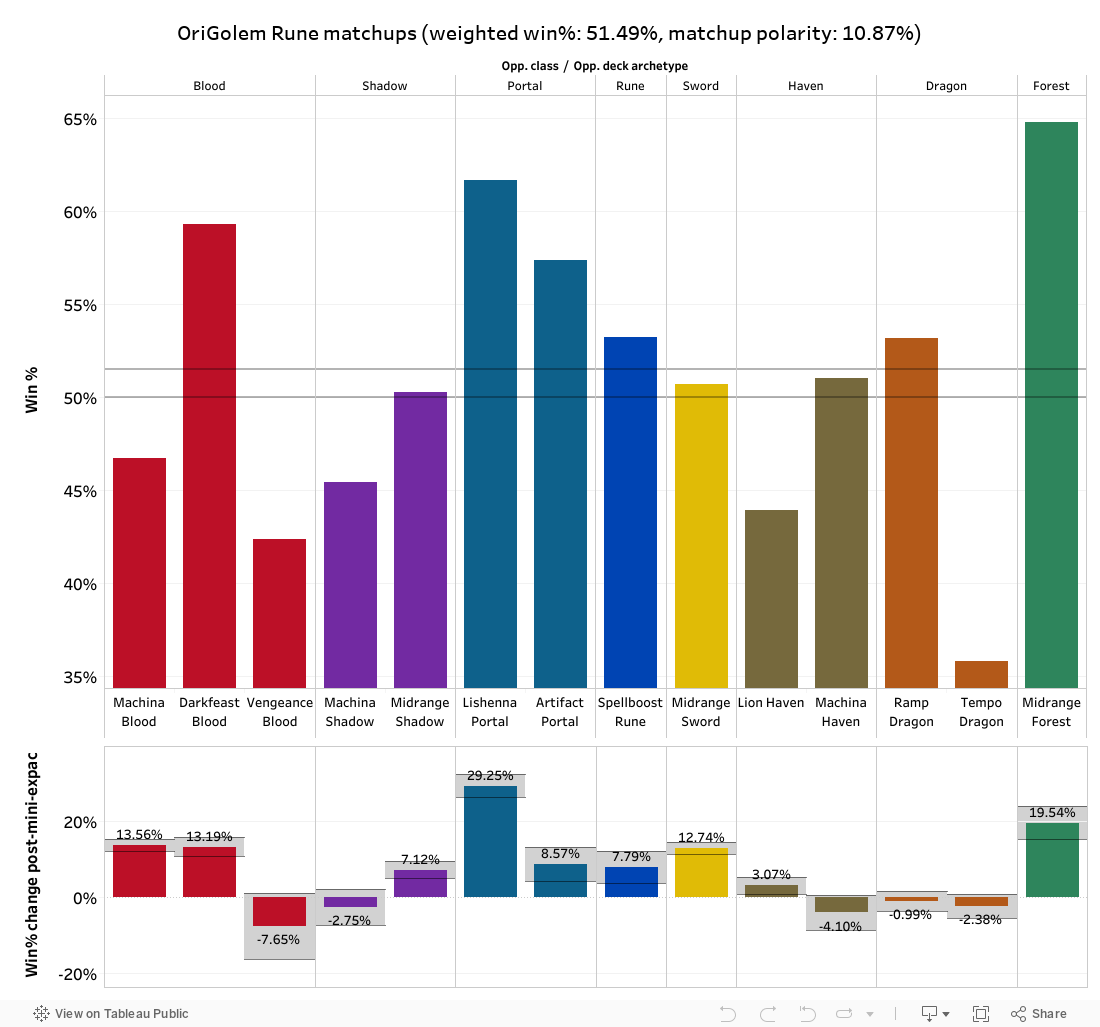
Dirt Rune matchups are not that different from Spellboost Rune matchups, but the archetypes performs better against Lishenna Portal and DFB Blood, which makes its overall ladder winrate higher. In competitive play, the two archetypes have very similar strengths and, looking at the winrates of lineups that include Dirt and Spellboost Rune, the two archetypes are neck and neck in terms of their overall performance. This makes sense since the 2 archetypes run a lot of the same cards, and basically means that deck choice between the two Rune archetypes comes down to player preference.

[ps2id id=’blood’/]
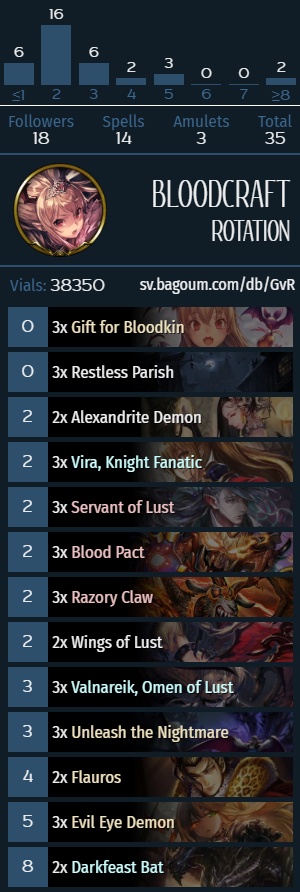
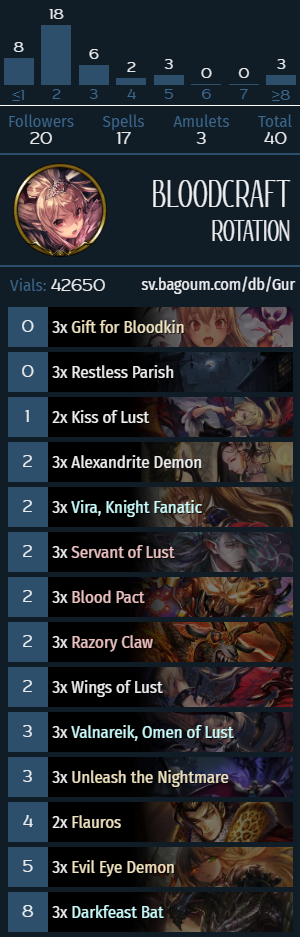
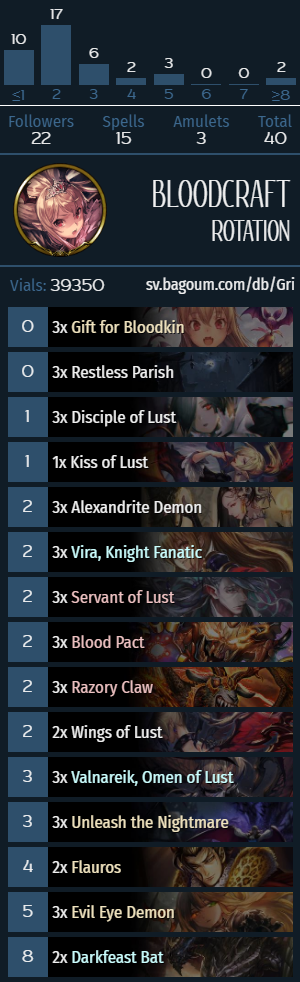
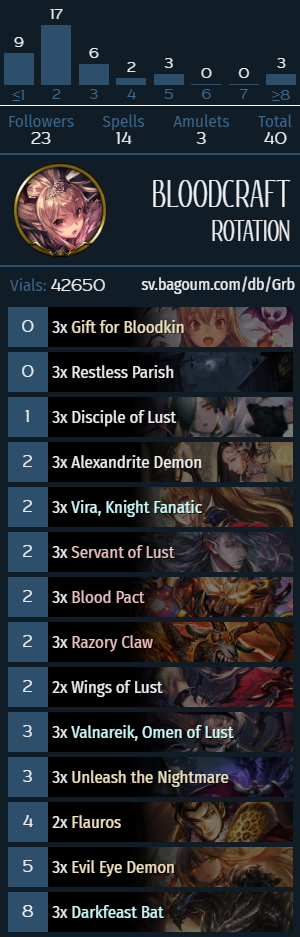
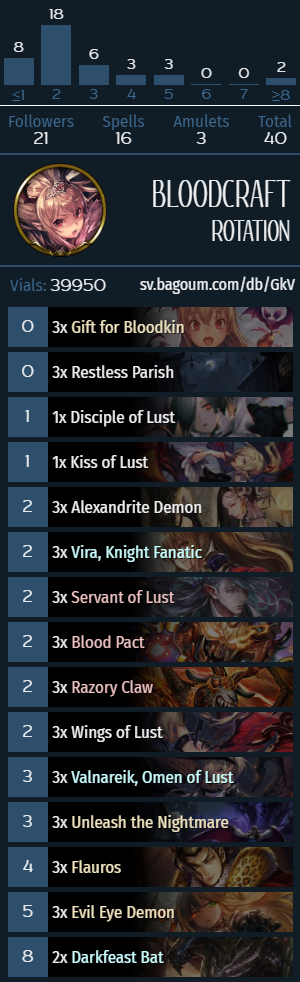
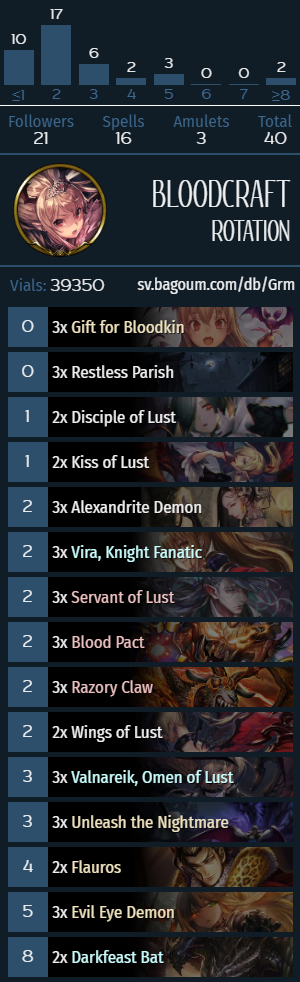
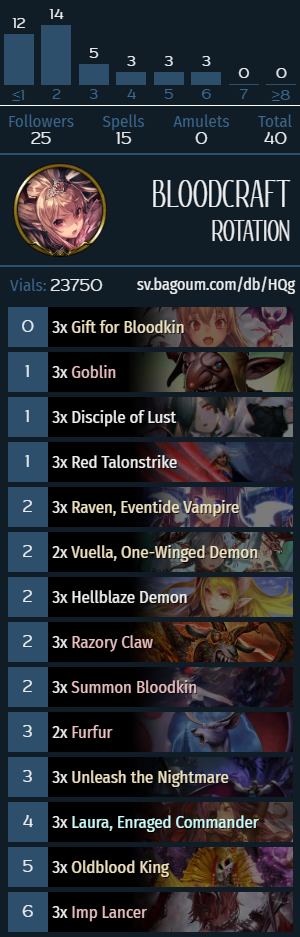
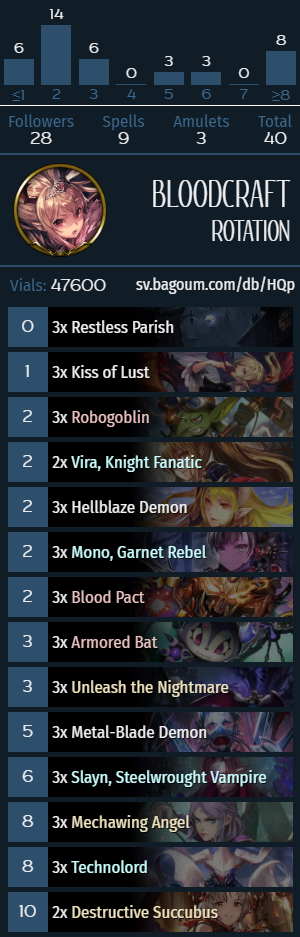
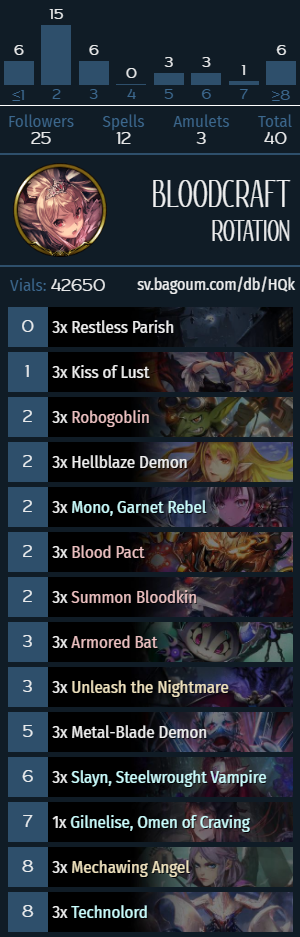
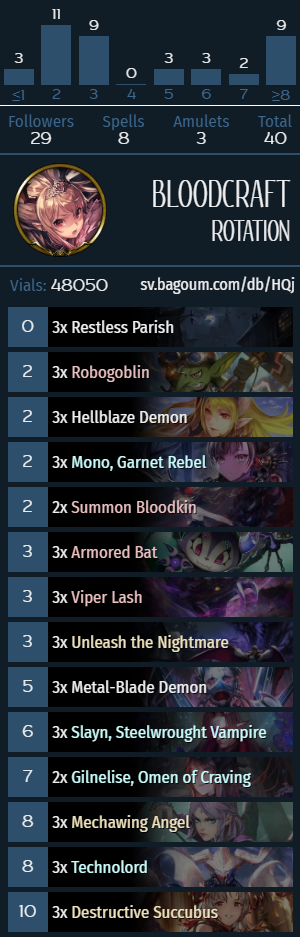
Darkfeast (a.k.a. DFB) Blood
Identifying cards: Gift for Bloodkin, Alexandrite Demon, Servant of Lust, Wings of Lust, Valnareik, Flauros, Evil Eye Demon, Darkfeast Bat.
Mulligan priority
- Always keep Restless Parish, Unleash the Nightmare and up to 1 copy of Servant of Lust.
- Against Sword/Shadow/Blood, keep Kiss of Lust/Evil Eye Demon.
- Try to keep a proactive 2-drop against Sword/Haven/Shadow, that includes Servant/Alexandrite Demon/Vira, in order of priority.
- Going second, keep Vira.
- Against slower classes like Portal/Rune/Dragon, keep Blood Pact/Alexandrite Demon.
- Against Dragon/Rune, keep Disciple of Lust.
- If you’re keeping 2 cards for an early Flauros setup (e.g. Servant of Lust/Blood Pact+Parish), also keep Gift for Bloodkin.
- Don’t keep Flauros/Darkfeast Bat.
Mulligan strategy for DFB Blood hasn’t really changed all that much since December, with the main exception being Unleash the Nightmare being a card. Unleash is (arguably) the best card in any Rotation Blood deck, and I usually find myself keeping it in the opening hand regardless of what I’m playing against, as greedy as it may seem. It may seem weird to keep Alexandrite Demon against Rune because it’s weak to Magic Missile/Vesper, but the card draw is too valuable to pass up.
Optional inclusions and tech cards
- Disciple of Lust and Kiss of Lust is the main split between different DFB lists, and the choice here depends on player preference and the expected meta. As a rule of thumb, Disciple is better against slower classes like Rune and Portal, while Kiss is better against proactive midrange decks like Sword/Shadow and Lion Haven. In addition to that, there’s a slight difference between playing an extra follower and an extra spell, because it affects Unleash odds of hitting Valnareik/Vira/EED/DFB, so lists without Disciples can usually cut the third copy of Darkfeast Bat since it’s more likely to find DFB with Unleash and you can generally get by with playing 2, although the difference isn’t very significant. Recent lists generally favor Disciple over Kiss of Lust, particularly due to the popularity of Rune and Lishenna Portal.
- Alexandrite Demon/Wings of Lust/Flauros and Darkfeast Bat are all cards that can be either be played as 2-ofs or 3-ofs to make space for extra 1-drops, but DFB Blood generally is an archetype that is very tight in terms of card slots, with very little wiggle room. It’s preferable to not include any extra followers since it messes with Unleash pulls, so “fair” Blood cards like Hellblaze Demon aren’t something you can include. There are no good Blood spells in Rotation, and DFB Blood is not really a reactive deck so tech cards like Seraphic Blade are counterproductive.
Darkfeast Blood skeleton


What does DFB Blood do?
DFB Blood is a tempo-oriented combo deck that utilizes cards that deal damage to your (or both) leader(s) to get to activation thresholds for such cards as Flauros/Evil Eye Demon/Valnareik/Darkfeast Bat. The deck’s primary win condition is its eponymous card, Darkfeast Bat, but the archetype can scrape by with chip damage from followers, burn spells like Razory Claw, Valnareik damage (in combination with Wings of Lust) to close out games even without the final DFB push. This is particularly relevant in the DFB mirror, which can often come down to which player deals more damage to themselves and gets less healing from Flauros/Wings of Lust. The defining characteristics of the archetype include conditional tempo-cheating effects like Flauros‘s invocation effect and Valnareik/EED, as well as abundant amounts of possible burn damage.
When playing against DFB Blood, it’s important to keep track of the “DFB counter” for 2 main reasons: on one hand, to know how close you are to dying to Darkfeast Bat, and on the other hand, to keep track of whether Valnareik is active or not (and how close it is to being active), as well as to have an idea of the current follower health thresholds to play around EED.
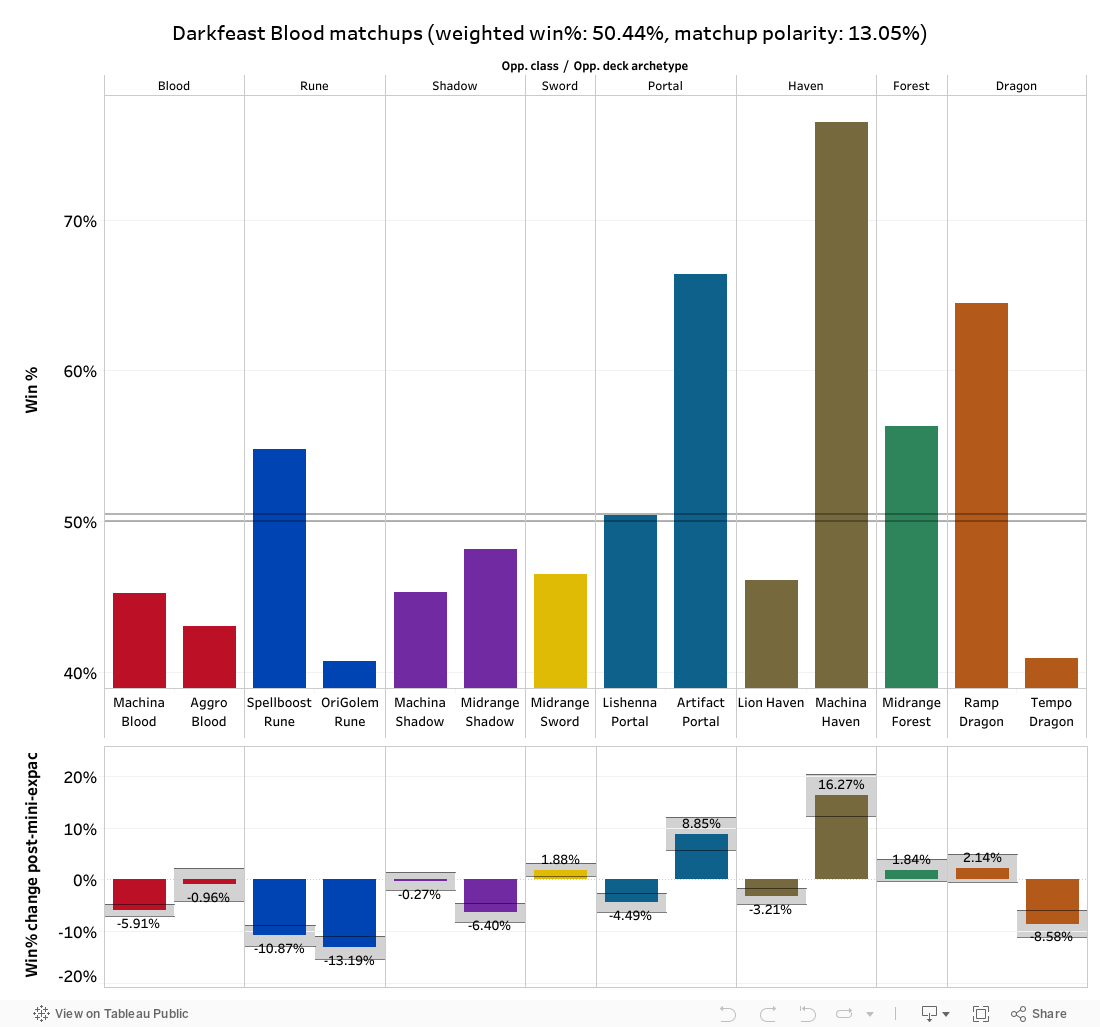
DFB Blood is a deck that is currently not all that popular on ladder, although it does see fringe competitive success, about on par with decks like Lishenna Portal. DFB Blood struggles against decks with a lot of healing, which includes things like Machina Blood, Lishenna Portal and, to an extent, both builds of Shadow. DFB Blood also has has issues closing out games against Machina Shadow because Fleeting Joy prevents Darkfeast Bat damage. With that said, DFB Blood is still the best Blood archetype in the current Rotation format and is still reasonably competitive.
After the mini-expansion, DFB started doing worse against Machina Blood because the current build of that deck exists to beat up on Rune and Slayn is a lot of healing for DFB Blood to deal with. The archetype also started doing worse against Midrange Shadow due to its build being more proactive; previously, the matchup was mildly (55/45) Blood-favored because Blood could answer Ceres really well and DFB could usually outpace the Arcus plan, however, cards like Bone Drone, Cerberus and Big Soul Hunter throw a wrench into Blood’s plans and help run Blood out of answers while developing a tempo advantage.
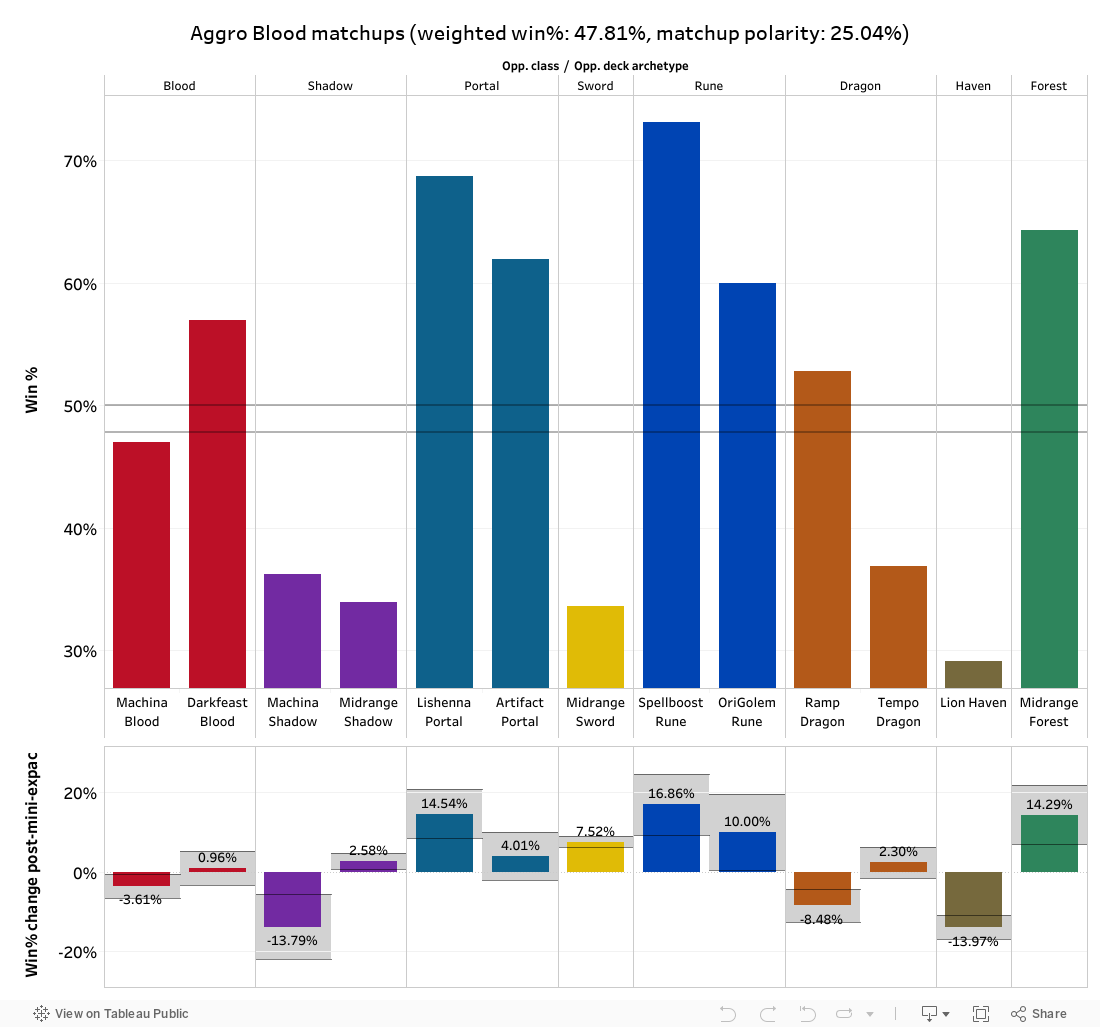
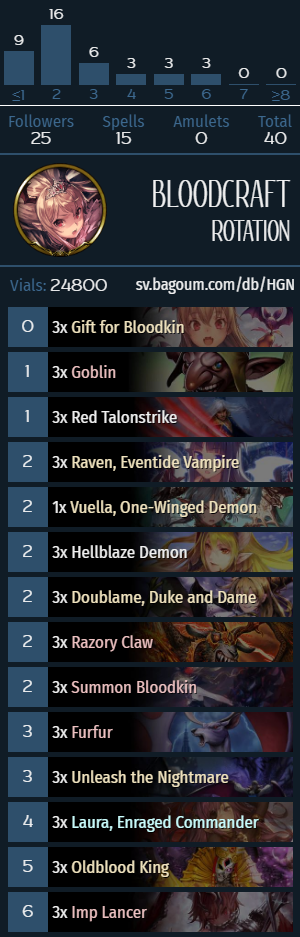
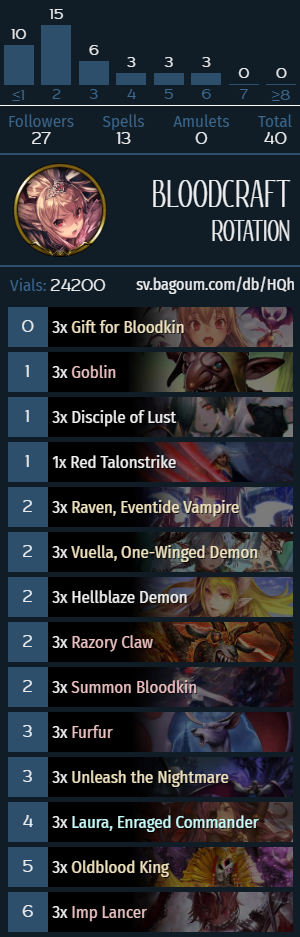
Aggro Blood is a Shadowlog category for Blood decks focused around Oldblood King (OBK for short) and Forest Bat cards. The current build of the deck was popularized by Agni and includes the “OBK package” and some handbuff synergy, which works with Doublame‘s Storm token, Laura and Imp Lancer. The archetype generally does very well against reactive decks like Lishenna Portal and Rune in general, but struggles against Technolord decks, Midrange Sword (because of Ivory Sword Dance) and most other Midrange decks in the format (because it can’t really control the board). The deck is extremely polarized in terms of its matchup spread and doesn’t see much competitive play (for obvious reasons). The one good thing about Aggro Blood is that it’s very budget-friendly, I suppose.
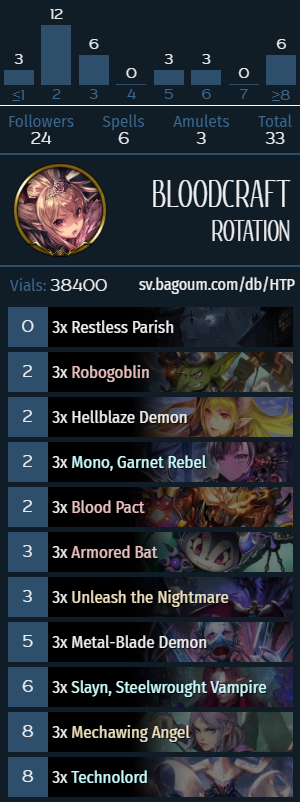
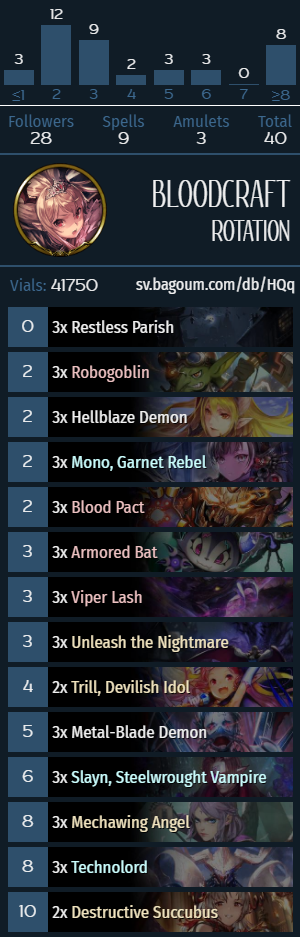
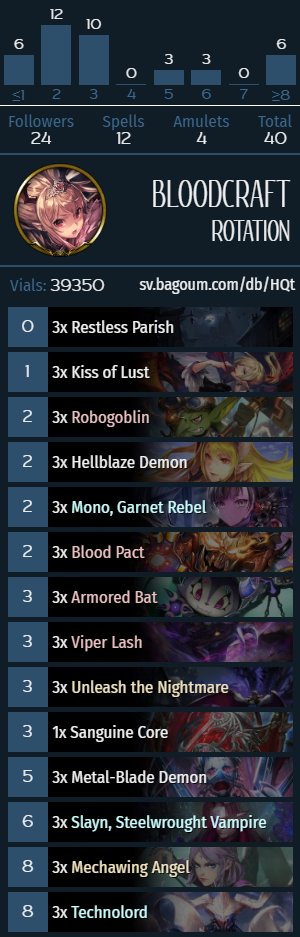
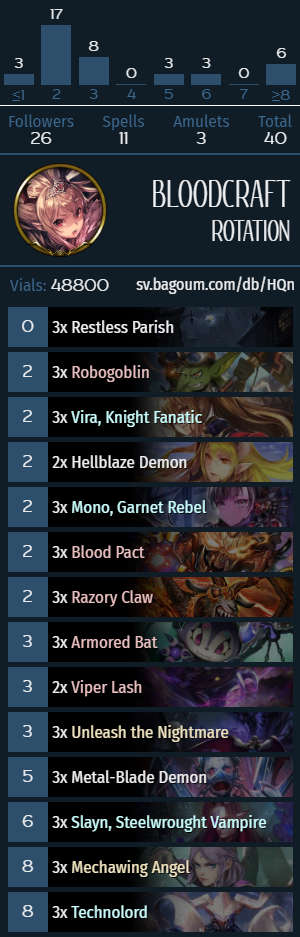
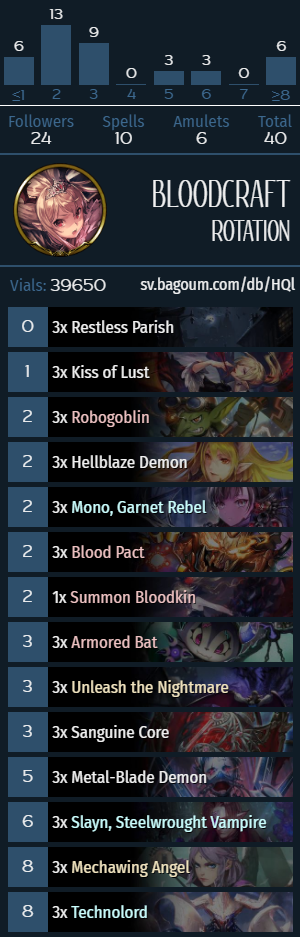
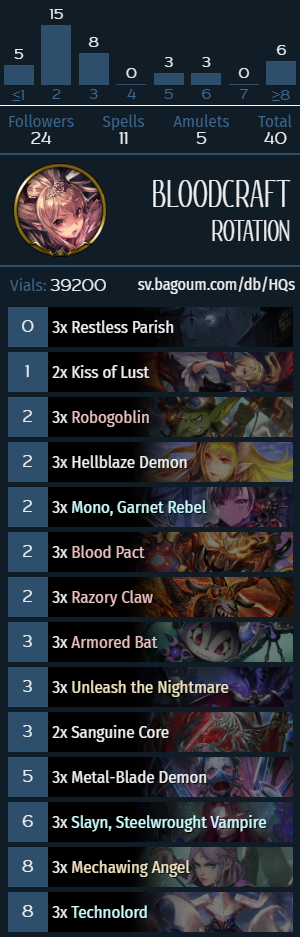
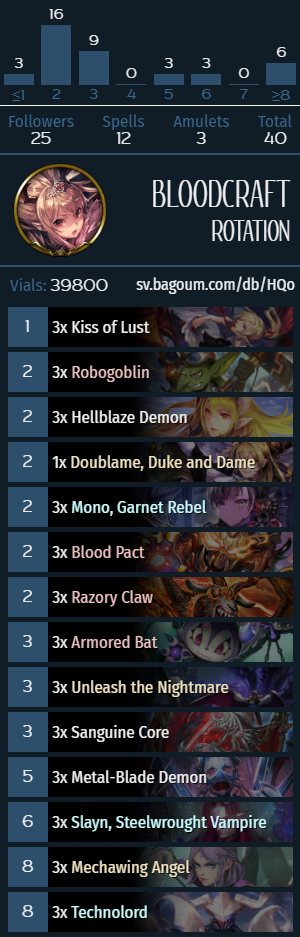
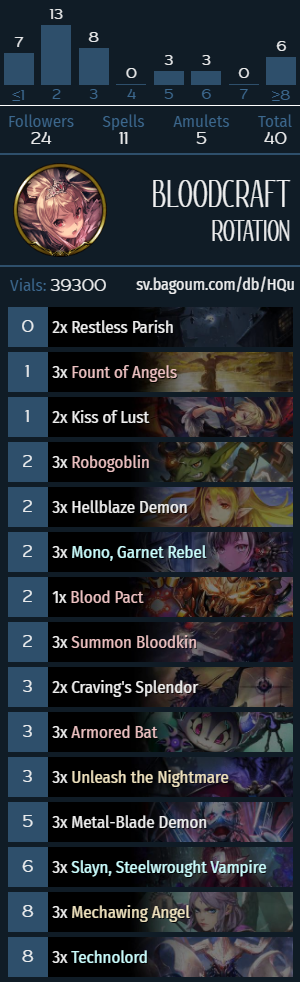

Machina Blood
Identifying cards: Robogoblin, Mechawing Angel, Mono, Armored Bat, Metal-Blade Demon, Slayn, Steelwrought Vampire, Technolord.
Mulligan priority
- Always keep Parish and Unleash the Nightmare.
- Against Sword/Shadow/Haven, keep a proactive 2-drop (Robogoblin/Mechawing Angel/Hellblaze Demon/Vira/Mono, in order of priority).
- Against Rune/Portal/Blood, keep Blood Pact.
- Going second against Sword/Shadow/Haven, keeping a removal spell is fine (includes Viper Lash/Kiss of Lust/Razory Claw).
- If you’re already keeping 2 cards, keep a midgame card, which includes Metal-Blade Demon and slower things like Destructive Succubus.
- If you’re playing a list with Fount of Angels, keep it the same way as Parish.
The current build of Machina Blood has a lot more card draw than its prior iteration and usually runs few evolve synergy cards. Depending on the matchup, you either want to contest the early board as most midrange decks do (against proactive decks like Sword/Shadow/Haven), or play as more of a combo deck with a focus on getting Slayn with Storm (against primarily reactive decks like Lishenna Portal and Rune in general).
Tech cards and optional inclusions
- Removal spells like Razory Claw/Viper Lash/Kiss of Lust, as well as Fount of Angels, Summon Bloodkin and Sanguine Core are tech cards against Rune and Lishenna Portal. It may seem counterintuitive, but the idea is fairly straightforward: playing less non-Machina cards makes Unleash the Nightmare almost guaranteed to hit two Machina followers, and cards that cycle themselves (Blood Pact/Parish/Metal-Blade Demon/Robogoblin/Fount of Angels/etc.) all help get to 8 cards in hand, and if you keep the level of “Machina purity” high enough, you get Slayn with both Storm and Drain, which is powerful against reactive decks like Lishenna Portal and both builds of Rune. Sanguine Core is a shining example of this approach to playing the deck: it’s a card that you put in your deck so that you don’t dilute the Unleash pool, but still improve the odds of having Slayn active. You virtually never get to play Sanguine Core because the card is unplayably bad in the majority of matchups, but the fact that it’s not a follower and has a Machina tribal tag is all the deck needs.
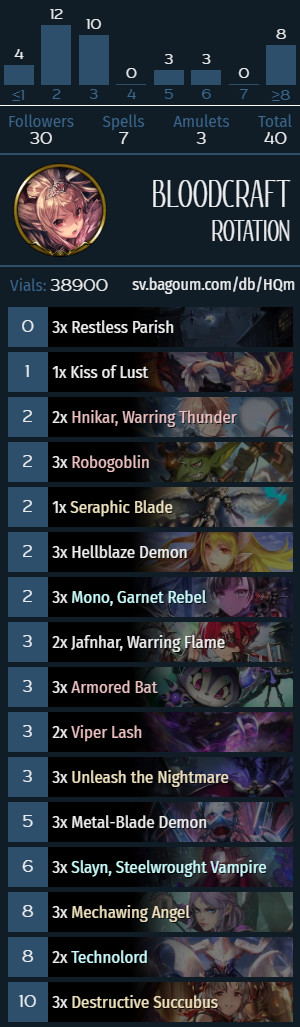
- The so-called “Evolve package”, including Hnikar/Jafnhar/Trill/Destructive Succubus and occasionally Odin/Grimnir are a tech choice that helps against midrange decks like Midrange Sword and Shadow. Simply speaking, there are 2 ways to build Machina Blood: either to beat reactive decks like Lishenna Portal, DFB Blood and Rune in general, or to beat midrange decks like Sword/Shadow with the Evolve package. It’s also possible to mix the two packages, but doing so leaves you in a spot where you’re weak to both types of decks, so the balance is quite tricky. In ladder play, the “combo build” is more common and generally considered successful, but in tournament play (where there’s a lot of Sword/Shadow/Haven), the Evolve package seems necessary. The way it seems to work currently is that Machina Blood ends up simply not being played in tournaments whatsoever, because there is no good build of the deck for that purpose so far.
- Vira is a 2-drop that started to get cut from Machina lists because it’s often outperformed by Hellblaze Demon now that there are 6 good targets for handbuffs in the deck. That is not to say that Vira is bad in the deck since it’s still great against Shadow and Sword, but it often doesn’t make the cut.
What does Machina Blood do?
Machina Blood is a tempo deck that follows one of two lines of play: either a midrange-y plan of playing Machina followers on curve, where getting ahead on board enables reloads with Metal-Blade Demon and can threaten a lot of face damage with Alpha Drive or an occasional Gilnelise; alternatively, specific builds of the deck can focus on having an 8-9-card hand and attempting to give Slayn Storm. Both of these approaches naturally enable Mono as a win condition, and it’s common for the archetype to play double Mono on turn 9 to deal 12+ damage to close out the game.
Compared to other midrange decks, Machina Blood can be characterized as an archetype with a lot of card draw and access to a lot of Storm damage, which is balanced out by deckbuilding constraints.
Current Machina Blood builds exist to beat up Rune, Blood and Lishenna Portal and struggle against midrange decks like MidSword/MidShadow and Lion Haven. This matchup distribution makes the archetype a fine (if highly polarized) ladder deck, but severely limits its tournament viability. Despite being the currently most popular ladder deck of the format, following the mini-expansion, the archetype has become worse across the board against virtually every deck of the format, with the exception of Lishenna Portal and DFB Blood, and the sample size is large enough where it can’t simply be waved off as random variance. The saving grace of the archetype is that Darkfeast Bat and even Oldblood King are rotating out, so it’s reasonable to assume that Machina Blood is going to become the most prevalent Blood deck after the rotation.
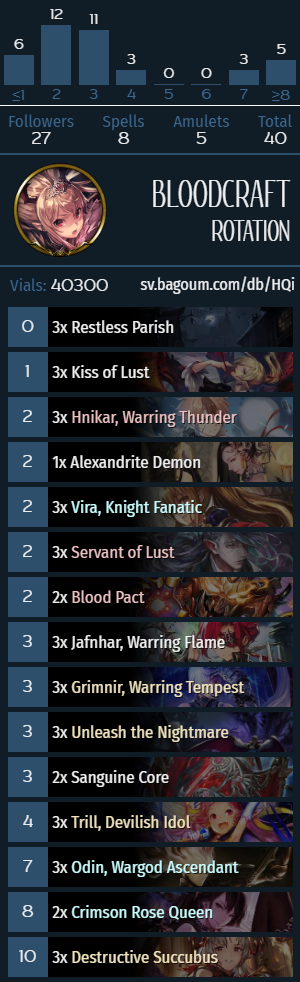
Blood decks with the Evolve package and without Machina synergy (for lack of a better name, “Evolve Blood”) are a type of deck that has also seen some recent experimentation with Odin and Crimson Rose Queen as its primary win conditions. The idea is simple: the deck plays a curve of midrange followers with Evolve synergy and enables Grimnir to clear midrange boards; and in the meantime saves up cards that are “past their expiration date” (e.g. Kiss of Lust/Vira/Parish/etc.) to get enough reach from Crimson Rose Queen in combination with Odin(s) and Destructive Succubus(bi).

[ps2id id=’portal’/]
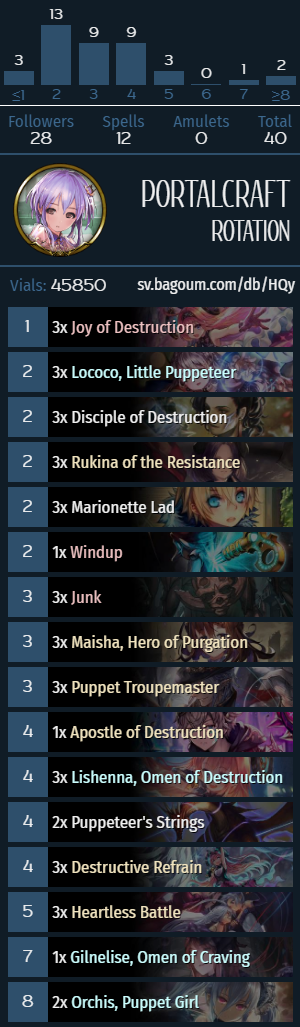
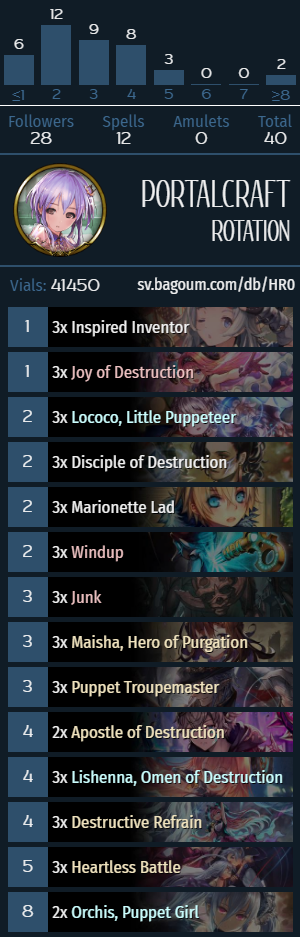
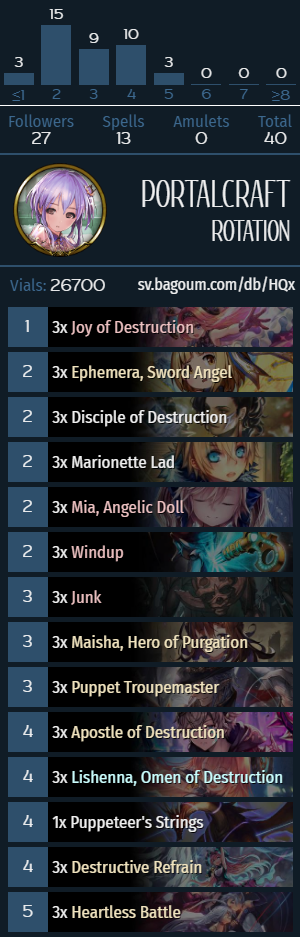
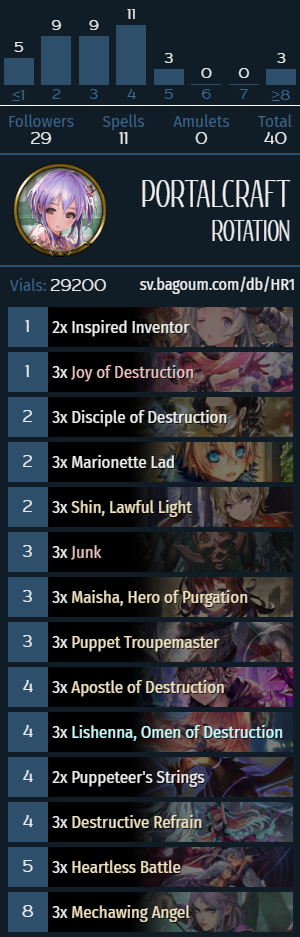
Lishenna Portal
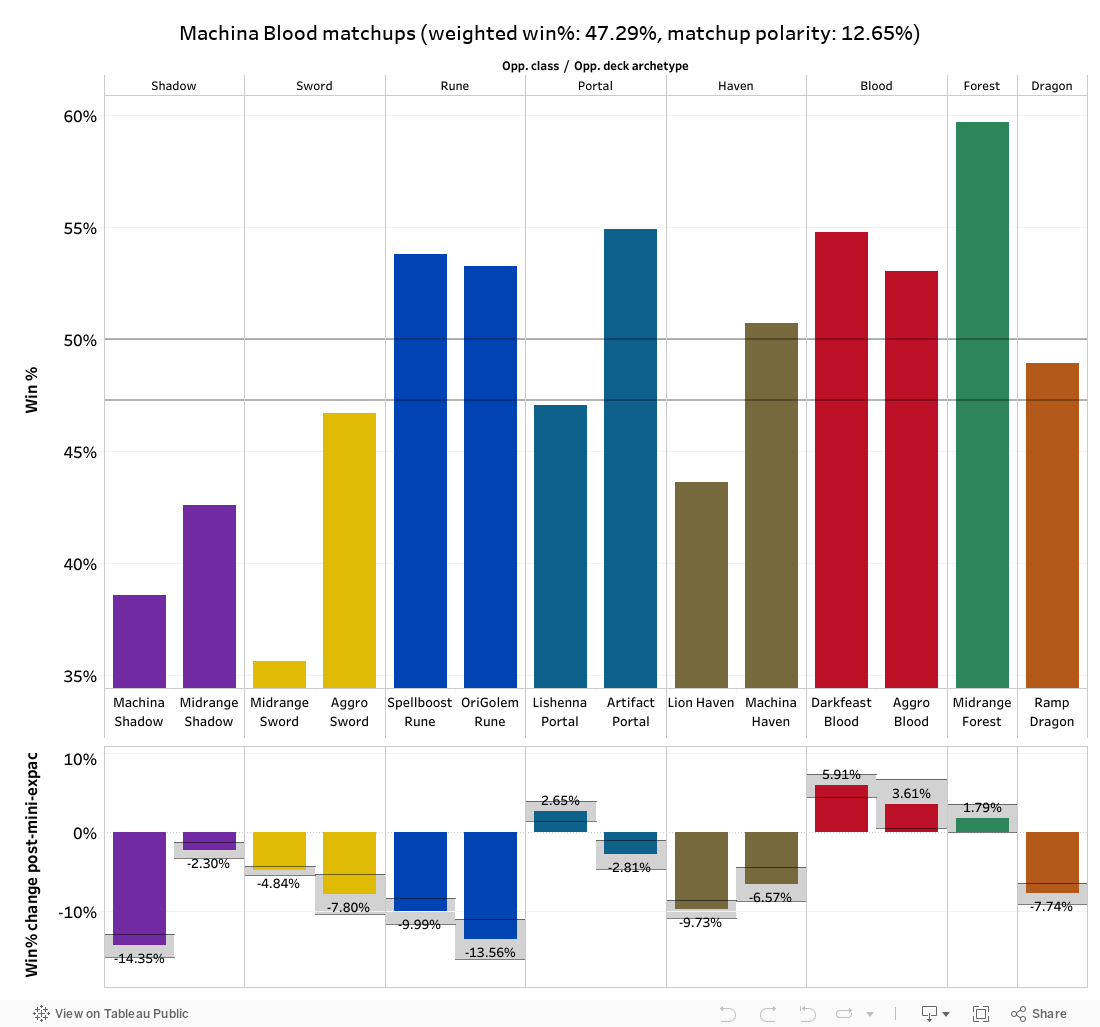
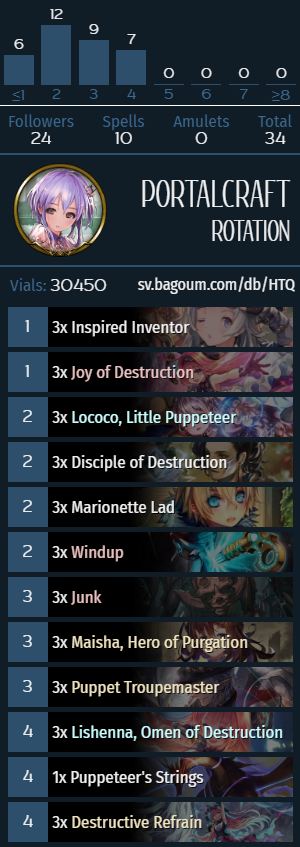
Identifying cards: Inspired Inventor, Joy of Destruction, Windup, Marionette Lad, Junk, Apostle of Destruction, Lishenna.
Mulligan priority
- Always keep Maisha, Puppet Troupemaster and Lishenna.
- If you’re not keeping Lishenna, keep Disciple of Destruction.
- If you’re already keeping Lishenna, keep a proactive 2-drop (Lococo/MarioLad/etc.). Against Sword/Shadow/Haven, also keep Destructive Refrain.
The idea behind Lishenna Portal mulligans is that finding Lishenna is important, so you want to keep Lishenna and all the cards that say “draw a card” on them. Well, I am exaggerating, but as a rule of thumb, Troupemaster and Lishenna are the cards that make the deck actually function; the majority of the deck consists of cards that generate Puppets without any particular synergy, and you can’t get far with those outside of Take 2 games. In addition to that, Refrain is a crucial card against midrange decks, but it doesn’t really work without an early Lishenna.
Tech cards and optional inclusions
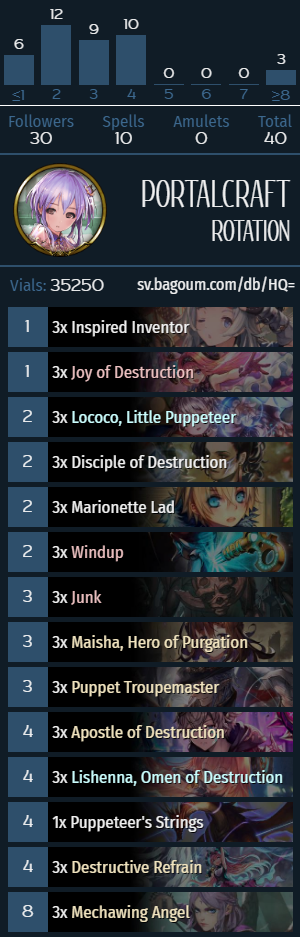
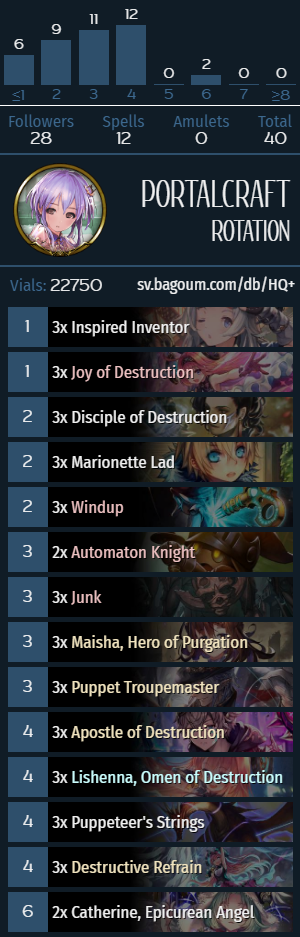
- Catherine, Epicurean Angel is a tech card against specifically Rune that has been cropping up in both types of Portal. Healing in Portal is either slow (Destruction in White) or conditional (Inspired Inventor), so having a card that just gets you out of burn range with no questions asked is valuable.
- Heartless Battle is an optional inclusion that helps deal with Storm damage, which is particularly relevant in the mirror match, as well as against Lion Haven and Machina Blood. 7 health is a notable breakpoint since it doesn’t die to Eachtar and blocks Mono/Slayn. Lion Haven also doesn’t have a clean answer to Heartless Battle because Lions themselves deals damage in increments of 4. Duel is pretty mediocre against Rune because of Fiery Embrace, but it can still be used as removal for Adjudication tokens and whatnot.
- Apostle of Destruction is a (fairly greedy) optional inclusion that has a wide range of possible applications: it can copy Lishenna tokens or the healing Amulet from Inspired Inventor to double up on cards with the “Can’t be destroyed” clause. In addition to that, Apostle can be used on Maisha on turn 7 to get a 0-cost Maisha that can close out the game before turn 10, which is particularly relevant in the mirror match and decks with faster inevitability engines (e.g. Midrange Shadow).
- Orchis can be an alternate win condition that can come either be used to push damage or protect yourself, depending on the matchup. Orchis is a pretty heavy card and doesn’t really fit the deck’s overall gameplan, but it can have a lot of surprise factor since Lishenna Portal usually can’t build a threatening board. In a similar vein, Rukina is also a card that lets Portal generate a board using Puppets, and also conveniently enables Joy of Destruction without having to use up a Puppet.
- Neutral 2-drops like Mechawing Angel and Ephemera are optional inclusions with fringe synergy that can fill out the weak points in the archetype’s early curve.
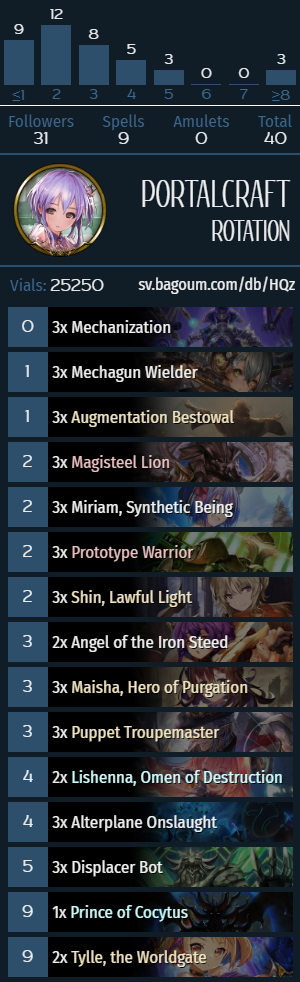
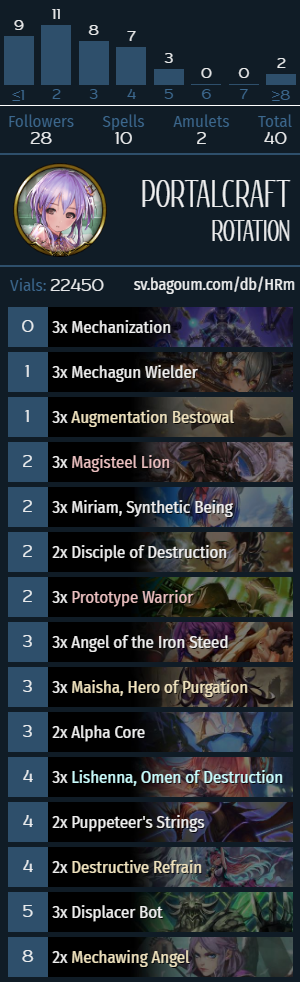
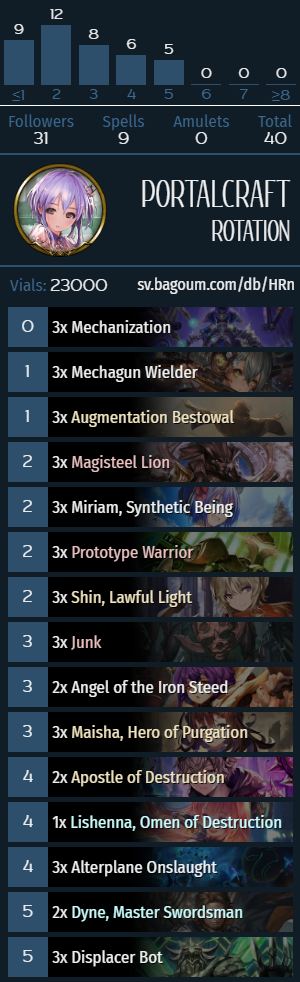
What does Lishenna Portal do?
Lishenna Portal is a control deck that has 2 primary win conditions: it can either play an early Lishenna and discount the Amulet tokens with various Puppet generators to the point where the deck naturally wins the game against decks with no Amulet-banishing effects due to recurring healing and powerful reactive cards like Destructive Refrain/Joy of Destruction. Alternatively, the Portal player can save an Evolve point until turn 10 (or earlier with an Apostle discount), and so long that the Portal has had 16 followers die over the course of the match (fairly trivial requirement), Maisha deals 20 damage. In most matchups, the Lishenna plan is too slow to actually close out the game, but saving an Evolve point is a lot easier if your conditional removal cards (most notably, Refrain) are enabled.
Puppet Troupemaster, for most intents and purposes, reads “Evolve: add a Puppet to your hand at EoT for the rest of the match” and generally speeds both win conditions of the deck since the card generates 6-7 Puppets by itself, which is a lot of value. It’s a little awkward that all 3 relevant cards in Lishenna Portal require an Evolve to function properly, but this is likely intentional by design.
The defining characteristics of Lishenna Portal as an archetype are high draw variance, powerful, but conditional, AoE and a lack of ability to generate a board.
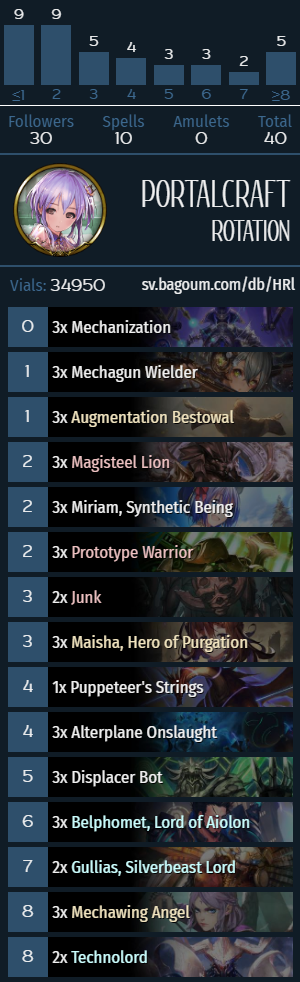
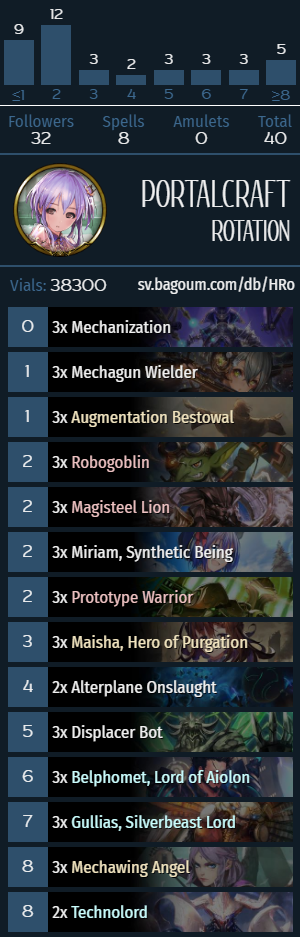
Regarding Artifact Portal
There are 2 primary builds of Artifact Portal: the Belphomet build that some additional Machina followers in addition to the regular Artifact synergy cards (Mechagun Wielder/Prototype Warrior/Displacer Bot), and a hybrid Artifact-Lishenna build, which runs Lishenna/Troupemaster in a conventional Artifact shell. My personal testing shows that Belphomet is often not a good enough win condition against most decks, although the 8-cost token that does 5 random damage is a very clean answer to Gilnelise, and the 8/7 Rush can clear most things as well. The problem with Artifact Portal in general is that the deck doesn’t have enough reach and usually wins games with a turn 10 Maisha.
Certainly, Troupemaster is a fine card in Artifact Portal and cards like Alterplane Onslaught, Displacer Bot, Miriam and Mechagun Wielder consistently provide a lot of value, but it does beg the question of why you’re not just playing Lishenna if so many matches end up depending on having Maisha on 10.

Lishenna Portal is a deck that struggles against decks with faster “inevitability engine” (e.g. Lion Haven/Midrange Shadow/Dirt Rune), effects that banish Amulets (Satan in Ramp Dragon) or both (Midrange Sword). The one deck that Lishenna Portal does well against is Machina Shadow since both Fleeting Joy boards and Gilnelise can be cleared with Destructive Refrain. With this in mind, the archetype usually struggles in tournament play, but it can still have occasional good showings because of the deck’s inherently high draw variance.
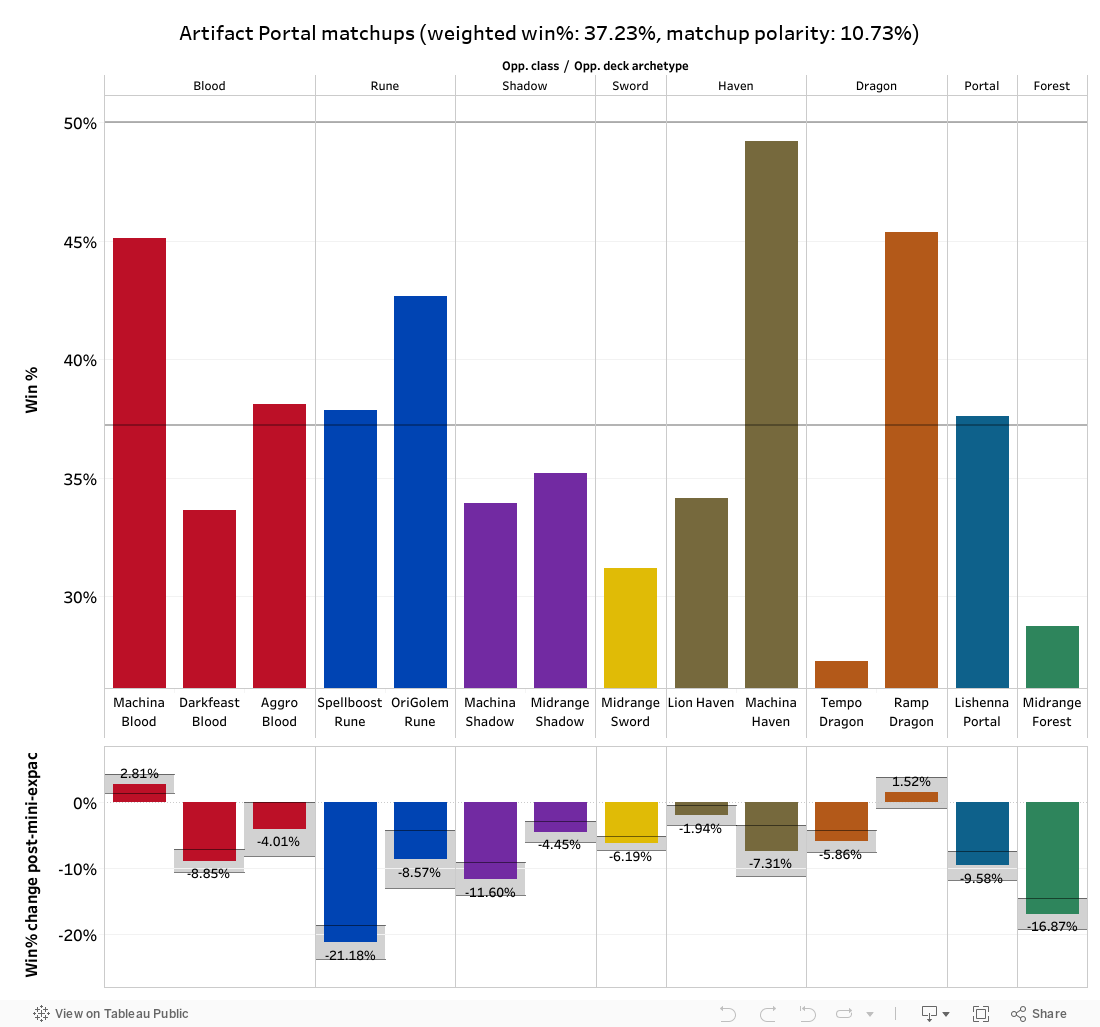
Among decks with a relative ladder popularity of above 10%, Artifact Portal is the worst-performing deck by leaps and bounds. it’s certainly true that the most common Belphomet-centric Artifact Portal build is not that great, and it could be that some better Artifact builds improve the deck’s performance in future data, but as it stands, Artifact Portal has been consistently hovering at ~36% total winrate, which makes it hard to recommend as a candidate for further testing and refinement.

[ps2id id=’dragon’/]
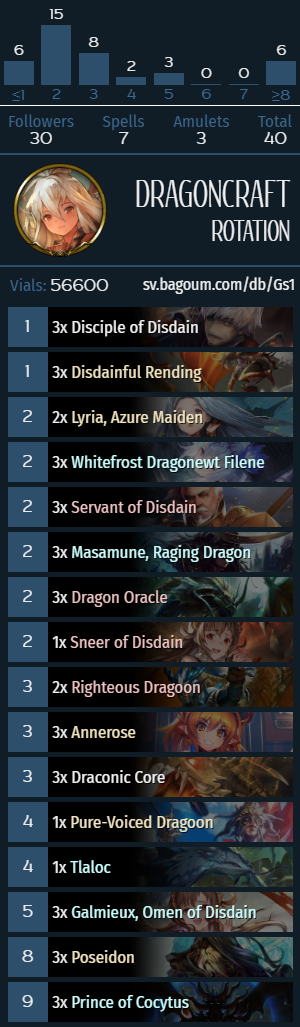
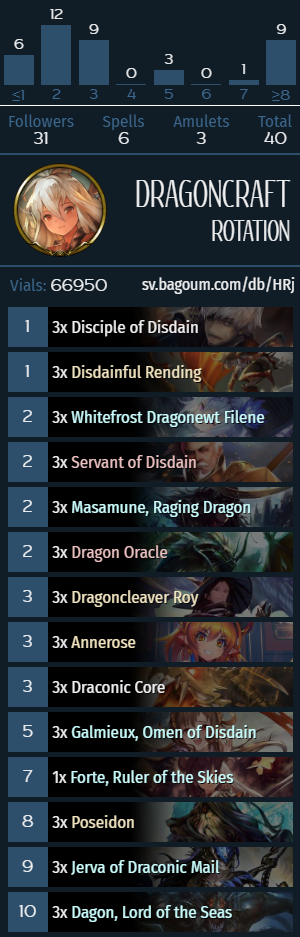
Ramp Dragon
Identifying cards: Masamune, Dragon Oracle, Dragoncleaver Roy, Draconic Core, Prince of Cocytus.
Mulligan priority
- Always keep Dragon Oracle and Dragoncleaver Roy.
- Going second, keep Annerose and Draconic Core. Against slower decks (Rune/Lishenna Portal/Lion Haven/Dragon mirrors), keep these cards even when going first.
- Against Sword/Haven/Shadow/Blood, keep Disdainful Rending and a proactive 2-drop, those include Filene/Servant of Disdain/Sneer/Masamune, in order of priority.
- If you’re keeping Servant of Disdain, also keep Rending/Disciple.
Ramp Dragon mulligans are fairly straightforward: ideally, you want to find your ramp cards and get to that turn 5 Satan as fast as possible. Well, turn 5 is a bit of a dream since you don’t go second every game, but ramping early is extremely important and is by far the most unfair thing Ramp Dragon can pull off.
Optional inclusions and tech cards
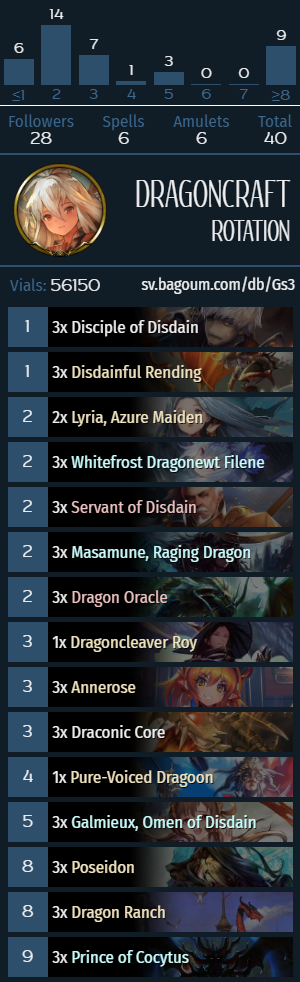
- Dragoncleaver Roy is an optional inclusion that makes you draw ramp more consistently. There is some debate as to how many ramp effects you one really needs in a Ramp Dragon deck, but past estimates show that the sweet spot is at about 10-11, so Roy makes for a fine 1- or 2-of.
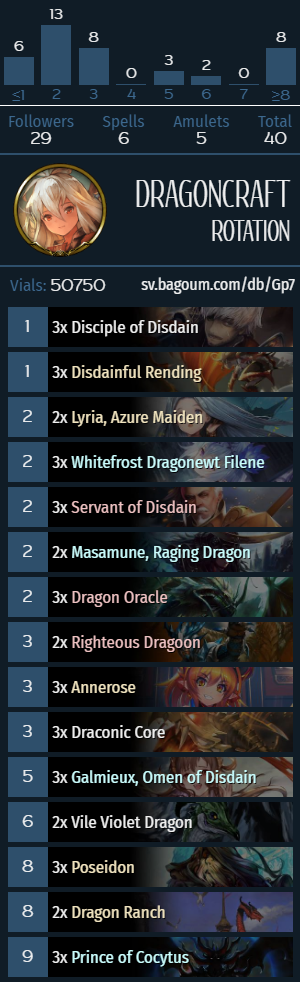
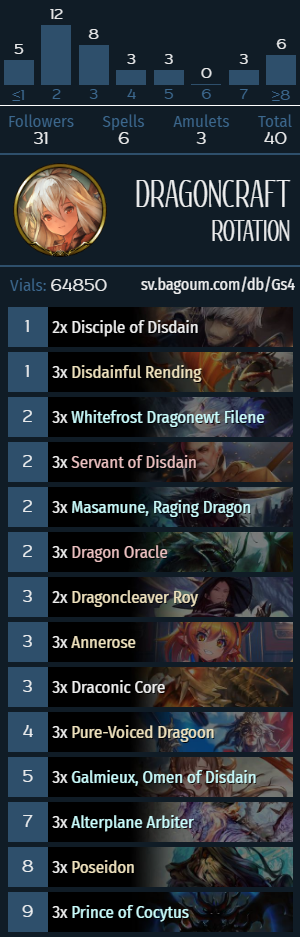
- Either Alterplane Arbiter or Dragon Ranch (or even Vile Violet Dragon if you’ve been living under a rock for the past 5 months) are optional inclusions that add consistency to your ramp effects and allow you to have a proactive play for the pre-Satan turns. The downside of both of these cards is the factor of randomness, so there are lists that choose to run neither of the two effects.
- Lyria is an optional inclusion that serves a similar function to the two cards mentioned in the previous point. Lyria obviously doesn’t mesh well with Arbiter since ideally you’d want to tutor out Satan, but it can works fine in Dragon Ranch lists or decks without either Ranch or Arbiter. After Satan, Lyria is a 50/50 between Gluttonous Behemoth (7/7/7 deal 7 guy) and Heretical Hellbeast (8/8/8 Ward AoE guy), so it still has value even if you already have Satan.
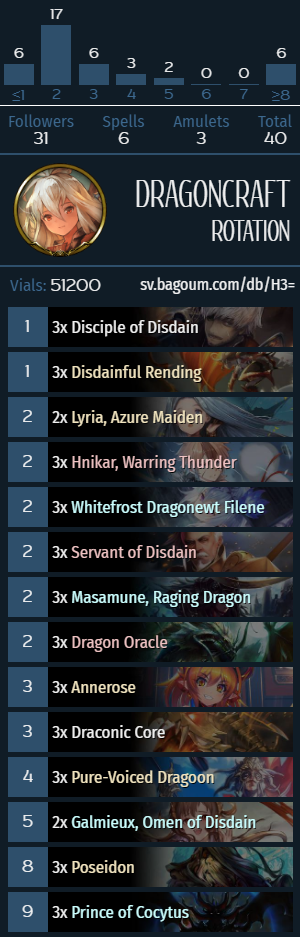
- Righteous Dragoon/Sneer of Disdain/Force of the Dragonewt are all tech cards against generic midrange decks and Machina-centric decks in particular. The most flexible of these options are Righteous Dragoon and Sneer, although Force of Dragonewt has also seen play in the early stages of the expansion, when Machina Blood/Sword were prevalent.
- Pure-Voiced Dragoon is a tech card against Rune, DFB Blood and Midrange Shadow. Healing effects can be generally useful if you take chip damage from being behind on tempo. While decks like Midrange Shadow can technically deal 20 damage out of hand, it takes a lot more setup than doing, for example, 15, especially with Wards getting in the way. Pure-Voiced Dragoon can also serve as a proactive threat in matchups where you don’t need the healing.

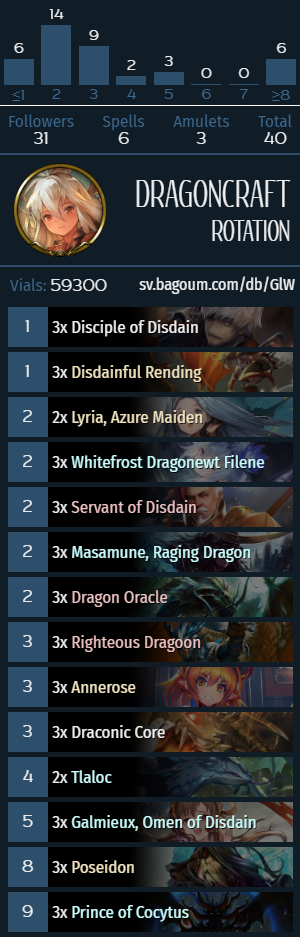


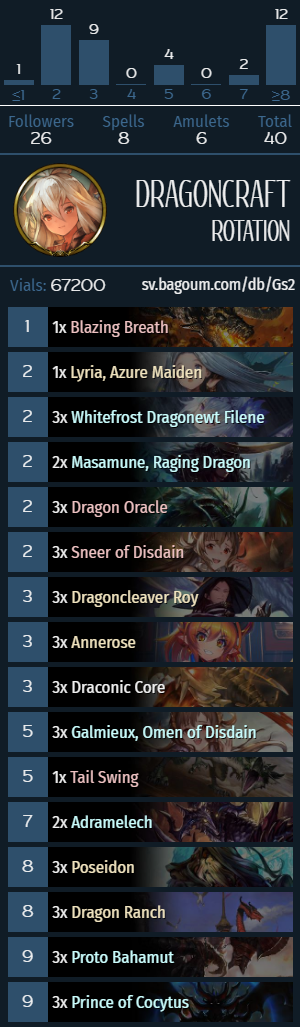
What does Ramp Dragon do?
Ramp Dragon is an archetype centered around playing expensive followers before other classes have an opportunity to answer them. The finisher of the archetype is typically Satan that can generate a lot of damage/value by itself, but other powerful high-cost followers like Galmieux/Poseidon (especially combined with Masamune) can present immediate tempo swings that are backbreaking for “fair” midrange decks. The defining characteristics of Ramp Dragon are high draw variance, powerful board clear effects and the inevitability that Satan provides.
Compared to previous iterations of the archetype, a notable card in the arcehtype is Draconic Core, which is a conditional and slower Dragon Oracle. The neat thing about Draconic Core is the mana refund, which allows to fit in extra cards on your evolve turns, e.g. with a Draconic Core in play, you can evolve Annerose on 4 and still fit in a Dragon Oracle or Servant+Disciple/Rending. In addition to that, you can also occasionally activate the Draconic Core with Galmieux‘s Enhance ability. Dragon is also a class that can occasionally leverage the 7-cost Enhance ability because of the mana acceleration, which can enable things like Vicious Commander (the 3/4/4 card from Satan) and various Storm cards for 2 extra face damage.

[ps2id id=’forest’/]
Aggro Forest
Identifying cards: Lina & Lena, Greenglen Axeman.
What does Aggro Forest do?
Aggro Forest is a midrange deck that relies on generating early board presence with Fairy tokens and low-cost followers, which can get buffed by board-wide buffs such as Lily, Crystalian Conductor or Lila, Arborist. All the cheap token generation also works well with Greenglen Axeman and allows the deck to have some reach in the later stages of the game. Aggro Forest decks are usually built in a way that ensures getting Greenglen Axeman from Liza‘s Last Words effect.
Aggro Forest is an archetype that hasn’t evolved much since the beginning of the expansion, and is still a deck plagued with the same issues as before: it can’t really outpace Shadow or Lion Haven, and decks with Ivory Sword Dance and Technolords make life difficult for boards of 1-health tokens. Despite the deckbuilding being so well-explored and fairly optimized, Aggro Forest is on its last legs: it has barely seen any play in the last 2 months (in tournaments and on ladder) and Greenglen Axeman (as well as Falconer) are rotating out at the end of July. If there’s no new win condition for the archetype in the upcoming set, it could soon be appropriate to take an axe to Aggro Forest as a Rotation archetype.
Evolve Forest
Identifying cards: Hnikar, Jafnhar, Grimnir, Milolo, Carbuncle, Cynthia, Odin.
What does Evolve forest do?
Evolve Forest is a new spin on the previously existing Midrange Forest archetype that includes all the Neutral Evolve synergy, as well as all Forest-specific Evolve cards, namely Milolo, Cynthia and sometimes even the Carbuncle/Apostle of Unkilling “package”. The “win condition” of the deck involves getting to turn 10, playing Izudia (a 1-of in the deck, gets tutored up by Liza) and setting your opponent to 6 health, and if you happen to have Odin‘s Invocation condition fulfilled and a spare Evolve point (naturally or from Carbuncle tokens), the deck can consistently kill the opponent on turn 10. Well, “consistently” is a strong word because of how much setup it requires, but it is a plan, and the rest of the supporting shell does reasonably well against non-Lion midrange decks by virtue of having Grimnir and all the Evolve synergy.
Regarding “Other Forest”
Forest has a few other miscellaneous archetypes that have seen some experimentation, these include:
- Midrange Korwa builds that try to make use of Forest Defender in conjunction of various buff cards as a means of board control. The problem with Korwa decks is that they don’t have a real win condition and still can’t deal with huge proactive tempo turns like Fleeting Joy boards or Rune decks playing Adjudication and 1-2xZealots of Truth. An interesting take on the archetype is Satellite’s list that specifically doesn’t run any 6-drops, making it so that Liza tutors either a Korwa or a Forest Defender.
- Sky Devouring Horror OTK lists are a type of Forest deck that have seen some fringe experimentation previously and rely on using removal spells, Yggdrasil‘s card draw tokens and bounce effects like Nature’s Guidance with Flower of Fairies to get to the 7-card threshold. The problem with the archetype is that going through one turn of setup only results in 13 damage, and in order to get an actual OTK, you have to have two turns of setup, which isn’t impossible with card draw from Yggdrasil and effects with actual board impact like Aria’s Whirlwind, but I am still somewhat confused by these types of decks. How does it deal with Wards? How does it kill Machina Shadow through Fleeting Joy? It doesn’t? Understandable, thank you for answering.
- Lord of the Vajano Marsh is also a potential Forest finisher, that can do 10 damage by itself (when evolved), which can be enough against specific decks, especially with Axeman procs and various bounce effects, which are Nature’s Guidance and Paula. There technically are some other fringe bounce effects (Swiftgait Okami/Tart Man/Rose Gardener), but they are either too expensive or require an evolve. Lord of Vajano Marsh could have some potential in the future, but without another helpful exploit or better bounce effects in future sets, the card doesn’t seem too promising currently.
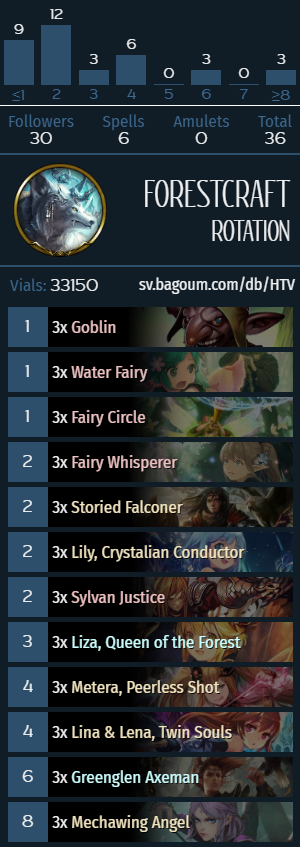
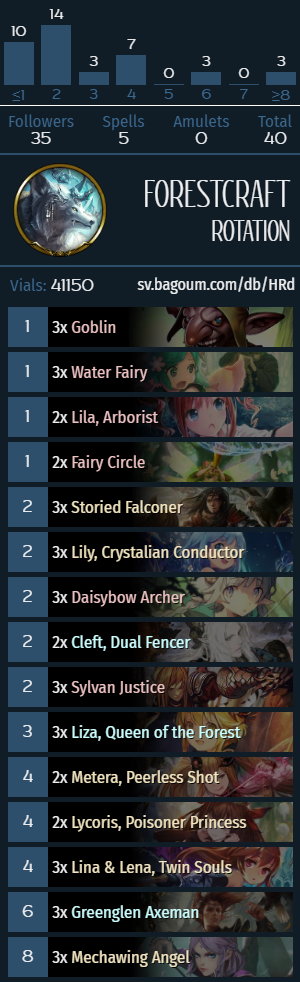
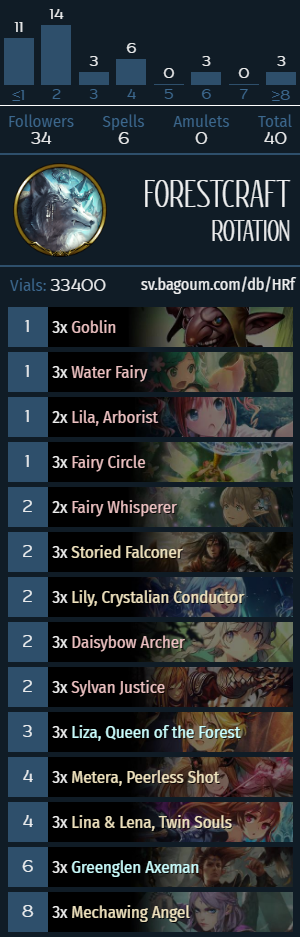
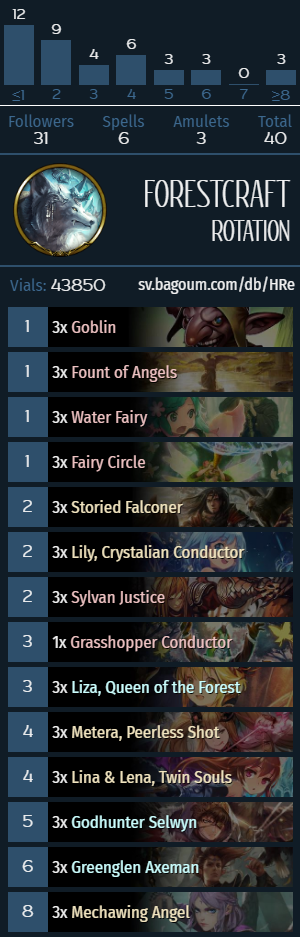
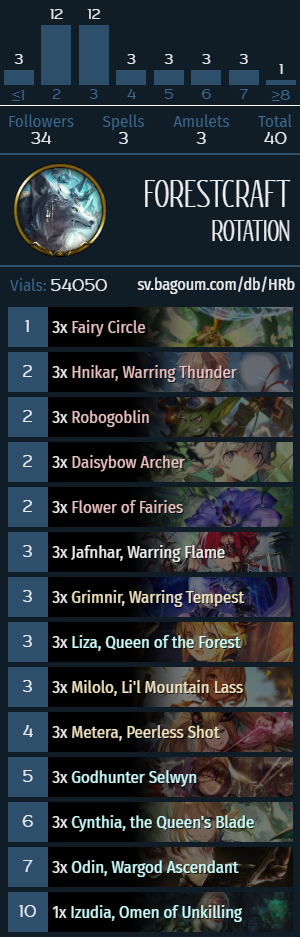
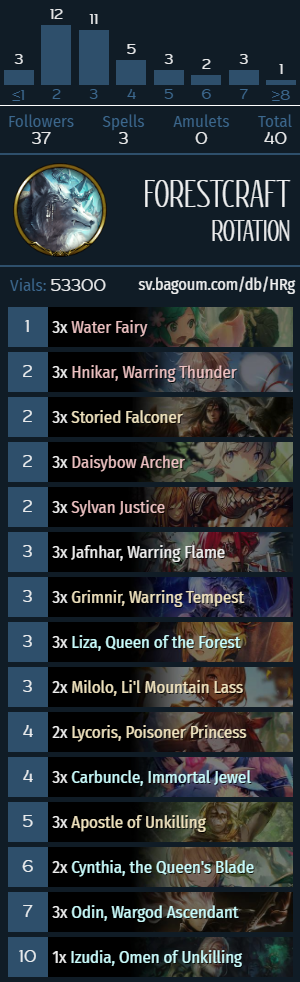

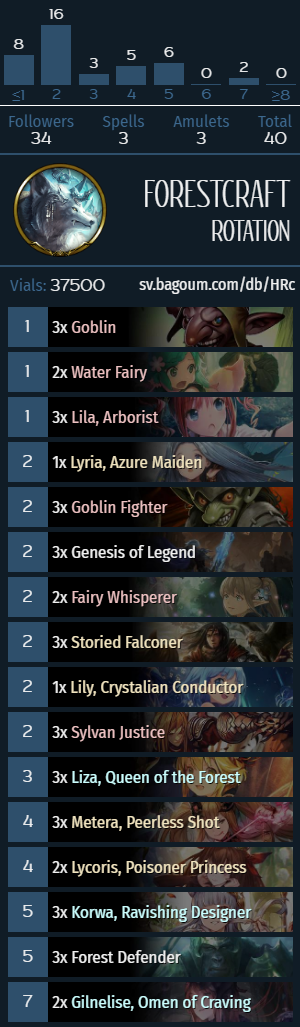
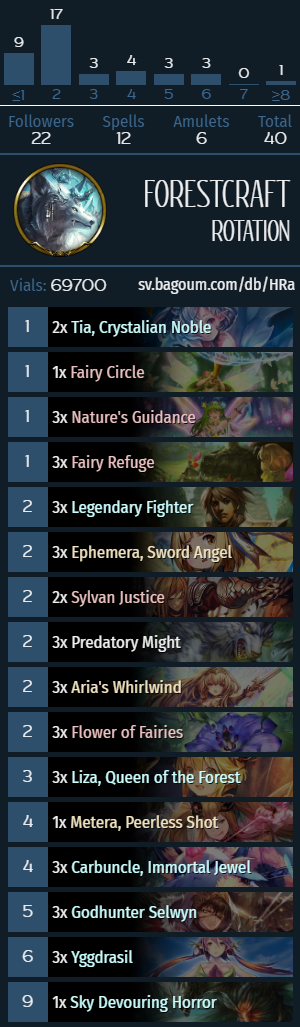
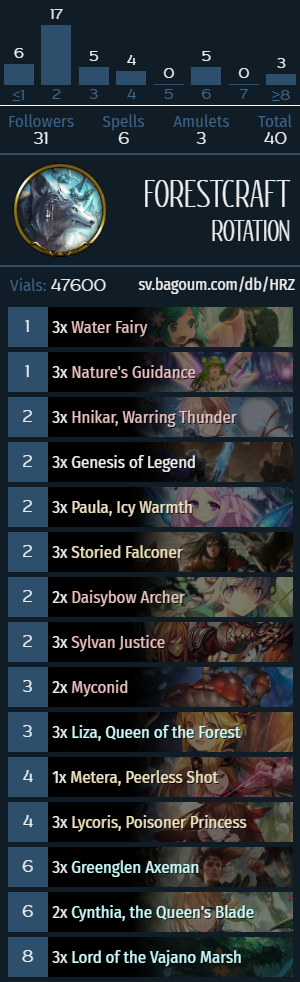
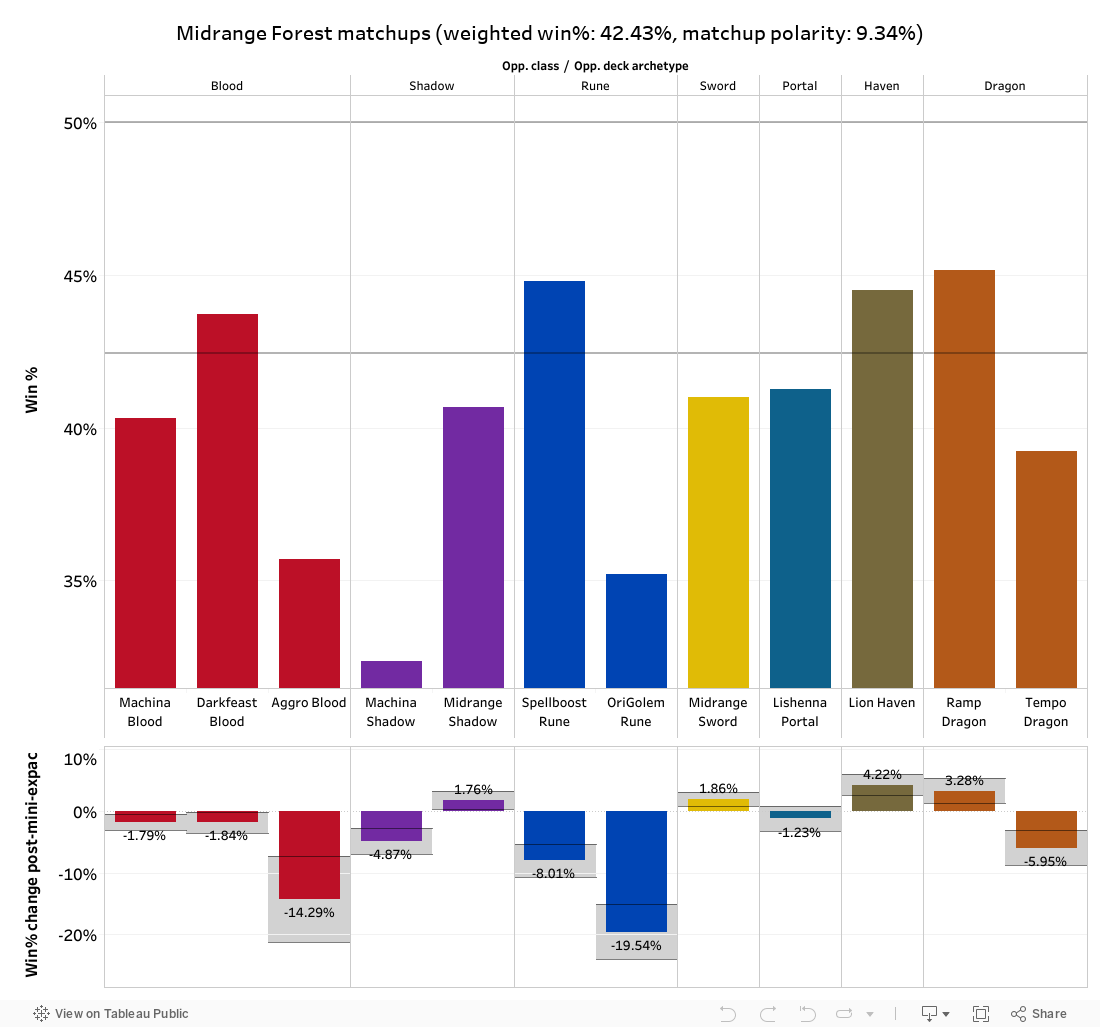
Midrange Forest is the only category of Forest decks on Shadowlog with a high enough sample size to discuss matchup winrates. This category most likely includes a few different Forest archetypes. Generally, it appears that although the mini-expansion has had a positive impact on performance of Midrange Forest against midrange Sword and Shadow, Forest decks have a particularly miserable time against Machina Shadow and Golem Rune. Although there technically are no decks in the Rotation format that are unfavored against Midrange Forest, DFB Blood and Spellboost (Machina) Rune have a 50/50 matchup against Midrange Forest (within margin of random error caused by the low sample size).

[ps2id id=’stats’/]
Stats corner