Shisogenius’s Meta Insight 3/9
“Meta Insight” are a series of articles covering the differences between various Shadowverse deck archetypes, their role in the metagame, common play patterns and tech cards.

Burial Rite Shadow
Identifying cards (BR/Midrange): Goblin Queen, Shuten-Doji, Io, Journeymage, Fieran, Havensent Wind God, Conquering Dreadlord, Milteo, the Lovers, Ruinblade Reaper.
Identifying cards (Reanimate): Kasha, Deathbringer, Fatal Order, Path to Perdition, He Who Once Rocked.
Burial Rite Shadow is a blanket term for midrange Shadow decks that utilize the Burial Rite synergy package (Demonic Procession, Undead Parade, Savoring Slash, Bone Maven, etc.) to rapidly generate Shadows while cycling through your deck, which in turn activates the deck’s primary win condition, Gremory. In the context of the current Rotation format, this description covers two distinct Shadow archetypes, which I am going to categorize as “Midrange” and “Reanimate” BR Shadow, with the main difference between the two decks being the nature of their win condition: both decks tend to run Gremory, Invincible Monster Trio and some number of Necroimpulses, but BR/Midrange Shadow can also utilize Ruinblade Reaper and the Shuten-Doji/Io package in the late game and often runs proactive Invocation cards (Fieran and Dreadlord) that bolster its midgame turns; while Reanimate Shadow includes the package of Deathbringer/Fatal Order to interact in the midgame, with a lot of the deck’s late-game damage coming from Path to Perdition, which not only pushes 7+ damage by itself, but also transforms your healing/ interaction effects (Fatal Order/Bonenanza Necromancer) into damage. I should also note that there can be some intermixing between the two Shadow decks: generally speaking, you don’t want Ruinblade Reapers in the same deck as Deathbringers, and decks that don’t run Milteo tend to not include Fieran/Conquering Dreadlord, but it’s obviously not as if you’d be charged with thoughtcrime the moment you’d consider putting Kasha into a Midrange Shadow list, but it’s more that Midrange Shadow lists tend to run Goblin Queen in that card slot as it aligns with the archetype’s game plan a bit better (for that specific example), so the distinction between the two archetypes is more so predicated on what the win condition of that specific deck tends to be, and the cards listed in the “identifying cards” section aren’t set in stone.
BR/Midrange Shadow is a more proactive and well-rounded version of the archetype, with the main advantage of the archetype compared to Reanimate lists being a more proactive midgame (which obviously depends on how many Invocation cards you’re running), where it is not uncommon for Midrange Shadow lists to win with board tempo (as in, without activating Gremory) against tempo-oriented decks (e.g., Loxis Forest, Baal Blood, Vincent Rune): in some of those (non-Vincent Rune) matchups, simply keeping your life total high and resolving double IMT on turn 7 can be enough to seal the deal if the opponent is trying to race you. With that said, Ruinblade Reaper is another card that is quite important and changes the deck’s matchup spread: against decks like Sanctuary Haven, recurring an RBR with Bonenanza Necromancer is a win condition in and of itself if you manage to do so around turn 8-ish, and in a similar vein, if you manage to resolve RBR in a BR Shadow mirror (be it a Midrange or Reanimate list, but this is obviously more applicable to Reanimate lists due to their reliance on Path to Perdition) either to answer the opponent’s board state or to prevent them from getting to active Gremory thresholds, it is often pretty backbreaking, so in that sense, Midrange Shadow is a deck that primarily targets slower archetypes, and depending on the exact construction, can either be more tempo-oriented or more control-based.
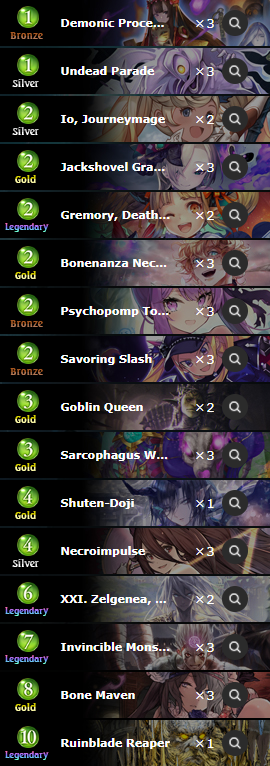
BR/Midrange Shadow skeleton
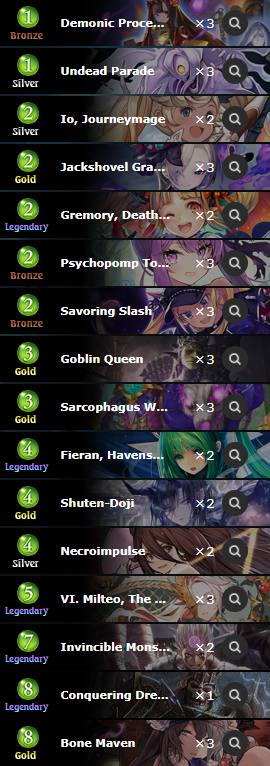
Reanimate Shadow skeleton


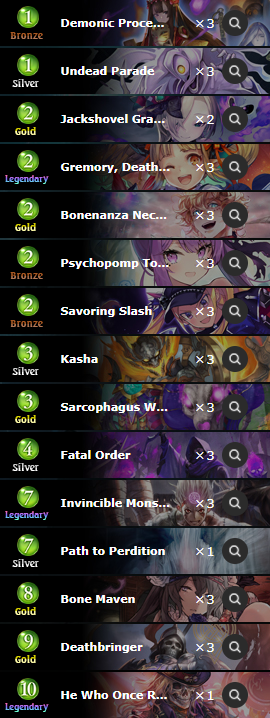
Reanimate Shadow has the obvious advantage of the Deathbringer + Fatal Order package wiping the floor with fair tempo decks like Loxis Forest (that can’t really develop more than 2-3 followers a turn), which allows the archetype to skimp on some of its early- and mid-game cards (which is where the preference for Kasha over Goblin Queen comes from, for example), but conversely, also means that you have to rely on Path to Perdition as your win condition against control decks (such as Sanctuary Haven), which means that if your opponent isn’t doing anything proactive, you’re going to be deploying your threats a lot slower than Midrange Shadow would, even if the total number of threats you have (IMT/Necroimpulse/Path and Bone Maven, kind of) is pretty comparable between the two archetypes. For that reason, Reanimate Shadow is a better choice in tempo-dominated metagames (e.g., if you’re expecting to face a lot of Aggro Dragon/Loxis Forest/Vincent Rune/Baal Blood), but it is worse than BR/Midrange Shadow against reactive decks like Sanctuary Haven/Roost Dragon/Karyl Rune, and can even get outvalued by some of the worst decks of the format (namely, Midrange Sword and Evolve Portal) if they run anti-Amulet tech cards (read: Resolve of the Fallen).
Mulligan priority
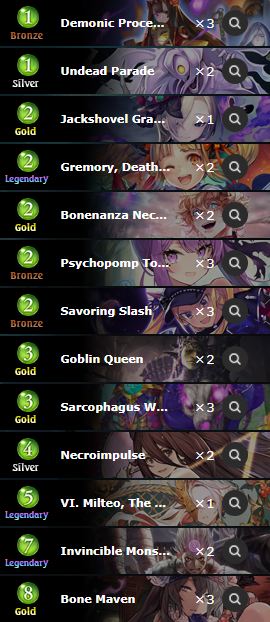
- Always keep Undead Parade, Demonic Procession, Kasha and Sarcophagus Wraith.
- Keep Psychopomp Tour Guide with Parade.
- Keep Savoring Slash against Shadow/Dragon/Forest/Portal.
- Keep Goblin Queen going second. Also keep it going first if you either have a 1-2 curve or a non-Wraith hand with a Jackshovel.
- Keep Bonenanza Necromancer if you’re going first or if you’re up against Dragon/Haven. If you’re not keeping Bonenanza Necromancer, keep Jackshovel Gravedigger (even when not going first).
The mulligan priority for the two archetypes has a lot of overlap and generally involves keeping card draw that can advance your game plan and develop early-game tempo/contest the board. An important factor to keep track of in the context of this Burial Rite-based game of solitaire is that most BR cards leave you with a card disadvantage, so if you don’t have any cards that draw (or generate) 2 cards by themselves (e.g., Wraith, Kasha, Goblin Queen, Tour Guide) and draw too many spells, the BR engine can fizzle if you run out of followers to discard. In addition to that, sticking a Bonenanza Necromancer on turn 2 often allows you to draw 2-3 extra cards, which can enable some of the fastest Gremory setups the deck can pull off, but if you’re on the draw against proactive classes, Necromancer is unlikely to stick, but against classes that don’t do anything in the early game, it is often correct to keep, as even if the opponent has an answer, they will either have to waste a Cursed Furor/Blind Justice, which is a beneficial exchange for the Shadow player. This is appplicable to Dragon/Haven, and if you somehow know that your opponent’s on Spellboost Rune, Bonenanza Necromancer is a pretty safe keep as well.
Optional inclusions and tech cards (BR/midrange)
- Ruinblade Reaper is a tech card for the Shadow mirror, various Amulet-based control decks (e.g., Sanctuary Haven and Roost Dragon) and “fair” midrange decks (e.g., Midrange Sword). The primary purpose of RBR in the current Rotation format is being an anti-Haven tech card, as bringing back an RBR alongside a Blight-proof threat around turn 8-ish (e.g., Bone Maven and then evolving the 6/5, or simply a Conquering Dreadlord) is pretty backbreaking for Sanctuary Haven, and, in a similar vein, if you’re going off with Gremory in a Shadow mirror before your opponent is in Gremory range, a resolved RBR effectively shuts down the opponent from doing anything productive in response. Since the main way of summoning RBR is generally through Bonenanza Necromancer, I don’t believe that there is much merit to running more than 1-2 copies of RBR (the in-hand discount can be awkward to activate in relevant matchups) with the amount of card draw BR Shadow has (the deck can often draw 30+ cards by turns 8-9), I’ve had very good results with a single copy of RBR against Sanctuary Haven, and would advise against running 2 or more copies for general ladder play, though a lot of tournament-oriented lists are split between either running 0 copies (for players that are trying to target Dragon/Forest) or 2 copies (lineups that target Haven), the latter sometimes cutting Invincible Monster Trio as well (which I wouldn’t really recommend for the high matchup variance of the current ladder environment).
- Conquering Dreadlord and Fieran are tech cards that specifically help in proactive matchups (e.g., Loxis Forest, Baal Blood, Vincent Rune) by way of generating free tempo in the midgame. The upside of Invocation followers in this specific deck is that you can still pitch these cards to Burial Rite effects even if you do end up drawing them (and Fieran is even Procession-compatible!), but the drawback is that sometimes you’re going to be drawing unplayable cards. An alternative to Invocation cards is to simply include more card draw (e.g., Kasha), which cuts down on the random variance, but obviously makes the deck weaker against Forest/Blood. I personally prefer limiting the number of Invocation cards in most decks I play (partly due to the frustratingly random nature of their effects, and partly due to the fact that these cards cut into your tech card slots and make the deck less flexible), but Invocation cards are perfectly valid inclusions in the deck if you don’t have a problem with the draw variance these cards introduce.
- Milteo is an optional inclusion that complements Invocation cards (Fieran and Dreadlord) in particular, and is generally a passable midgame play in the deck. Milteo is pretty clunky and can be difficult to resolve against Loxis Forest/Aggro Dragon, and a lot of decks have answers that prevent Milteo card draw, either incidentally or intentionally, so Milteo is pretty cuttable in the current format. Since the most likely (46.875%) split is 2-4, Milteo has notable synergy with proactive 4-drops (Fieran, Shuten-Doji and Goblin Queen tokens), but since the second most likely (31.25%) split is 3-3, in a non-trivial amount of cases, Milteo will bring back two Sacrophagus Wraiths, which is far from ideal, and that is even without going into the lowroll cases (the 1-5, which happens 18.75% of the time, and the 0-6 split, which is 3.125%). With these factors in mind, I’ve personally found Milteo to be quite cuttable so long as you’re not running 4+ Invocation cards, but it is obviously somewhat meta-dependant.
- Zelgenea is primarily an anti-Dragon/Blood tech card that brings some valuable healing to the archetype. With Bone Maven in the picture and most Shadow lists cutting the Io package, BR Shadow has a tendency to get burned out by decks with a lot of reach, and 1-2 Zelgenea improve those matchups by a very significant margin. It can be said that Zelgenea somewhat competes with Milteo, with both of the cards being these clunky midgame threats, and I would personally consider at least a 1-of Zelgenea necessary for general ladder play, but if you’re trying to pack more Dreadlords/Fierans, it is generally one of the first cards to get cut.
- Shuten-Doji and Io, Journeymage are an optional package that give the deck additional Gremory pay-offs, with Shuten-Doji being a 4-mana Gremory reset (which is particularly relevant in games when you draw all of your Gremories), and Io is a passable play in the early game and a good mana sink in the post-Gremory stages of the game, and can push a lot of damage if you have Shuten-Doji going. The downside of Shuten-Doji is that the card is often uncastable pre-Gremory if the deck is running well (you don’t want to waste 8 Shadows on it), so the best Io/Shuten splits are generally either even (e.g., 2/2) or with a slant towards more copies of Io (e.g., 2/1 or 3/2), as Io is a better stand-alone card and is better in multiples, although if you’re running 2 or more RBRs and end up casting it from hand often, it is not that unreasonable to run Shuten without Io as well.
- Goblin Queen is a tech card for tempo-based matchups, with the main application of the card being that it a “draw 2” effect in the early game and can represent 10 power on turn 4 when going second. Goblin Queen has synergy with Fieran and works particularly well with BR effects, as it generates 2 followers to “bury”, but it obviously doesn’t draw cards from your deck, so it’s not as effective at activating Gremory as Sarcophagus Wraith. Goblin Queen is pretty interchangeable with Kasha (the latter is a bit better against control decks, while Goblin Queen is more of a tempo card) in lists that don’t include Milteo, but Kasha obviously always fetches up a Psychopomp as once of its draws, and Goblin Queen has natural synergy with Milteo by virtue of its 5/5 token being a 4-drop, so most BR/Midrange Shadow lists tend to include Goblin Queen in their standard configuration, but Kasha is also an option in that card slot if you’re trying to be more control-oriented.
Optional inclusions and tech cards (Reanimate)
- Path to Perdition is a tech card for healing-heavy matchups (primarily Sanctuary Haven and Roost Dragon) and converts some of your rective tools into late-game face damage. I would personally consider Path to Perdition more or less mandatory as at least a 1-of, and if you’re seeing a lot of Haven, I’d consider running a second copy. In a similar fashion to Ruinblade Reaper, Burial Rite-based Shadow decks can get away with running these “silver bullet” answers to specific decks in the format due to how much card draw these decks have (and in the case of followers like RBR, due to being able to recur them later in the game if you’re forced to use it for Burial Rite purposes in the early game), so I’ve personally found 1xPath to be sufficient, but if you’re facing decks with incidental Amulet answers (e.g., Ruinblade Reaper in BR Shadow lists, or Dragon-Devouring Dread in Roost Dragon) or a lot of Sanctuary Haven, a second copy could be something to consider.
- Necroimpulse is the main card that competes with Path to Perdition for its card slots: certainly, it is less efficient in terms of raw damage, but in a lot of tempo-oriented matchups, once you manage to stabilize, you don’t really need the whole 14-damage Perdition setup to close out games, and Necroimpulse is more than sufficient, so if you’re facing a lot of tempo-oriented decks, a 1-of Path and 1-2xNecroimpulse are a more well-rounded configuration than double Path/0xImpulse builds of the deck.
- Kasha is the 3-drop of choice in most Reanimate lists, due to the deck being a lot more reliant on Burial Rite setups and generally less tempo-oriented. With that said, a lot of the factors mentioned in the Midrange section apply to Reanimate lists as well: if you want to be a bit more proactive, Kasha can be swapped out for Goblin Queen, although Goblin Queen obviously gets a lot happier in a Milteo deck, and most Reanimate Shadow players avoid getting in the way of such a lovely couple.
- He Who Once Rocked was an optional inclusion in early mini-expansion builds of Reanimate Shadow, primarily as a an additional late-game aimed at decks of the Sanctuary Haven/Roost Dragon variety. Generally speaking, a 1-of HWOR isn’t going to affect your ability to recur Deathbringers in matchups where it’s relevant, as you can always just use it for its Accelerate mode, after which point Deathbringers are more likely to get reanimated (since you’re running more Deathbringers and probably “bury” more of them on average), and in matchups where you just want as much damage as possible, if you Burial Rite the initial HWOR, you will always get it with Fatal Order/Necromancer (because it costs 10 and Deathbringer costs 9). As the deck developed, it seems that the consensus has settled on running an extra copy of Path to Perdition instead of HWOR, as it doesn’t mess with your Reanimate pool, and I am personally of the opinion that everything HWOR does for the deck, an extra Necroimpulse would do better, so I wouldn’t recommend
He Who Once Rocked . The old skeleton’s glory days are long over, and it seems that he only gets to rock in Atomy decks these days.
Aggro Shadow
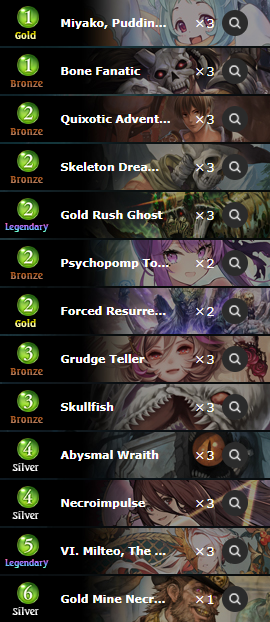
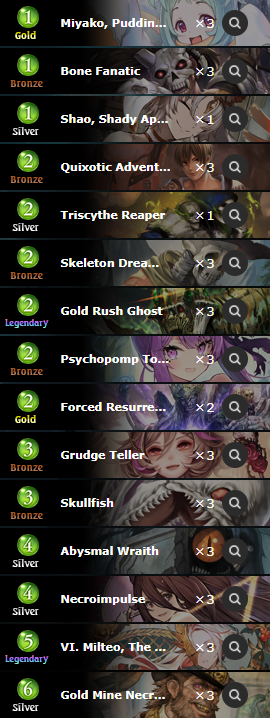
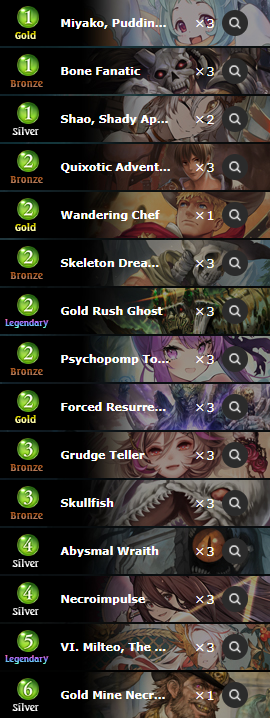
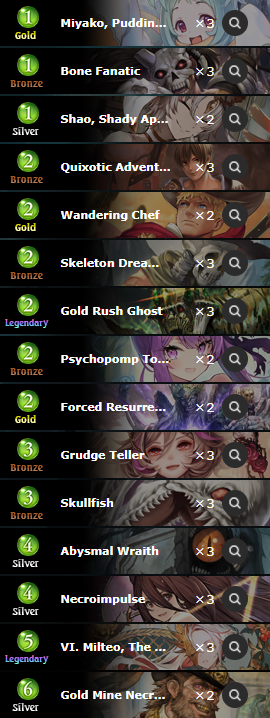
Identifying cards: Miyako, Pudding Poltergeist, Quixotic Adventurer, Skeleton Dreamer, Grudge Teller, Skullfish, Abysmal Wraith, Gold Mine Necromancer, Forced Resurrection.
Aggro Shadow is an archetype that does what it says on the tin: the deck plays an aggressive curve of early-game followers utilizing the Vehicle package and beats up archetypes with weaker early game configurations by overwhelming them with chip damage and efficient followers. A key aspect of the archetype is the 3-drop synergy package, with cards like Grudge Teller/Skullfish and Forced Resurrection and Gold Mine Necromancer, which work particularly well with the Vehicle-based 2-drops of the archetype (Dreamer/Quixotic). Due to this 3-drop-centric configuration, Milteo is a particularly valuable card in the deck: the only 4-drop you’re playing is Abysmal Wraith (which you’re always happy to get), but if you don’t have an Abysmal Wraith in your Reanimate pool, even the 4-2 or 5-1 Milteo splits push some chip damage, although the 3-3 split is generally the best one (even if it only occurs 31.25% of the time).
In a metagame sense, Aggro Shadow does well against decks with weak early game curves (e.g., Aggro Dragon, Midrange Sword, Spellboost Rune, etc.), but the archetype struggles against Forest (as a blanket statement, but to be more specific, Aerin is a huge pain in Aggro Shadow’s backside, and both Accelerate Forest and Loxis Forest are fast enough decks to race Shadow), and the Neutral-based “Control package” of Archangel of Remembrance/Fluffy Angel/Ramiel/Embodiment of Cocytus/etc., which are played in a variety of decks, but are most prevalent in decks like Karyl Rune and Sanctuary Haven. Broadly speaking, Aggro Shadow is a very good ladder deck, as the surprise factor (as in, players often mulligan for BR Shadow and don’t respond to your early developments appropriately) can be enough to steal wins against Dragon and in Shadow mirrors, but the archetype gets way worse in open-decklist environments due to that factor not being present. Certainly, the deck still has good matchups: it still farms Sword/ Spellboost Rune/etc. no matter how much they know about your deck, but it is nevertheless played less in tournament settings. Be that as it may, even if the deck is very linear and not particularly exciting in terms of its play patterns, it is probably one of the best archetypes in the format in terms of its (vial) cost-performance ratio.
Mulligan priority
- Always keep Bone Fanatic, Miyako or Shao (prioritizing Fanatic over Miyako over Shao).
- Always keep Grudge Teller or Skullfish, prioritizing the former against Dragon/Forest/Haven/Blood/Rune/Sword and the latter against other classes.
- If you’re keeping a 1-drop and a 3-drop, also keep Abysmal Wraith. Going second, it’s also fine to keep Gold Rush Ghost in this situation.
The Aggro Shadow mulligans are very straightforward and generally involve trying to hit a good 1-2-3-4 curve. The most important points in the curve are the 1-drops (since you’re only running 6 and you’re seeing the least of your deck to have a 1-drop on turn 1), the 3-drops (since those set up Gold Mine/Milteo/Forced Resurrection), and the least important parts of the curve are 4-drops (even if you don’t have a Wraith on 4, you can usually find an efficient line of play that uses up all your mana) and 2-drops (which are pretty redundant with one another and are the most populated spot in the deck’s curve, with most lists running 12-13 playable ones). In terms of priority, you generally prioritize Fanatic over other 1-drops since it trades better and works with Psychopomp, and for 3-drops, you generally prefer cards that don’t eat into your Shadow count in most matchups (even more so when you bring them back repeatedly), but in matchups where you tend to trade a lot (disgusting, I know), Skullfish is slightly better to have, which is primarily relevant against Portal, West Wind Haven and in the Shadow mirror.
Optional inclusions and tech cards
- Shao, Shady Apothecary is an optional inclusion that makes your early game a little more robust and can be used during later points of the game for some (inefficient) damage. The problem with Shao is that it is the worst of your 1-drops, and it also interacts awkwardly with Vehicle-based Amulets, and if you take into consideration the fact that games in which you use Shao‘s Necromancy effect, you’re basically locking yourself out of activating Necroimpulse (particularly in matches where you bring back Skullfish a lot). Shao is a pretty low-value card, so it’s in a similar spot to Gold Mine Necromancer (which is another “1-mana” midgame card), and even if you generally don’t want to pay the full retail for Gold Mine Necromancer, it is better than Shao when you’re out of gas and trying to set up for a Necroimpulse.
- Gold Mine Necromancer and Forced Resurrection are optional inclusions that bring a lot of value to the 3-drop package. Of the two cards, Resurrection has the important utility of dealing with non-Set Wards, and in some matchups, you can even take advantage of the opponent not having early-game followers (which can come up against Dragon or decks like Sanctuary Haven and Karyl Rune) to play Resurrection on your own followers for tempo on turn 4, although this can obviously come back to bite you against Fluffy Angel decks. Gold Mine is generally a lot more low-value than Resurrection, so it is more cuttable, and can be replaced with extra 2-drops or Shao if you’re facing a lot of aggressive mirrors.
- Wandering Chef is an optional inclusion that helps in aggressive matchups, more specifically, against Aggro Dragon. Shadow has a variety of proactive 2-drops that you can run (e.g., Death of the Party/Triscythe Reaper/Grudge Knight/etc.), and these types of cards improve your matchups against either decks with a lot of chip damage (e.g., Aggro Dragon) or archetypes that force you to trade a lot, where having a consistent early curve (as in, more Shaos and 2-drops) with good mana efficiency is valuable. I’ve personally found the standard 12 2-drop setup more than sufficient, so I get the impression that most of these optional 2-drops are a bit overkill and make you run of gas more often, so I personally prefer the 3xGold Mine configuration, but there are obviously always going to be 1-2 flex slots left over, which can either be a 1-of Shao or whichever 2-drop you might prefer, which don’t really make a huge difference for a fast deck with effectively 0 card draw.

Loxis Forest
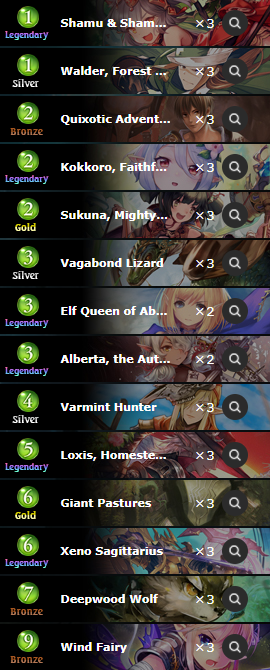
Identifying cards: Quixotic Adventurer, Vagabond Lizard, Loxis, Homestead Pioneer, Shamu and Shama, Posh Felines, Sukuna, Mighty Malleteer.
Loxis Forest is a proactive tempo deck that specializes in setting up powerful tempo swings with its eponymous card, Loxis, on turns 5-6, which effectively allows you to cheat mana on 1-mana Amulets (e.g., Xeno, Pastures, Vagabond Lizard tokens, etc.) and up to 3 bounce effects (or Storm 1-drops, such as Walder and Shamu and Shama later on in the chain) to set up a threatening board state while pushing a lot of face damage. Generating all of those Vehicles with Loxis also enables Sukuna during the later stages of the game, which is generally going to be your main tool for finishing the job that Loxis and the gang didn’t quite get done. Compared to pre-EA builds of the archetype, Loxis Forest isn’t as good at going off without any additional setup the way it did when the Tree package was still Rotation-legal (as Xeno Sagittarius is worse than Fertile Aether for what the deck’s trying to do), so the archetype is a bit more aggressive and requires some cards that were previously considered staples of Aggro/Tempo Forest, such as Quixotic Adventurer and Vagabond Lizard. With that said, Loxis can no longer go off completely by itself, so you usually have to do a bit of setup on turn 4, ideally by setting up 2 Vehicle Amulets, which can then allow you to go up the refund chain to play multiple Storm cards on the same turn.
In the early game, you’re mostly just cycling and setting up, but the deck goes off a lot faster than a lot of other decks in the Rotation format, and for a lot of conventional midrange archetypes, not answering the turn 5 Loxis setup usually means losing the game on the following turn. While you can certainly play a more proactive game if you curve out well in the early game (e.g., with Quixotic Adventurers/Vagabond Lizards or an early Alberta), Loxis Forest tends to lose games where it’s pressured in the early game, so the deck strugges somewhat against decks like Vincent Rune and Aggro Shadow, but can generally race slower proactive decks (e.g., Burial Rite Shadow, Aggro Dragon, etc.), and the deck is generally moderately unfavored against Sanctuary Haven (again, you have to be aggressive in the early game to pressure the Haven player, and you’re not a full-on Rivaylian Bandit deck, so it’s not always something you can afford to pull off), and while Alberta certainly helps against healing-heavy decks, if your control opponent manages to keep up a relatively high life total and stabilize behind a big Ward, Loxis Forest will have issues closing out games, which is one of the reasons for the archetype’s recent decline in popularity. The deck is still one of the best-performing archetypes in the Rotation format at the time of writing, but due to having a bit of a learning curve, I wouldn’t exactly recommend blindly picking up the archetype to most players. Of course, if you’re familiar with prior iterations of the deck or the Unlimited build of the archetype, Loxis Forest could very well be one of the best ladder decks of the Rotation format, but it is somewhat meta-dependant and often not very straightforward to pilot.
Mulligan priority
- Always keep Kokkoro, and either Elf Queen or Vagabond Lizard.
- Keep Loxis with Vagabond Lizard/Varmint Hunter.
- Keep Alberta against Haven/Dragon/Forest/Rune and against Blood/Shadow/Sword when going first.
- Keep Xeno Sagittarius with Deepwood Wolf/Wind Fairy.
- If you’re not keeping Kokkoro, keep Quixotic Adventurer.
- Going first against Shadow/Dragon, keep Walder as a 1-drop if you have a 2-drop or a Xeno with any of your bounce effects.


Loxis Forest can certainly just cycle through its deck in the early game, in a similar manner to its Accelerate counterpart, but it can also play a more tempo-centric game: if you’re landing followers on curve, it makes your Loxis setup that much more backbreaking. To this end, proactive cards that put pressure on the opponent (Quixotic Adventurer or turn 1 Walder in relevant matchups) are valuable, and cards that can set up Loxis on turn 5 by themselves (Varmint Hunter/Vagabond Lizard) are at a premium. Alberta is a somewhat matchup-dependant card, in that you want to have it against decks that don’t develop anything in the early game, and it’s only really good against proactive decks if you can eat a 2-drop with it, so I tend to not keep Alberta going second if I’m expecting my opponent to have a 2-3 curve. Keeping these proactive openings against Rune can be a bit of a crapshoot, as if you’re up against Karyl/Spellboost Rune, it’s obviously a great card, but if you’re up against Vincent Rune and your opponent starts doing Rivaylian Bandit things, an early-game Alberta looks pretty silly, but in my experience, Vincent Rune is less popular on ladder than all other Rune archetypes combined, so the odds are generally in your favor, even if it’s a bit of a gamble.
Optional inclusions and tech cards
- Alberta, Autumnblade is primarily a tech card against slower decks and makes it so the deck can function (to some extent) without going through the whole Loxis setup, and makes your Loxis turns better if you have Alberta primed and ready to go. These factors make Alberta a great card against decks that don’t develop followers in the early game (e.g., Haven/Dragon/non-Vincent Rune, and to a lesser extent, the Forest mirror), but mean that it’s a bit of a gamble against decks with more proactive early game setups (e.g., Shadow/Blood/etc.). With these factors in mind, Alberta is an important tech card against Haven/Dragon, but gets worse the more Shadow/Blood/Sword you’re facing. Alberta primarily competes with Walder (and to a lesser extent, Elf Queen) for card slots, so running 2-3 Alberta generally means that your Loxis turns can be a bit more clunky (since you have access to fewer copies of Walder) if you don’t have Alberta set up, which is the price you pay for trying to target reactive decks.
- Ramiel is an optional inclusion that helps you set up a slower Loxis swing turn when going second. Ramiel is a fine card, but the main strength of Loxis Forest in the Rotation format is that the deck tends to go off on turn 5, and while Ramiel allows for some cute tricks (e.g., Ramiel on 4, Pastures on 5, Loxis into active Sukuna on 6), it is a bit slow against Shadow/Dragon and obviously isn’t particularly great when going first, so it’s generally pushed out by Quixotic Adventurer in a lot of Loxis Forest lists.
Accelerate Forest
Identifying cards: Aerin, Forever Brilliant, Lionel, Woodland Shadow, Fairy Flowering, Levon, Scentbound Sword.
Accelerate Forest is a reactive combo deck that utilizes the Accelerate package to generate damage through one of its two win conditions (Walder and Fairy Flowering), and controls the board with various combinations of reactive Accelerate cards (Skipper/Lionel/Aerin) and bounce effects in combination with Levon and Xeno Sagittarius, which can be used for board control and card draw, respectively. The deck generally wins through resolving a big Walder, and against healing-heavy decks, you sometimes need more damage, in which case you can set up a proper 10-mana combo of Varmint Hunter + Flowering + Walder. An important aspect of the archetype is fetching up Walders: you’re running 3 copies of the card, and the first couple of copies can be used for tempo/chip damage without worrying too much about it, but the third copy almost always must be saved to be a finisher. For that reason, it is often correct to set up a turn of 2 Accelerate cards followed up by a bounce effect (Deepwood or Wind Fairy) at some point throughout the game, which sets up your win condition. Another tricky card to mention in this context is Levon: in aggressive matchups (e.g., Aggro Dragon/Loxis Forest/Baal Blood/etc.), Levon is often the card that allows you to race the opponent, and if you have an early Levon in those matchups with enough targets to increase its KDA, Walder is not as high of a priority. The other effect to be aware of in specific matchups is Xeno Sagittarius: in the vast majority of matches, you can just use it to cycle your excess bounce effects and itself, but against specific decks (primarily applies to Shadow, but also applies to decks like Midrange Sword and West Wind Haven and such), it can be important to save Xeno for a board clear.
Accelerate Forest is one of the better decks in the format at dealing with Shadow, it can race or go over the top of slower control/combo decks (e.g., Sanctuary Haven and Roost Dragon), and one of the big downsides of the archetype is its weak matchup against Aggro Dragon: the matchup is certainly not unwinnable, but it is difficult to race Aggro Dragon in a conventional manner, and you don’t have nearly enough defensive tools to heal out of range of Aggro Dragon’s damage. In addition to that, the conventional wisdom is that Accelerate Forest is unfavored against Loxis decks, but the matchup is certainly not unwinnable in my experience: if you have a good opening with a bit of early pressure and the Loxis Forest player has a slow (draw-heavy) opening, it is not impossible to pressure the Loxis player into wasting their resources to answer your early developments, so it’s more of a tempo-based matchup. With these factors in mind, Accelerate Forest has mostly been pushed out by its Loxis counterpart after the mini-expansion, which is not to say that Accelerate Forest is a bad deck, but more so that Loxis Forest does better against Aggro Dragon, while Accelerate Forest is more of a deck to target Haven with, and due to how the dynamics of the Forest mirror tend to end up working out, Accelerate Forest is a pretty fringe archetype in the current Rotation format.
Mulligan priority
- Always keep Reclusive Ponderer, Kokkoro and Elf Queen.
- Keep Levon against non-Dragon/Haven/Rune classes. Going second, also keep Deepwood Wolf with Levon.
- Keep Xeno Sagittarius with Wind Fairy/Deepwood Wolf.
- Keep Alberta if you’re not keeping Elf Queen going first. Going second, keeping Alberta with Elf Queen is fine.
- Don’t keep Walder.
The mulligan priority for Accelerate Forest is quite straightforward, as you’re primarily looking to cycle through your deck by any means necessary, which includes keeping early-game cantrips and Xeno Sagittarius when it’s paired up with bounce effects. Against proactive follower-based decks, Levon can interact with the opponent’s board, and when paired up with bounce effects, can even set up to be your secondary finisher later in the game. The most clunky part of the Accelerate package is generally the bounce effects, since they require a target to use (meaning that it’s often a bit awkward to utilize these cards during Skipper/Aerin turns), and while it might be an acceptable line of play during the later stages of the game, bouncing Kokkoro/Elf Queen in the early game sets you back in terms of tempo a little too much, so it’s not really something you should be doing against proactive decks. It should be said that just because you’re keeping Elf Queen/Kokkoro, doesn’t necessarily mean that you have to play these cards on curve: if the matchup permits, you can always delay Kokkoro to get 2 cards out of it, and if you’re going second, it is sometimes correct to save Elf Queen for its AoE effect. Unlike its Loxis counterpart, Accelerate Forest isn’t as good at presenting early pressure, with Alberta being just about the only exception as far as proactive cards go (the earlier you set it up, the more opportunities you get to get chip damage out of it), though it’s certainly possible to keep some sort of Pastures + Ponderer or double Pastures hand to start beating down with Walder on turn 2, which is primarily applicable to matchups like Aggro Dragon and Spellboost Rune, but can backfire if you end up against Roost Dragon or Vincent Rune, for example, which is why I wouldn’t recommend doing so blindly in ladder games.
Optional inclusions and tech cards
- Alberta is a tech card for the Forest mirror and other tempo-oriented matchups. Accelerate Forest has a harder time activating Alberta than its Loxis counterpart, but nevertheless, if you can manage to set up an early Alberta, it’s possible to recur it multiple times over the course of the game, particularly during Varmint Hunter and Skipper turns. With these factors in mind, I don’t think it’s unreasonable to run a couple copies of Alberta, trimming some of the copies of Aerin/Lionel/Elf Queen/Varmint, but it’s also not unreasonable to play 0 Alberta, as there isn’t much that Alberta would do for the deck that a third Varmint Hunter wouldn’t. The downside to Alberta is the case of drawing multiple copies of it, as the effect doesn’t stack, and since you’re often cutting healing/interaction to fit in Alberta, the card makes you weaker against proactive midrange decks by proxy, and if you go too deep on cutting Aerins, for example, your matchups against decks like Aggro Shadow start losing percentages as well.
- Xeno Sagittarius is a flex slot in the deck, and mostly competes with Elf Queen and, to a lesser extent, Varmint Hunter. Xeno is an important card to have against Shadow, and I’d personally consider running at least 2xXeno necessary, but if you’re not facing as many “tall-board” proactive decks, then you can get by with a single copy.

Sanctuary Haven
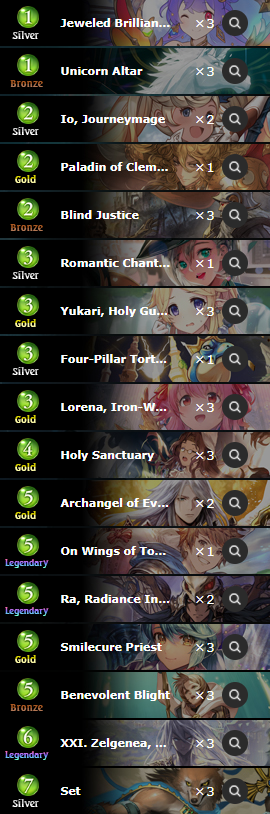
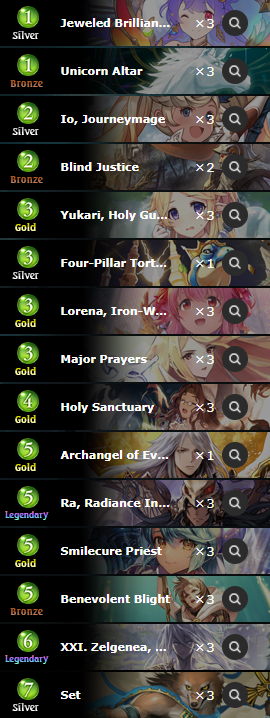
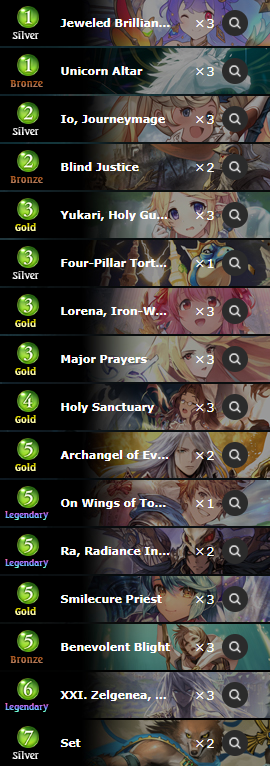
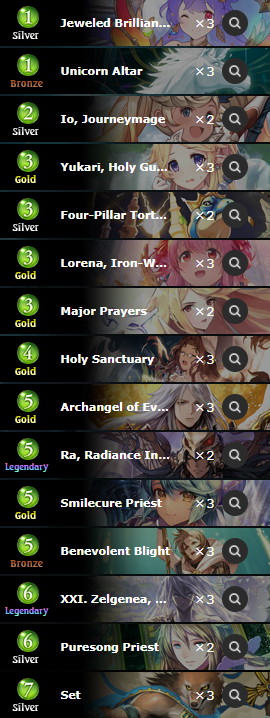
Identifying cards: Jeweled Brilliance, Lorena, Iron-Willed Priest, Holy Sanctuary, Archangel of Evocation.
Sanctuary Haven is a control deck that revolves around its eponymous Amulet card, Holy Sanctuary, which allows the deck to turn healing effects into proactive tempo developments. The archetype generally wins through attrition, with the actual win condition being Ra and Zelgenea damage. The archetype has lost some of its tempo-oriented strengths with the Justine/Respite/Confectioner package rotated out of the format, but Unicorn Altar, Io and, in more recent times, Smilecure Priest, have kept up the archetype’s identity of boring opponents to death, so while some of the tools of the deck are a bit slower, there isn’t much change to the deck’s strategy or decision making.
In a metagame sense, Sanctuary Haven does really well against conventional aggressive decks, which includes straight things like Baal Blood and Aggro Dragon, and to a lesser extent, also applies to decks like Loxis Forest. The archetype can struggle against BR/Midrange Shadow, as you don’t always have answers to all of their threats (due to BR Shadow having a higher threat density), and Ruinblade Reaper is a big problem, however, the archetype does pretty well against Reanimate Shadow builds. Sanctuary Haven is so painfully slow and bad at developing proactive pressure, that other control decks with a combo-style finisher (e.g., Karyl Rune and Roost Dragon) have effectively infinite time to set up their win conditions, and while Archangels of Evocation certainly help the Karyl Rune matchup, Haven has worse card draw than Rune/Dragon, so the odds are never really in your favor. In addition to that, Sanctuary Haven does poorly against decks that can either close games out of hand in a single turn by turn 10-11-ish, which includes decks like Accelerate Forest, Evolve Portal and Disrestan Dragon, most of which are pretty fringe archetypes currently, even more so in a ladder environment, where players have an incentive to play games with shorter game durations, but there are certainly decks in the format that completely crush Sanctuary Haven: if there’s a deck in the format that the Nep/Vaseraga/He Who Once Rocked piles are good against, then Sanctuary Haven is that deck. In my experience, Sanctuary Haven is a consistent, if very slow, ladder deck, although the Ruinblade Reaper/DDD decks can be a bit of a problem, obviously, but a big part of the current Rotation field can really struggle against Sanctuary Haven, so even if the deck is a bit meta-dependant, Sanctuary Haven is very well-positioned in the Rotation format.
Mulligan priority
- Always keep Jeweled Brilliance, Unicorn Altar, Holy Sanctuary and Four-Pillar Tortoise.
- Keep Scripture/Blind Justice against Shadow/Dragon/Portal.
- If you’re not keeping Tortoise, keep Major Prayers.
- Keep Archangel of Evocation against Rune.
The mulligan strategy for Sanctuary Haven generally involves trying to find Sanctuary, and an early Unicorn Altar is similarly quite good. I tend to keep removal spells against aggressive decks, and if you know/suspect that your opponent is on a more aggressive deck (e.g., if you’re playing against Haven in an open-decklist setting and know that you’re up against West Wind Haven), keeping Blind Justice in those cases is also acceptable. Archangel of Evocation is your main out against Karyl Rune, and in my experience, Evocation isn’t bad against Spellboost Rune to a point where you’d be really punished for keeping it (since you’re playing a Yukari deck, it’s generally a decent matchup), so it’s often a fine keep against Rune, even if it’s a bit of a wash against Vincent Rune.


Optional inclusions and tech cards
- Major Prayers and On Wings of Tomorrow are somewhat interchangeable draw spells that have a similar rate to one another. Major Prayers is better at finding answers (since it can hit Blind Justice/Scripture and Blight) as well as Holy Sanctuary, while Wings of Tomorrow is better at finding threats (most notably, Ra and Yukari). Wings also has the rare utility of giving you an extra 5 damage (that goes through Yukari) in Sanctuary Haven mirrors, which tend to end around turn 12-13-ish, but you should obviously be aware of that fact once you get to active Union Burst thresholds, you can no longer draw cards with Wings, so you have to decide whether you’re drawing cards or saving Wings for pressure quite early (around turn 6-7), which makes Wings a bit complicated to optimally utilize in Haven mirrors, and this is not one of the contexts where “a high skill cap card” is equivalent to a “bad” card, but is more of a testament to the fact that Wings of Tomorrow gives you an opportunity to misplay, and keeping note of the damage application of the card can give you a lot of percentages in Haven mirrors. The exact split depends on what you’re trying to target (e.g., Prayers is slightly better against aggressive decks, while Wings is better against midrange/control decks), but as a rule of thumb, Prayers costs less so it’s generally preferable, but I personally have a soft spot for a 1-of Wings, as it helps you close out games a bit faster by avoiding the nightmare scenario of Ra hiding in your bottom 3, and it just makes your ladder games end a bit faster. I know it’s from a different patch, but the irony of the triple Prayers hand with the turn 17 Ra being exact lethal (12 from Ra + 4 from Zelgenea) is not lost on me, what a game.
- Io and Paladin of Clemency are optional inclusions that help contest the board in the early game and can generate healing procs for Sanctuary/Lorena to go off. Io is a bit more proactive (the 1-damage ping is often relevant in the early game), but Paladin does draw a card (and sometimes even two) in a non-trivial amount of cases. In my personal experience, Io does more than Paladin in most cases, and Paladin has a tendency to clog up your board and can often limit your developments if you have 2 Sanctuaries out, so I personally prefer running more copies of Io in this card slot, but if yo’re lighter on card draw, Clemency can be a better choice.
- Blackened Scripture is an anti-aggro tech card that specifically shines against Aggro and Burial Rite Shadow. Generally speaking, Blind Justice is a lot more versatile as an answer and as such is played a lot more, but having some redundancy in matchups where the opponent either has valuable Last Words effects (e.g., Razia) or threatens to bring back their 3-drops repeatedly can be valuable. A slower alternative to Scripture is Acolyte’s Light, which is good against BR Shadow, Sword and Aggro Dragon, but is a bit too slow against Aggro Shadow, so depending on how greedy you want to be, there are ways to customize your suite of removal. Scripture is a bit too loo-impact for the current Rotation format, but a 1-of Acolyte’s Light can be a good inclusion if you’re facing a lot of Shadow.
- Archangel of Evocation is primarily a tech card against generally aggressive decks and Karyl Rune. The issue with Archangel of Evocation is that you don’t always have time to develop (more specifically, evolve) it if you’re behind on tempo, which makes it an awkward card against decks like BR Shadow or Accelerate Forest, but it is a pretty versatile, if cuttable, card in the current Rotation format. Some other options in this card slot include Calm Featherfolk (works well if you play it on 1 and then have Sanctuary on 4, but it’s obviously a worse 5-drop than Evocation and limits your board space) and other strange high-end healing cards like Vice, Death Grip (which I’ve personally found quite underwhelming, but the card is a bit cute if you really want to get get get get got got got got specific decks that can’t deal with untargetable Wards, as it does set you up to have access to multiple 1-mana healing triggers, just don’t let the blood rush to your head).
- Four-Pillar Tortoise is an optional inclusion that helps fetch up Holy Sanctuary and mostly serves as a 4th copy of Jeweled Brilliance. Since the deck never really does anything proactive in the early game, a 1/4 Ward on turn 3 is a fine proactive development by Sanctuary Haven standards, and I personally don’t think there is much of a reason not to play a 1-of Tortoise, as a lot of the deck’s other card draw is significantly worse than the first copy of Tortoise; running more than 1 copy can often be pretty redundant, however, as you only have 3 cards Tortoise can hit in your deck.
- Romantic Chanteuse is a tech card for the Haven mirror and the Baal Blood matchup. Sanctuary Haven mirrors often come down to which player starts playing their Yukaris last (yes, playing Yukari while on full health is worse than playing it when you can also get value out of your other healing cards, shocking, I know), and to a lesser extent, it comes down to which player drew more Yukaris (which can be a factor, but if you’re running a decent amount of card draw, you should be able to dig 25-30 cards deep in a Haven mirror even with a bad draw, as those games tend to take a while), but Chanteuse can rig the odds in your favor by having more quasi-Yukaris in your deck instead. Chanteuse is not as universal as Yukari and doesn’t allow you to generate a board to protect with Yukari, and outside of Haven mirrors, neither stops damage from non-follower sources nor gives you a healing trigger, so I’ve personally found Chanteuse to be pretty underwhelming for ladder play, which is not to say that it’s a bad card in Haven mirrors, but more so that I’d rather play cards that answer a wider range of threats in the format while also helping the Haven mirror (e.g., Wings of Tomorrow has a similar impact to Chanteuse, but is a way better card in a vacuum), but it is a valid choice for tournament lists if you’re expecting to play a lot of Haven mirrors.
West Wind Haven skeleton


West Wind Haven
Identifying cards: Quixotic Adventurer, Wandering Chef, Goblin Queen, Noa, Primal Shipwright, Goddess of the West Wind.
West Wind Haven is a broad name for piles of Shadowverse cards that fulfill the condition of running a playset of Goddess of the West Wind and 2-3 followers that can be legal targets for Goddess of the West Wind, which most often consist of exactly Set and Noa, but can also include 1-2xSofina in some builds of the archetype. The rest of the deck is generally comprised of a Neutral-heavy proactive package of Vehicle cards (e.g., Quixotic Adventurer/Chef), and Accelerate/Crystallize effects that give you things to do in the early game without disrupting your West Wind pool (e.g., Noa/Wilbert/Anvelt/Unicorn Altar/etc.), which in conjunction form a tempo-oriented midrange archetype that tries to aim towards playing a turn 6 Goddess of the West Wind. If the opponent is unable to answer an 8-10 power Noa hiding behind a Set, they often fall behind to a point where the chip damage from Ra/Wilbert is enough to seal the deal. West Wind Haven is a real thinking man’s/woman’s deck: piloting the archetype generally involves trying to play your most expensive card and either attacking the opponent or taking juicy value trades when they’re just too good too pass up. One important thing to note is that for a lot of decks, the only clean answer to Noa pulled by Goddess of the West Wind is Zelgenea, so it’s important to play around the magic number of 15 if you’re trying to resolve a Goddess of the West Wind and suspect that you might be up against a Zelgenea deck, so there is a bit of strategy to the archetype, but it is pretty straightforward (some might even say boring) to pilot.
With the construction of the archetype having a lot of Ward effects and incidental healing, the archetype does really well against both Aggro Shadow and Dragon, with the turn 6 West Wind setup spelling doom for any opponent trying to play a fair game of Shadowverse and not packing any board clears. Speaking of which, West Wind is quite weak against Midrange Sword (which is frankly one of the only strengths of Sword in the format, as Nahtnaught/Alyaska make short work of West Wind Haven’s board developments), Xeno Sagittarius decks (or in more broad terms, Forest in general, and Loxis Forest in particular) and Karyl Rune (Madcap Conjuration is not a card you can really recover from). In that sense, West Wind Haven is a deck that limits the success rate of aggressive decks in the format and punishes midrange decks for not running enough interaction. After the mini-expansion, the hightened presence of Shadow is an issue for West Wind Haven, and even cards like Tiamat negatively affect some of the matchups the archetype used to be favored against it, so the deck has become a lot worse after the patch; nevertheless, the linear nature of the archetype, fast game duration and a relative lack of impactful decision-making make West Wind Haven an excellent archetype for grinding ladder points, and while the deck isn’t super budget-friendly (with Goddess of the West Wind being an old mini-expansion card that wasn’t particularly playable anywhere else), it is arguably the first deck I’d recommend to new and returning players: it is relatively strong against the current metagame, runs a lot of Neutral Rotation staples and is very straightforward to pilot.
Mulligan priority
- Always keep up to one of Anvelt, Unicorn Altar or Noa, in order of priority.
- Keep Ramiel and/or Goblin Queen when going second.
- Keep Wilbert with Anvelt/Noa.
- Keep Goddess of the West Wind with Ramiel going second.
- Keep Ramiel, Quixotic Adventurer, Io or Archangel of Remembrance as a 2-drop against Shadow/Dragon/Portal, in order of priority.
- Keep Rivaylian Bandit with Quixotic Adventurer/Vagabond Lizard.
The mulligan strategy for West Wind Haven generally involves trying to find one of your “highroll”-y Amulet 1-drops, with Anvelt having the biggest potential pay-off, and Noa being the worst option (as it’s often just a vanilla 5/5 at most). In addition to that, the Neutral scam package of Ramiel/Goblin Queen are good cards when going second, and keeping Ramiel going second allows you to play Goddess of the West Wind on turn 5 (which is a highroll, but isn’t that unfair in the grand scheme of things, as your Noa tends to be smaller, and the opponent still gets 6 mana to answer your cards). Keeping both Goblin Queen and Ramiel is often fine, as you get the flexibility of saving the better card for the evolve turn and if all else fails, you can just play them as a 2-3 curve; though the general plan when you have both is to GQ on 3 and then Ramiel into double Goblin on 4, which potentially sets up for a West Wind or Wilbert as follow-up. Against aggressive decks, you have to contest the board to some extent, so having a 2-drop is fine, and if your early curve can support a Rivaylian Bandit activation, that is obviously helpful, if nothing else, as a proactive tempo play.
Optional inclusions and tech cards
- Wandering Chef, Io and Archangel of Remembrance are the 2-drop flex slots, which you can adjust based on what you’re facing. Generally speaking, Chef is the easiest to include and is something I’d consider a no-brainer: it’s pretty easy to activate with Quixotic/Vagabond Lizard/Gabriel and has the best statline of the optional 2-drops you could run. Io adds a bit of reach to the deck, and an be a decent tempo play against BR Shadow (as it can often snipe a 1/1 in the early game). Archangel of Remembrance does a couple of things in the deck: on the one hand, it’s a really good card against Shadow, and on the other hand, it gives the deck an avenue to draw cards with its evolve effect, which is generally worse than Ramiel/Goblin Queen in the vast majority of cases, but is better than nothing. In addition to that, Remembrance can shuffle redundant copies of Set/Noa if you’re trying to set up a good West Wind, which is primarily relevant in Sofina lists (since changing the split in a particular direction makes a tangible difference), but can also apply in the rare cases where you either draw multiple Goddesses of the West Wind or if you draw all 3 of your Sets/Noas. The deck can run any of the mediocre Neutral 2-drops, with Master Sleuth and Vyrn being some of the options I’ve seen the most, but these cards have been mediocre in my testing and I wouldn’t recommend running them.
- Rivaylian Bandit is an optional inclusion that helps you establish an early tempo lead. Bandits need a bit of additional support to consistently work, so cards like Vagabond Lizard and Gabriel are at a premium in Bandit lists, but in my personal testing, even with 3xVagabond/Gabriel, I still found Bandits a bit clunky and inconsistent, and I’m not as high on Rivaylian Bandits than Wandering Chefs in my evaluation: in its worst case, Chef can at least be a 2/2 for 2, and sometimes you evolve it and get value out of the clown car, so it’s not as bad when you don’t find any of its enablers.
- Sofina is a somewhat unusual inclusion, in that it makes your Goddess of the West Wind pulls somewhat random (which primarily means that you don’t always get a big Noa), which makes the deck worse at pressuring opponents (a Set + Sofina WW setup is very annoying to clear in conventional ways, but also doesn’t really pressure the opponent’s life total a whole lot). Where Sofina really shines is the Aggro Dragon matchup, as it stops Bahamut/Wings of Tomorrow from meaningfully affecting your board, and it’s still enough pressure to serve as a clock in that matchup. The other utility of Sofina is that it can enable Chef in its Amulet form, and getting the Sofina buff on something like Ramiel is also decent, which is an upside compared to the other West Wind payoffs that don’t immediately affect the board when played in the early game. With that said, Sofina does make you worse in pressure-oriented matchups (e.g., against Forest), so I generally wouldn’t recommend playing more than 2xSofinas, and the best split in my testing has been 1xSofina/3xSet/3xNoa, which doesn’t obviously mean that it’s optimal (the 0xSofina variant is still the most consistent in general), but it is something to consider if you’re facing a lot of Dragon.
- Zelgenea is an optional 1-of that I personally consider a no-brainer inclusion. The deck has a lot of 6-drops, sure, but it also has a lot of healing and can often lack the chip damage in the later stages of the game, which is where your 1-of Zelgenea can swoop in and steal games. Zelgenea is obviously pretty slow and doesn’t really align with the deck’s game plan, but I think that the opportunity cost of playing a 1-of Zelgenea in this type of deck is so low that it’d be foolish not to take advantage of it.
- Anvelt and Unicorn Altar are optional inclusions that make your early game stronger. Anvelt is obviously a lot more high-impact when it goes off, but the critical word here is “when”, which, for a deck running only Wilberts/Ramiel and Goblin Queen (kind of) as its early-game Wards, Anvelt is only really good if you have two different Ward-based followers in the early game (e.g., Ramiel with Wilbert), and even with that, Anvelt rarely activated before turn 7 in my testing, so Anvelt has been pretty inconsistent in my testing. Unicorn Altar is the safer alternative: it always does 4 damage to something (not the whole board, but still) on turn 5, and it gives you a playable (if off-curve) 5/5 on turns 4 and 5, which can be weaved into your curve and generate extra pressure. The main issue with 1-mana Amulets is that they’re bad in multiples: you don’t want to draw multiple Noas/Anvelts, as they’re awkward for your curve and will clog up your board, stopping you from playing your good cards like Goddess of the West Wind, so it’s justifiable to run neither Anvelt nor Unicorn Altar if you want the deck to have a low curve. I personally really like Unicorn Altar over Anvelt (and over not running any other 1-mana Amulets), as it’s more proactive and actually works well in multiples (depending on how the Unicorn discounts stack up), but Anvelt is obviously a lot more impressive when it works well.
- Major Prayers is an optional inclusion that helps you find more threats to deploy in slower matchups. On Wings of Tomorrow and Benevolent Blight are an alternative to Prayers and have the big advantage of affecting the board in a meaningful manner and conveniently curving into Goddess of the West Wind on the following turn. I would personally consider Wings of Tomorrow to be almost a no-brainer inclusion as 2-3 copies, but you can also consider Prayers/Blight if you’re running out of gas too often.
- Fieran is an optional inclusion that makes the archetype a bit more threatening in the post-West Wind stages of the game. We can joke about how Goblin Queen was a card that made Rally Portal as good as it was, but West Wind Haven’s short list of Rally enablers starts with Wilbert and ends with Goblin Queen, so the deck isn’t very good at getting to Fieran thresholds, and in my testing, Fieran only really activates on the turn following the Goddess of the West Wind turn, which is pretty slow. The advantage of Fieran is mainly that if you play West Wind on 6, and then Fieran gets invoked on 7, you can get away with only deploying a single threat on that turn (e.g., Ra/Wilbert/Set or another West Wind) and still put a lot of pressure on the opponent; in addition to that, Wandering Chef gets a lot happier with Fieran in the mix. The downside of Fieran is that sometimes you draw your 4-mana 2/2 in the early game, and that doesn’t really make me happy in most games. Notably, if you’re playing a playset of Archangel of Remembrance, you can shuffle excess copies of Fieran back into your deck and get value out of it that way, but that is more or a band-aid solution to the problem of hemorrhaging card advantage. I generally wouldn’t recommend including Fieran in the deck, but if there is a bit more Rally support for Haven at some point in the future, it could be something to consider.
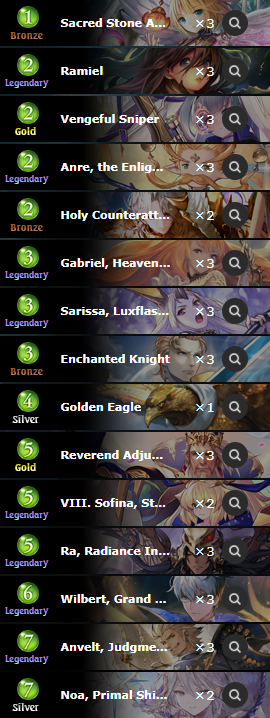
Regarding Ward Haven
Identifying cards: Sacred Stone Apostle, Vengeful Sniper, Enchanted Knight, Sarissa, Luxflash Spear.
Ward Haven is another proactive midrange Havencraft archetype that involves putting big followers into play by mulliganning aggressively for 1-mana Amulets. Generally speaking, Ward Haven is a fine deck and does quite well against aggressive archetypes like Aggro Dragon/Shadow, but the obviousy flaw of the deck is that the Neutral removal package that is played in a variety of decks to target Aggro Shadow conveniently also deals with a lot of threats Ward Haven tries to develop. In addition to that, while the early-game Anvelt highrolls are a strength of the deck, West Wind Haven is generally a more “unfair” tempo deck in the grand scheme of things and simply does more with its swing turn, and the difference between the 2 decks’ early game packages is quite negligible. An upside of Ward Haven is that you can run Yukari, which is a powerful card in certain matchups (e.g., Spellboost Rune), but Sanctuary or Control Haven are both better Yukari decks. Ward Haven is a decently playable deck, but it’s ultimately overshadowed by its more popular Haven counterparts, and it is not a particularly exciting deck for most people to pilot after months of its prevalence in the format. It’s not the worst deck one could be plaing, that’s for sure, but I’m not sure why I’d want to actually play Ward Haven in the first place.

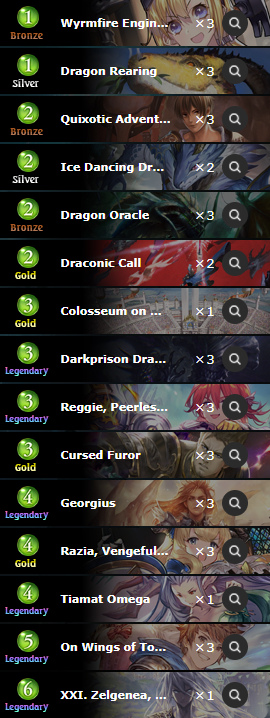
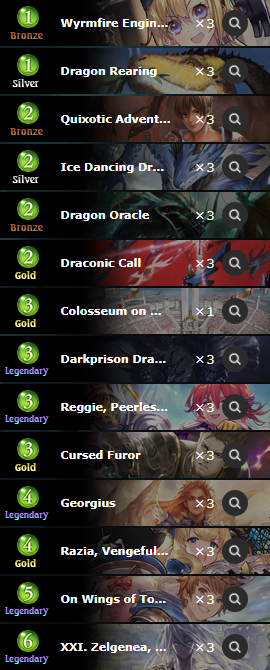
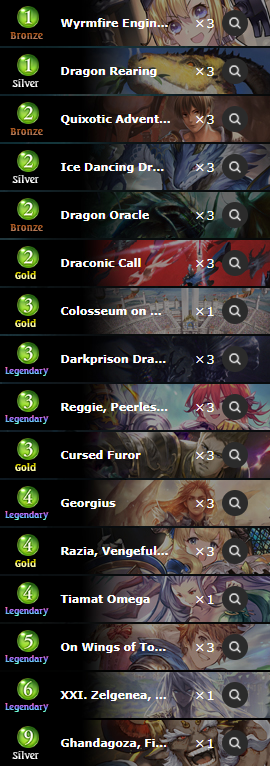
Aggro Dragon
Identifying cards: Wyrmfire Engineer, Reggie, Peerless Artisan, Dragon Rearing, Quixotic Adventurer, Wandering Chef, Razia, Vengeful Cannonlancer, Jerva, Wyrm Transcendent.
Aggro/Vehicle/Face Dragon is a tempo deck, in a very loose definition of the word “tempo”. Conventional tempo decks usually generate a tempo advantage by developing a threatening board state and then maintaining their tempo lead with efficient interaction or trades. Aggro Dragon generates tempo advantages in two main ways: either by ramping (which is a pretty standard tactic for Dragon decks) and playing cards earlier than other decks, or by utilizing midgame threats that control the board and pressure the opponent while dealing chip damage, which include cards like Razia/Georgius/Ghandagoza (though the “chip” is more of a “chunk” for some of these cards). By controlling the opponent’s life total, Aggro Dragon can dictate trades and the opponent’s board developments, which is, in some ways, what an aggressive tempo deck does. Generally speaking, Aggro Dragon tries to ramp in the early game, and then transitions to setting up lethal with various damage cards, with the general goal in most matchups being a turn 6-7 lethal (although you can certainly play a slower game against reactive decks, of course).
Aggro Dragon is a very well-positioned deck in the Rotation format: the archetype generally does well against Accelerate Forest, and can punish midrange decks that don’t run a lot of healing (which mostly means BR/Midrange Shadow, but also includes the more fringe decks, such as Midrange Sword). The archetype struggles against conventional (board-based) tempo decks that can generate a defensively-statted board state around turn 5-6 (or more specifically, a board that doesn’t die to Georgius/Tiamat), which includes decks like West Wind Haven and, to a lesser extent, Loxis Forest. Aggro Dragon is somewhat draw-dependant (as most Dragon decks tend to be), but it is generally fast enough to race most decks in the format, so it has been one of the best-performing ladder decks of the expansion and consistently does pretty well in tournament play.
Mulligan priority
- Always keep Dragon Oracle, Cursed Furor and Reggie.
- Keep Wyrmfire Engineer/Quixotic Adventurer with Reggie if you’re not also keeping Dragon Oracle. If you’re keeping Oracle/Furor, also keep Dragon Rearing with Reggie.
- Going first, keep Razia with Dragon Oracle if you’re not keeping Reggie.
- Against Shadow/Forest/Portal, keep Wyrmfire Engineer.
The mulligan strategy for Aggro Dragon generally involves trying to get your ramp cards, and Reggie in particular requires an enabler, some of which can interfere with your turn 2 Dragon Oracle. Keeping a Wyrmfire Engineer as a Goblin is something that I personally do a lot, but I don’t think it’s something you should do in every matchup, and it’s mostly applicable to decks that try to take the board early, where contesting the board is relevant. Dropping a Razia on turn 3 is generally just a good tempo play and helps you recover tempo after skipping your turn to ramp, but trying to develop/snowball a Reggie is obviously a higher impact line of play.


Optional inclusions and tech cards
- Colosseum on High is an anti-control tech card that I would personally consider a core inclusion in the current Rotation format. Due to being an Invocation card, you never really want to play more than a single copy of Colosseum, as you only really pull it out of your deck in matchups where its effect is relevant, and try to avoid doing so in Dragon mirrors and against Loxis Forest-style decks, and you never really want to draw multiple copies of it (spending 6-7 mana to draw 2 cards isn’t very efficient even if you’re ramping, apologies to all of the Hedron Archive enthusiasts in the audience), but a single copy of Colosseum is more or less a no-brainer and improves the archetype’s matchups against Sanctuary Haven/Reanimate Shadow/Karyl Rune-type of decks by a very significant margin.
- Tiamat is a pretty back-breaking card against conventional proactive tempo-oriented decks and adds a lot of healing/interaction to the archetype, and my personal impression is that one has to have a very strong reason not to include Tiamat in a Dragon deck with no restrictions to its follower pool. The drawbacks of Tiamat are that it’s a bad card against Haven/Roost Dragon/etc., and that the more Tiamats you run, the less likely you are to find damage with Draconic Call. For that reason, if you’re trying to target a more control-heavy field, Zelgenea might be a card to consider in this slot: it doesn’t interact with Call the same way Tiamat does, and still gives you a good bit of healing in matchups where it matters. I should also mention that a relevant Tiamat interaction to be aware of against BR Shadow in particular is Tiamat‘s ability to hide Storm cards from follower-based interaction: e.g., if you’re up against BR Shadow and they take their Milteo/Jackshovel turn (meaning they only have 1-2 board slots open, or even 0 when accounting for Fieran), simply evolving Darkprison Dragon/Reggie and hiding it with Tiamat can be a better way to race the opponent than just clearing the board with Tiamat and then deploying your Storm threats. This isn’t something that Zelgenea can really do, but it is obviously very matchup-dependant (you have to be up against a deck that tends to go wide on board and at the time time, has limited access to non-follower-based removal) and only really applied to non-Reanimate Shadow decks, but it is something to be aware of if Shadow decks don’t play a lot of Zelgeneas.
- Draconic Call is one of the cards you can trim to 2 copies if you’re keen on playing Tiamat, although I would personally recommend looking into cutting some of the lower-cost followers in the deck first before cutting card draw. In this context, Ghandagoza is an important 1-of against slower decks and a key card to consider if you’re looking to trim a copy of Call: if you’re not running Ghandagoza, Call consistently fetches two 4-drops, which are good at filling out your curve at that (post-Overflow) stage of the game, while Ghandagoza can be too clunky to really utilize against proactive decks like Loxis Forest/Vincent Rune, so the 1-of Ghandagoza makes your Call a lot worse in specific matchups. I would personally consider Call a core 3-of in non-Zelgenea Aggro Dragon lists, as you can definitely run out of gas if you cut too much card draw, and I personally dislike cutting Call in general, but it can be a valid approach in top-heavy Aggro Dragon lists.
- Balefire Wrenchsmith is an optional inclusion that serves as your 4th and 5th copies of Quixotic Adventurers by way of being an early-game Reggie activator and a late-game damage card. The primary card Wrenchsmith competes with is generally Ice Dancing Dragonewt, as the two cards have a lot of functional overlap (playable early, or a bit of extra reach later on), and Wrenchsmith is more conditional than IDD, but has some other conditional utility (apart from activating Reggie, it can also give Razia Rush and make Zelgenea trade with things) that can be helpful in the midgame. Balefire Wrenchsmith and IDD are some of the first cards to consider cutting if you’re trying to fit in more midgame healing and/or interaction (Tiamat/Zelgenea) or Draconic Calls, as these low-impact damage cards are not essential for the deck to function in most matchups.
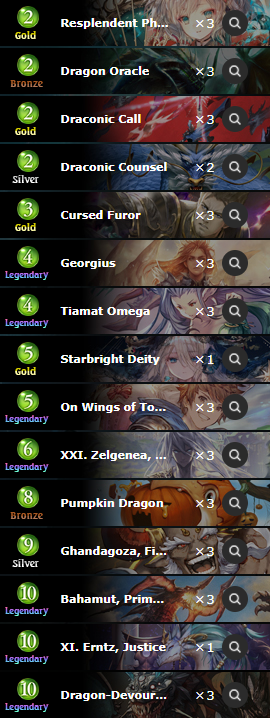
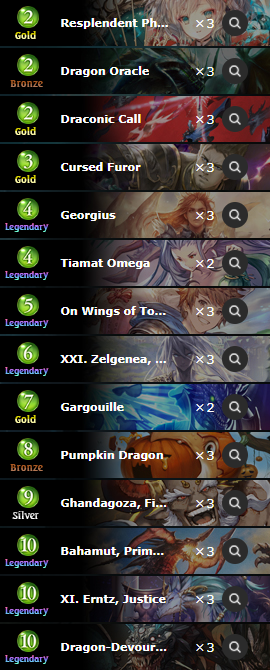

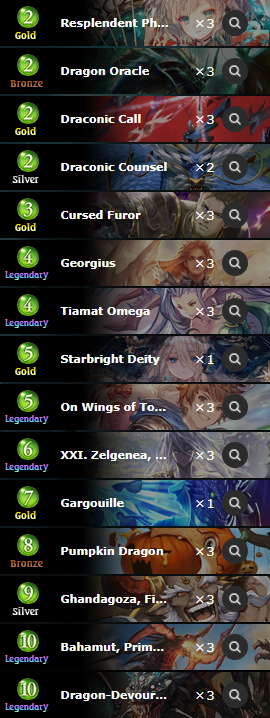
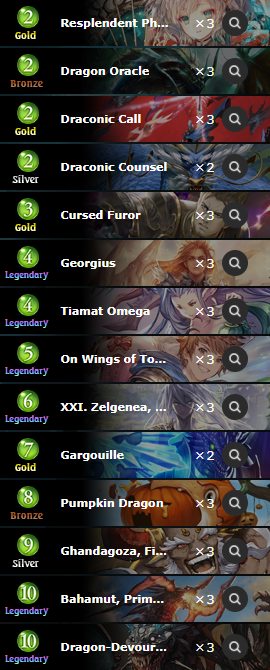
Roost Dragon
Identifying cards: Resplendent Phoenix, Pumpkin Dragon, Dragon-Devouring Dread, Gargouille, Erntz, Justice.
Roost Dragon is a control archetype that utilizes mana acceleration and discounts on cards you get to discount with Resplendent Phoenix to answer the opponents’ board developments and eventually set up for a 16-ish damage Storm finish with some combination of Ghandagoza/Bahamut/Erntz/Georgius. The archetype has a lot of healing and removal with the introduction of Tiamat, and the deck is a lot more resilient to aggressive strategies in the current format than it used to be before the mini-expansion. A key feature of the deck is the Dragon-Devouring Dread, which makes it so you have to run a certain density of 7+ cost followers in the deck, but also has the important utility of answering Holy Sanctuary and Shadow boards in the later stages of the game, which gives Aggro Dragon a late-game edge against slower strategies, all while ramping/drawing cards in the early game. It goes without saying that while the deck is reliant on Resplendent Phoenix discounts to close out games in slower matchups, it is often correct to not evolve Resplendent Phoenix against Forest/Blood, as having all of the Blood player’s cards discounted isn’t something you can really deal with, and in a similar manner, if the Forest player gets discounts on some of their high-cost cards (the most disastrous of which being Wind Fairy, but a 4-mana Deepwood Wolf is also nothing to scoff at). With that said, Roost Dragon can generally take better advantage of Phoenix Roost than most decks in the format by virtue of having more card draw, and in the case of facing other draw-heavy decks, getting into a slugfest against Roost Dragon isn’t going to end well for most decks in the format, even for the less greedy builds of the archetype. With these factors in mind, Roost Dragon is a well-positioned deck in the current Rotation format, and only really struggles against Blood and Loxis Forest (which stems from the fact that you have to play those matchup very differently from a lot of other common matchups).
Mulligan priority
- Always keep Dragon Oracle, Cursed Furor and Dragon-Devouring Dread.
- Keep Resplendent Phoenix against non-Forest/Blood decks.
- If you’re keeping 1 or more ramp cards, also keep On Wings of Tomorrow. If you’re keeping 2 ramp cards, also keep Tiamat against Shadow/Forest/Blood/Sword/Portal.
The mulligan strategy for Roost Dragon, as is often the case with slower Dragon decks, involves trying to find your ramp cards and some of the most relevant pay-offs. As I mentioned in the overview section, Resplendent Phoenix is generally not something you want against Forest/Blood, but if, let’s say, you know that your opponent isn’t on Loxis Forest or Baal Blood (which they probably are), then keeping Resplendent Phoenix is obviously fine. If you already have some ramp, then having some recovery to stabilize afterwards is pretty reasonable. I should also mention that on ladder, Roost Dragon can occasionally masquerade as Aggro Dragon if you don’t reveal DDD, so if the second DDD fusion doesn’t enable any additional lines of play (as in, if you’re aldready going into your 5 mana turn and don’t have a Tiamat in hand), it can be correct to not reveal DDD if you have other ramp in hand, as there is not much of a difference between getting the card draw off DDD immediately after you evolve Resplendent Phoenix or at the start of the next turn (barring anti-Amulet tech cards, of course).
Optional inclusions and tech cards
- Tiamat is a card that I would personally consider a core inclusion as at least a 2-of, and if you’re facing a decent amount of Shadow/Forest, a full playset is a configuration I’d personally recommend. Being more of a reactive deck, Roost Dragon makes better use of Tiamat than Aggro Dragon would, and while it is a bit of a dead card against Sanctuary Haven, Tiamat is an invaluable tool for a reactive deck like Roost Dragon and one of the big reasons to play the deck over some of the other control-oriented archetypes of the format.
- Erntz, Justice is an anti-Haven/Reanimate Shadow tech card. Erntz is a big Storm card that is specifically good in matchups where you can afford to save Evolve points without falling behind on tempo too much, and if you’re particularly good at winning coin flips, Erntz can serve as both a defensive threat and a Storm card, whichever one you need more at the time. Tails never fails, as they say. Jokes aside, the real downside to Erntz is that running Erntz in your deck makes your Draconic Call inconsistent, meaning that you can’t Call for DDD in the early game, which isn’t hugely relevant in a lot of games, but is a slight downside, since once you get all the DDDs out of your deck in an Erntz-less list, you’re only hitting Ghandhagoza with Call, which doesn’t rely on saving evolve points/winning Erntz coin flips. For this reason, I’ve personally found Erntz to be a pretty mediocre inclusion in the deck, and I personally believe it’s better to run more card draw and fewer high-end threats for the deck to function more consistently.
- Gargouille is an optional piece of the DDD package that helps against specifically Loxis Forest (being a big Ward) and doesn’t disrupt Draconic Call the way Erntz tends to do. In my experience, Gargouille often ends up rotting in your hand, as it’s not really a card you’re ever happy to play, even if it’s discounted to 4 mana. I’m not a huge fan of this French vanilla 7-drop, but if you’re cutting Erntz and feel like DDD doesn’t have quite enough fuel to consistently work, 1-2 copies of Gargouille could be something to consider as the least bad option, followed by even more awkward cards like Boom Devil and Mammoth God’s Colosseum.
- Draconic Counsel is an optional inclusion that helps if you’re running a lower threat count. Counsel looks 4 cards deep and can often discard redundant ramp pieces, though the tendency to discard Tiamat/Georgius instead of Cursed Furors can sometimes be an issue. Scalebound Plight is a similar effect, which gives you a bit more control over what you discard, but only digs 2 cards deep, and is a sensible alternative to Counsel if you’re having issues manipulating Counsel RNG. Another optional card draw effect to consider is Starbright Deity, which particularly shines in matches where you draw a lot of your high-cost cards pre-Resplendent Phoenix and can “reset” specific threats that you might need for that matchup: e.g., if you have a 10-cost DDD that you used to ramp in the early game (which means that it costs 10 and is stuck on the left side of your hand), but you need to answer a Path to Perdition, you can set up to Deity and then use the 10-mana copy of DDD as fusion fuel for the discounted one, and in a similar fashion, if you draw Erntz/Ghandagoza pre-Roost and you need damage against Haven, you can Starbright Deity to clone 1-2 of your big Storm cards. Starbright Deity is very clunky and is primarily relevant in slower matchups, so it’s difficult to justify running more than a single copy of it, but it does tangibly change the way the deck is played and gives you outs in situations where your deck is running awkwardly, in a way that no other card draw effect would allow to.
Disrestan OTK Dragon
Identifying cards: Ramiel, Archangel of Remembrance, Gabriel, Heavenly Voice, Embodiment of Cocytus, Archangel of Evocation, Dragon Spawning.
Disrestan (OTK) Dragon is a control deck that utilizes Encounter from the Deep in a deck where the only Dragon follower is Disrestan, and attempts to set up for an OTK with Gabriel or other sources of damage (e.g., Bahamut against an empty enough board, invoked Zelgenea with some sort of extra damage from Wings of Tomorrow or some such if you’re going off on turn 10, or with just a double Encounter). What makes OTK Dragon a functional deck in Rotation is the Neutral support package of Ramiel/Embodiment of Cocytus/Fluffy Angel/Wings of Tomorrow/ Bahamut/Zelgenea, with a key piece of the Neutral package being Archangel of Rememberance, which can shuffle Disrestan back into your deck if you draw all 3 copies, and can obviously contest the board in other ways in relevant matchups. The unique property of this support package in Dragon is that you get access to mana acceleration with Oracle/Cursed Furor, so even if some of these cards are below-rate for class-specific cards other decks are playing, getting out effects like Wings of Tomorrow/Archangel of Evocation/Bahamut a turn earlier makes them acceptable plays against the current field of Rotation decks.
OTK Dragon is generally unfavored against Aggro Dragon and struggles against IMT decks (since getting through IMT is very hard without a double Encounter or some other convoluted setup), but does quite well against slower decks (e.g., Haven/Sword) and goes off faster than Karyl Rune (due to having access to more ramp than Rune). The Neutral control package actually does really well against Aggro Shadow, and the deck has a lot of healing, but a lot of “big board-based stuff” decks can be difficult to navigate (e.g., playing against West Wind Haven, you have to Embodiment of Cocytus for the 8/8 that blows up the board, and you obviously have to ramp to get there). The deck does have some cards that it more or less autoloses to, with IMT being the most prevalent example, Arthur in Sword decks being another tricky card to play around, and Archangel of Evocation, primarily seen in Sanctuary Haven, doesn’t make games completely unwinnable, but stops the standard Gabriel+Disrestan 20-22-damage setup. With those factors in mind, OTK Dragon is more or less just a worse Karyl Rune for most intents and purposes, mostly due to how limited the deck’s card pool really is and how much the archetype relies on ramping to consistently do unfair things. In addition to that, being a 1-card “combo” deck, there are going to be games where you can’t draw Encounter in your first 22-24 cards, which doesn’t happen often (somewhere in the ~5-8% probability range), but then there’s also a chance of drawing all 3 Disrestans (which is ~11.5% for your first 20 draws), which then turns your setup into a 3-card combo, so there is a non-trivial (~5-10%) probability of the deck just whiffing on its combo even with no pilot error. In the grand scheme of things, this is not a very likely scenario, but it is something to be aware of if you’re trying to grind a lot of OTK Dragon games, as the deck is not only slow (being a turn 9-ish control/combo deck), but also occasionally susceptible to randomly not functioning.
Disrestan OTK Dragon skeleton


Mulligan priority
- Always keep Dragon Oracle, Cursed Furor and Ramiel.
- Against non-Shadow classes, keep Encounter from the Deep.
- Going second, keep Embodiment of Cocytus.
- Keep Archangel of Remembrance and Fluffy Angel against Shadow/Portal.
The mulligan priority for OTK Dragon generally involves trying to find your ramp cards, and while Ramiel doesn’t always ramp you (or at least not when you’re going first), it is generally a fine turn 2 play even when going first. I tend to keep Encounter as much as I possibly can, as I’ve been burned by not drawing Encounter on time too many times to count, but in the Aggro Shadow matchup in particular, your win condition is rarely the actual Disrestan combo, and you’re often winning by just answering all of their threats and healing out of range of their reach, so you don’t really need Encounter against that deck and it’s better to look for early action.
Optional inclusions and tech cards
- Archangel of Evocation is primarily a tech card against aggressive decks (e.g., Aggro Shadow/Dragon/etc.), that also serves as an anti-combo tech for against other combo decks and Karyl Rune. In a general meta setting, running a single copy is sufficient, but if you’re seeing a lot of aggro decks (and, hell, Karyl Rune), then running a second copy is fine.
- Embodiment of Cocytus is a general inclusion against decks with chip damage that is played as a 2-of in most OTK Dragon lists. The problem with Embodiment is that it’s a very clunky card when going first, but if you’re seeing a lot of Sword/West Wind Haven, a third copy can improve your percentages in that matchup, due to its utility as an 8-mana board clear.
- Blazing Breath, Clash of Heroes and Sudden Showers are optional inclusions that can improve the deck’s early game interaction. These types of cards are often redundant with your other removal, but due to how limited the card pool is for OTK Dragon, having 1-2 extra removal spells can be valuable against decks like BR Shadow, but none of these cards are ever going to be particularly high in impact.

Spellboost Rune
Identifying cards: Runie, Resolute Diviner, Shikigami Summons, Crystal Witch,Demoncaller, Fiery Embrace, Daria, Infinity Witch, Kuon, Founder of Onmyodo.
Spellboost Rune is a midrange archetype revolving around two of its iconic finishers, Runie and Kuon. The basic game plan of the archetype involves trying to resolve a 10-Spellboost Runie and then follow it up with Kuon to Spellboost all of the new Runie copies you’ve generated, which can then allow you to chain together Runies on the following turns. The archetype has gotten a lot of help from the Maiser buff, which has pushed the archetype into running Golem Marshal, but even with no additional support, Maiser can generate 2 0-mana Spells by itself, which makes the turn 6 Kuon setups a lot more consistent, and an early Maiser can really swing tempo-oriented matchups (e.g., Loxis Forest/Aggro Forest) by coming down on the first few turns of the game, and allow you to then parlay that early tempo lead into a midgame where it’s a lot easier to stabilize/establish an overwhelming tempo advantage.
In a metagame sense, Spellboost Rune is weak to board-centric aggressive decks that try to pressure you around turns 4-5 (e.g., Loxis Forest, Aggro Shadow, etc.), but the archetype is pretty well-rounded and performs decently well against a lot of other archetypes in the format, making it a decent choice as a ladder deck and a potentially potent tournament archetype, but the flexibility of the archetype is a double-edged sword: on the one hand, you can adjust the deck to perform better or worse against specific parts of the field, but on the other hand, a lot of Spellboost Rune builds can be teched very awkwardly and lack critical answers to specific decks in the format, which make the deck somewhat polarized in specific configurations of the deck. In other words, I am certain that there is a good variant of Spellboost Rune out there, but I’d also wager to say that a lot of Rune players are getting baited into playing bad cards, some of which will be discussed in later sections.
Mulligan priority
- Always keep Runie and Crystal Witch.
- Keep Maiser going second. Also keep Deputy/Golem Marshal if you’re keeping Maiser.
- Keep Vincent against Shadow.
- Keep Alistair against Shadow/Sword/Dragon/Portal.
- If you’re keeping Runie, also keep Kuon and 2-mana cantrips, which include Authoring Tomorrow/Magic Missile/Sorcery in Solidarity, in order of priority.
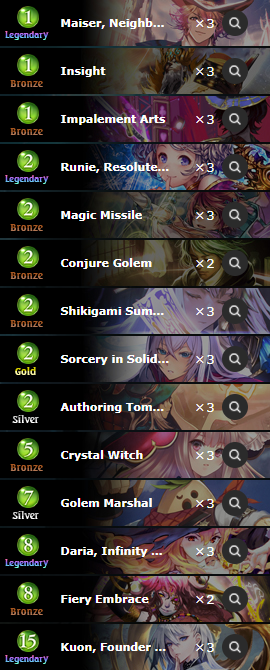
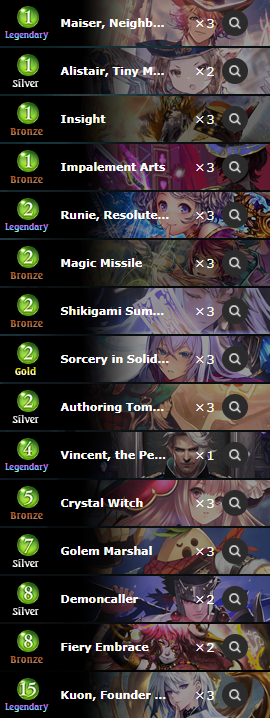
Optional inclusions and tech cards
- Vincent is primarily an anti-Shadow tech card that happens to have synergy with the Maiser/Golem Marshal package. In my experience, Vincent isn’t particularly great in a lot of matchups, and I do not believe that there is enough pay-off to run it in a Spellboost-based deck. A lot of recent Spellboost builds run a 1-of Vincent, and some even dip a bit farther with Rivaylian Deputy. Deputy isn’t particularly great, but it’s at least a 2-mana cantrip and sets up for Maiser. A cute inclusion in Vincent lists is Magical Gunslinger, which can fetch up Vincent (since all the followers in Spellboost Rune have Fanfare effects), so you can run a singleton Vincent with some number of Gunslinger, but I’ve personally not been terribly impressed by Vincent in general, so I don’t think the Gunslinger tutor setup is particularly necessary either, even if it does help with drawing multiples. Before the Maiser buff, there have been some hybrid Spellboost lists running Vincent and Angelic Melody, but with Maiser the package seems a bit obsolete (as you can just run Maiser and Marshal). I should also mention that Vincent has a certain impact on the deck with its “3-of-a-kind” leader effect, which works particularly well with Maiser (and incentivizes you to save the third Rapid Fire, for example), and Vincent also works with Impalement Arts (if you Spellboost it enough times). Vincent puts a slight incentive on you to run as many 3-of Spells as possible, which makes cards like Fiery Embrace a bit awkward to cut/include, but that is a very marginal effect that shouldn’t matter in most cases, so long as the majority of your Spells are 3-ofs.
- Alistair is a tech card against any sort of deck that plays followers in the early game, and in matchups where the effect is relevant, Alistair is an incredible tempo tool. The main cards that Alistair competes with is Demoncaller and Fiery Embrace, which have the upside of Spellboosting your hand immediately, but Alistair doesn’t require as much setup. The downside of Alistair is that it can be a dead draw against decks like Sanctuary Haven and Karyl Rune, but even in those matchups, you often don’t mind just dumping it out of your hand and hoping it doesn’t get slapped by Archangel of Remembrance. I think that Alistair is an important effect to have in the deck in certain matchups, but I don’t think the effect is versatile enough to include in ladder lists.
- Sorcery in Solidarity is a card that has been a no-brainer 3-of in Spellboost Rune lists for as long as it has been in the format, but with players going deeper down into the Vincent hole, this is one of the cards that can get the boot in favor of Deputies/Marshals/etc. In my opinion, there is no real reason to cut Sorcery in Solidarity, as it’s one of the best cards in the deck at finding Runie/Kuon for when you need them, and if you’re thinking about cutting Solidarity chasing that Vincent high, I’d suggest examining what exactly Vincent does for your deck in your matches first before making questionable decisions.
- Daria is a card that has seen play in every iteration of Rotation-legal Spellboost decks so long as it has been legal, and with further optimization of the archetype, it is historically the first card to get the boot. The issue with Daria is plain and simple: you need to have 5 or fewer cards in hand to resolve Runie, and Daria‘s effect can range between being a 4/4 that draws a card and a 4/4 that clogs up your hand with cards that you can’t resolve, which is not particularly great. The cards that Daria competes with are Demoncaller, Traditional Sorcerer and Fiery Embrace, all of which have the utility of Spellboosting your hand and not just a random part of your deck that Daria sees, and both Demoncaller and Embrace are very important to have against proactive decks (as they affect the board state), so I’d personally consider some combination of Demoncallers/Fiery Embraces better for the general ladder environment and I really dislike having the variance of Daria ruin Runie setups, so in my experience, Daria is just an aggressively terrible inclusion in the deck, even if it’s a common 3-of in tournament-oriented lists.

Karyl Rune
Identifying cards: Ramiel, Lhynkal, the Fool, Fluffy Angel, Embodiment of Cocytus, On Wings of Tomorrow, Karyl, Catty Sorceress, Madcap Conjuration, Pholia, Retired Sovereign.
Karyl Rune is a category of control decks that utilize the combination of Lhynkal and Karyl to close out games, often in combination with Authoring Tomorrow, Zelgenea damage and incidental burn from cards like Spice Shower/ Magic Missile/etc. A key aspect of Karyl Rune that distinguishes it from its sister archetype (Disrestan OTK Dragon) is the inclusion of Madcap Conjuration, which can single-handedly swing board-centric matchups in your favor. The Neutral-centric control package primarily consists of followers, so Spell-based tech cards and removal are at a premium, since you’re trying to get to a high enough Spell count to have a roughly even Spell/Follower split, but with some followers generating Spell tokens (e.g., Lhynkal), the sweet spot for an even split is generally somewhere in the realm of 16+ Spells.
Karyl Rune generally does well against aggressive archetypes due to its abundance of healing, and particularly shines against board-based tempo decks that fold to Madcap. The archetype has the usual issue of Ramiel/Embodiment of Cocytus decks that is even further exacerbated by the deck’s reactive nature, which is to say that Karyl Rune really prefers going second, so the deck has some natural variance in that aspect, and the archetype also has some issues against decks with a high enough density of chip damage/storm cards and has a tendency to perform poorly against Aggro Dragon, which often just has more damage than you have Wards/healing. This combination of factors make Karyl Rune a somewhat meta-dependant archetype, but it is well-rounded to a point where you can expect it to perform well against a field with a high enough Haven presence, but the archetype is in a similar category to Sanctuary Haven: it has some okay matchups against the current field, but it is just a bit too slow to make it a good archetype for grinding ladder points, so it’s mostly a tournament-oriented archetype as part of double-control lineups.
Mulligan priority
- Always keep Lhynkal, Authoring Tomorrow and Ramiel.
- Going second, keep Embodiment of Cocytus.
- Keep Alistair against Shadow/Dragon/Sword/Portal.
- Keep Fluffy Angel against Blood/Shadow.
The early game plan for Karyl Rune generally involves trying to contest the board and get down a Lhynkal if you can afford to (or sometimes save the Lhynkal token for a good Madcap split). Embodiment of Cocytus is good when going second, even if you have a Ramiel, as you can always cast both on turn 4 and then just save the Cocytus token for later use. Alistair is a relevant card in any matchup where you get attacked by early-game followers. Fluffy Angel is most just important against Aggro Shadow and Baal Blood to stem the bleeding, and if you’re expecting your opponent to be on BR Shadow, it’s not a terrible play to contest the board in the early game.
Optional inclusions and tech cards
- Clash of Heroes, Spice Shower, Mystic Absorption, Impalement Arts and Magic Missile are some optional inclusions that help balance out the deck’s Spell/Follower split. Of these cards, these effects have different utility, and the rule of thumb is that higher-value cards are generally better than effects that just ping something for 1 damage or replace themselves. Of these effects, Clash of Heroes is one of the highest-impact tempo effects (since the deck tends to run a lot of expensive followers, and it notably works really well with Ramiel as it doesn’t take any damage from the fight effect), but Clash is somewhat redundant with Alistair and other removal effects you’re running. Spice Shower has the important utility of dealing 2 damage to any target, which is often a relevant breakpoint for early-game interaction and an important factor in the late game (e.g., if you’ve only played one Karyl over the course of the game and have a Karyl on 10, the 10 damage from Karyl, the 4 from Zelgenea and the 2 from the Spice Shower lines up really well, and similar breakpoints are common with turn 4-5 Lhynkal lines of play), and it’s also a healing card that doesn’t take up 6-7 mana and can be used without a target. Mystic Absorption is primarily an anti-Shadow tech card and has the utility of being an interaction spell that replaces itself, however, Karyl Rune isn’t very good at getting to the critical “Shelldock Isle threshold”, so Absorption falls off quickly as the game goes on. Magic Missile is similar to Spice Shower, but is a bit faster and can replace itself when you’re trying to dig for answers/correct the Madcap split.
- Forbidden Darkmage is a anti-combo tech card against Accelerate Forest and Roost Dragon, which can also be a cantrip in matchups where the effect isn’t relevant. The main downside of Darkmage is that it’s a follower, so you have to cut some of your high-end followers to slot it in (e.g., Pholia/Archangel of Evocation/etc.), but unlike most other followers, Darkmage has a lot more synergy with Madcap than other utility followers: you can use it as a cantrip to find a second Spell, and you can play it and then discard your hand with Madcap, which makes the opportunity cost of running Darkmage incredibly low, even in matchups where the damage prevention effect isn’t particularly relevant.
- Aleister (not to be confused with Alistair) is an anti-Shadow tech card that has taken over the Archangel of Evocation slot after the mini-expansion. This is not to say that Evocation is worse than this shiny mini-expansion-limited legendary, but Aleister is particularly efficient at answering Goblin Queen boards (since Goblin Queen usually bumps into something when evolved) and lines up really well against Milteo (though a lot of Shadow lists don’t run Milteo, but that’s besides the point), and if you Madcap enough times, it is not impossible to get a free evolve out of Aleister in the late game, and I’ve had matches where Wings into Aleister on turn 8 was enough to answer IMT-filled boards, so I get the impression that there is little reason not to play Aleister in the deck if you had Evocation in there previously. An alternative to Aleiester is Formbender, which also has somewhat notable utility of hosing Sanctuary Haven (which is generally a Rune-favored matchup, so it’s not as valuable of a tech card) and can still answer Milteo and deals with other fringe amulets (e.g., Colosseum on High in Aggro Dragon, Phoenix Roost in, you guessed it, Roost Dragon and Path to Perdition in Reanimate Shadow).
- Force Barrier is a tech card against Blood, Sanctuary Haven and every Rune deck in the format. The card is pretty mediocre against Shadow and Dragon, but being a Spell, it has a bit of a privilege in the deck due to how it affects Madcap splits, but the effect is still pretty narrow and I wouldn’t recommend playing the card, even as a 1-of.
Vincent Rune
Identifying cards: Rivaylian Bandit, Quixotic Adventurer, Astral Dancer, Vagabond Lizard, Gabriel, Heavenly Voice, Magical Gunslinger, Wandering Chef, Terra Nova, Mirror Witch.
Vincent Rune is a tempo deck that utilizes the Vehicle synergy package (and to a lesser extent, its eponymous card, Vincent) to generate proactive early-game tempo, which the archetype can then parlay into closing out the game with either a snowballing early-game board (Rivaylian Bandit decks tend to do that) or some combination of chip damage from Vincent, and in the later stages of the game, Gabriels and Mirror Witches. One of the big advantages of Vincent Rune in the current format is its ability to silence followers with Vincent tokens, which make it a surprisingly decent deck against Burial Rite-based Shadow decks, and the high amounts of proactive early-game tempo the archetype can generate with Rivaylian Bandits/Maisers and Astral Dancer in the early game can often put decks like Aggro Dragon and Loxis Forest on the back foot, even if a lot of your late-game threats are pretty underwhelming in comparison (and include things like Gabriel, Terra Nova and full-cost Golem Marshals). It is not uncommon for Vincent Rune to more or less run out of (real, non-token) cards around turn 7-ish, which make the deck at beating control decks like Sanctuary Haven once they’ve stabilized, which puts the archetype in a similar niche to Loxis Forest: it’s a very solid tempo deck that struggles against decks with a lot of healing/interaction, but does well against decks with weak early game developments; unlike Loxis Forest, however, Vincent Rune has a lot more snowball potential and deals with Shadow a lot better than Forest, which makes Vincent Rune the best tempo-based tournament archetype despite its miniscule representation. In my experience, Vincent Rune has been one of the best-performing ladder decks that I’ve tested after the mini-expansion, as the deck does well against Shadow, Forest and Aggro Dragon, although it can certainly struggle against Sanctuary Haven and Roost Dragon; in addition to that, the proactive nature of the archetype and the surprise factor of it in ladder play are non-negligible factors for the deck’s ladder performance as well.
Mulligan priority
- Always keep Rivaylian Bandit, Maiser and Rivaylian Deputy.
- Going second, keep Vincent and/or Astral Dancer.
- If you’re keeping Bandit, also keep Golem Marshal/Astral Dancer. Also keep Marshal with Maiser.
- If you’re not keeping Maiser, keep Magical Gunslinger/Vagabond Lizard.
- If you’re not keeping Deputy, keep Quixotic Adventurer.
The mulligan strategy for Vincent Rune generally involves trying to snowball Bandit or maiser in the early game and establish a tempo lead. An early Maiser somewhat changes how you play out your early turns, as you either play Maiser on 1 (by itself or with a Bandit) or on 2 (with a Golem Marshal), and then your turn 3 is taken up by doing Maiser-related things, so regular 3-drops don’t really mesh with Maiser lines of play. Rivaylian Bandit is a bit simpler, as you generally don’t count on getting more than one activation of it in the early game, but Astral Dancer can obviously breaks that rule and can potentially grow the Bandit a second time, at which point it is likely to stick in play and get buffed by Terra Nova/Gabriel on turn 4 (though this is not a particularly reliable setup, so I wouldn’t recommend keeping conditional 4-drops in an aggessive tempo deck like Vincent Rune). Deputy is generally your best 2-drop (as it replaces itself), but if you don’t have a Deputy, a Quixotic Adventurer will also do, so long as you’re not embarrassing yourself with a turn 2 Dancer/Chef.

Optional inclusions and tech cards
- Vincent, despite being the archetype’s eponymous card, is not that essential in a lot of matchups, so the card is cuttable, especially if you don’t run Chefs and have Magical Gunslingers consistently tutoring up Vincent as its only target. In my experience, Wandering Chefs are very important in the deck (being the only source of healing the deck has access to), so the 0xChef lists with the Gunslinger/Vincent tutor package generally felt pretty clunky and inconsistent and show mediocre results in tournament play. With that said, if you find away to replicate Vincent‘s utility in the deck (e.g., with Formbenders), one can attempt to cut Vincent to 1-2 copies, but that stipulation is obviously contingent on not facing a lot of Shadow to really succeed. This might be somewhat close-minded, but I’ve personally found that cutting Vincent from Vincent Rune to be a bad idea in the current Rotation format.
- Terra Nova is an optional inclusion that can get you all 3 Vincent triggers with minimal help (sure, you have to have a follower in play) and has the important utility of re-activating a snowballing Rivaylian Bandit when going first. Angelic Melody is an alternative to Terra Nova that has seen play in earlier builds of the archetype, but Terra Nova is a lot more self-sufficient and the Terra Nova buff can actually push some face damage if you have followers in play, so Melody in general feels a bit greedy (since it needs Vincent to get most of its value) and win-more (since you need to have multiple followers in play to get value out of it), while Terra Nova has an (arguably) worse failure case, but doesn’t require as much help and is a passable, if unexciting, play when you don’t have Vincent active.
- Gabriel is one of the deck’s primary win conditions and is particularly relevant against Loxis Forest and other proactive tempo-oriented decks, as it puts a sizeable Ward and snowballs one of your other followers when it comes down. Gabriel also gets you two Vincent triggers “by itself” (well, not quite, as you need to have another follower in play, but it’s close enough) and can re-activate Wandering Chef/Rivaylian Bandit in the midgame. While Gabriel is more of a “win condition” in tempo-based matchups, Mirror Witch is the deck’s primary source of reach against reactive decks: not only is it an efficient Storm follower by itself, it also gives you a valid target for Maiser and Vincent tokens, which can represent a fair bit of damage against decks like Roost Dragon or Sanctuary Haven. As a rule of thumb, Vincent Rune lists need somewhere in the realm of 4-6 of these cards to consistently close out games in my experience, and I’d personally prioritize Gabriel over Mirror Witch for the current ladder environment.
- Artistic Arcanist is an optional inclusion that has significant synergy with Vincent: not only does it trigger Vincent 3 times by itself, but it also gives you a persistent Amulet that you can keep in play to make Vincent tokens more mana-efficient. I’m not saying that Arcanist is an Acceleratium, but it kind of is. In addition to that, Arcanist can activate Bandits/Chefs in the early game (there is some random chance involved, of course, but you can often trade in a way that lands the buff on the right follower) and can even serve as a bad Gabriel if you have a couple followers that managed to stick in play in the midgame.
- Runie is an inclusion that has synergy with Vincent, Maiser and not a whole lot else in the deck. Runie, and by extension, the rest of the Spellboost package (e.g., Insight, Impalement Arts, Magic Missile, Authoring Tomorrow, Angelic Melody, etc.) are a very greedy inclusion in the archetype and can often get stuck in your hand if you don’t manage to find Maiser/Vincent to get proper value out of these cards, and if you include additional low-cost Spells, you lower the overall card quality of the deck, as the main cards to get the boot usually include high-impact synergy cards like Gabriel/Vagabond Lizard/Terra Nova/Arcanist, which in turn make the rest of the deck function worse as a tempo archetype. At the time of writing, Runie-based Vincent Rune lists show aggressively terrible results in tournament results, and while the temptation to mix these two synergy packages is understanable, I don’t think there is any reasonable way to really pull it off without sabotaging the rest of the archetype.

Baal Blood
Identifying cards: Bloodsoaked Archdemon,Showdown Demon, Skull, Freedom Raider, Hellspear Warrior, Hallessena, Calamity’s Saw, Ravening Corruption, Baal, Ayer, Ashen Brawlder, Vuella, Unblemished Wings, Shemyaza.
Baal Blood is an aggressive tempo deck that utilizes the synergy package of Ravening Corruption and its supporting cast of Baal, Ayer and Bloodsoaked Archdemon to generate chip damage, which in combination with other incidental sources of damage (Hellspear Warrior, Vuella, Io) can close out the game if the opponent doesn’t have enough healing to get out of range. In order to support Baal more effectively, the deck tends to consist of almost exclusively Blood followers that cost 1-3 mana, with the only exceptions being Bloodsoaked Archdemons and an occasional Razory Claw-style burn spell, which makes the deck somewhat limited in terms of its tech card flexibility (any card that you put into your deck, that isn’t Baal-able makes your deck run worse) and inherently quite aggressive (you have some interaction with Io/Lucius/Skull/Ayer, sure, but when the average effective cost of cards in your deck is ~2.15, things tend to be a bit aggressive). The archetype generally does well against decks that lack healing and/or can’t generate wide enough midgame boards to tank Ravening Corruption pings and struggles against archetypes that either have a lot of overall healing (e.g., Sanctuary Haven), generate resilient midgame boards (e.g., Loxis Forest or Vincent Rune) or have some combination of the two (e.g., Reanimate Shadow). More so that any other deck in the Rotation format, Baal Blood has a tendency of losing “to itself”: if you don’t find a Ravening Corruption in your first 12-ish cards, the deck often falls apart: sure, you can certainly pretend that it can still function to some extent, and if your opponent never plays any cards, this ragtag crew of 2- and 3-drops can certainly deal 20 damage eventually, but it’s going to take 6-7 turns, and if your opponent is playing a real deck, you are effectively giving them infinite time to execute their game plan, which is obviously far from a serviceable strategy. With there reasons in mind, and taking into accoun the archetype’s inherent metagame-based shortcomings, Baal Blood is far from an archetype I’d personally recommend anyone to play outside of very specific double-aggro Conquest lineups.
Mulligan priority
- Always keep Ravening Corruption, Bloodsoaked Archdemon and Vampiric Bloodbinder.
- If you have a Ravening Corruption, also keep a Baal or Ayer, prioritizing Baal.
- If you have a Ravening Corruption, keep Silverbolt Hunter/Lucius going first against Dragon/Haven/Forest/Rune.
In my experience, Baal Blood isn’t exactly a deck that can function without an early Ravening Corruption, and since a lot of cards in the deck are pretty redundant with one another in the early game (you’re generally not going to get an actively bad curve with a deck entirely comprised of cards that cost 1-3 mana), with the only real standout cards being those that replace themselves. If you have managed to find your key engine piece, keeping proactive 1-drops in matchups where they’re relevant and ways to reload or start digging through your deck (preferably Baal, but you can also get a lot of value out of Ayer if you manage to find a Showdown Demon by that point or just naturally dump most of your hand) is generally pretty safe. It’s possible that being a bit less conservative in Baal Blood could have a greater upside in the matches that it works out, but I’ve been tracking the turn at which I resolve Ravening Corruption, and in my testing sample, the difference between games where the deck doesn’t have Ravening Corruption on curve and games where it does is ~40%, so I personally believe it to be justified, but it’s possible that there is some additional nuance at play that I am not aware of.

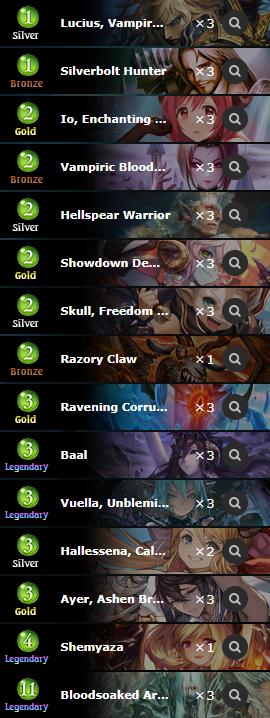
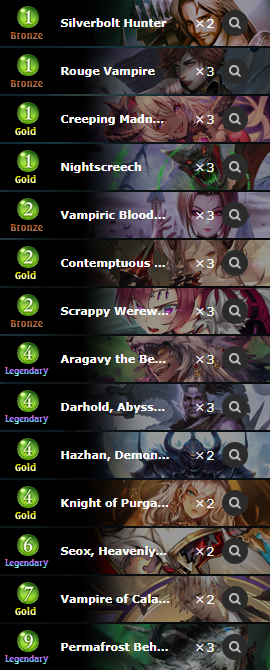

Optional inclusions and tech cards
- Shemyaza is an optional inclusion that helps against proactive decks as a 4-mana Wrath. Shemyaza is a bit awkward as a draw engine in the Rotation format, as Baal Blood has too high of a curve to effetively utilize drawing 4 cards every turn, so it’s difficult to play Shemyaza before turn 6-ish in most cases. With that said, if there were more “fair” midrange decks in the format that won exclusively through generating a threatening board (e.g., West Wind Haven or Midrange Sword), Shemyaza could certainly be a card to consider, but as it stands currently, the archetype would need a lot more 1-drops to properly utilize Shemyaza the way Blood decks are able to do in the Unlimited format.
- Garnet Waltz and Razory Claw are optional inclusions that add a bit of extra reach to the archetype. Intuitively, Garnet Waltz makes more sense (as it doesn’t lose you health and can also be used to get an evo point for Io/Ravening Corruption), but Razory Claw has the utility of targeting followers in the early game (which obviously doesn’t really make any Blood players happy, but it is what it is) and can bring down your life total to reach relevant Lucius thresholds and activate Skull.
- Some alternatives to the above non-Baal-compatible cards include Moonrise Werewolf, Tyrant of Mayhem and Rouge Vampire, none of which are particularly great in the deck, but make Baal easier to activate. Due to the card pool limitations enforced by Baal, there isn’t much room for tech cards in the archetype, but some of the most common cards to consider trimming (if you’re trying to fit in a particular card) are genearlly Silverbolt Hunter and Hallessena.
Pain Blood
Identifying cards: Rouge Vampire, Nightscreech, Vampire of Calamity, Contemptuous Demon, Scrappy Werewolf, Darhold, Abyssal Contract, Hazhan, Demonblade Knight, Knight of Purgatory, Aragavy the Berserker, Seox, Heavenly Howl.
Pain/Wrath Blood is a midrange archetype that utilizes cards that damage your leader to generate value and tempo from its midgame threats. The archetype has access to a lot of out-of-hand damage with Aragavy, Scrappy Werewolf, Seox and Permafrost Behemoth, so the deck rarely has issues closing out games once it starts to stabilize, but getting to that critical Wrath threshold is often the tricky part, and the deck has a play pattern of dropping its life total to 10 or less around turns 5-6, and then gradually starting to heal back up in the later turns, which make it a juicy target for aggressive decks with out-of-hand damage.
In a metagame sense, Pain Blood struggles against decks with a lot of midgame chip damage (such as Aggro Dragon, Baal Blood, etc.), as the deck tends to lower its life total in the early game and doesn’t always manage to stabilize under pressure. Pain Blood does pretty well against slower midrange decks that don’t pressure its life total (e.g., Spellboost Rune, Midrange Sword, etc.), as Pain Blood can close out games around turns 8-9, and has a lot of redundancy in terms of its damage, so it is quite difficult to heal through out of Blood’s range through conventional means. With that said, tempo decks that generate a big swing around turns 5-6 (e.g., Loxis Forest) can be very difficult for Pain Blood to get through, which is one of the main reasons why Pain Blood has been on a steady decline in tournament play: not only does it not perform well against conventional aggro decks, but the emergence and later prominence of Loxis Forest in the format has put a damper on any attempts to bring Pain Blood to Conquest events. On ladder, Pain Blood is a bit polarized: it does decently well against some of the slower decks that see ladder play (e.g., Midrange Sword, Spellboost Rune, Roost Dragon), but struggles against a lot of the more aggressive archetypes in the format and doesn’t always have sufficient pressure to deal with Sanctuary Haven. All of these factors combined make Pain Blood difficult to recommend: it is a real Shadowverse deck, but it doesn’t really have a good niche in the format that would make it worth playing.
Mulligan priority
- Always keep Vampiric Bloodbinder.
- Going first, keep Silverbolt Hunter or Rouge Vampire as a 1-drop. Against Shadow, also keep these cards when going second, and if you don’t have any of the above 1-drops, keep Nightscreech.
- If you’re not keeping a 1-drop, keep Creeping Madness.
- If you’re not keeping Bloodbinder, keep Contemptuous Demon.
- Keep Bear Pelt Warrior against Shadow/Dragon/Forest.
- Keep Darhold and Permafrost Behemoth against Sword/Forest.
The goal of Pain Blood in the early game is generally to curve out and set up for your Wrath thresholds around turn 5. To this end, you’re looking for cards that can either contest the board, or in the case of Rouge Vampire/ Contemptuous Demon/Bear Pelt, give you some early healing to offset the health you’re losing to your own cards. In slower matchups, where you’re not afraid of dying on turn 6 (very brave, I know), you can be a bit greedy and keep your high-value card draw effects, as these cards will help you transition into the late game if your life isn’t in too much (immediate) danger. I am never sure when to keep Vampire of Calamity, and the card just tends to rot in my hand too often, so I don’t tend to keep it, and try to look for more proactive cards instead.
Optional inclusions and tech cards
- Silverbolt Hunter and Vampire of Calamity are your early-game tech cards that help against aggressive decks. As a rule of thumb, proactive cards generally do more in a vacuum, so Silverbolt Hunter is generally played as a playset, and Vampire of Calamity can be cut to a 2-of. In a similar vein, Bear Pelt Warrior is a card that specifically helps against Aggro Shadow/Dragon: against Shadow, it gives you some protection against Resurrection, and against Dragon, it forces the opponent to trade, as the thing threatens to heal for 4 if it’s allowed to evolve. Now, you might be wondering, why don’t we just play Fluffy Angels if we’re so afraid of aggressive decks? The answer is that you certainly can run a couple of Fluffy Angels, but things like Bear Pelt/Silverbolt/Vampire of Calamity also help you in matchups where you’re trying to be proactive, so they have a better balance in terms of their utility in different types of matchups, but if you’re really facing nothing but straight aggro, a bit of fluff can be something to consider, if you’re not as much of a beast, that is.
- Hazhan is a card that has utility as both an answer against midrange decks and a healing card against aggressive decks. Hazhan is a bit clunky and doesn’t work against every deck (e.g., Goddess of the West Wind makes Hazhan very sad). I would personally consider at least 2 Hazhans to be core inclusions in the deck, but it is certainly cuttable if you’re trying to fit in more early-game tech cards.
- Zelgenea is primarily a tech card against Aggro Dragon and also helps a bit in the West Wind Haven matchup. Pain Blood is very good at getting to the 14-health threshold required to activate Zelgenea, and while it’s not a very efficient answer, the card gives you a big chunk of burst healing in the Dragon matchup, and is notably one of the few ways Pain Blood can answer the 7-10-power Noa hiding behind a Set in the West Wind Haven matchup. I would consider 1-2xZelgenea a sensible choice in the current ladder environment, and the cards you’re generally cutting for it are Hazhan and Seox.
- Speaking of which, Seox is a key card in midrange matchups, such as Sword and Spellboost Rune. Pain Blood has a lot of direct damage between Aragavy, Scrappy Werewolfs and Permafrost Behemoth, but it doesn’t always have quite enough to close out the game. The issue with Permafrost Behemoth in particular is that you can’t play it if doesn’t quite kill the opponent, as you’re open to be dead on the crack-back, and Seox only costs 6 mana, which allows you to fit in Contemptous Demon/Nightscreech/Rouge Vampires/etc. on the same turn, all while Seox itself can pick off some threatening followers while pushing face damage. I should note that you rarely get to the Union Burst (15) threshold, and I should also mention that you don’t always have to go face with all of your Seox(es), as Seox can just trade on both of its attacks, so long as that you leaves you with enough damage to close out the game on the following turn. In my testing, Seox is a bit clunky, so I personally think that running 2 copies is generally sufficient, but if you’re facing a lot of Sword, for example, a full playset can be reasonable.
Regarding Highlander Blood
Identifying cards: Volteo, Hedonistic Dealer, Ramiel, Goblin Queen, Embodiment of Cocytus, Roulette Vampire, Gabriel, Heavenly Voice, Io, Journeymage, Sudden Showers, Craps Devil, Wandering Chef, Gluttonous Demon, Ruinweb Spider, Pureshot Angel, Fulminating Berserker, Bahamut, Primeval Dragon, Discerning Devil, Redcap, Vagabond Lizard, Romantic Chanteuse.
Highlander/Singleton/Volteo Blood is a Shadowverse deck (in a very loose definition of what the word “deck” means) that utilzies Volteo, Hedonistic Dealer as its primary win condition, and due to Volteo requiring that out of all cards in your deck, “there can be only one” of each (which is a reference to the 1986 “Highlander” movie, hence the naming convention). Due to the eccentric nature of the archetype, Highlander Blood decklists wouldn’t fit the regular tab layout, and as such, example HL Blood decklists are shown as a list of link above. In a more concrete sense, Highlander Blood is a deck that aims to cheat out bit followers with Volteo‘s EoT effect, and due to the prevalence of Accelerate followers and the high power level of Neutral cards in the set, there is enough of a card pool for the archetype to be functional. Some standout cards that should be mentioned in the context of Highlander Blood are effects that provide immediate board impact when pulled by Volteo: Gluttonous Demon, Wandering Chef and Ruinweb Spider, these cards are some of the “highroll” Volteo outcomes, alongside the Bahamuts and other beefy followers of the world. This combination of the early game of the deck being a disjointed mishmash of random playable Blood cards, Neutral control tools (with Ramiel, Embodiment of Cocytus and Zelgenea being the highlights) and the late game win condition being a literal roll of the dice of whichever followers you’re lucky enough to get, make Highlander Blood a pretty inconsistent archetype in the context of the format, and while it does decently well against decks with a limited amount of answers (e.g., Accelerate Forest, BR Shadow, etc.), the archetype auto-loses to any proper midrange deck (e.g., Spellboost Rune, Midrange Sword), and its performance against aggressive decks hinges on stabilizing with your random early-game cards and then getting good Volteo RNG, so the deck is, frankly speaking, some of the most high-variance decks one could play in the Rotation format. This can be seen as a good thing, as you never know what you’re going to mulligan into, and if you’re a fan of limited formats, you can export your favorite Take 2 deck into Rotation, add a playset of Volteos and the other 7 cards (Zelgenea, Ramiel, Embodiment of Cocytus, Gluttonous Demon, Wandering Chef, Ruinweb Spider and Bloodsoaked Archdemon would be my recommendation, but you can obviously substitute whatever cards you drafted out of that list), and there you have it, your creation is complete, and you didn’t even have to netdeck anything. Not knowing what your deck does in any given game or which followers are going to sit in your clown cars at the end of each turn, now that’s what card games are all about, Volteo, take the wheel.

Evolve Portal
Identifying cards: Vyrn, Li’l Red Dragon, Spinnah, Spin Artist, Sylvia, Grand Arbiter, Courageous Puppeteer, Karula, Arts Master, Feower, Double Blade Flash, Tien, Treacherous Trigger, Lucifer, Fallen Angel.
Evolve Portal is a reactive midrange deck that utilizes Tien as its primary win condition by way of giving followers in your hand Storm, and either landing the buff on a Kaiser or on some combination of Feower and some number of followers that cost less than 8 mana and can get to a total of 6 power, although both the Feower and Tien are required to be in the Union Burst (15) range, so the secondary setup requires jumping through more hoops. Since the archetype is not particularly good at drawing cards, and due to the fact that some of the cards in the deck only really function when you’re in Resonance (Sylvia and Spinnah), the archetype often runs a variety of 1-mana cantrips that can set up chains of Resonance turns, such as Focus/Syntonization/etc., and to a lesser extent, Ameth/Vyrn.
Evolve Portal is an archetype that actually got a fair bit of help from the recent patches: Karula is a real Shadowverse card, and both Colossus Omega and Combustion Demon are acceptable enablers for Evolve-based strategies, or at the very least, these cards are a bit more playable than Spinnah and Courageous Puppeteer. The power level of Karula in the deck has given rise to the adoption of the “float mana” package by some Evolve Portal players, which primarily consists of cards that specifically work well with Karula (Focus and Elemental Brink) and digging deeper, cards like Gravity Grappler and even Dimension Dominator. Evolve Portal is far from being the best deck of the format, in part due to its low representation (and poor optimization as a direct consequence), but it has a specific role in the format: the deck is a “control hunter” of sorts, in that it does extremely well against decks like Sanctuary Haven/Karyl Rune/etc., but struggles against IMT decks and some of the faster proactive decks that can pressure its life total (e.g., Loxis Forest and Aggro Dragon). This polarized matchup spread makes Evolve Portal a pretty mediocre ladder deck, but gives it an actual niche in Conquest tournaments: if you’re trying to target Haven, Evolve Portal is (arguably) one of the best decks to bring outside of heavily-teched BR Shadow/Roost Dragon lists, and the archetype isn’t embarrassingly terrible against a lot of the common decks in the format: if you don’t pressure Evolve Portal enough, the deck can close out games on turns 9-10, and while it’s more draw-dependant than similarly slow decks (e.g., Karyl Rune), it could have a bit of potential with further optimization.
Mulligan priority
- Always keep Tien, Focus and Syntonization.
- Going second, keep Ramiel. If you have a Tien, also keep Ramiel going first.
- If you’re not keeping Focus, keep Colossus Omega.
- If you’re keeping Tien, keep Gravity Grappler going first.
Optional inclusions and tech cards
- Focus and Elemental Brink are optional inclusions that make the deck run better when you can either play two or more of these 0-mana effects in the same turn or combo it with Karula. Focus seems like more or less an auto-include in the archetype, and I’ve personally found Brink incredibly valuable in the deck due to how it interacts with Karula. Gravity Grappler is in a similar category to these synergy pieces, but it’s more of a stand-in for Karula: it doesn’t quite work as well for floating 3 mana, but it’s still a decent combo with Brink/Focus on turn 4 and gives the deck something proactive to do on turn 4 when going first, which isn’t something available to the archetype after Spinnah got pushed out of Evolve Portal lists and with Sylvia not consistently being active on 4.
- Ramiel is a card I’d personally consider a core inclusion if you’re running the “float mana” package, as it allows you to ramp into Enhanced Karula or a full Gravity Grappler on turn 5, and since a lot of the deck’s pay-offs are mana-gated, having access to more mana has other incidental synergies in the deck, such as Vyrn and Zelgenea, among other things.
- Combustion Demon is an anti-Shadow tech that has two primary functions: it disrupts Milteo card draw and can help the deck get through IMT boards (with a bit of luck). Combustion Demon is a fine inclusion in the deck, but I wouldn’t consider it something that you really need a full playset of: if you’re running a more removal- or card draw-heavy list, Combustion Demon can be a bit redundant with a lot of other cards in the deck, and as such, has had pretty significant negative winrate correlations in available Evolve Portal tournament data, and I’ve personally been somewhat unimpressed with the card in my testing.
- Resolve of the Fallen is a common inclusion that helps against proactive midrange decks, Aggro Dragon (gets rid of Colosseum on High) and Amulet-based control decks (e.g., Sanctuary Haven). The drawback of Resolve of the Fallen is that the card is very clunky before turns 6-7 (which is the point of the game when you’re in a more dire need of removal spells), but it certainly does a lot to answer threats once you get to the late-game. In contrast, cards like Wings of Tomorrow and Kitty-Cat Arsenal have a lower ceiling, but are significantly better than Resolve in the midgame of most matchups where removal spells are relevant, so my impression is that Resolve of the Fallen is a bit too greedy for the current Rotation format, and it’s no coincidence that the only Evolve Portal lists to ever make top 16 in Rotation JCG events (before and after the mini-expansion) ran 0xResolve, so the card could very well be a trap.
- Syntonization is a card that I’ve advocated for in literally every single Portal deck for as long as it has been Rotation-legal, and I personally find it incredibly confusing that so many Evolve Portal forgo the card altogether. Sure, I get it, I would prefer to play an actual Baphomet if I had the chance, but Syntonization is the next best thing. “B-b-but, ackchually, Baphomet only draws Blood followers, so it wouldn’t draw anything in a Portal deck, feeble cursed one!” Well, how about you just stay petrified if you’re going to behave like that? Straid is an archetypal tsundere character, and if you don’t think so, you are wrong.
- Zelgenea is an optional healing card that allows you to live longer in damage-heavy matchups and has the additional utility of giving you a free Evolve trigger at the start of turn 10, which can often mean the difference between being in Tien range or not. I’d personally consider a couple copies of Zelgenea more or less mandatory, but it is cuttable if you include Fluffy Angels instead.
Regarding Rally Portal
Identifying cards: Marionette Expert, Stringmaster, Illganeau, Horror Astray, Goblin Queen, Box of Puppets, Mind Splitter, Fieran, Havensent Went God, Wandering Chef.
Rally/Puppet Portal is a midrange archetype that utilizes Puppet-generating cards (Marionette Expert/Box of Puppets/Phantom Blade Wielder/etc.) in combination with Stringmaster/Mountainous Marionette and various Rally pay-off effects (Fieran/Mind Splitter, as well as Illganeau/Iceschillendrig in the later stages of the game) to set up threatening board states. Some Rally Portal lists also play the Lazuli + Kaiser package, which gives the deck a bit of extra reach in the late game, but most Rally Portal lists purely rely on the tempo advantage generated by the deck’s pay-off effects to win games, and Iceschillendrig with Zelgenea are the deck’s main source of late-game value. For most intents and purposes, Rally Portal is more or less just a bad BR Shadow, and if you look at all of the new cards Rally Portal has gotten after the devastating Illganeau nerf, there wouldn’t be a lot of cards to name aside from Mountainous Marionette (which is a sweet card, but doesn’t quite pull the deck together) and Colossus Omega (which is fine in Rally lists, but is a lot better in the archetype it was designed for). Well, setting aside all of that aside, Rally Portal didn’t really get enough playable support after the archetype’s best card got nerfed by (effectively) 3-4 mana back in December for its sins in a metagame dominated by Loxis Forest. With these factors in mind, I don’t think there is anything I can say about Rally Portal without repeating my statements from the December MI article (which covered the archetype before the Illganeau nerf). It can be said Rally Portal isn’t exactly a deck that anyone is eager to play, and while it could have some potential, it is more or less simply worse than Burial Rite Shadow and West Wind Haven in its niche of proactive tempo-oriented “go wide” decks, so I don’t think there is much reason to play, optimize or discuss Rally Portal in its current state.
Regarding Artifact Portal
Identifying cards: Robotic Engineer, Android Artisan, Artifact Scan, Ironsting Archaeologist, Mobilized Factory.
Artifact Portal is yet another Portal archetype that was caught in the crossfire of the Illganeau nerf and didn’t get any particularly playable support in the recent expansion(s). There are some tools for the deck to potentially function, between all of the Paradigm Shift cards and Mobilized Factory, but the deck doesn’t have an actual win condition after Absolute Modesty rotated out, and the deck was frankly too slow to compete with the field even back in November, so my suggestion to Artifact Portal enthusiasts would be to play it in a different format, you know, the one that has Acceleratiums that cost 4 less mana. Well, maybe Cygames did actually learn something for once, one can only imagine what Unlimited would look like with another 1-mana Acceleratium/Augmentation Bestowal-type of mana-refunding effect, so it’s not all bad.

Midrange Sword
Identifying cards: Amelia, the Silverflash, Alyaska, War Hawker, Nahtnaught, Cursed Queen, Seofon, Star Sword Sovereign, Eahta, God of the Blade.
Midrange/Evolve Sword is a reactive midrange archetype that utilizes Evolve synergy and Union Burst effects to generate overwhelming amounts of value in the late game. The primary game plan of the deck involves getting to 8 mana and casting an Eahta, which then effectively makes all the Sword followers in your hand (and sometimes, in your deck, too) free, which can then allow you to have a bit tempo swing, clear the opponent’s board and potentially set up an unkillable* Seofon, which can then hopefully kill the opponent over a course of multiple turns. The asterisk is there to imply that there are some decks in the format that can and will answer a Seofon, which ranges from Ruinblade Reaper in Burial Rite Shadow, Blind Justice in Sanctuary Haven, DDD in Roost Dragon, fringe Banish/ transformation effects in Rune/Portal, and so on. In more practical terms, a lot of decks can simply race the 7-damage Seofon clock, and while there are ways to give Seofon Ward (e.g., with Outlaw Gunner), it is not a consistent enough setup to where you can reliably pull it in matchups where you’re getting pressured a lot, and even against decks that primarily win through Storm damage, such as Aggro Dragon, cards like Ghandagoza and Razia can still get to your face even if you pull off the Ward Seofon setup.
After the mini-expansion, the addition of Luminiera Omega did improve the deck’s matchups against grindy reactive decks (e.g., Roost Dragon and Sanctuary Haven), but the fact of the matter is that those decks still have answers for all of your threats, so I wouldn’t exactly jump to conclusions about the archetype being significantly better against a lot of decks in the format: sure, you have an early-game cantrip and you can remove card draw from Milteo, but the deck still doesn’t have a proper win condition that can consistently race Shadow/Aggro Dragon and it doesn’t have the midgame tools to live through Loxis Forest tempo developments either. Unlike the other Evolve-oriented archetype of the format (Evolve Portal), Sword doesn’t even have the necessary tools to kill players with out-of-hand damage in a single turn, so the niche of Midrange Sword in the format is that it farms West Wind Haven (yes, it farms all the 10 people playing that deck, that’s right) and does okay-ish against Roost Dragon and slower Reanimate Shadow lists, but there isn’t much going on with Sword decks aside from that. With these factors in mind, Midrange Sword is a mediocre tournament deck outside of specific, West Wind Haven-populated niches of the meta, and has consistently been one of the worst-performing ladder decks despite having some pretty decent representation. It does seem that Midrange Sword has a certain je ne sais quoi that lures players into its alluring ladder-points-losing rabbit hole, and if I were to try to describe it, I’d say that Sword is the quintessential Timmy deck of the Rotation format: it does some very sweet things once it gets to a certain point in the game, but it often just doesn’t quite make it there. The archetype is flashy and fun, but it’s not particularly well-positioned in the current Rotation format, and I wouldn’t recommend Midrange Sword to anyone trying to be competitive.
Mulligan priority
- Always keep Ramiel, Kagemitsu and Gelt.
- If you’re not keeping Ramiel or if you’re going second with a Ramiel, keep a proactive 2-drop, which can include Arthur/Shield Phalanx/Steadfast Samurai, in order of priority.
- Going second, keep Goblin Queen.
- If you’re keeping Ramiel going second or if you’re up against Haven, keep Nahtnaught.
Midrange Sword’s early game isn’t something I can say a lot of positive things, but you have to try and contest the early developments to the opponent’s proactive developments. In that aspect, Kagemitsu is probably the best early game card in the deck, but with the 2-drop situation being as dire as it is in Sword decks, Ramiel is a close second. Goblin Queen has some nice modality in the archetype when going second: if you don’t have a turn 4 play, you can always save Goblin Queen for that purpose, but if you’re not under a lot of pressure, you can go Goblin Queen on 3 into Ramiel with double Goblin on 4, which sets up your Rally thresholds nicely and conveniently curves into Nahtnaught or Alyaska + Thief on 6. Speaking of Nahtnaught, the card is one of the main reasons why Sword has a favored West Wind Haven matchup, so I tend to blindly keep it against unknown Haven opponents, and it can still pick up value against Sanctuary Haven as well, since that deck always has Amulets in play (and can set up some untargetable Wards).
Optional inclusions and tech cards
- Goblin Queen is a tech card against aggressive decks that helps Sword’s weak early game. Goblin Queen aligns really well with a lot of what Sword decks are trying to do, but it has the fatal flaw of being a Neutral card, and Eahta, God of the Blade is a bit racist towards Neutral cards, so it’s difficult to justify running it as anything more than a 2-of. This is one of the reasons why anti-aggro tech cards such as Combustion Demon, Archangel of Evocation and Fluffy Angel don’t quite make the cut in most Sword lists (although Fluffy Angel also infringes on the highly contested 3-drop slot), and one of the reasons why key cards like Resolve of the Fallen often get cut from the current iteration of Evolve Sword: there is a limited amount of Neutral cards you can feasibly run without sabotaging your Eahta consistency, and with 4-6 slots occupied by Ramiel and Wings of Tomorrow, the more Neutral cards you run, the worse your win condition gets.
- Nahtnaught and Alyaska are, frankly, two of the main reasons why anyone would want to play Midrange Sword from a metagame perspective. Cutting Nahtnaught makes the archetype observably worse in all available tournament results (at the time of writing), and while Alyaska is a bit more conditional, I’d still consider running at least 2xAlyaska more or less mandatory. You can certainly cut these cards if you’re not playing against Shadow/Haven, but be aware that you are losing a lot of percentages in some of the deck’s best matchups by doing so.
- Steadfast Samurai is an awkward card in the Io, Journeymage universe, and doesn’t do a whole lot as a 2-drop. The main utility of Steadfast Sammy is that it can provide the deck with a tiny bit of out-of-hand damage: after a certain point, all of your Sword cards stop costing mana, which is where the 3 points of Storm damage can be valuable, and the damage prevention effect is marginally relevant as well.
- Outlaw Gunner is a card that helps you against aggressive decks and gives the deck a potential out in certain matchups by potentially giving Seofon Ward. In the vast majority of cases, the main utility of Gunner is that you can play it off Amelia and then give Ward to whichever card you play on the following turn, which helps stem the bleeding against aggressive decks. In that sense, Outlaw Gunner is a bit similar to Goblin Queen, with the main difference being that it gives you less immediate tempo, but more potential pay-off in the later stages of the game.

Stats corner
The below charts show the performance of various deck archetypes in qualifiers of open JCG events, which follow the Conquest Bo3 ruleset. Deck archetypes are categorized by their popularity (as in, how many players brought said deck) and the average number of match wins of lineups containing the specified deck archetype. For the qualifier performance chart, deck archetypes are sorted in descending order of Score values, where Score is a weighted average of “winrate score” (a linear scale where the 100% represents the maximum number of match wins among deck archetypes with more than 2% meta share, and 50% representing the average number of played matches per player, which is equal to exactly 15/16 for a 4-stage single elimination bracket, but gets adjusted accordingly when not all player slots are filled, as BYEs don’t count as played matches) and the “frequency score” (a.k.a., “relative frequency”, in other words, the ratio of popularity of a deck compared to the most popular deck in the field: e.g., the most popular deck of the format has a relative frequency of 100%, and a deck that is played half as much has a relative frequency of 50%), with the weight of the sum determined by the adjustable “Meta score parameter”, set by default to 80/20, meaning that the default formula for calculating Score is 0.8 * [Winrate score] + 0.2 * [Relative frequency].
For more detailed information on how the archetypes are defined, I’d recommend looking at the conditional clauses in class-specific sections of the qualifier spreadsheet linked below.
JCG qualifiers spreadsheet (EA mini-expansion)
JCG top 16 spreadsheet (EA mini-expansion)
JCG open Rotation events site directory (data source)