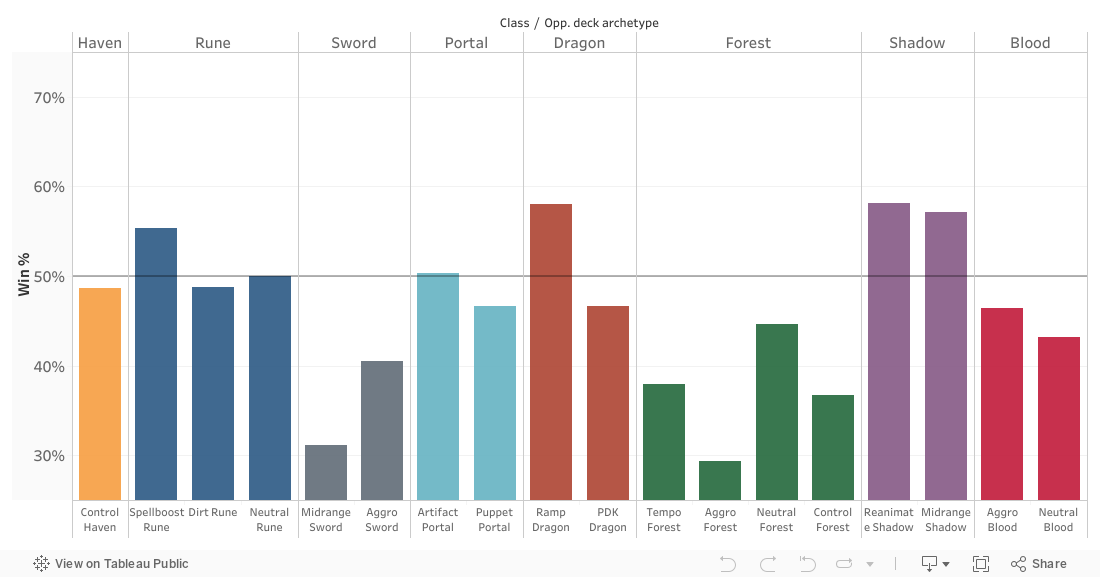
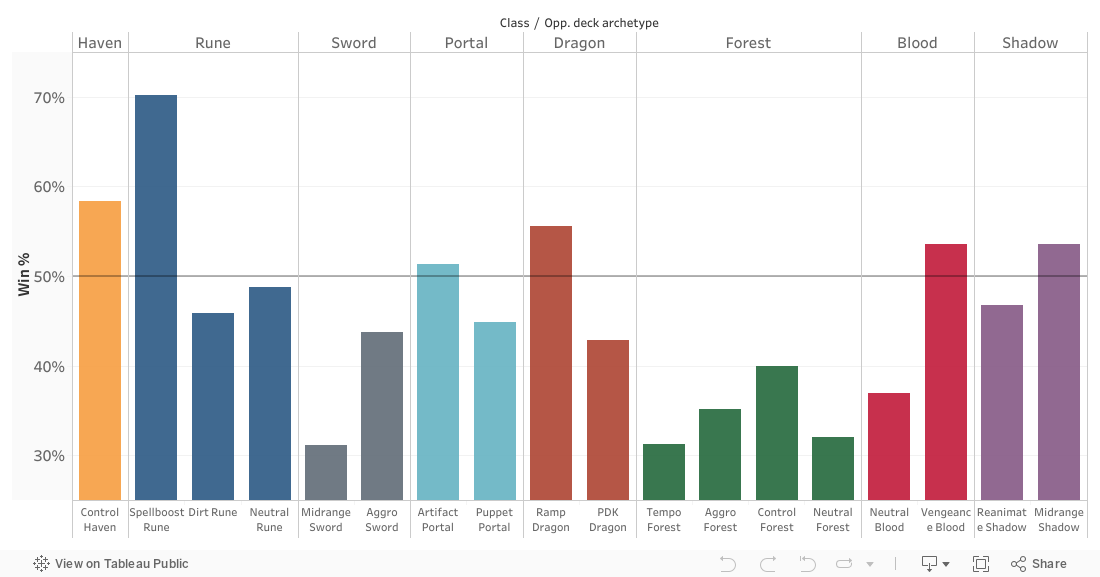
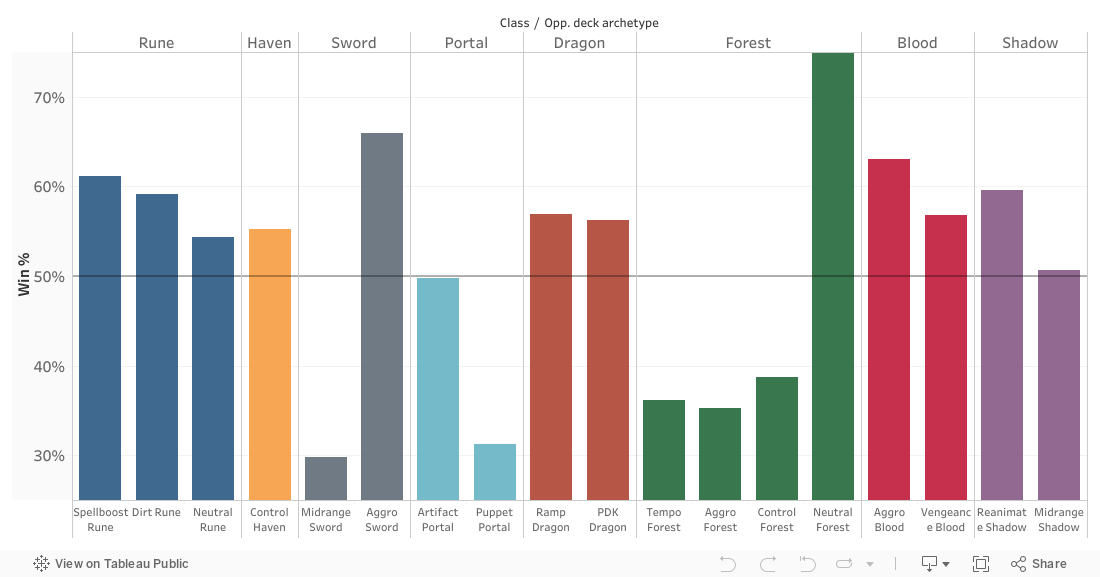
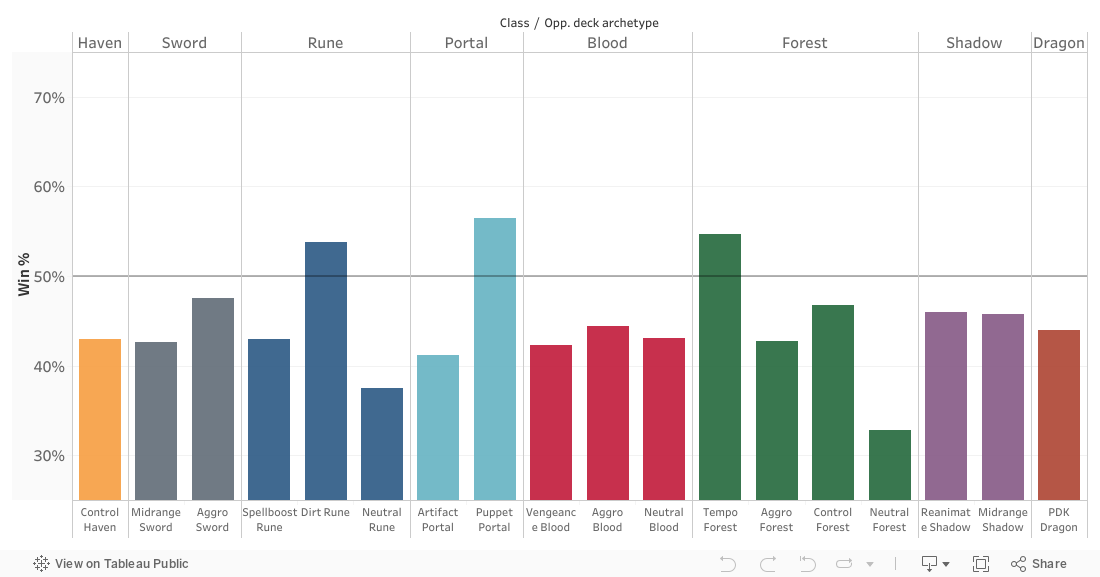
Shisogenius’s Meta Insight 4/15
The “Meta Insight” series covers the differences between popular ladder decklists, showcasing the core cards of each of the archetypes (“deck skeletons”), as well as various optional inclusions and tech cards.
[ps2id url=’#sword’]Sword[/ps2id] [ps2id url=’#haven’]Haven[/ps2id] [ps2id url=’#portal’]Portal[/ps2id] [ps2id url=’#rune’]Rune[/ps2id] [ps2id url=’#blood’]Blood[/ps2id] [ps2id url=’#dragon’]Dragon[/ps2id] [ps2id url=’#forest’]Forest[/ps2id] [ps2id url=’#shadow’]Shadow[/ps2id] [ps2id url=’#stats’]Stats corner[/ps2id]

[ps2id id=’sword’/]
Midrange Sword
In the provided deck skeleton, some of the 2-drops (namely, Bladed Hedgehog and Holy Bear Knight) can be swapped out for Maisy (in more Neutral-oriented builds), Innocent Princess Prim or Lux, Solar Lancer. In addition to that, it is not unheard of to take out 1 copy of Sky Fortress in lists with a lot of high-end cards (e.g. Roland, Hero of Antiquity, etc.).
Arthur’s collected company
The first question one has to ask when building a Midrange Sword is the selection of 2-drops which can get pulled by Arthur. The most common distribution of 2-drops is the 12-card package of Hedgehogs, Cuhullins, Bears and Celias. The vast majority of MidSword lists stop at that in order not to introduce any semblance of randomness into the deck’s natural turn 7 play. That said, it is not unheard to play other 2-drops instead or in combination with the two weaker 2-drops (Bears and Hedgehogs). The first common inclusion here is Lux, Solar Lancer. Lux is a pretty bad pull from Arthur, however, the card cycles itself and has an enhance ability that fetches either an Arthur or a Sky Fortress. I personally think that Lux is not a great inclusion in MidSword because she makes your Arthur turns worse, and Purehearted Singer brings similar card advantage, however, many players consider the tutor aspect to be very important.
Other potential 2-drops are less frequent and serve different purposes. During the first few days of the expansion a lot of Sword lists included Innocent Princess Prim as a 2-drop that usually stuck on the board after a turn 7 Arthur and more or less guaranteed a target for Sky Fortress afterwards. However, as the meta developed, Haven and Artifact Portal became a lot more popular and both of those decks have efficient board sweeps that happen to clear Prim as well (enhanced Jeanne and Magna Legacy). For that reason, Prim, being a vanilla-statted Ambush minion, has found a new home in a different Sword archetype that actually wants the Ambush effect. Another direction one can take Midrange Sword is adding in a few Neutral cards in order to activate Maisy, a very strong card against Summit Haven. Maisy lists usually cut Hedgehog and include solid early-game Neutrals such as Paradise Vanguard, for example. It’s important to note that Arthur doesn’t pull Neutral cards, so if one wants more early game in Midrange Sword, Happy Pig and Paradise Vanguard are some of the cards that can be considered. To sum it up, you have to consider if the 2-drops that you choose to include are good enough to sacrifice some of the consistency of your Arthur turns.
One-dimensional chess
Before moving on to discussing the midgame of the deck, I wanted to briefly go over the usage of Chromatic Duel and its role in the deck. Chromatic Duel provides the deck with some flexibility in the early game and “card advantage” in the mid- to late-game. Chromatic Duel is usually a good keep in the mulligan because (outside of the more aggressive builds with Quickbladers) the deck doesn’t play any 1-drops so spending your turn 1 on fixing your curve is usually better than not doing so. A vast majority of the time, if you’re playing Duel on turn 1, you should pick the King of White, since it provides you with a tempo-oriented 4-drop that can either clean up the opponent’s 3-drop follower (going first), or even 2 (going second, after evolving the Knight token). The only exceptions to the “always pick King of White” rule comes into play against Dragon, to protect your board against Dragoncleaver Roy’s token that usually comes out on turn 4, as well as an occasional Wrath Drake and other potential AoE. In addition to that, if you’re past turn 4, you should always try to play the Enhanced version of Chromatic Duel since there’s literally no downside to doing so. One last thing to look out for with Chromatic Duel is keeping your Gawain turns in mind, since both of the generated tokens are Commanders and thus get discounts. A turn 6 enhanced Duel into enhanced Gawain is not only extremely satisfying, but also allows you to pull off some sweet combos later on, like Arthur into Magnus (after trading off the Cuhullin), or Hemera into Sky Fortress, as well as generally filling out your curve with the discounted cards.


Midgame
The midgame cards in Midrange Sword are fairly straightforward, there are “standard” cards which are good enough to run as 3-ofs in most builds. Those cards are Valse, Lancer of the Tempest, Luminous Mage and Celia, Hope’s Strategist. In addition to those, most lists usually include additional 3-drops such as Mars (good against other midrange decks, helps establish a board, removal magnet), Momo (mostly anti-Haven tech, not very good in mirror matches), Purehearted Singer (provides card advantage, poor tempo), Princess Juliet (very good Sword card, deals damage to your opponent on the turn it’s played) and Neutral 3-drops (for Maisy builds). With Valse, you should usually take the Spellbomb option since it provides better tempo, but against Dragon/Haven or Portal with Prime Artifacts you can sometimes take Holy Purebomb to deal with beefy followers (Heavenly Knight/Prime Artifact/big Dragon cards) and high-impact amulets (most of the time Canyon of the Dragons, as well as an occasional Tenko Shrine/Support Cannon/etc.). As a rule of thumb, you should aim for 8-11 3-drops when building a Midrange Sword deck, which means you can fit in 2-5 of the “optional” 3-drops based on your preference.
Compared to the diverse array of 3-drops, the Swordcraft 4-drops are somewhat lacking in quality. Your 2 main options here are Gawain and Frontline Cavalier, both of which require an evolve point to have any board impact on turn 4. Cavalier provides better immediate tempo and a bit of healing and Gawain provides with improved tempo on later turns or makes your powerful late game turns happen one turn earlier. You should always be on the lookout for Gawain evolves if you have Arthur in hand; even if you’re playing off-curve (e.g. evolving Gawain on 5 when going first), playing Arthur on turn 6 can be backbreaking for a lot of decks so you should always try to do that, especially in Sword mirrors. You should aim to have 2-5 4-drops in your MidSword lists, but it’s not unheard of to not play any 4-drops at all. Filling out your curve with 3-drops, Valse’s Spellbombs and Chromatic Duel tokens. In fact, a significant fraction of Chromatic Duel’s power comes from the fact that it gives you a proactive 4-drop that is a little better than a Goliath, which matters when going first.
In the 5- and 6-cost slots your core card is Luminous Mage, but in addition to Luminous Mage you can include Council of Card Knights (requires an evolve point, good tempo), Barbarossa (vanilla-statted 5-drop with Rush, lets you save evolve points, doesn’t have any effect aside from its Rush ability), Darksaber Melissa (poorly-statted Ward follower, gets better when behind, absolutely dreadful when ahead), Sage Commander (played mainly for the nostalgia factor, good follow-up to a turn 5 Celia), Round Table Assembly (in Mars lists). As a rule of thumb, the more reliability a card has, the better it is. The most tried-and-true options here are Council of Card Knights and Barbarossa, while cards with varied (Melissa, Sage Commander) or random (RTA) effects are not as consistent.
Bad to the bone
As far as slower Sword cards go, the 2 centerpieces of MidSword’s lategame are Arthur and Sky Fortress. These 2 cards are fairly straightforward, but one thing to look out for with them is that if you play Arthur into Sky Fortress on curve, be sure to take note of the followers’ types. Hedgehogs, Bears, Maisy and Cuhullin (if it lives somehow) are Officers so they gain Ward, while Celia, Arthur (if it’s not cleared) and Princess Prim are Commanders so they gain the Thief Clash effect. From a flavor standpoint, I don’t really understand why a giant flying fortress turns the army’s Commanders into thieves, but I’m sure that there’s an explanation in the lore somewhere.
Apart from those standard lategame options, you can also include Hero of Antiquity (good reactive card that is usually outshined by Sky Fortress, immune to direct removal which is not very common in the format, a lot of health), Roland (tech against Safira/Aegis/HK/angry Lindworm/etc.) as well as random expensive Neutrals such as Zeus (1-of, provides some reach very late into the game).
Other brilliant ideas
For the most part, Midrange Sword is a “solved” deck at this point in the meta, so most lists look somewhat similar. Even with that, I still wanted to briefly mention other unusual takes on the deck. The first one is an aggressive Midrange Sword shell with Quickbladers and Princess Juliets, similar to the aggressive Sword lists popularized by Agni during the Chronogenesis expansion. The other approach to Midrange Sword stems from the fact that a lot of the good Sword cards are Commanders (Celia, Princess Prim, Celia, Mars, Lancer of the Tempest, Frontline Cavalier, Luminous Mage, Arthur, Sky Fortress, Perseus, Noble Chancellor) so a card you can consider is Luminous Standard. If you exclude a few Officer followers (Bears, Hedgehogs, etc.) you can build a Midrange Sword deck that is almost entirely comprised of Commanders, even the entire Arthur pool can be made Commander-only (Perseus, Noble Chancellor, Prim and Celia). Unlike most aura-based effects, Luminous Standard doesn’t affect the followers you have in play when you play the Standard, but at least it’s pretty cheap and difficult to get to rid of. It should be said that the deck loses a lot of defensive power if you’re cutting Bears and Officer followers so you don’t have as many Wards (from Sky Fortress, for example), which makes it worse against Summit Haven. And no, I am not saying that cutting Bears is bad just because of my ethnicity. Other, more radical approaches include Frozen Mammoths to make your Arthur turns even stronger in a Maisy build, or even cutting Arthur from the deck entirely. I wouldn’t really recommend the last two, but, nonetheless, there are a few unusual directions you can take Midrange Sword if you choose to.
Midrange Sword matchups
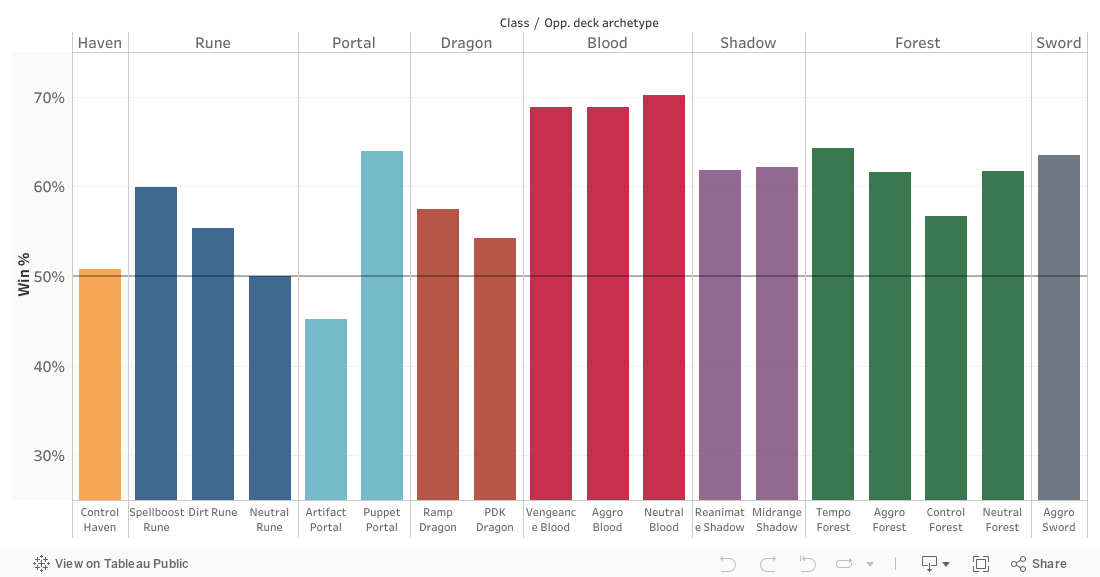
Midrange Sword is the best performing deck in the format by a very significant margin, being even or favored against most of the decks in the format. The only somewhat reliable counters to Midrange Sword are Artifact Portal and, to an extent, Summit Haven. Artifact Portal is the best deck at controlling the board, so it stands to reason that Midrange Sword, a deck with very little out-of-hand damage, would struggle against it. Summit Haven does well at clearing the board and playing efficiently statted followers, so it’s close to being even against Midrange Sword.
During the first week of the expansion, MidSword had a winrate of 58.51%, which, for comparison, exceeded the winrate of Neutral Blood during the first week of the Wonderland Dreams expansion. Since then, the meta has been warped around the archetype, giving a huge rise to Haven and Artifact Portal, decks that are generally worse across the board, but can deal with Midrange Sword. While the meta is still developing, in my opinion, a few of the Sword cards released in the DBNE expansion are slightly overtuned, being either a little undercosted or a little overstatted. To give a few examples, Valse’s Fatal Spellbomb costs 1pp, when most of the 3-damage removal in the game costs 2pp. While Spellbomb doesn’t technically do 3 damage so it’s a little weaker than a regular “deal 3 damage” removal spell but it’s a little too efficient at 1pp. Another offender in this category is Sky Fortress, a card that puts effectively 8/10 of stats into play, all of which can immediately attack on that turn, as well as either provide with a beefy Ward minion or some card draw. Sky Fortress could be a 4/5 and still be an insanely strong Sword card, so the current power level of the card is bizarrely high when compared to other cards in the same cost category. I’ve heard a few players proposing changes to Arthur and Chromatic Duel, but personally I don’t think that those cards are necessarily too strong. The wording on Magnus should definitely be corrected, though.


Aggro Sword
One can argue that you don’t need to play all 9 1-drops in the deck and that Princess Prim is not core in the deck, so Princess Prim is included as a 1-of in the skeleton. Most lists either play 0 or 3 copies of Prim, with no real in-between, so it’s included the way it is. In addition to that, Angelic Knight is sometimes replaced by Badb Catha.
Early game
The big strength of Aggro Sword lies in the fact that Sword is the only class in the game that actually has playable 1-drops, and even two different ones at that! Most of the 1-drops in Rotation are 1/1s, and the only playable ones out of those are Water Fairy, Quickblader and Merman. Merman is conditional and Water Fairy is only really played in Aggro Forest. So, out of 18 deck archetypes in the format, only 2 of them can really contest a turn 1 1-drop. Thus, a playset of Goblins, Quickbladers and Perseus are necessary in Aggro Sword.
Out of the 2-drops available to Sword, the ones you want to play in Aggro Sword are either those with Ambush, immediate board impact or some other innate stickiness. For that reason, the 2-drops you commonly see in Aggro Sword are Kunoichi Trainee (Ambush), Bladed Hedgehog (3 health, a growing early-game threat), Princess Prim (Ambush), Evelisia (immediate face damage), Oathless Knight (creates 2 1/1s, one of which usually gets to attack your opponent in the face), Celia (not a very good 2-drop, but very flexible in the midgame, the Storm variant is a lot more relevant than in Midrange Sword) and Holy Bear Knight (protects your 1-drop on turn 2 and your other weenies later in the game).
In the 3-drop department, the cards you want are usually cards that can deal immediate face damage on the turn they’re played, so Princess Juliet, Angelic Knight and Badb Catha. You can also include Valse, an insanely powerful tempo tool that isn’t really good at hitting face, but provides you with good board control opportunities.
Midgame
Aggro Sword doesn’t run a lot of midgame cards, with the most common 4-drop being Vagabond Frog, a “clock” that most classes in the format can’t interact with. Due to the popularity of Vagabond Frog, some lists also include White General to buff the Frog and speed up the clock by 2 damage a turn. An evolved Frog with a White General has 5 attack, so most time you put your opponent on a 3-turn clock since most decks in the format don’t really run any healing. Personally, I’ve always considered Vagabond Frog my single least favorite card in Shadowverse due to its uninteractive nature and I find it frustrating that Vagabond Frog is rearing its ugly head in the format again. Well, it’s not that ugly. It is quite cute, actually.
Throughout the previous months it has been established that playing 2 copies of RTA with 3 Juliets is optimal, however, a few players also play 3xRTA because Aggro Sword doesn’t usually run any card draw, so drawing more than one copy of RTA doesn’t happen very often. In addition to Round Table Assembly, Aggro Sword usually includes Kunoichi Master, since it is another effective Ambush card. For the sake of comparison, I also listed Aguno’s theorycrafted Aggro Sword list and one of the unusual cards in there is Frontline Ramparts, a card that summons a 1/2 at the end of your opponent’s turn for 3 turns and those 1/2s can attack on your turn, making Ramparts into a sort of very slow Demonic Strike that also generates some tempo. Ramparts is not a card that is worth playing at the moment, but it is something to look out for in the future.
Aggro Sword matchups
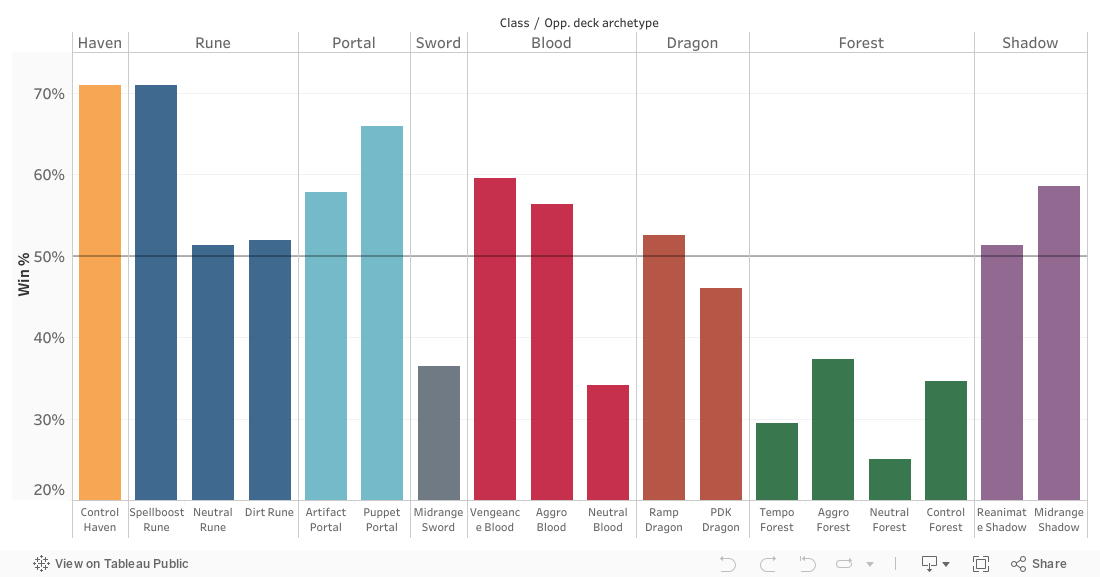
Aggro Sword is a recently emerging archetype and the main strength of the archetype lies in its ability to go under decks which don’t apply a lot of pressure in the early game (Control Haven, Artifact Portal, Spellboost Rune, Shadow in general, etc.), allowing you to play low-tempo Ambush minions that hit face. Coincidentally, all those decks also not play any healing tools or good Wards. Aggro Sword struggles against Midrange decks that can race it while maintaining some board control, such as Dirt Rune, Neutral Rune, Midrange Sword, PDK Dragon, and Forest in general. There is not a lot of stats on the archetype at this point, but it seems to be particularly good against Haven because current Haven builds don’t have a lot of early game, healing or wards; and considering that Haven is the most popular class at the moment, Aggro Sword is an interesting choice in a metagame with a lot of Summit Haven. If Midrange Sword becomes more popular, Aggro Sword is going to lose percentages accordingly.

[ps2id id=’haven’/]
Early game
Recent Haven lists run very few proactive 2-drops, essentially the only cards that contest the board in the early game are Snow White and Jeanne. Jeweled Priestess, while technically a 2-drop, doesn’t really trade for anything without a Summit Temple in play, and most players will take a value trade into Jeweled Priestess to not allow you to get a trade with your 1/2 on the backswing. That said, while there aren’t too many early followers in the deck, the deck has early-game amulets in spades, between Gemstone Carapace, Moriae Encomium, Beastly Vow, Blackened Scripture (not an amulet, but still), the archetype develops cards which provide tempo later down the line. For the sake of comparison, more control-oriented lists can usually include more early game because they don’t include Summit Temple, so they can play cards like Happy Pig and Red-Hot Boots, for example.
It should be noted that some of the provided decklists include Purehearted Singer, while other ones include Jeweled Priestess instead. These 2 cards are very similar in function, Purehearted Singer draws a card immediately while Jeweled Priestess has more flexibility and additional Hind synergy. Overall, I’d say Priestess is a better card, but Singer is not a bad option by any means either. With Jeweled Priestess, the majority of the time you should pick the card draw option, but in the later stages of the game it doesn’t hurt to be on the lookout for the healing/damage one as well. 2 damage can occasionally set up lethal opportunities, and healing is not exactly easy to come by in Haven. Remember, Dragon is the healing class that uses water magic to heal stuff, and Haven doesn’t have healing because why would priests, in a fantasy setting, praying in churches, do anything related to healing? Priests work with turtles, tigers, deer, horses and birds of various shapes and sizes. Some priests even ARE birds! Priests don’t work with elephants and monkeys, though, that’s under Forestcraft’s jurisdiction.
The amulet debate
If you’re not very familiar with playing Haven, you might be wondering as to why Haven decks play so many mediocre amulets (Beastly Vow, Moriae Encomium, Red-Hot Boots, Featherwyrm’s Descent, etc.). The answer to this is two-fold, firstly, when playing Haven, you ideally want to mitigate the low-roll result of Globe of the Starways drawing into another Globe in the early game. The probability of that happening is 2/n+2, where n is the number of non-Globe Countdown amulets. Ideally, you’d want your Globes to work right over 80% of the time, which means playing at least 8 other amulets. For that reason, the absolute bare minimum “amulet package” is 3xCarapace, 3xMoriae, 2xTeatime, which is exactly 8 amulets. The math checks out.
The second part of the answer is Ceryneian Hind synergy, because ideally you’d want to have it active somewhat frequently. In Summit Temple builds, you only really need 1 extra amulet (after Summit) to activate it, but ideally you’d want some more cards with Countdown of exactly 2. Those cards include Moriae Encomium, Gemstone Carapace, Beastly Vow, Jeweled Priestess tokens and that is it. There are cards with a Countdown of 3, but they are somewhat harder to include due to being expensive (Featherwyrm’s Descent), have weaker effects (Red-Hot Boots), or other annoying effects like Enhance costs (Featherfall Hourglass, Godscale’s Banquet), so they’re less commonly seen. Another small thing you have to keep in mind in Summit lists is board space concerns, because a lot of the time you have 4 board slots in total, and if you add in a Globe and a Teatime, you don’t have a lot of space to work with, which makes cards like Godscale’s Banquet, Opposing Statues, Ancient Protector, Red-Hot Boots that much worse.


Mid- and late-game
The previous section touched upon Ceryneian Hind, but it’s not the only midgame card played in Haven decks. Haven has 2 main 4-drops: Priest of the Cudgel and Pegasus Dullahan. Priest of the Cudgel is the more tried-and-true reactive option, great when going second. Dullahan is somewhat random (if you have multiple amulets in play), vulnerable to banish effects (which are very common in a Sword-Haven-Portal meta), but provides more value in theory, albeit at a condition. That said, Cudgel is the more common option, if you play against a hundred Haven opponents, you’ll likely see more than 85 Priests of the Cudgel and maybe 15 Dullahans if you’re lucky. Well, this analogy doesn’t really work because there’s no guarantee to see a single 4-drop in a single game, but hopefully the reader can understand the overarching point.
Moving along, most lists run 3xCeryneian Hinds and 2xTeatime. It is not unheard of to run 3-ofs of both, or a 2-2 split, but the general build is 3-2. In addition to that, most lists include 3xAether and 3xHeavenly Knight and sometimes a single copy of Heavenly Aegis. The format is a lot more tempo-oriented and so a lot of Haven decks, especially Summit Temple ones, have dropped Aegis from the deck because it doesn’t have a lot of impact on the board. With that said, if you really want to beat greedy decks, you can always find an optional card to cut for one Aegis, there’s not a lot of cost associated with doing so.
What about actual Control Haven?
If you don’t want to play Genesis Dragons on turn 7 for some reason, I can direct you to the “pure Control” lists played early on in the expansion, such as Lilac’s list, for example. The Control Haven lists are not really optimized and contain some awkward card choices, but that main points that distinguish it from its Summit Temple tempo-oriented counterparts are the inclusions of Happy Pig, Judge of Retribution, Curate and Heavenly Aegis. I don’t really like any of the Control Haven lists that I’ve found so far, because they’re missing some obvious inclusions like Moriae Encomium and Jeweled Priestess which should really be in the deck over the third Curate/Dark Jeanne, Pureherted Singers and so on. I would recommend my own Control Haven list (because overall I have personally played well over 800 of various Control Haven decks in the past) but that’s against the rules. We can’t do that.
Alternative Haven builds
Other decks one can play with the new expansion’s cards include Tenko’s Shrine and Holy Lion Haven. Tenko Shrine lists involve a large amount of follower-healing cards such as Octobishop, Dullahan, Ceryneian Hind, as well as regular incremental sources of healing such as Jeweled Priestess, Moon and Sun, Happy Pig, Tenko, Monk of Purification and so on. I would recommend mogupasi’s (ぱんだ) Tenko list if you want to try out the archetype, mainly because it includes Tenko. If you’re playing a Tenko Shrine deck, you have to include Tenko, don’t you? That’s just common sense. On the other hand, Holy Lion Haven is not very optimized and doesn’t seem particularly strong. The neat thing about Lions is its good proactive early game and the synergy between Temple of the Holy Lion and Heavenly Knight. Holy Lions have a fair bit of impact in Arena, since all the Lion cards are bronze or silver, so you pick them a lot, but in constructed there’s just not enough time to summon larger and larger lions, which could allow you later on to summon an even larger lion. I would also like to mention Miyako, (probably the only) player that has been tinkering with various Neutral Haven builds and has probably the most Neutral Haven games in the current expansion, if you’d like a reference for a Neutral Haven list.
Haven matchups
Haven doesn’t really have many bad matchups, and it’s evenly matched against Midrange Sword and Artifact Portal, the 2 other common decks in the format. The weakness of Haven is aggressive decks like Aggro Sword/Blood/Forest which can run it over in the early game and punish it for not running much in terms of defensive cards and early game followers. Despite being the most popular class (at the time of writing), Haven has abundant counters, some of which are rising in popularity, and as such the overall winrate of the deck is not that high for how popular the deck is.

[ps2id id=’portal’/]
Artifact Portal
The provided deck skeleton contains 29 out of 30 cards run in any Artifact Portal deck. The reason that number is not at 30 out of 30 is due to the fact that a few players started to play 2xBiofabrication, but it’s not that common. In addition to that, unlike most other deck archetypes presented in this article, the provided Artifact Portal lists are not sorted in the order of descending recency, because the archetype has not undergone any changes since the release of the expansion, to put it simply, day 1 lists are not any different from any later decklists.
Early game
The early game cards in Artifact Portal are mostly set in stone, with a few variations based on personal player preference. The early game cards include playsets of Metaproduction, Magisteel Lion, Hamelin, Icarus, Miriam, Fervent Machine Soldier and Substitution. In addition to that, you can include an optional number of Mech Wing Swordsman if you want more proactive 2-drops, as well as 0-3 copies of Cat Cannoneer/Iron Staff Mechanic, depending on your preference. The reason why Mech Wing Swordsman is optional in Portal lists is due to the randomness present in the card. In essence, the “good” outcomes from Swordsman are Ancient and Analyzing Artifacts, Mystic Artifacts are the “okay” outcome, and Radiant Artifacts are the “bad” outcome, so 56.25% of the time the card produces okay results, 37.5% of the time it produces one bad result, and 6.25% it completely screws you over with the double Radiant Artifact roll. As a rule of thumb, the odds are slightly in your favor, but it’s not very reliable in the early stages of the game, where you have to rely on your Icarus/Miriam/Fervent/etc. pulls to get the right artifacts. One might ask: why are Radiant Artifacts bad? Well, they’re not bad per se, however, they’re mostly unplayable before Deus, so they’re not that great for tempo. In addition to that, you can copy all the artifacts (aside from Radiant ones) with Hamelin, and the better ones to copy are Analyzing and Ancient ones, and Mystic Artifacts are passable, albeit a bit clunky.
Mid- and late-game
The midgame cards in Artifact Portal are Spinaria or Hakrabi (depending on player preference), 3xDeus Ex Machina (the centerpiece of the deck), Acceleratium (either a backup plan without Deus or a helpful additional tool to give your Analyzing Artifacts Rush and further cheat tempo with Deus) and Ironforged Fighter (doesn’t do much in the midgame, but contributes to your wincondition). A card I’ve personally experimented with a lot is Dirk, Steelarm Battler, but he’s not very consistent at present since he usually doesn’t draw anything and vanilla Rush minions are not that great. However, in the future, if there’s ever a 2-drop that shuffles Mystic Artifacts into your deck, Dirk might be the card to consider. In addition to those, some midgame tech options include Otherworld Rift (good tech against Haven, fairly mediocre otherwise) and Puppeteer’s Strings (good tech against Forest, not very common).
The late-game cards include Magna Legacy (anti-Sword tech card, commonly played at 1-3 copies in most lists due to popularity of Midrange Sword in the meta), Safira (very slow finisher, reasonable reactive card in the midgame, can be used with an evo point for 4 Storm damage in a pinch), as well as an occasional Nilpotent Entity (anti-Haven/Dragon tech, occasionally sees play as a 1-of). Technically, the two finishers (Safira and Ironforged Fighter) are optional in the deck, since you can pay Miriam and Biofabrication the Radiants, but that makes the deck’s win condition incredibly slow. I would recommend playing 2-4 of Safira/Fighter, depending on player preference.


2, 3, 5, 7, 11, 13, 17, 19…
Speaking of win conditions, I’d like to briefly discuss Prime Artifacts. The “Prime Artifact plan” doesn’t work until you get an Acceleratium in play, and the earliest you can get it to work is by turn 6, by discounting it with Biofabrication after playing Acceleratium on a prior turn, which dilutes your deck and is not really a good play most of the time, but is something you should keep in mind if you can’t draw your Deus and have an Acceleratium/Biofab in hand. Generally, it’s hard to play a 7pp or 6pp 5/5, but if it’s a 5/5 for 5pp with Rush, that’s actually reasonable tempo. In that light, I’d like to mention a common misplay I often see from Portalcraft players, that is playing Miriam on turn 2 in Resonance and shuffling the 2 artifacts. Unless you have Deus in hand and are planning for a slow game, this dilutes your deck with Radiant and Prime Artifacts (the latter are terrible draws until roughly turn 8), and making your Icarus/Miriam/etc. pulls unreliable, so unless you have a specific plan in mind, this is something you might want to avoid.
I would also like to mention an interesting 2-drop option that is usually not run in Portal for obvious reasons, Knower of History. Knower of History is a card that is hard to play correctly, because you need to have a sufficient number of cheap artifacts in your deck before using its evolve ability, and after personally experimenting with Knower of History, the card is more or less unplayable until you have more than 4 other artifacts in your deck, which is why it is not played in constructed. In Arena, however, Knower of History is a good card that is also a bronze so it comes up a lot and is highly efficient there. It wouldn’t surprise me if Knower of History is excluded from Take 2 in the future.
Lies, damned lies, and statistics
A big weakness of Artifact Portal (and Portalcraft in general, one might add), is its reliance on drawing Deus on time to fuel the Artifact-centric gameplan. I’ve heard a few players make an argument that drawing Deus is not very important since you have other tools like Acceleratium, or that you can draw cards with Analyzing/Mystic/Radiant Artifacts/etc. For that reason, I decided to do a little experiment: I recorded my wins/losses after having particular cards on curve (the stats I recorded were 2-drops on turn 2, Fervent Machine Soldier on turn 3, Deus on turn 6, and Deus by turn 9). The sample size is not very large (at 79 total games), but in my opinion, it shows the underlying problem of Artifact Portal as an archetype. In games when I had Deus on curve, I had a 29-15 record (65.91%), and in games when I didn’t, I had a 14-21 record (40%). To put it simply, my winrate with Portal nearly doubled in games in which I had Deus on turn 6. If we loosen up the condition to include drawing Deus by turn 9, the numbers change to 33-19 (63.46%) and 10-17 (37.04%), respectively, which is also about equivalent to doubling your winrate. Naturally, with different decklist variations and a greater sample size one can potentially reach a different conclusion, but in my opinion, drawing Deus on time is the biggest performance-affecting factor of Artifact Portal.
Arifact Portal matchups
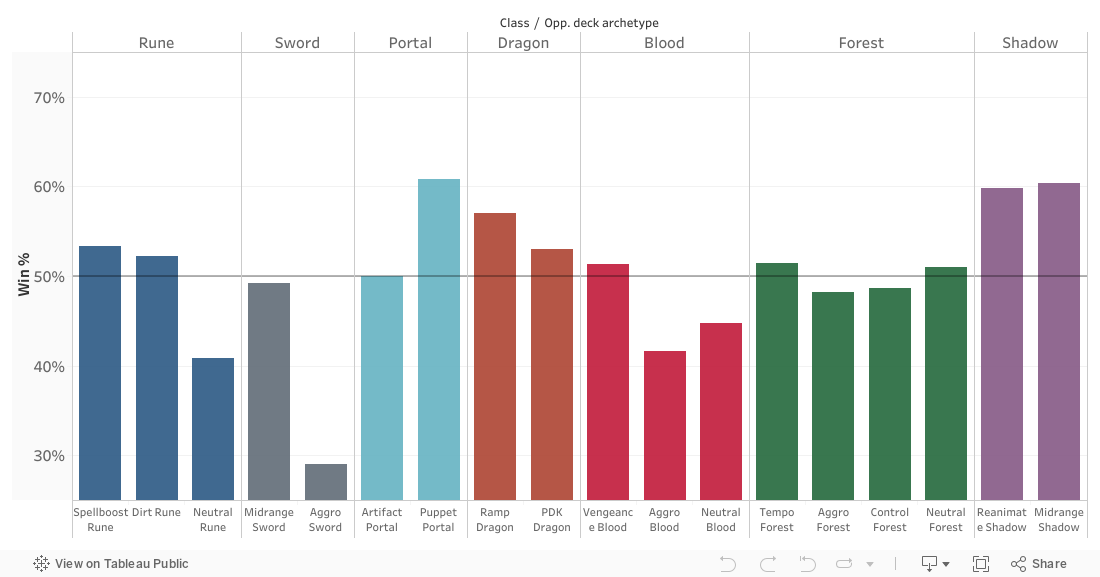
Artifact Portal is a good counter to Midrange Sword, and does reasonably well against most decks in the format. The weaknesses of the archetype include decks with aggressive early game and a lot of reach (Aggro Sword/Blood, Dirt Rune, etc.), efficient wards (Neutral Rune) and Wood of Brambles (Tempo/Aggro Forest). Wood of Brambles singlehandedly makes all the artifact/puppet tokens unable to have any board impact, making Aggro/Tempo Forest a miserable matchup for most Portal decks.


Puppet Portal
In the provided deck skeleton, Flower Doll is not played in one of the lists, in addition to that, Noah is played as a 1-of occasionally.
The good
While Puppet Portal is an archetype that players have given up very quickly, let’s briefly discuss the strong points of the archetype. The good cards in Puppet Portal are the Artifact-centric early game engine, consisting of Metaproduction, Magisteel Lion, Hamelin, Icarus, Miriam and Fervent Machine Soldier, as well as (to an extent) Spinaria and Magna Legacy. In addition to that, some of the Puppet-generating cards are actually good and efficient tools on their own, namely, Substitution and Puppeteer’s Strings. Those 2 cards are something you can fit into most Portal decks and they’re fairly reasonable regardless of what your gameplan is.
The bad
Moving along, let’s look at what the archetype is trying to do outside of its artifact-centric early game. The win condition of the deck is getting a lot of Puppets in your hand and then playing Orchis/Noah to do a bunch of Storm damage. How many Puppets do you need for that? Orchis requires at least 2, but ideally you’d want 4, Noah technically doesn’t require any, but you’d want at least 2 or 3. So, over the course of the game you have to assemble a few Puppets in your hand, and therein lies the problem. Most Puppet-generating cards (aside from Substitution/Strings) are followers that lose some stat points because they generate Puppets. The good cards among those are Flower Doll, Bear Puppeteer, Automaton Knight, and… that is it. Copying Puppets with Hamelin is also something that you can do, but generally copying Analyzing/Ancient Artifacts is better for early tempo.
The ugly
If we count all the Puppet cards so far, we could potentially include about 15 total Puppet generations, and that is not really enough for the whole Orchis gameplan because you need to use some of the Puppets in order not to lose tempo. So, we’d need some more Puppet generators, preferably ones that generate more than one Puppet at a time. Your 2 main options here are Junk and Puppet Room, both of which are some of the worst tempo you could possibly get out of a Shadowverse card. To summarise, despite the fact that Orchis is an amazingly powerful 8-drop, there just aren’t enough good sources of Puppets in the game to justify playing Puppet Portal. In the future, when there are more Puppet-centric 2-drops (à la Flower Doll), Orchis could become a lot better. As it stands, the archetype needs at least 3 or 4 good early game cards that help the Puppet gameplan, so in the event that Puppet Portal gets the Midrange Sword treatment in the next expansion, Orchis is definitely going to be something to look out for.
I would also like to briefly mention the Neutral-centric Puppet list by Kazuki Tomoda (ぽるんが) that utilizes the synergy between Puppets and Rapunzel, and combines strong Neutral early-game cards with the finisher power of Orchis and Noah. It’s likely not as strong as playing Neutral Forest, but it’s an interesting take on the old running joke that is Neutral Portal.
Puppet Artifact matchups
There’s not a whole lot of data regarding the performance of Puppet Portal, but what little data we have closely lines up with the winrate of Artifact Portal when it doesn’t draw Deus, mentioned in previous sections. Puppet Portal is heavily unfavored against most decks in the format, and the only popular archetype that it beats is Spellboost Rune, but then again, what deck doesn’t beat Spellboost Rune.

[ps2id id=’rune’/]
Spellboost Rune
Out of the presented deck skeleton, Fiery Embrace can sometimes get cut, in addition to some of the 2-cost spells that can be swapped around.
Early game
The early game of Spellboost Rune borrows a lot of cards from the regular old Daria builds which were seen a lot throughout February and March. The standard set of low-cost spells include all the 1-cost spells available in the format (aside from Mystic Ring, which makes you lose card advantage and Treasure Map which quite literally doesn’t do anything approximately 85.71% of the time), as well as a variety of 2-cost spells, among which there are spells that draw/generate cards (Magic Missile, Chain of Calling, Golem Assault), control the board (Wind Blast and Magic Missile), and spells that generate tempo (Conjure Golem and tokens from Golem Assault/Mysterian Knowledge). Aside from spells, some lists also include Magic Owl (great tempo tool for discounting Chimeras) and Silent Laboratory (solid 2-drop, allows you to curve out better with Golem Assault and Concentration).
Among the more expensive spells, there are not many good options (aside from Concentration, which is usually a 3-of). You can play Moon and Sun (recurring value, provides a little bit of healing), Absolute Zeroblade (clunky Wind Blast most of the time, can occasionally draw a card in the midgame), Nova Flare (a blanket tech card that helps deal with wide boards, not particularly good in the format) and Summon Snow (generates tempo in the form of 1/1 tokens).
Midgame
The only real midgame cards in Spellboost Rune are discounted Chimeras and Fiery Embraces, Runie and an occasional Snowman King. Most of the time when playing Runie, it’s preferable to get the card draw option outside of really slow matchups that you can identify really early on (Control Haven/Forest, Ramp Dragon, etc.). Realistically speaking, a lot of decks in the format are too fast to ever really get the Prophecy of Doom plan. In addition to that, unlike Dimension Shift, Prophecy of Doom is a heavily telegraphed card, and most adequately skilled players will count the number of spellboosts after you play Runie, so if your opponent has spellboosted more than 5 times and still has a Runie card, then he likely has a Prophecy of Doom prepared. If you have played against D-Shift/Daria before, you should know how to count the number of spells cast to estimate the minimum cost of Chimera/Daria/D-Shift your opponent could have. The Rotation-legal Spellboost Rune is even more straightforward to play against, since the only cards you have to account for are Chimera, Fiery Embrace, Runie tokens and occasionally Flame Destroyer (which is close enough to Chimera for the most part).
Slow cards
The huge threats in Spellboost Runecraft usually consist entirely of Giant Chimera, as well as an occasional Flame Destroyer or even Unbodied Witch. You shouldn’t really ever play around Unbodied Witch because of how slow the card is, however. For the most part the main play pattern of Spellboost Rune is to try and set up a board space that allows Giant Chimera to clear the board on turn 9 and maybe even deal some face damage. Without Dimension Shift, Giant Chimera can rarely outright kill the opponent, but if the game goes on for very long, it could deal up to 30-ish damage. Conversely, if you’re playing against Spellboost Rune, you should try to make playing Giant Chimera problematic by building a board going into turn 9 of Spellboost Rune, keeping in mind the order in which Giant Chimera deals damage (from left to right).
Spellboost Rune skeleton


Spellboost Rune matchups
Spellboost Rune has very few good matchups and mostly preys on really slow decks such as slower Forest lists, Ramp Dragon, etc. Against most other decks in the format, Spellboost Rune can’t really keep up in terms of board control. To put it simply, if most of the cards in your deck trade 1-for-1 with opponent’s followers, it’s hard to answer cards like Arthur, beefy Haven followers, wide Portal boards and so on. In my opinion, Spellboost Rune is one of the worst decks you can play on ladder, but it could be close to being playable if you play it in a tournament environment and choose to ban Sword.


Dirt Rune
Out of the provided deck skeleton, Paradise Vanguard and Magic Illusionist are occasionally cut from the deck for different 2-drops, for example, they’re not present in mogupasi’s (ぱんだ) list, which is somewhat non-standard to begin with.
Dirty deeds done dirt cheap
Dirt Rune is a deck that has existed in an iteration similar to the one played now for almost 6 months at this point, so a lot of the old packages in the deck have remained the same (in particular, Magic Illusionist, 2-drops that generate Earth Sigils like Silent Lab and Beastfaced Mage, Mage of Nightfall, Karl, Halo Golem, Master Mage Levi and the “Oz package”). The only cards that do something radically new in the deck are Summoning Drills, an expensive Earth Sigil amulet that has immediate board impact when played and consumed with Earth Rite; as well as Paradise Vanguard, a card that looks very similar to Lyrial, yet subtly different in its application. Paradise Vanguard can snipe 1-defense followers, just like Lyrial, however, he can’t ping the opponent’s face for 1 damage, which technically makes it a little worse. The neat thing about Paradise Vanguard is that it can banish Analyzing Artifacts and deny card draw, and you can occasionally set up other cards with powerful last words to banish them (e.g. setting Radiant/Prime Artifacts/etc. to 1 by bumping them with the cards you have in play and then banishing it). Most of the time you are basically playing a Fighter, but you should be on the lookout for those situations nonetheless.
If you compare current Rotation Dirt lists to the ones played a month ago, for the most part the only changes to the deck are that Beastfaced Mage replaced Dwarf Alchemist, Paradise Vanguard replaced Lyrial and Summonning Drills replaced Piercing Runes. For that reason, Dirt Rune is a deck that was “solved” very early in the expansion’s lifespan, very similarly to Artifact Portal. Apart from wacky (and suboptimal) inclusions like Mysterian Wyrmist, Moon and Sun, Witch of Foresight and Staff of Whirlwinds, there’s not a whole lot of wiggle room in the deck. To reiterate, the current Dirt Rune build is probably as optimal as it gets, save for small variations between the number of played Chain Lightning/MutaBolt/Grand Summoning, which have always depended on player preference and the expected metagame.
Unusual builds
I would like to briefly mention Tatsuno’s build of Dirt Rune that omits a few aggressive tools like Mage of Nightfall/MutaBolt/Telescope/Vanguard to fit in a burn-centered package with Manaria synergy with cards such as Mysterian Wyrmist/Knowledge, Magic Missile, Staff of Whirlwinds and Chain Lightning. With 1 extra spell damage, Staff of Whirlwinds nearly doubles in power, doing 6 damage to one follower and 2 to all the others and your opponent’s face. It is certainly interesting seeing cards like Staff of Whirlwind and Force of the Dragonewt, carbon copies of basic spells with the same functionality from a certain faster card game, find a home in Shadowverse decks despite their increased (by 1) cost. Naturally, I am not allowed to utter the H-word in this Christian Meta Insight. What a shame.
Dirt Rune matchups
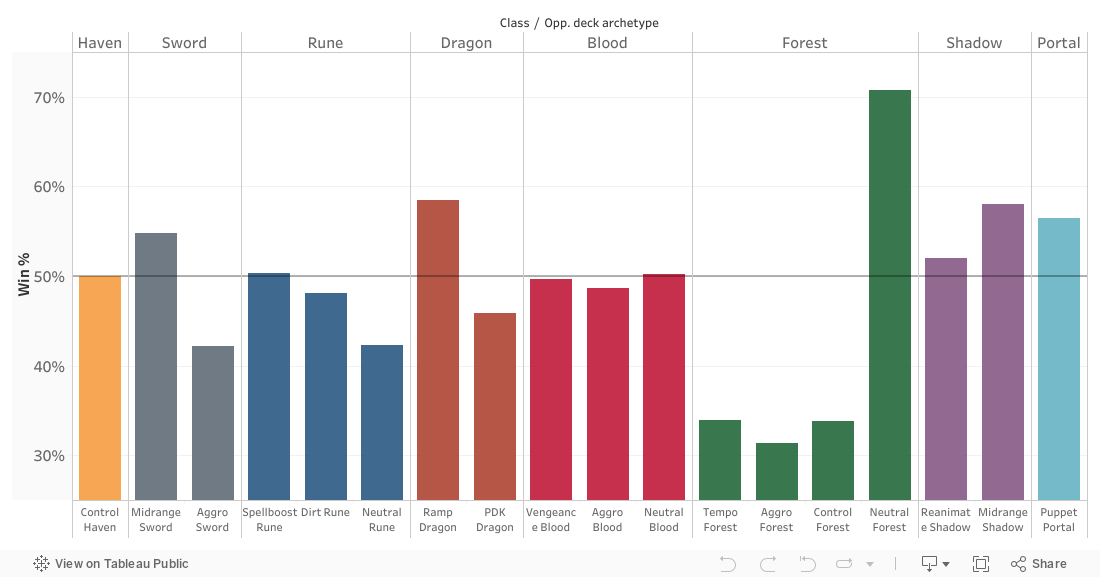
Dirt Rune has a fairly reasonable matchup spread, it does well against Artifact Portal, Vengeance/Aggro Blood and Shadow in general due to having burn and AoE. It is about even against Haven, Ramp Dragon and Aggro Sword, but struggles a bit against Midrange Sword. The archetype is a reasonable choice for ladder games (especially if Midrange Sword starts seeing a decline), due to having a fast, proactive game plan. It is not technically the best Rune archetype, since Neutral Rune actually performs better in a lot of matchups, but Dirt Rune’s games are a lot faster and the deck itself is a lot more affordable, which shouldn’t really impact its competitive viability, but it does explain why Dirt Rune is played a lot more than Neutral Rune, at least in my opinion.
Neutral Rune
The provided deck skeleton doesn’t include the Abomination Awakened package, because in my opinion, it’s not a core component of the archetype, and a few players choose to not include the Abomination package in order to make space for different cards.
Recipe for disaster
The first and main defining characteristic of Neutral Rune, as opposed to, let’s say, Neutral Forest or Blood, is its synergy with high-cost Neutrals even in a world without Sahaquiel. Wordwielder Ginger is a card that usually just ends games when played, because there is quite literally no answer to a few Zeuses and Israfils hitting the board at the same time. Well, technically, there is Mutagenic Bolt and triple Scyther/Momo/Moriae procs/etc., but MutaBolt is only played in Dirt Rune, a fairly uncommon deck archetype, and all the other options require a lot of cards and are not very reliable or probable. In addition to that, there are still windows for Wordwielder Ginger to be used for immediate face damage with Zeuses if the Rune player still has an evolve point and can trade the Ginger off, thus allowing the played Zeus(es) to immediately attack the opponent. This is definitely something to look out for when playing slow decks like Ramp Dragon, for example. Neutral Rune has a few cards that allow it to save evolve points, such as Hector, Falise and Illusionist which can make this situation come up a lot more often than one might expect.
Abomination package
Neutral Rune naturally runs a lot of card draw for a Neutral deck due to having Witch of Sweets and Purehearted Singer, as well as potentially having access to Mysterian Grimoire. For that reason, a few popular variants of the deck archetype Abomination Awakened in combination with a few additional card draw effects, ideally those that draw more than 1 card. Cards that fulfil that purpose are Purehearted Singer, Mysterian Grimoire and a few highly sub-optimal cards such as Shining Bellringer Angel and Sammy. It is quite a bizarre world to live in, where an absolutely terrible card that is Shining Bellringer Angel is unironically and commonly played as a 2-of in a competitive deck. Other cards that are even less optimal at putting cards into your hand, are Stella and Moon and Sun.
Other options
Neutral Rune is a very flexible deck and can include a wide variety of unusual cards, so long as they are followers. These unusual cards can include Lightning Lancer (non-neutral card, fairly okay reactive evolve target, Neutral Rune also doesn’t really have any 4-drops), Impartial Strix (hard to fit in an Abomination/Grimoire build, but has a lot of stats), Lion Champion (a beefy Ward that is not that great against Haven, but okay against Sword/Portal) and Gruff Mountaineer Captain (saves evolve points, but is usually outshined by Falise). Additionally, I’d like to briefly mention Carrot’s lists, which include really strange 2-drops instead of Elta (Owlcat/Tartman). I wouldn’t recommend those exact choices unless you’re planning to participate in the Tartman Cup, because Elta can occasionally shutdown some very powerful Fanfares, delaying Arthur/Heavenly Knight/Aether/Sky Fortress/Safira/etc by a turn is nothing to be scoffed at. Against less savvy opponents who might play the countered card regardless, an evolved Elta is that much better, I have definitely never played Deus into an evolved Elta and conceded out of shame. That has never happened to me.


Neutral Rune matchups
Neutral Rune has a lot of good matchups and the only decks that is really loses to is Aggro Sword and Spellboost Rune, but it does well against most things in the format despite its low playrate. I wouldn’t really call it some crazy meta-breaker yet, but it’s definitely a good deck that has gone under the radar for a lot of people. A lot of its success could be attributed to the surprise factor because it’s a fairly uncommon Rune archetype (at the time of writing), but nonetheless, the stats that we have at the moment point to its great performance. It wouldn’t surprise me if Neutral Rune becomes another Summit Haven-type of deck in the future meta developments.

[ps2id id=’blood’/]
Vengeance Blood
The provided deck skeleton is for the standard, midrange build of Vengeance Blood. Blood decks in general are a bit of a mixed bag and a little difficult to categorize as a consequence. Aggressive Vengeance Blood lists play somewhat different cards, but they are in this category because they utilize mostly the same Vengeance engine. In addition to that, the Nacht/Darkfeast Bat and one of the Maelstrom Serpent lists are included here for much the same reason.
New toys
Vengeance Blood is a deck that hasn’t really lost anything in the recent rotation, and even got a few new cards to play around with. The first new inclusion, Silverchain Disciple, takes Yurius’s spot in the pre-rotation lists. Silverchain Disciple is a vanilla 2/2 when played on curve, but provides board control and 1 face damage when in Vengeance. The other new 2-drop is Paradise Vanguard, usually played at 2-3 copies in most lists, is a solid Neutral 2-drop that is good at controlling the board on evo turns. It can be said that Paradise Vanguard “replaced” Hungering Horde, despite the 2 cards being pretty drastically different. Finally, the final new inclusion is the new and improved Vania. Vengeance Blood hasn’t really had access to good 6-drops (after the Carabosse nerf), so Vania helps bridge the gap between Sabreurs/Airjammers and Emeralda. The big downside of Vania lies in the steep Vengeance requirement, the card is very weak when out of Vengeance, which is why some Vengeance lists choose not to include Vania altogether. Most of the time you should pick the Storm/Bane option, because it allows to immediately trade with the evolved Bane-Bat, and trade/push face damage with the Vania herself. That said, if you’re facing a deck with a lot of reach (Dirt Rune/Aggro sword/to an extent Summit Haven), you should pick the Drain/Ward option if you have an evolve point available, especially if you’re in Celia/Chain Lightning/HK range.
Buller and co.
While the regular Vengeance Blood is for the most part a “solved” archetype, the same cannot be said about the more aggressive Vengeance variants that borrow some of the elements of Aggro Blood. The defining characteristic of Aggressive Vengeance lists is added cards that help generate a wide board that have some amount of Forest Bats. The best card at doing so is Nightmare Devil, and other efficient options include Goblins and Summon Bloodkin. Those wide boards of weenies can be buffed by Buller, Dark Maiden for an “à la Sage Commander” effect. It remains to be seen whether it’s worthwhile to include the “Vengeance package” (Belphegor/Dark General/Brand/Emeralda/etc.) into what is essentially an Aggro Blood shell.
Unusual inclusions
Apart from the regular, preference-based card choices (Dark Airjammer, Snarling Chains, etc.) I would like to briefly mention a few cards that are either played as 1-of or are otherwise uncommon. Unusual 1-ofs include Reach of the Archdemon (anti-Sword tech) and Maelstrom Serpent (generally a win-more card, good against Portal). Other cards that one can consider in Vengeance Blood are Nacht/Carabosse (provides a bit of reach in longer games), Happy Pig (neutral healing option, good against most aggressive decks like Dirt Rune/Aggro Blood/etc.), Glassbrand Demon (flexible 2-drop, can provide some healing) and Darkfeast Bat (provides reach in lists with Snarling Chains/Nacht/etc.).
Vengeance Blood skeleton


Vengeance Blood matchups
Vengeance Blood struggles against Sword and Forest in general, and is slightly unfavored against the other popular decks in the format (Haven and Portal). Vengeance Blood preys on decks which can’t pressure its life total, such as Ramp Dragon, Reanimate Shadow and Spellboost Rune. The archetype is close to being playable, but isn’t exactly optimized at the moment, since it really struggles against Sword, many players shun away from it.


Non-Vengeance Blood
The other Blood archetypes are a bit of a mixed bag. In this section, a few different archetypes of Blood are discussed: Aggro Blood, Neutral Blood, Jormungand and Control Blood.
Aggro Blood
The definition of Aggro Blood is somewhat vague, but the cards that define the archetype are aggressive tools that usually have some semblance of Bat synergy. The identifying cards of Aggro Blood are Gift for Bloodkin, Red Talonstrike, Summon Bloodkin and Oldblood King. The closest list to the traditional definition of Aggro Blood are Yuriasu’s and Matomo’s lists. Hasu’s list is more of a deck that aims for huge Oldblood King turns, it includes some defensive cards and card draw tools. Rizer’s list is a mix between an Aggro list and a “Vengeance package”, which coincidentally also allows him to fit in the Vanias for additional Bat synergy. I am personally not very well-versed in the current Aggro Blood (as you can probably tell) and the deck is not very well-tested or refined, but hopefully, if there are further developments in the archetype, this section will be revised accordingly.
Neutral Aggro Blood, on the other hand, hasn’t changed much after the rotation. The only new inclusions one can consider for previous Neutral Aggro lists is Paradise Vanguard and Moon and Sun, which take the place of Lyrial and one of the rotated 3-drops (Goblin Mage/Angel of the Word), respectively.
Jorm Blood
Jormungand decks have gotten 2 new pieces of synergy in this expansion, namely Gift for Bloodkin and Darkfeast Bat. After one of your Jorms has died, Gift for Bloodkin can deal 2 damage to your opponent for 0pp and clear the bat from their side of the board. Darkfeast Bat can provide roughly 5-6 points of reach in longer games and can help close out games. The big problem with Jorm Blood in the current format is the popularity of Haven and Portal, both of which have access to cheap Banish effects that negate any effect from Jorm/Nacht. And the power level of Jorm decks in general is not that great to begin with, so the archetype has largely remained unplayable.
Control Blood
Moving down in order of descending deck viability, Control Blood is one of the worst-performing decks in the format at present. The underlying problem of Control Blood is lack of any good AoE (your best options are Reach of Archdemon and Demonic Storm) and good early-game removal (after Hungering Horde rotated out). Control Blood is an archetype that is considerably better in Unlimited and there’s very little reason to play it in Rotation.
Aggro Blood matchups
Aggro Blood struggles against Sword and Forest, just like its Vengeance counterpart, however, it has an advantage against Haven, punishing its lack of defensive measures. The archetype also does fairly well against Artifact Portal and as such seemingly makes for a good deck in a format without much Sword presence. That said, there isn’t a lot of data available on the archetype, so one should take the available charts with a grain of salt.
Neutral Blood matchups
Neutral Blood has a very similar matchup spread to Aggro Blood, mainly because the 2 decks largely have the same gameplan and utilize similar tools. However, the sample size is still not particularly great here either, so it’s hard to gauge at the deck’s performance just yet.

[ps2id id=’dragon’/]
Ramp Dragon
The provided deck skeleton is the absolute minimum of cards played in Ramp Dragon. The skeleton doesn’t include “Lindworm package” because there are different builds of Ramp Dragon, some of which don’t utilize the Lindworm.
The new Ramp Dragon shell
Most current builds of Ramp Dragon include every single Ramp card available to the class (Aiela, Dragon Oracle, Roy and Sibyl), every good removal card that has previously seen play in Dragon (Blazing Breath and Scyther), as well as Canyon of the Dragons, the staple high-value amulet that has eclipsed Tilting at Windmills after the rotation of Sahaquiel and nerfs to Queen of the Dread Sea. The radically new staple in Ramp Dragon is Frenzied Drake, that has a similar function to the rotated Bahamut. If you remember the previous months’ discussion of Ramp Dragon, I made a prediction that Frenzied Drake and Zirnitra will become staples in Dragon after the RoB rotation, and it is plain to see that that particular prediction turned out to be half-wrong, because Zirnitra is still nowhere to be seen (for the most part). I was wrong about something yet again.
The Lindworm package
In this section, I’d like to briefly discuss what a Lindworm is, what it does and so on. Lindworms are the snake-like dragons in Norse folklore that chew away at the roots of Yggdrasil, the sacred tree that connects all parts of the world with its branches. Famous lindworms include Fafnir, Nidhogg and a large variety of other difficult-to-pronounce names. In Shadowverse, Lindworm is a conditional 10-drop that can either provide healing and card advantage or 10 Storm damage that ignores Ward followers. The condition of Lindworm is playing 10 non-follower cards throughout the duration the match, which gives it synergy with followers that generates spell/amulet tokens (Somniferous Whitewyrm/Dragoncleaver Roy/Galua of Two Breaths), spells that generate followers (Moon and Sun/Waters of the Orca), removal/Aoe spells (Blazing Breath/Force of the Dragonewt/Avowed Strike/Conflagration), as well as regular Amulets (Dragon’s Nest/Canyon of the Dragons/potentially Frozen Mammoth).
The exact probability of having an active Lindworm on a particular turn is difficult to calculate due to a lot of those cards drawing cards and ramping, but as a rule of thumb, you need about 23 “Lindworm activators” in your deck, or to put it differently, a little over half of your deck should interact with Lindworm. The regular Ramp Dragon shell has 12 of those activators, so you need to add in about 11 of those. Combined with the 3 Lindworms, that leaves you with 2-3 cards of wiggle room of followers that you can fit in. The most common cards to include are Galua (usually gives card draw, can provide removal in a pinch), Dragon’s Nest and Somniferous Whitewyrm (cycle themselves, heal for a little bit, very inexpensive). The other cards are somewhat varied because they’re not as good (for the most part), they can include Waters of the Orca/Moon and Sun (slightly below average tempo, flexible), Force of the Dragonewt/Conflagration (AoE, Force also deals some face damage) and Avowed Strike/Dragon’s Foresight (suboptimal card draw).


Other Dragon finishers
Lindworm has heavy deckbuilding constraints if you want the card to activate consistently, which in turn means that you’re barred from playing a lot of follower cards in a Lindworm Ramp Dragon build. In addition to that, a few cards that support Lindworm are fairly suboptimal or narrow in application, and since you have to play a certain critical mass of those support cards, you’re inclined 3-5 copies of cards that are fairly mediocre in their own right. If you drop the idea of playing Lindworm, you can choose to include better early game card draw options (Purehearted Singer/Dragon Summoner), as well as slow, greedy cards that really used to define Dragon in the past, like Israfil or Ouroboros. Dropping Lindworm makes it necessary to run different Storm cards, namely Zeus and Azi Dahaka. A similar card to those is Jerva of Draconic Mail, that can provide incremental value over the course of the game. The format doesn’t have that much Storm damage or other forms of reach, so Jerva is a lot less risky than a lot of players have expected and makes for a reasonable 1-of in Ramp Dragon builds without Lindworm. Who could’ve thought that “Form of the Dragon on a stick” is a card that you can lose to these days.
You also gain access to Wrath Drake, a good anti-Sword tech card that has been outperformed by Conflagration in the past, during the Daria Rune meta. Now that 2 out of 3 most popular archetypes in the format (Midrange Sword and Artifact Portal) don’t play a lot of high-health followers, 3 and 4 damage AoE effects have become mostly equivalent. For that same reason there’s been an increase of Haven post-rotation, since enhanced Jeanne/Scripture/etc. used to be unable to clear Daria boards (which had a lot of 4- or 5-defence followers), but now manage to clear Sword/Portal boards with ease. Three equals four, you heard it here first.
Ramp Dragon matchups
At present Ramp Dragon is unfavored against most deck archetypes in the format. Part of the problem here stems from the fact that Dragon lists are not very optimized at the moment, however, in my opinion, a lot of the tools in Dragon are just plain insufficient for dealing with the decks in the format. To give an example, a 2/2 on turn 2, followed by a 2/3 on turn 3 is a nearly unbeatable curve for Dragon because the archetype barely has any proactive early game. I would consider Ramp Dragon the single worst archetype you could play on ladder (excluding obscure decks like Tenko Haven/Jorm Blood/Puppet Portal/etc.) due to its long game duration, poor matchups and extremely high draw variance.


PDK Dragon
In the provided deck skeleton, Phoenix Rider Aina can get cut from top-heavy lists that have other sources of Storm Damage.
New PDK toys
The latest expansion brought a few early-game followers for Dragon which are not particularly great by themselves, but can provide flexibility or card draw in PDK lists. Dragoncleaver Roy is a generally good Dragon 3-drop that is played as a 3-of in most Dragon decks, but cards like Waters of the Orca and Somniferous Whitewyrm that generate tempo without losing card advantage, are a lot better in a midrange Dragon shell such as PDK Dragon. The flexibility of Waters of the Orca also bears mentioning, since it not only provides vanilla stats if you play it on even turns, but with Prime Dragon Keeper can also help clear the board with multiple PDK procs. Being able to refill the board with a single card is nothing to be scoffed at, especially if you factor in the synergy with Staircase of Paradise.
Optional cards
PDK Dragon is an incredibly flexible deck, since most Dragoncraft followers that cost 3 or less have synergy with PDK and can be considered good inclusions in the deck. For a full list of all the weird cards you can play in PDK Dragon, I would recommend referring to れしあ’s list, that includes so many 1- and 2-ofs that it almost looks like a highlander deck at a glance. The only cards missing from his list are Aqua Nereid and Dragonrearer Matilda. It even includes a small Jabberwock package with 2xZeus and 2xAzi Dahaka. For a more Jabberwock-centered list, I would recommend Rizer’s list that is closer to a regular Ramp build. Still, Jabberwock is a lot more powerful in a different card game, but I can’t talk about that.
Joking aside, the non-standard early game cards in PDK dragon can include Dragon Horde (good with Aina), Dragonrearer Matilda (generally solid card, fairly slow for the format), Somniferous Whitewyrm (cycles itself, has 2 attack, very rare for a Dragoncraft 2-drop), Aqua Nereid (okay 3-drop, generally worse than Dragon Aficionado), Force of the Dragonewt (mediocre AoE, does face damage) and Star Phoenix (awkward to utilize in current PDK lists because they only include 8-12 total spells, counting Roy). The midgame cards you can consider are Basilisk Rider (awkward in a meta with lots of Portal/Haven) and Rahab (fairly weak Ward).
The more aggressive PDK variants only include Aina as its source of face damage, but lists with Azi Dahaka/Zeus, Jerva of Draconic Mail or a 1-of Ouroboros are not that uncommon either. Hippogryph Rider has always been a more awkward Aina-like card, so it has lost a lot of traction. A card that saw some limited play at the start of the expansion is Heroic Dragonslayer, since putting a Demonic Strike into your hand doesn’t sound that bad of an idea in an aggressive deck. However, the card requires you to lose a card for it and has a very awkward stat line so it got dropped rather quickly. As it turns out, 3/1s die to a lot of things for free (Snow White, Puppets from Substitution, Wood of Brambles, Paradise Vanguard, the list goes on).
PDK Dragon matchups
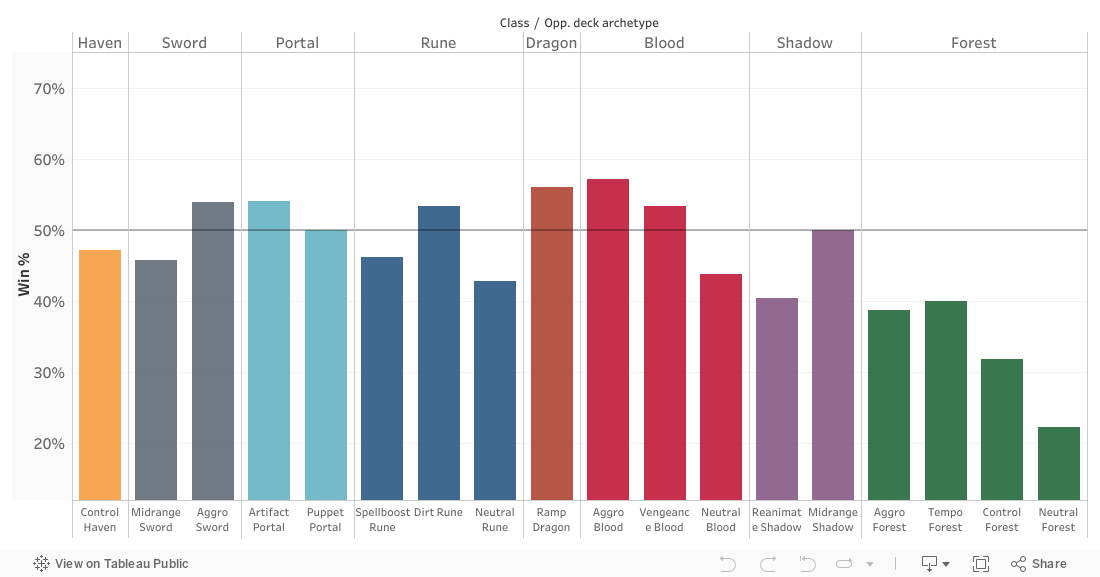
PDK Dragon doesn’t have a lot of recorded stats, but what little information we have points to it struggling against Midrange Sword, likely due to the fact that the 2 decks attempt to do similar things, but Sword has better individual cards, just compare Roy and Valse, for example. In addition to that, PDK is fairly good at dealing with wide boards, but high-health followers that impact the board in a big way (Arthur and Sky Fortress) are hard to clear with PDK tools. Scythers can clear single tall followers like Heavenly Knight, for example, but if there’s a Ward in the way, things get problematic. Other than that, PDK Dragon appears to be evenly matched against most of the decks in the format, which could potentially make it a sleeper archetype in the future. If the Midrange Sword numbers start to decline and the meta becomes all Portal and Dirt Rune, PDK Dragon might just come into the spotlight. Although, if nobody plays Sword, why would anyone play the Sword counters? A better example would be a tournament environment where you exclusively ban Sword and bring a PDK list somehow teched against Haven, Portal and Rune, that could actually be pretty reasonable.

[ps2id id=’forest’/]
Aggro and Tempo Forest
This section groups together the more aggressive Forest archetype, Aggro/Tempo Forest, as well as Neutral Forest. The definition of Tempo Forest is somewhat vague, but as a general rule of thumb, Tempo Forest is an in-between slow Control Forest builds with elements of Aggro Forest mixed in.
What is Aggro Forest?
By most definitions, Aggro Forest is a Forestcraft deck archetype that includes a lot (~30) of 1- or 2-drops, utilizing Elf Song and Wood of Brambles to buff wide boards and finishing the game with Storm Damage from Fairy Driver or Beetle Warrior; or utilizing Ipiria’s Ambush effect to push face damage. Aggro Forest hasn’t received any new tools in the expansion, so the decklists have remained unchanged. Kii’s list is an example of standard Aggro Forest build. Hamasaki’s list, on the other hand, opts for Grasshopper Conductor to tutor for Fairy Driver, the only follower in the deck with 3 attack.
What is Tempo Forest?
Tempo Forest is a Forest archetype that is an in-between stepping stone between Aggro and Control Forest. Tempo Forest is characterized by cards such as Fairy Saber, White Vanara (without other 6-drops), Fashionista Nelcha, Aria, Guiding Fairy and occasionally Yggdrasil. The difference compared to Control Forest is that Control Forest usually includes a playset of both Aerin and Cassiopeia, as well as various more expensive cards. Tempo Forest lists can range from aggressive ones like しゅー’s one to heavily defensive ones like Bamboo’s one. The new cards that have found a home in Tempo Forest are Paula, Icy Warmth, Fashionista Nelcha and White Manara. There is obvious synergy between Nelcha and Manara that allows the monkey in a dress to deal 6 face damage on turn 6. Similar synergy can be attained with Yggdrasil as well.
What changed with Neutral Forest?
Neutral Forest lists have replaced Lyrial for Paradise Vanguard, and Khaiza/Goblin Mage for Moon and Sun. In addition to that, due to losing access to the Sahaquiel package, the deck has started including 1-drops like Goblins and Wise Mermen. Despite the deck itself not changing much, the environment surround it has shifted in a major way. In particular, the popularity of Artifact Portal, an archetype that can answer B&B very efficiently, puts a damper on the deck’s performance.


Aggro Forest matchups
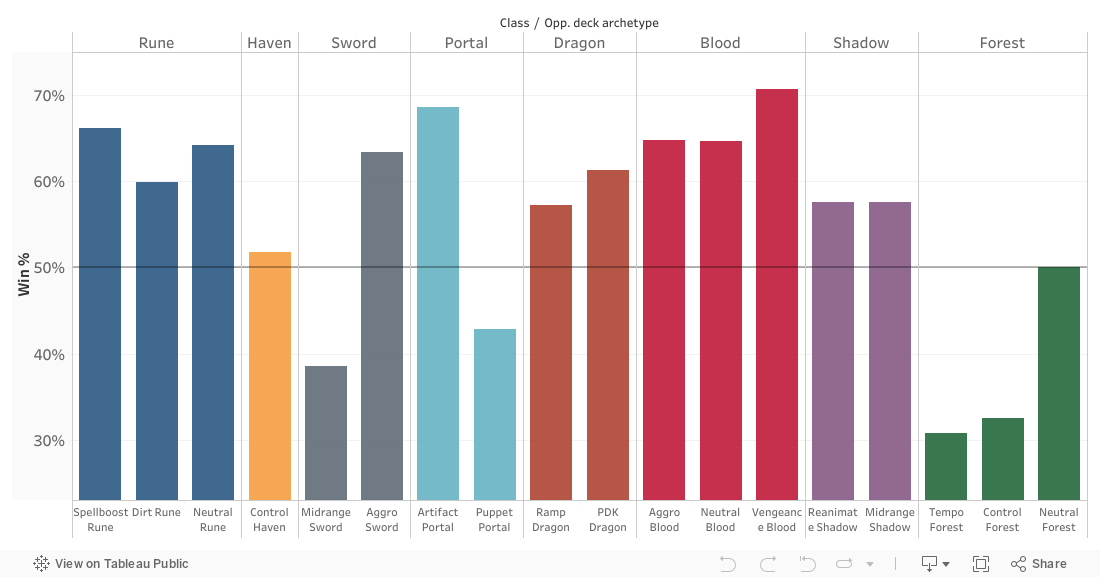
All the Forest archetypes in the format are heavily unfavored against Midrange Sword, and Aggro Forest is no exception. The good things about Aggro Forest are its favored matchups against Artifact Portal (due to having Wood of Brambles) and Haven. Other Aggro Forest matchups look very favored, but the sample size is incredibly small, so the actual power of the archetype is hard to gauge outside of the more popular deck archetypes.
Tempo Forest matchups
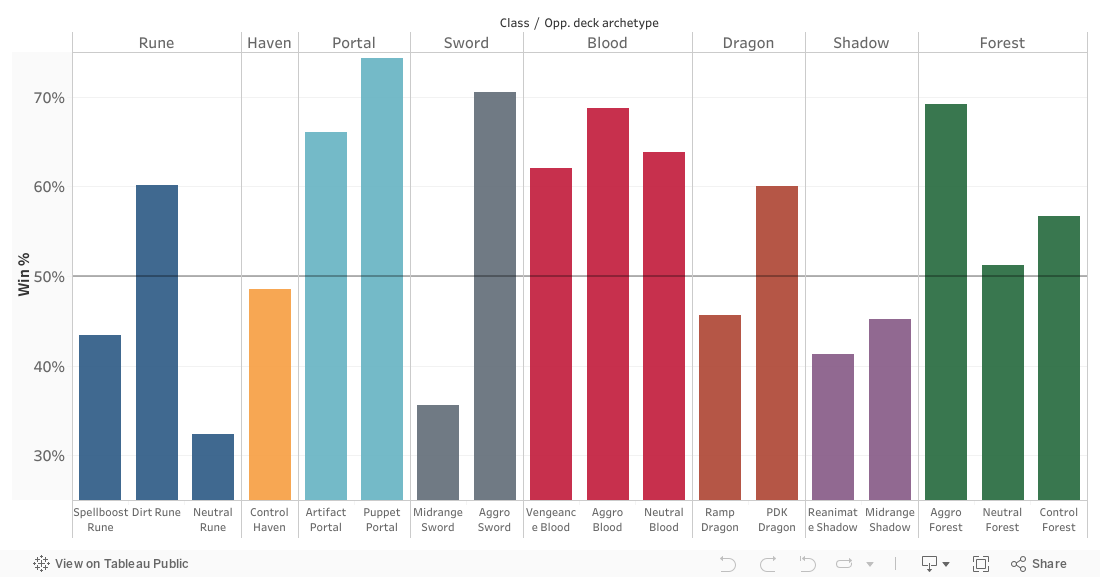
Tempo Forest has a very similar matchup spread to Aggro Forest, but it does even worse against Midrange Sword and is slightly unfavored against Haven. Based on stats alone, Aggro Forest seems like a stronger deck than Tempo Forest, however, Aggro Forest has a smaller sample of available data, which likely skews our perception of the deck due to variance.
Neutral Forest matchups
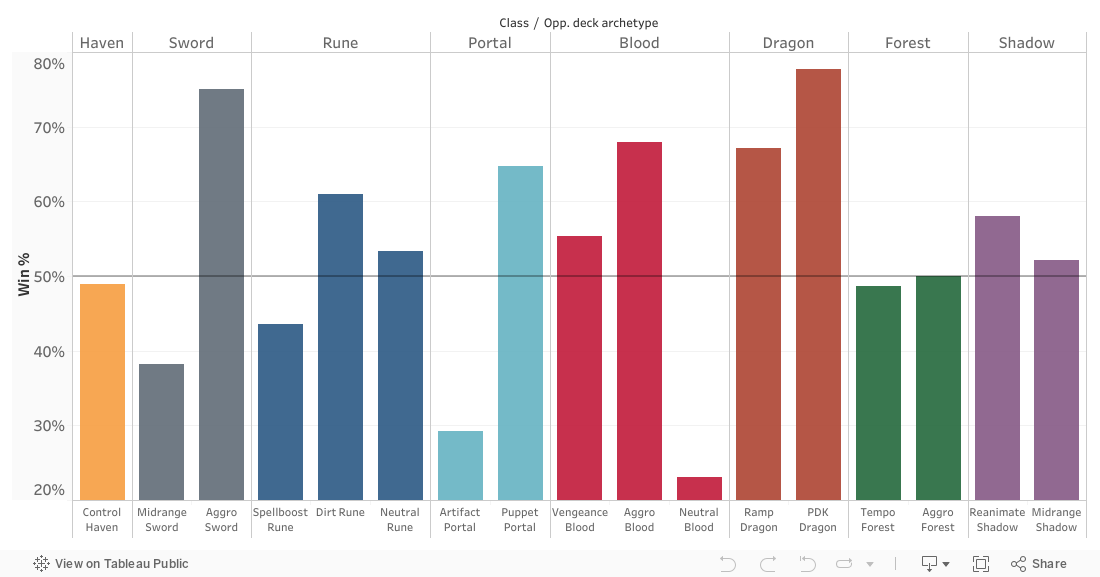
Unlike other Forest archetypes, Neutral Forest struggles against Artifact Portal. The archetype is even against Haven, but similarly to other Forest archetypes, struggles against Midrange Sword. Being unfavored against 2 out of the 3 most popular ladder archetypes and even against the third one makes Neutral Forest a poor choice in the current metagame.


Control Forest
In the provided deck skeleton, a third copy of Venus is occasionally cut and some lists don’t run Fairy Whisperer in favor of other 2-drops.
Slow Forest shell
The main cards of Control Forest have largely remained the same with the ones from previous months, the deck includes good 2-drops (Rayne/Fairy Whisperer/Insect Lord), early game board control tools (Airbound Barrage, Sylvan Justice, Wood of Brambles and 1-2 copies of Starry Elf to fetch Brambles) and a suite of defensive midgame followers (Warden/Venus/Aerin/Cassiopeia). One could argue that Paula and Nelcha, both flexible cards that can provide immediate board impact, should be included as the core Control Forest tools, however, the cards are fairly optional and are not present in all Control Forest lists. Paula is a solid, but conditional card that is usually outperformed by Insect Lord and Rayne. Nelcha is never really bad because at her worst she is a vanilla follower at 4 or 5pp, and she can fetch pseudo-removal in a pinch as well.
The finisher problem
In the past, slow Forest lists utilized White Wolf/King Elephant to deal large amounts of Storm damage, however after White Wolf rotated out, Control Forest finds itself without a strong capacity for actually ending games. Naturally, you could still just play King Elephant on turn 10, and that strategy can work out if you stall the game long enough, however, a turn 10 finisher is a little too slow. Another solution one can use is to not include any specific finisher and just rely on board control or enhanced Jungle Warden to win, which is something that Aguno’s list aims to do.
The other solution one can take is by trying to utilize Yggdrasil in some shape or form. A lot of the time, Yggdrasil is a card you use for card draw if you have an evolve point available, but a 2/6 for 7 is not a good rate for a follower that just draws 2 cards. Naturally, the Drain is a nice bonus, but it only ever comes into play if you evolve Yggdrasil, which is not something you can do reliably. The other Yggdrasil mode is a lot more interesting, giving +1/+0 and Rush to something immediately can either be used on Yggdrasil itself to get a 3/6 Drain Rush for 7, which is almost a reasonable card. An interesting use for Yggdrasil, which coincidentally happens to be the first deck I personally played when the expansion dropped, is Fairy Dragon. Control Forest naturally generates a lot of fairies in the early game from Fairy Whisperer and bouncing Wood of Brambles, so it’s very common for Fairy Dragon to have 4-6 Attack by turn 8. A 4/4 Ward for 2 is pretty good, but the more exciting possibility with it is that you can play 2xFairy Dragon on turn 8, followed by enhanced Wrath of Nature to deal about 10 Storm damage, depending on how many Fairies have died. Similarly to Safira, you can look at the play history tab to see how many Fairies have died if you’re playing with or against Control Forest. This plan is not exactly reliable since there is no reliable way to fish for Fairy Dragons after Goblin Mage rotated out, but it’s something to look out when playing the deck. I would recommend looking at NAOKI’s list if you want to try out the whole Fairy Dragon OTK thing, or Tabu’s list that goes even more all-in with the OTK gameplan by also including Swiftgait Okami, Loki and King Elephant.
Control Forest matchups

There’s not a whole lot of stats on Control Forest (about ~2000 games in total), but from we have, the archetype seems to struggle against Midrange Sword, Haven and Neutral Rune. Due to having access to Wood of Brambles, Control Forest does well againt Artifact Portal. In addition to that, strong defensive cards like Aerin make the deck good against Dirt Rune and Aggro Sword.

[ps2id id=’shadow’/]
Reanimate Shadow
The provided deck skeleton includes cards for the Midrange Reanimate lists, some of which are not played in “all-in” Reanimate Shadow decklists. The following section goes over the difference between the two.
To Each(tar) his own
There are 2 general approaches to building a Reanimate Shadow deck: the first, more consistent and better optimized one, is to include the reanimate cards into a standard Midrange Shadow shell with Eachtars/Skull Rings/etc.; and the second one, the more high-roll one, which uses more Reanimate payoff cards and heavily benefits from having the reanimate effect actually go off by using cards like Sow Death, Reap Life and Poisoned Apple of Rebirth. You can combine the 2 approaches to an extent, e.g. you can play both Eachtars and Sow Death, Reap Life by cutting some 2-drops and Skull Ring. Among the provided lists, グラシア’s one strays away from the Midrange Shadow route, and しぇりえ’s list is a hybrid between the two. And yes, nobody pronounces “Eachtar” the same way as “each”, I know.
The Reanimate package
In the previous section the idea of a “Reanimate package” is outlined. The package consists of Gloomy Necromancer, Everdark Stryx, Ceridwen, Death Dragon Caller and Zeus. Sow Death, Reap Life and Poisoned Apple of Rebirth are the extension of the package. Now, let’s go over the problem of the Reanimate package. If you look at the included cards, you might notice that they can be divided into 3 categories: Burial Rite enablers (Gloomy Necro and Edgy Owl), Reanimate targets (Zeus) and Reanimators (Ceridwen, Death Dragon Caller, Sow Death, Reap Life). Ceridwen can serve both the Burial Rite and the Reanimate part, but since her most common utility is as a Reanimate engine, she’s included in the last section. At this point, there emerges an issue: the first and last categories have multiple cards that do the same thing (they have redundancy, one might say), however, there is only one Reanimate target, Zeus. Of course, you can Reanimate other cards, but the biggest follower in the deck is Eachtar, a 5/6, and playing understated 6-drops and otherwise jumping through hoops to get a 5/6 for 5 is not particularly worthwhile.
2 – 1 = 1
Let’s look at some of the probabilities of specific scenarios happening with Reanimate Shadow. For example, let’s look at the probability of summoning a Zeus by turn 8. For the sake of simplicity, I will consider the scenario in which you draw 2 Ceridwen unlikely (which it is), to put it simply, Ceridwen is only used for the Eternal Potion in the following analysis. The base assumption is that by turn 6 you draw the 3 + 6 or 3+7 cards (going first or second, respectively) naturally, and draw an additional 4-5 cards with your other card draw options, which puts you overall at ~14 drawn cards on turn 6 and ~15 drawn cards on turn 7. With 6 Burial Rite cards, the probability of having at least one by turn 7 is 95.39%; the probability of having Ceridwen on turn 6 is 73.68%; the probability of having Death Dragon Caller by turn 8 is 79.51%; the probability of having either of those is 94.61%. So, to put it simply, you basically almost always (90.25%) have both a Burial Rite and a Reanimate option by turn 8. Now, what’s the probability of finding Zeus by turn 5? That would be 70.39%, making the total probability of a turn 7 Zeus about 63.53%. Now, this is assuming that every piece of the package is played at 3 copies (which it usually isn’t), so the probability is a little higher than it should be. Still, the underlying weakness should be obvious: the part which lowers your odds the most is the Zeus, the only reanimate target in the deck. For comparison, if you do the same calculations, but assume you have 2 different reanimate targets (so, 6 cards in total), the probability of cheating out a big follower is equal to 83.24%. So, 2 is a lot better than 1. Quick maths.


What about Midrange Shadow?
There is not a whole lot of difference between regular Midrange Shadow lists and their Reanimate-centric counterpart. The main difference between the two is inclusion of Prince Catacomb, Immortal Thane and Skeleton Prince, as well as better 2-drops, since you don’t have to include Gloomy Necromancer or Everdark Stryx. The big weaknesses of Midrange Shadow are its inability to apply pressure due to having primarily low-attack followers and lack of tempo-efficient removal (a gaping hole left by Lurching Corpse/Necroassassin). You could try Troth’s Curse to fill in that gap, but the card is not particularly great. Big Soul Hunter has an expensive necromancy cost, so it’s not exactly viable either. Fickle Resurrector is an interesting Thane replacement, however, the steep Shadow cost makes the card not that great. To put it simply, a lot of Midrange Shadow tools are too fair, either because of nerfs or conditional effects that are difficult to utilize. In card games “fair” cards don’t usually see play, which explains the low playrate of Midrange Shadow.
Janky decks
Dark Alice Shadow has always been an archetype that was on the verge of playability, but after losing Sahaquiel Dark Alice has become that much worse. The first DAlice list focuses on trying to resurrect Dark Alice on turn 8 with Test of Strength that can be played on the same turn. This decklist is an example of trying to solve the “one Reanimate target” problem that Reanimate Shadow lists have by having an alternative target for it. The second DAlice list is an aggressive Neutral list utilizing Caterpillar of Riddles as an Alice 2.0, and the deck includes Dark Alice as it’s top-end plan. The problem with Dark Alice currently is that there are a lot of Banish effects going around in the format, so the DAlice+ToS combo is not exactly as reliable as one would think. Lastly, I wanted to briefly mention Clock’s Hinterland Ghoul list that attempts to include many low-cost shadow generators between Spartoi Segreant, Skull Ring, Prince Catacomb, Goblin Princess and Skeleton Prince to activate the PtP effect. With Loki, Hinterland Ghoul can generate up to 20 Shadows, almost guaranteeing the activation. The deck usually attempts to proc Hinterland Ghoul once and hopefully put the opponent into Aisha range.
Reanimate Shadow matchups

Reanimate Shadow performs poorly against the 3 most popular decks in the format (Haven, Midrange Sword, Artifact Portal), and is one of the few deck archetypes that manages to be unfavored against Spellboost Rune (since that deck has Fiery Embrace against your Zeuses). The poor matchups of the deck stem from the fact that the deck is not terribly consistent at what it does, as discussed in previous sections, and sometimes has the chance to simply not work.
Midrange Shadow matchups
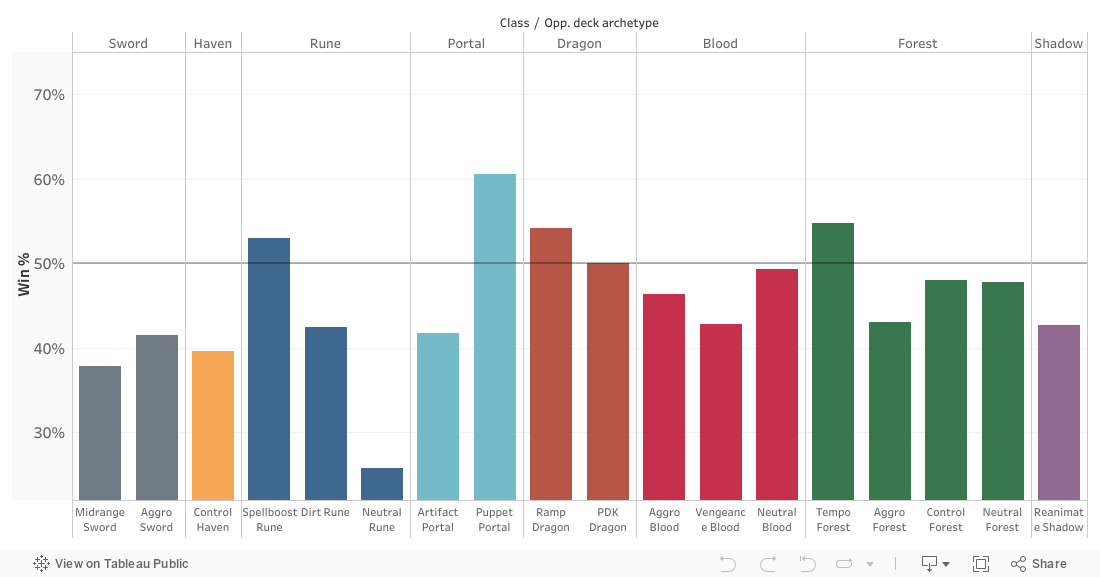
Midrange Shadow has a very similar matchup spread to its Reanimate counterpart, but it does even worse against Control Haven and Artifact Portal (because the archetype is vulnerable to board clears and banish effects), however, it does better against Spellboost Rune because it has a more proactive game plan.

[ps2id id=’stats’/]
Stats corner
This section is a representation of the meta trends based off the recent Shadowlog stats. In the matchup table below, rows represent the player’s deck archetype and columns represent the opponent’s deck archetype. For example, if you’d like to find out the details about the matchup of Midrange Portal against Dirt Rune, find the intersection of the “Midrange Portal” row with the “Dirt Rune” column. Hovering over specific cells in the table shows additional details about the matchup like the total number of games, for example. You can sort the table in descending order of any of the rows/columns by clicking on the sort buttons on the corresponding rows/columns; as well as exclude/isolate specific parts of the table with the selection tools. To revert back after making changes to the table, you can use the “Undo” and “Reset” buttons below the table. Some of the deck archetypes are not included in the matchup table due to low sample size, the cut-off point is at 2% of total presence in the metagame. To get an idea of which decks are popular (and have a large enough sample size as a consequence), you can refer to the Class distribution, as well as “Deck Archetype Map”, both of which are provided below the matchup table. The deck archetype map also shows weekly changes in the relative playrate (which is equal to the frequency of a particular archetype divided by the frequency of the most popular deck archetype, Daria Rune) and win percentages of every archetype. Hovering over the specific parts of the histogram or points on the map shows additional info about the corresponding deck archetype.